Table of Contents >> Show >> Hide
- What You’ll Learn
- 1) Windows 10 Start Menu Basics: Know the Three Main Areas
- 2) Open, Search, and Launch: The Fastest Ways to Use Start
- 3) Pin & Unpin Like a Pro: Apps, Folders, and Even Websites
- 4) Organize Tiles: Groups and Folders (a.k.a. “Make Start Not Ugly”)
- 5) Resize the Start Menu and Tiles for a Better Fit
- 6) Customize the Left Rail: Add Useful Folders Next to Power
- 7) Right-Click Tricks: Faster Settings, Jump Lists, and Quick Actions
- 8) Keyboard Shortcuts: The “I Know Things” Starter Pack
- 9) Troubleshooting: When the Start Menu Stops Cooperating
- Real-World Experiences: How People Actually Make Start Useful (Extra 500+ Words)
- Conclusion: Your Start Menu, Your Rules
The Windows 10 Start Menu is basically your PC’s “kitchen drawer.” It can be a tidy organizer for everyday tools…
or a chaotic pile of stuff you swear you’ll sort “later.” The good news: Windows 10 gives you a ton of simple ways
to make Start faster, cleaner, and more “you” without requiring a computer science degree (or a soothing cup of tea).
In this guide, you’ll learn exactly how to open, search, pin, organize, resize, and troubleshoot the Windows 10 Start Menu.
We’ll keep it quick, practical, and just fun enough that you won’t fall asleep on your keyboard.
2) Open, Search, and Launch: The Fastest Ways to Use Start
Open the Start Menu (two easy ways)
- Click the Start button (Windows logo) on the taskbar.
- Press the Windows key on your keyboard.
If you’ve been clicking around for years, give the Windows key a try. It’s a tiny habit that saves a shocking amount of time.
Search from Start (the “don’t make me hunt” method)
Start Menu search is built for people who don’t want to scroll through 80 apps named like “UpdateHelperThingy 2.0.”
You can just open Start and begin typing.
- Open Start.
- Type what you want: an app name (e.g., “Excel”), a setting (“Bluetooth”), or a file (“budget”).
- Press Enter to launch the top result, or click the one you want.
Bonus: you can also use Win + S (or Win + Q on some setups) to jump straight into search.
Jump through the app list faster (alphabet shortcut)
When you’re in the All Apps list, you don’t have to scroll forever. Click any letter heading (like “A”) and you’ll get an
alphabet indextap a letter to jump right there. It’s the Windows version of flipping to the right page in a cookbook.
3) Pin & Unpin Like a Pro: Apps, Folders, and Even Websites
Pinning is how you turn Start into a personalized dashboard. Unpinning is how you undo the “why is Candy Crush here?” era.
Pin an app to Start
- Open Start and find the app in the app list (or search for it).
- Right-click the app.
- Select Pin to Start.
Unpin a tile you don’t need
- Open Start.
- Right-click the tile.
- Select Unpin from Start.
Unpinning removes the shortcut tile, not the app itselfso you’re not accidentally deleting anything important. (Your IT
department thanks you.)
Pin a folder to Start (instant shortcut)
- Open File Explorer.
- Right-click a folder you use often (Downloads, Projects, Photos, etc.).
- Select Pin to Start.
Pin a website to Start (yes, really)
If you live in a web app (your project tracker, your email, a dashboard, a portal), pinning a site tile can be a legit
productivity boost.
- Open Microsoft Edge.
- Go to the website you want.
- Open the menu (the three dots) → More tools → Pin to Start.
Now it launches like an “app” from Startno bookmark spelunking required.
4) Organize Tiles: Groups and Folders (a.k.a. “Make Start Not Ugly”)
The pinned tiles area is where Start can become either a calm control panel… or a neon casino. Organization is the difference.
Create a tile group (your own labeled section)
- Open Start.
- Drag a tile into an empty space until you see a divider/placement cue.
- Release to create a new group area.
- Hover near the group name area and label it (e.g., Work, School, Creative, Utilities).
This is perfect if you want “work stuff” separate from “fun stuff” so you don’t accidentally open Steam during a Zoom call.
Create a tile folder (stack tiles together)
Tile folders are the fastest way to reduce clutter without sacrificing access.
- Open Start.
- Drag one tile directly on top of another tile.
- A folder is created automaticallyopen it and rename it.
- Drag more tiles into the folder to add them.
- To delete the folder, drag every tile out of it (it disappears once empty).
Turn Live Tiles on/off (calm the chaos)
Live Tiles can be helpful (weather, calendar, news) or distracting (flashing updates you didn’t ask for). You can control them:
- Right-click a tile.
- Open More.
- Select Turn live tile off (or on).
If you like a clean dashboard, turning off Live Tiles is the “declutter in 30 seconds” move.
5) Resize the Start Menu and Tiles for a Better Fit
Windows 10 lets you resize Start to match your screen and your patience level.
Resize the Start Menu
- Open Start.
- Hover over the top or side edge until your cursor becomes a double-headed arrow.
- Click and drag to make Start taller or wider.
Bigger Start = more tiles visible. Taller Start = more apps visible. Wider Start = more tile columns. Pick your flavor.
Go full-screen Start (Windows 8 vibes, but optional)
- Open Settings (Win + I).
- Go to Personalization → Start.
- Turn on Use Start full screen.
Full-screen Start can be great on touch devices and large displaysespecially if you like big targets and less squinting.
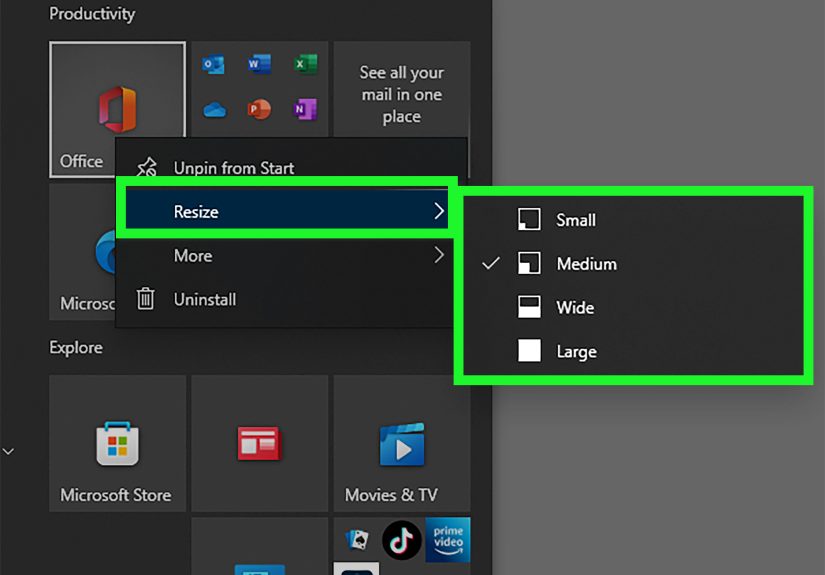
Resize tiles (because not everything needs to be a billboard)
- Right-click a tile.
- Select Resize.
- Choose a size (options vary by app).
Show more tiles per row (power user layout)
Want extra density? Windows 10 includes a “Show more tiles” option so you can fit more in the same space.
- Open Settings → Personalization → Start.
- Turn on Show more tiles in Start (if available on your build).
6) Customize the Left Rail: Add Useful Folders Next to Power
The left side of the Start Menu can show shortcuts to folders like Documents, Downloads, Pictures, and moreright next to the Power button.
This is one of those small changes that feels “meh” until you try it, and then you wonder why you waited.
Choose which folders appear on Start
- Open Settings → Personalization → Start.
- Select Choose which folders appear on Start.
- Toggle on what you actually use (Downloads, File Explorer, Documents, etc.).
Practical combo for most people: File Explorer, Downloads, and Settings. You’ll use them constantly.
Hide the app list (if you’re a “tiles-only” person)
Prefer a minimalist Start Menu? You can hide the All Apps list and focus on pinned tiles.
- Go to Settings → Personalization → Start.
- Toggle the option related to showing/hiding the app list.
If you do this, make sure your pinned tiles are organizedor you’ll just move the mess from one side to the other.
7) Right-Click Tricks: Faster Settings, Jump Lists, and Quick Actions
Right-click the Start button (the secret “power menu”)
Right-clicking the Start button opens a Quick Link menu with power-user shortcuts (think: Device Manager, Disk Management,
Task Manager, Settings, and more). If you like keyboard shortcuts, Win + X does the same thing.
Use Jump Lists for frequent tasks
Many apps support Jump Listsquick access to recent files, pinned documents, or common actions.
- Right-click Word to see recent documents.
- Right-click File Explorer to jump to frequent folders.
- Right-click a browser to open a new window or InPrivate mode (depending on the browser).
If you want recent items to show up, check your Start settings for the option that shows recently opened items in Jump Lists.
Uninstall from Start (when you’re truly done with an app)
Some apps can be uninstalled right from Start:
- Right-click the app tile or app name.
- If you see Uninstall, click it and follow the prompts.
If you don’t see Uninstall, no dramause Settings → Apps to remove it.
8) Keyboard Shortcuts: The “I Know Things” Starter Pack
These shortcuts make the Windows 10 Start Menu feel instantly faster. Use even two of them and you’ll feel like you leveled up.
- Windows key: Open/close Start
- Win + S: Open search
- Win + X: Open the Quick Link (power) menu
- Win + I: Open Settings
- Win + E: Open File Explorer
- Win + R: Open Run dialog (type explorer to launch File Explorer if Start is frozen)
- Win + 1–9: Launch apps pinned to your taskbar in those positions
If you’re trying to be faster on Windows 10 without installing anything extra, shortcuts are the cleanest win.
9) Troubleshooting: When the Start Menu Stops Cooperating
Sometimes Start gets stubborn: it won’t open, it won’t search, or it acts like it’s taking a nap. Before you panic (or threaten your laptop),
try these practical fixes.
Fix a frozen Start Menu by restarting File Explorer
- Press Ctrl + Shift + Esc to open Task Manager.
- Find Windows Explorer (sometimes shown under “Apps”).
- Right-click it and select Restart.
Your taskbar may disappear brieflythis is normal. It usually comes back quickly and restores Start functionality without a full reboot.
If the Windows key won’t open Start
If pressing the Windows key does nothing, check simple causes first:
- Restart your PC (yes, really).
- Check if your keyboard has a “Windows Lock” or gaming mode.
- Review accessibility settings like Sticky Keys or Filter Keys if keys behave oddly.
If search is broken or inconsistent
When search won’t find apps or files, start with basic steps:
- Try restarting File Explorer (above).
- Restart the PC if the issue persists.
- Use Windows’ built-in troubleshooting guidance for Windows Search if you’re in an IT-managed environment.
Search is one of the most-used Start features, so it’s worth fixingyour future self will thank you.
Real-World Experiences: How People Actually Make Start Useful (Extra 500+ Words)
Let’s be honest: nobody wakes up excited to “customize the Start Menu.” It’s usually something you do after the third time in one day you’ve hunted
for the same app like it’s hiding from you. Over time, you start developing tiny “Start habits” that either save minutes daily or quietly sabotage your
workflow. Here are some real-life, battle-tested experiences and lessons that make the Windows 10 Start Menu genuinely helpful.
Experience #1: The “Work vs. Life” tile separation saves your brain. One of the simplest upgrades is creating two big groups:
a “Work” group (Office apps, email, Teams/Slack, VPN, your time tracker) and a “Personal” group (music, photos, streaming, games). Sounds basic, but the
payoff is hugeespecially if you work from home. When everything is mixed together, it’s weirdly easy to open something distracting “just for a second.”
When groups are separated and labeled, your Start Menu becomes a gentle boundary: “Here’s work; here’s play. Choose wisely.”
Experience #2: Tile folders are the antidote to Start Menu sprawl. At first, pinning apps feels amazinglike you’re building a perfect
dashboard. Then you pin five more things, and suddenly your Start Menu needs its own zip code. Tile folders fix this. Put all browsers into one folder
(Edge/Chrome/Firefox), all Adobe tools into another, all Microsoft Office apps into a third. You still get fast access, but the Start Menu stops looking
like a Times Square billboard. The “clean Start” feeling is real.
Experience #3: Turning off Live Tiles is secretly calming. Live Tiles can be useful, but they can also create constant motionweather updates,
news headlines, sports scores, the feeling that your computer is trying to narrate your day. Many people end up turning Live Tiles off for everything except
maybe Calendar or Weather. The funny part is: once you stop Start from “shouting,” you start using it more. It becomes a tool again, not a distraction.
Experience #4: Start search is faster than your organizing fantasies. People often spend a Saturday afternoon trying to perfectly organize tiles,
only to realize that the fastest workflow is: Windows key → type three letters → Enter. For example: “win” for WinWord (Word), “exc” for Excel,
“blu” for Bluetooth settings. It’s so fast it feels like teleporting. The Start Menu becomes less about browsing and more about launching with intention.
Experience #5: “Choose which folders appear on Start” is underrated. If you add File Explorer, Downloads, and Documents to the left rail, you end up
opening Start for navigation even when you’re not launching apps. Need the latest PDF? Start → Downloads. Need a project folder? Start → File Explorer.
It’s the kind of small convenience that stacks up all week long.
Experience #6: The Win+X menu feels like a secret hallway. Once people discover Win+X (or right-click Start), they stop digging through menus.
Need Device Manager? Win+X. Need Disk Management? Win+X. Need Task Manager? Win+X. It’s like Windows quietly handed you the keys to the building. If you support
family members’ PCs, this shortcut alone makes you look like a wizard.
The big takeaway: your “best” Start Menu isn’t the prettiest oneit’s the one that matches how you actually work. Start with two groups, add a few folders on the
left, keep tiles minimal, and rely on search for everything else. In a week, you’ll wonder how you ever lived without it.
Conclusion: Your Start Menu, Your Rules
The Windows 10 Start Menu is more than a buttonit’s your daily command center. Once you know how to pin apps, organize tiles into groups and folders, resize the menu,
customize left-side shortcuts, and use a few keyboard shortcuts, Start becomes faster (and a lot less annoying).
If you only do three things after reading this: pin your top apps, create two labeled groups, and learn Win+S + Win+X. That combo alone makes Windows 10 feel smoother
in everyday use.