Table of Contents >> Show >> Hide
- What a Light Meter Actually Does (In Plain English)
- Types of Light Metering You’ll Run Into
- Before You Meter: 3 Setup Steps That Prevent 80% of Mistakes
- Easy Steps: How to Use an Incident Light Meter (Most Film-Friendly Method)
- How to Use Reflected Metering Without Getting Tricked
- Metering for Film Types: Negative vs. Slide (This Changes How You Think)
- Real Examples: Metering Scenarios You’ll Actually Shoot
- The Sunny 16 Rule: A Backup Plan That Makes You Look Like a Wizard
- Common Light Meter Mistakes (So You Don’t Have to Learn the Hard Way)
- Quick “Do This First” Cheat Sheet
- Final Thoughts
- Experiences Related to Using a Light Meter (Real-World, No Fluff)
Film photography is basically a trust fall with chemistry. You can’t chimp, you can’t “fix it in post” (not the same way, anyway),
and every click costs real moneylike a tiny accountant living inside your shutter. That’s why a light meter can feel like a superpower:
it turns “vibes” into numbers, and numbers into consistently good negatives.
This guide walks you through using a light meter for film photography in a way that’s simple, repeatable, and friendly to your future self
when you’re scanning and wondering, “Why is this frame a moody silhouette and the next one looks like noon on the sun?”
What a Light Meter Actually Does (In Plain English)
A light meter measures light and helps you choose an exposureyour shutter speed and aperture (and sometimes ISO, if you’re rating film differently).
The key idea: meters don’t “know” what you’re photographing. They only measure light and assume a “normal” scene should average out to a middle tone.
Your job is to tell the meter what you care aboutyour subject, the highlights, the shadows, or the overall vibeand then set exposure accordingly.
Quick refresher: exposure triangle for film
- ISO: Your film speed. You usually can’t change it mid-roll unless you’re intentionally rating/pushing/pulling.
- Aperture (f-stop): Controls light + depth of field (blur background vs. keep more in focus).
- Shutter speed: Controls light + motion (freeze action vs. blur).
Types of Light Metering You’ll Run Into
1) Reflected metering (what most in-camera meters do)
Reflected meters read the light bouncing off your scene. They’re fast and convenient, but they can be fooled by very bright or very dark subjects
(snow, black clothing, shiny cars, white walls, etc.). The meter is trying to make everything “middle-ish,” which is sweet but not always correct.
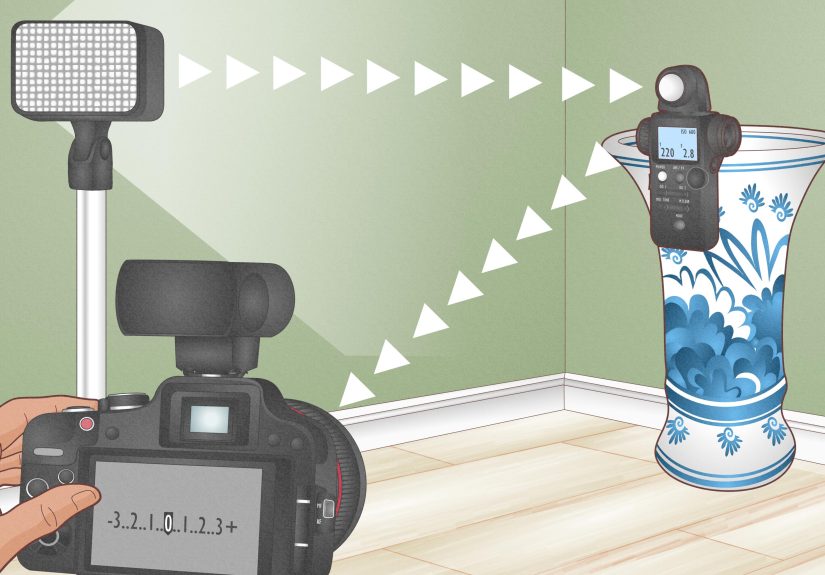
2) Incident metering (the handheld meter superpower)
Incident meters measure the light falling on the subject. Instead of asking, “How bright does this subject look?” it asks,
“How much light is hitting the subject?” That’s why incident metering is often more consistentespecially for portraits and scenes where the background
is brighter or darker than your subject.
3) Spot metering (tiny-area precision)
Spot meters measure a small areauseful for high-contrast scenes and Zone System-style thinking. If you want to place shadows or highlights exactly where
you want them on film, spot metering is the scalpel. Incident metering is the chef’s knife.
Before You Meter: 3 Setup Steps That Prevent 80% of Mistakes
- Set your ISO correctly. Match your meter to your film box speed (ISO 100, 400, etc.) unless you’re intentionally rating film differently.
If you plan to push/pull in development, write it down now (your lab will thank you). - Decide what you want to lock in: shutter speed or aperture.
Shooting a portrait and want creamy background blur? Pick an aperture first. Shooting movement? Pick a shutter speed first. - Confirm your meter’s mode. Ambient vs. flash, incident vs. reflected, and whether the dome (lumisphere) is out or retracted.
(Yes, people forget the dome. Yes, it happens more than anyone wants to admit.)
Easy Steps: How to Use an Incident Light Meter (Most Film-Friendly Method)
If you’re new to handheld meters, start here. Incident metering is the simplest path to consistently nice negativesespecially for people and street scenes.
Step 1: Stand in the same light as your subject
This matters more than owning an expensive meter. If your subject is in open shade, you meter in open shade. If they’re in direct sun, you meter in direct sun.
“Close enough” is not always close enough when the lighting changes across a few steps.
Step 2: Point the meter’s dome the right way
The common, reliable approach: hold the meter at your subject’s position (or as close as you can), with the white dome pointed back toward the camera.
This measures the light your subject receives and roughly what your camera “sees” in that lighting.
Alternate approach (useful for studio/key light thinking): point the dome toward the main light source to understand what the key light is doing.
For beginners outdoors, “dome toward camera” is usually the easiest default.
Step 3: Take the reading
Press the measure button (or trigger the needle readout, depending on your meter). Your meter will give you an f-stop/shutter speed pair,
or an EV value with combinations you can scroll through.
Step 4: Choose the combo you actually want
Meters often provide multiple equivalent exposures. Example: if the meter says f/8 at 1/250, that’s the same exposure as f/5.6 at 1/500.
Pick based on your creative goal:
- More background blur: wider aperture (lower f-number) + faster shutter.
- More depth of field: smaller aperture (higher f-number) + slower shutter.
- Freeze motion: faster shutter (1/500, 1/1000) + wider aperture (if needed).
Step 5: Set your camera and shoot (and re-meter when the light changes)
Outdoors, re-meter when you move from sun to shade, when clouds roll in, or when you turn your subject toward/away from bright sky.
Indoors, re-meter if your subject moves closer to a window or a lamp.
How to Use Reflected Metering Without Getting Tricked
Reflected readings can be greatespecially when you can’t reach your subject (street shots, across-the-room moments, candid scenes).
You just need a strategy so bright and dark subjects don’t bully your meter into bad decisions.
Option A: Meter a mid-tone (best simple habit)
Look for something in the same light as your subject that’s roughly medium in tone: weathered wood, grass, gray pavement, denim, etc.
Take a reflected reading from that area and use it as your baseline.
Option B: Use a gray card (most accurate reflected method)
Place an 18% gray card in the same light as your subject, fill the meter’s view with the card, take the reading, then shoot.
This is especially useful for product photos, portraits, and consistent results in tricky lighting.
Option C: Spot meter and “place” your exposure (mini Zone System)
Spot meter a shadow area where you want texture/detail, then open up about 2–3 stops from what the meter suggests.
Why? Because the meter wants to turn that shadow into a middle tone. You’re telling it, “No thanks, I want it to stay a shadowbut with detail.”
Metering for Film Types: Negative vs. Slide (This Changes How You Think)
Color negative film (C-41): usually forgiving, likes light
Many photographers prefer to err slightly toward overexposure with color negative film to keep shadows clean and detailed.
Underexposure can lead to muddy shadows and extra grain once scanned. A common beginner-friendly approach is to meter for the shadows (or midtones) and avoid
starving the film of light.
Slide film (E-6): gorgeous, dramatic, and less forgiving
Slide film generally demands more precise exposure. Highlights can blow out quickly, and you can’t “recover” them the way you might with negative film scanning.
A practical approach is to protect highlights: meter bright areas you want to retain and avoid overexposure. If you’re new to slide film, start with lower-contrast scenes.
Black-and-white negative: flexible, but your goals matter
With black-and-white film, many photographers prioritize shadow detail (especially in contrasty light) because you can often manage highlights later in printing/scanning.
But if you’re going for bold contrast and deep shadows, you might intentionally expose differently. “Correct” exposure can be artistic, not just technical.
Real Examples: Metering Scenarios You’ll Actually Shoot
Scenario 1: Backlit portrait at golden hour
Your friend is glowing, but the sky behind them is bright. If you rely on reflected metering aimed at the whole scene, the meter may underexpose your subject.
Do this instead:
- Incident method: stand by your subject, dome toward camera, take reading, shoot.
- Reflected method: meter your subject’s face (or a mid-tone near it), then shoot.
Result: your subject is properly exposed, and the background might go brightoften a beautiful look.
Scenario 2: Street scene with sun patches and shade
Here’s the trick: meter for the light your subject is standing in, not the light you wish they were standing in.
If your subject is in shade, take a shade reading and shoot when they’re in shade.
If they step into a sun patch, re-meter (or know your exposure difference).
Scenario 3: Indoor window light
Window light is lovely, but it’s also a contrast machine. Use incident metering near your subject’s face.
If the background is much darker, you’ll get a bright subject with a moodier roomoften perfect.
If you want more room detail, you may need to compromise exposure or add light.
The Sunny 16 Rule: A Backup Plan That Makes You Look Like a Wizard
If your battery dies, your meter gets forgotten at home, or you’re roleplaying as a 1970s photojournalist, Sunny 16 is your emergency parachute:
on a bright sunny day, set f/16 and set shutter speed to about 1/ISO (ISO 100 → ~1/100; ISO 400 → ~1/400). Then adjust for clouds, shade, and time of day.
It won’t replace careful metering in tricky light, but it can absolutely save a roll.
Common Light Meter Mistakes (So You Don’t Have to Learn the Hard Way)
- Metering in different light than your subject: the #1 classic.
- Forgetting ISO changes when swapping film backs/rolls: your meter is honest; humans are not.
- Trusting reflected readings on snow/black clothing without compensation: use incident or meter a mid-tone.
- Not re-metering when clouds move: nature loves surprise lighting.
- Confusing “perfect exposure” with “perfect mood”: sometimes you want silhouette. Just make it on purpose.
Quick “Do This First” Cheat Sheet
- Set ISO on the meter to match your film (or your chosen rating).
- Pick shutter speed (motion) or aperture (depth of field) as your priority.
- Use incident metering when you can reach the subject; dome toward camera for a solid default.
- Use reflected/spot metering when you can’t reach the subject; meter mid-tones or “place” shadows/highlights.
- For negative film, don’t starve shadows; for slide film, protect highlights.
- Re-meter when the light changes. Your roll deserves consistency.
Final Thoughts
Using a light meter for film photography is less about memorizing “correct” settings and more about building a repeatable process.
Once you can walk into a scene, read the light, and choose exposure intentionally, you’ll waste fewer frames and keep more happy accidents.
Best of all, your results become consistent enough that you can experiment with stylebecause you’re not guessing anymore.
Experiences Related to Using a Light Meter (Real-World, No Fluff)
Photographers often describe their first week with a handheld light meter as equal parts “I am a genius” and “I have made a mistake on purpose… right?”
That’s normal. A meter gives you numbers, but film teaches you what those numbers feel like.
One common experience is the sudden calm that comes from incident metering portraits. Instead of fighting the backgroundbright sky, dark trees, reflective windows
you meter the light on the person and move on. You stop negotiating with your camera like it’s a tiny stubborn roommate. The photos tend to look cleaner, too:
faces with detail, eyes that don’t disappear, and fewer frames where your subject looks great but the exposure is doing interpretive dance.
Another experience: you start noticing light like it’s a character in the scene, not just “brightness.” You’ll see open shade as its own soft, even world.
You’ll see the difference between a subject standing under an awning (cooler, dimmer, calmer) and one step forward into direct sun (hotter, harsher, higher contrast).
After a while, you’ll predict the reading before you press the buttonand when you’re close, it feels like unlocking a new skill tree.
People also run into the “reflected meter betrayal” moment. It’s usually snow, a white wall, a black shirt, or a shiny car.
The meter reads the scene, tries to average it to a middle tone, and your negative comes back looking off: gray snow, washed faces, or dark shadows.
That’s often when photographers start carrying a small gray cardor they learn to meter something boring and mid-toned (pavement, grass, a neutral jacket)
and use that reading as the anchor. Boring objects become heroes.
If you shoot color negative film, a lot of folks notice that slightly brighter exposures scan more pleasantlyespecially in the shadows.
The “aha” is that film isn’t a scoreboard where perfect is the only good result. It’s more like cooking: you can season to taste.
Once you know how your favorite film stock behaves, you’ll develop your own “house style” for exposure.
And then there’s slide film: the final exam energy. Many photographers describe the first roll as stressful (in a fun way).
Because slides are less forgiving, metering becomes more intentional: protecting highlights, avoiding extreme contrast, and checking the light more often.
But when it works, it really worksthere’s a special satisfaction in holding a well-exposed slide and seeing exactly what you saw, frozen in color.
Over time, the meter stops feeling like extra gear and starts feeling like a translator.
You still get to be creativemoody shadows, bright highlights, silhouettes, soft portraitsbut now you can do it on purpose.
And that’s the real “film photography flex”: not guessing, just choosing.