Table of Contents >> Show >> Hide
- Pick Your Path in 30 Seconds
- Before You Start: A Quick Checklist
- Method 1: Transfer Photos with iCloud Photos (Wireless & Automatic)
- Method 2: Transfer Photos with iTunes (USB Syncing from a PC Folder)
- Know This First: iTunes “Photo Sync” is a Managed, One-Way Relationship
- Step 1: Install iTunes for Windows (or Apple’s newer Windows device-sync app)
- Step 2: Connect your iPad to your PC
- Step 3: Choose the photos you want to sync
- Step 4: Sync and find the photos on your iPad
- When iTunes Photo Sync is the Better Choice
- Troubleshooting: Fix the Most Common Problems Fast
- Which Method Should You Use Long-Term?
- Real-World Experiences (500-ish Words of “Here’s What Usually Happens”)
- Experience #1: “I picked iCloud… and then it stopped at 1% forever.”
- Experience #2: “iTunes didn’t give me the Photos option, so I assumed the universe hates me.”
- Experience #3: “My cable charges, but the PC doesn’t see the iPad.”
- Experience #4: “I synced a folder, then edited the photos, and now everything looks weird.”
- Experience #5: “I want the photos on my iPad, but I don’t want them everywhere.”
- Conclusion
You have photos on a Windows PC. You have an iPad. Between them lies a vast, mysterious land filled with
“Sync,” “Upload,” “Trust This Computer,” and at least one cable that only charges when you need data.
Let’s fix that.
This guide walks you through two dependable methods to transfer photos from a PC to an iPad:
iCloud Photos (wireless, automatic, “set it and forget it”) and
iTunes photo syncing (or the newer Apple device-syncing apps on Windowswired, fast,
and very “my computer is the boss”).
Pick Your Path in 30 Seconds
- Choose iCloud Photos if you want your PC and iPad to stay in sync over time
(add photos once, they show up everywhere). - Choose iTunes/USB syncing if you want a one-way transfer from a specific
PC folder to your iPad (great for “I just want these albums on the iPad for a trip”). - Important: If iCloud Photos is turned on for your iPad, you typically won’t get the
normal “Sync Photos” options in iTunes/device-sync screens. In other words: you usually pick
iCloud Photos or manual syncing, not both.
Before You Start: A Quick Checklist
- Apple Account: Sign in to the same Apple Account on your iPad and on iCloud for Windows.
- Wi-Fi (for iCloud): Faster Wi-Fi = less waiting and less existential dread.
- USB cable (for iTunes): Use a data-capable cable (some “free” cables are charging-only).
- Storage: iCloud Photos needs enough iCloud storage; manual syncing needs enough iPad storage.
- Organize your PC photos: Life is easier if your photos live in tidy folders (even “Sort Later” is a folder name).
Method 1: Transfer Photos with iCloud Photos (Wireless & Automatic)
Think of iCloud Photos as one big photo library in the sky. Put photos in from your PC, and your iPad
sees them toono cable required. The trade-off: it’s tied to your Apple Account, and if you delete a photo
while iCloud Photos is on, that deletion can propagate to other devices.
Step 1: Turn on iCloud Photos on your iPad
- Open Settings on your iPad.
- Tap your name (Apple Account) at the top.
- Tap iCloud > Photos.
- Turn on Sync this iPad (sometimes shown as “iCloud Photos”).
- Optional but helpful: choose Optimize iPad Storage if your iPad is smaller than your photo habit.
(It keeps smaller device copies while originals live in iCloud.)
Step 2: Install and set up iCloud for Windows on your PC
- Install iCloud for Windows (commonly via the Microsoft Store).
- Open the app and sign in with your Apple Account.
- Enable Photos / iCloud Photos in iCloud for Windows settings.
Step 3: Upload photos from your PC to iCloud Photos
You have two easy upload routes. Use whichever feels less like “homework.”
Option A: Upload via File Explorer (Drag-and-drop)
- Open File Explorer.
- Look for iCloud Photos in the navigation pane (it may appear under Pictures).
- Drag the photos (or entire folders) you want into iCloud Photos.
Keep things sane by uploading in batches if you have thousands.
Option B: Upload via iCloud.com (Great when you can’t install apps)
- Open a browser on your PC and sign in to your iCloud Photos web library.
- Use the Upload button to select photos from your PC.
- Wait for the upload to finish (perfect time to refill your water, stretch, and practice patience).
Step 4: Confirm photos arrived on your iPad
- Open the Photos app on your iPad.
- Check Recents or Library for newly uploaded images.
- If nothing shows up yet, keep the iPad on Wi-Fi and plugged in for a bitlarge uploads take time.
iCloud Photos Tips That Save Real Time (and Real Sanity)
- Upload speed matters: If you’re moving a big library, do it overnight. Your router will be
doing burpees the entire time. - Edits on Windows: Some edits you make to iCloud Photos files on the PC may not reflect back
the way you expectwhen in doubt, upload the edited version as a new file. - Duplicates happen: If you upload a photo that’s already in iCloud, you might create a duplicate.
It’s not personal. It’s just computers being computers. - Storage reality check: If your iCloud storage is full, syncing can stall. Free space (or upgrade)
and the pipeline starts moving again.
Method 2: Transfer Photos with iTunes (USB Syncing from a PC Folder)
This method is old-school (in the best way): plug in the iPad, tell your PC which folder of photos you want on the iPad,
and sync. It’s often faster than cloud uploads for large batches because it’s not limited by internet speed.
Know This First: iTunes “Photo Sync” is a Managed, One-Way Relationship
- It mirrors your selected PC folder/albums. If you remove photos from the PC folder and sync again,
those photos can be removed from the iPad’s synced set. - You typically can’t delete those synced photos only on the iPad. You manage them from the PC,
then re-sync. - If iCloud Photos is on, photo syncing options may disappear. That’s your clue that iCloud Photos
is handling your library instead.
Step 1: Install iTunes for Windows (or Apple’s newer Windows device-sync app)
Many people still use iTunes for photo syncing on Windows. On newer Windows setups, Apple also offers separate apps
(including a device-management app) that can handle syncing and backups. If you already have iTunes and it recognizes
your iPad, you’re good to go.
Step 2: Connect your iPad to your PC
- Use a USB cable to connect the iPad to the PC.
- Unlock your iPad.
- If prompted on iPad, tap Trust This Computer and enter your passcode.
- Open iTunes (or the Apple device-syncing app on Windows, if that’s what you’re using).
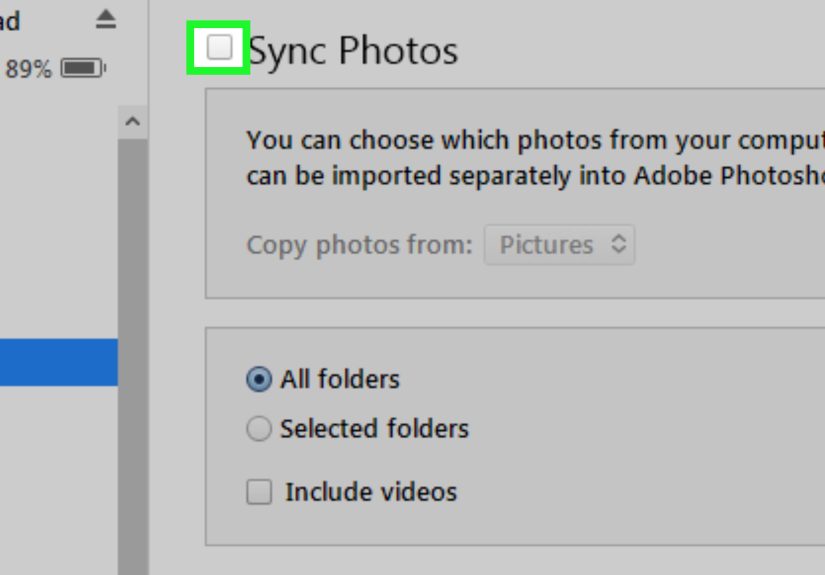
Step 3: Choose the photos you want to sync
- In iTunes, click the small device icon (your iPad).
- In the sidebar, click Photos.
- Check Sync Photos.
- Choose where to sync from:
- Pictures (default) or
- Choose Folder… and pick a specific folder, like C:UsersAlexPicturesiPad Album
- Decide whether to sync:
- All folders/albums or
- Selected folders/albums (great if you’re pickyin a good way).
- If you have videos in that folder, check Include videos (if available).
Step 4: Sync and find the photos on your iPad
- Click Apply or Sync.
- Wait for the sync to complete (don’t unplug earlythis is not a game of “guess when it’s done”).
- On your iPad, open Photos > Albums. Your synced set usually appears as one or more albums tied to what you selected.
When iTunes Photo Sync is the Better Choice
- Huge batches and your internet is slow (USB wins).
- Temporary collections (like “All the family photos for Grandma’s iPad”).
- You don’t want your photos in the cloud (manual sync keeps things local).
Troubleshooting: Fix the Most Common Problems Fast
Problem: iPad doesn’t show up in iTunes (or Windows device app)
- Unlock the iPad and tap Trust if prompted.
- Try a different USB port (directly on the PC, not a finicky hub).
- Swap cables (yes, even if it “worked yesterday”).
- Restart both the PC and the iPad. Classic, but effective.
Problem: No “Photos” tab or no “Sync Photos” option
- This often means iCloud Photos is enabled on the iPad. If you want manual syncing,
you may need to turn iCloud Photos off for Photos syncing to appear. - If you actually want iCloud Photos (recommended for ongoing sync), skip iTunes and use Method 1 instead.
It’s not giving up; it’s choosing the right tool.
Problem: iCloud Photos upload is slow (or looks stuck)
- Confirm you’re on stable Wi-Fi and not a “one bar of hope” connection.
- Upload in smaller batches (e.g., 200–500 photos at a time).
- Check iCloud storage and free space if needed.
- Keep the iPad plugged in and on Wi-Fi to finish indexing/syncing.
Problem: Photos look blurry on iPad
- If you’re using iCloud Photos with Optimize iPad Storage, you may see smaller previews until the originals download.
- Open the photo while on Wi-Fi; the iPad usually fetches the full-resolution version automatically.
Problem: You see duplicates after transferring
- With iCloud uploads, duplicates can happen if the same files were uploaded more than once.
- With iTunes syncing, duplicates are less common, but can occur if you sync from overlapping folders.
- Deduplicate on the PC first (by date or filename), then transfer again with a cleaner folder structure.
Which Method Should You Use Long-Term?
If you’re building a photo library you want to carry everywherephone, iPad, maybe a future device you haven’t bought yetiCloud Photos is usually the smoothest.
If you’re curating photo “playlists” for the iPad (portfolios, client albums, travel packs), iTunes/USB syncing is fast, predictable, and offline-friendly.
Real-World Experiences (500-ish Words of “Here’s What Usually Happens”)
Below are common, real-life patterns people run into when transferring photos from a PC to an iPad.
Not dramatic, not scaryjust the sort of tiny friction that makes you stare at your screen like it personally betrayed you.
Experience #1: “I picked iCloud… and then it stopped at 1% forever.”
This usually happens when the upload is bigger than your patience (or bigger than your available iCloud storage).
People often start by tossing 6,000 photos into iCloud Photos in one heroic drag-and-drop motion, then wonder why it doesn’t finish by lunchtime.
The fix is boring but effective: upload in batches, keep the PC awake, and keep the iPad on Wi-Fi and power.
If storage is the issue, freeing space or upgrading iCloud storage is the difference between “stuck forever” and “ohthere it goes.”
Experience #2: “iTunes didn’t give me the Photos option, so I assumed the universe hates me.”
The universe is innocent. iCloud Photos is usually the culprit. If iCloud Photos is enabled on the iPad, iTunes-style photo syncing may disappear.
People interpret this as “my iTunes is broken,” but it’s often iTunes saying, “Hey, your photos are being managed through iCloud already.”
At that point you choose: stay with iCloud (wireless convenience) or turn iCloud Photos off and use manual syncing (USB control).
The key experience here is realizing you’re not failingyou’re just being forced into a decision Apple quietly considers “good for you.”
Experience #3: “My cable charges, but the PC doesn’t see the iPad.”
This one is painfully common. A surprising number of cables are “power-only,” especially cheap spares.
People plug in, the iPad charges, and everyone assumes data must be flowingexcept it’s not.
Swapping to a known good data cable and a different USB port fixes this more often than any advanced troubleshooting ever will.
Bonus tip from experience: if you see a “Trust This Computer” prompt on the iPad, tap Trust immediately.
Until you do, your PC is basically standing outside the club with no wristband.
Experience #4: “I synced a folder, then edited the photos, and now everything looks weird.”
Manual syncing behaves like a “mirror” of your selected folder or albums. If you replace files, rename them, or reorganize folders,
the next sync can remove items and add others to match the folder’s current state. That’s not a bug; that’s the contract.
The practical lesson people learn: create a dedicated “iPad Sync” folder on the PC, copy the photos you want into it,
and treat it as the official source. Edit copies there, not scattered originals across three different “Final_Final_ReallyFinal” folders.
Experience #5: “I want the photos on my iPad, but I don’t want them everywhere.”
This is where manual syncing shines. iCloud Photos is designed for a unified library across devices. If you want a curated subset only on your iPad,
syncing from a specific PC folder is often the cleaner experience. People who do client work, build portfolios, or load classroom materials
tend to prefer the “folder-to-iPad” approach because it keeps personal photos personal, and work photos work.
The big takeaway from these experiences: decide what you want your photos to do.
If you want them to follow you everywhere automatically, pick iCloud Photos and commit.
If you want them to live on the iPad as a curated set, pick iTunes/USB syncing and keep your source folder organized.
Either way, you’ll spend less time troubleshootingand more time actually enjoying your photos (which is the whole point).
Conclusion
To transfer photos from a PC to an iPad, iCloud Photos is the simplest ongoing solution: enable iCloud Photos on the iPad,
set up iCloud for Windows, then upload via File Explorer or iCloud.com and let everything sync.
If you prefer a fast, offline, one-way transfer, iTunes photo syncing (or Apple’s Windows device-syncing app) lets you choose a folder
and copy photos to the iPad over USBjust remember it behaves like a managed mirror.