Table of Contents >> Show >> Hide
- Why Pan-Cooking Scallops Works (and Why It Sometimes Doesn’t)
- Buying Scallops: Make the Sear Easy Before You Even Get Home
- Food Safety and Storage (Quick but Important)
- Prep Like You Mean It: The 10-Minute Step That Makes or Breaks the Dish
- The Core Technique: How to Pan-Cook Scallops for a Golden Crust
- Easy Pan Sauces (Because You Already Did the Hard Part)
- Troubleshooting: Fix the Usual Scallop Crimes
- Serving Ideas That Make Scallops Feel Like a Full Meal
- Frequently Asked Questions
- Conclusion: The “Golden Rule” of Pan-Cooked Scallops
- Extra: Real-World Scallop Experiences (What You Learn After a Few Batches)
Scallops have a reputation: expensive, delicate, and only truly safe in the hands of a restaurant chef who owns
tweezers and a tiny spoon. In reality, pan-cooking scallops is one of the fastest “wow” dinners you can make at
homeif you follow a few non-negotiable rules. The big secret isn’t a rare spice or a fancy pan. It’s moisture
control, high heat, and the confidence to leave them alone for a minute.
This guide breaks down the exact technique to get that deep golden crust (the kind that makes people assume you also
fold fitted sheets perfectly). You’ll learn how to buy the right scallops, prep them so they actually sear (not steam),
and finish them with simple pan sauces that feel like a cheat code.
Why Pan-Cooking Scallops Works (and Why It Sometimes Doesn’t)
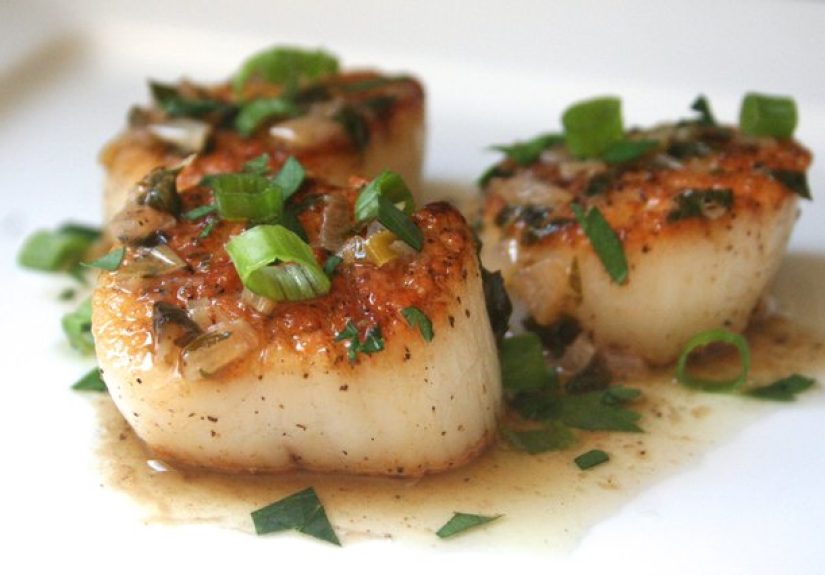
Great scallops are about contrast: a browned, caramelized exterior and a tender interior that’s opaque but still juicy.
The browning is the Maillard reactionflavor magic that needs high heat and a relatively dry surface. If scallops are
wet, they shed water into the pan, lowering the temperature and turning your “sear” into “sad seafood simmer.”
So the job is simple: start with scallops that can brown, dry them aggressively, and cook them in a hot pan in a single
layer. Everything elsegarlic, butter, lemon, capers, herbsis the fun part.
Buying Scallops: Make the Sear Easy Before You Even Get Home
Sea Scallops vs. Bay Scallops
For pan-cooking, sea scallops are the MVP. They’re larger, easier to sear, and forgiving enough to build a crust
before overcooking. Bay scallops are smaller and cook extremely fast; they’re great for quick sautés or pasta, but
they can overcook in the time it takes you to blink at your stove.
Dry-Packed vs. Wet-Packed
If you want restaurant-style browning, look for dry-packed scallops (sometimes labeled “dry,” “chemical-free,” or
“no added phosphates”). These haven’t been soaked in solutions that help them hold extra water. Wet-packed scallops
can taste fine, but they’re harder to brown because they release more liquid in the pan. When in doubt, ask the fish
counter directly: “Are these dry scallops?”
Fresh vs. Frozen
Frozen scallops can be excellent, especially if they were frozen quickly after harvest. What matters is how you thaw and
dry them. If you buy frozen, plan ahead so you can thaw in the refrigerator and give them extra drying time.
Food Safety and Storage (Quick but Important)
Keep scallops cold. Refrigerate immediately and use them quicklyideally within a day or two of purchase. If you won’t
cook them soon, freeze them. Thaw safely in the refrigerator, not on the counter.
For doneness, many home cooks go by appearance (opaque flesh), while food-safety guidance commonly recommends cooking
seafood thoroughly. If you serve scallops to higher-risk guests (pregnant people, older adults, immunocompromised
diners), err on the side of fully cooked and opaque all the way through.
Prep Like You Mean It: The 10-Minute Step That Makes or Breaks the Dish
1) Don’t Wash Them (Mostly)
Rinsing scallops can add water right when you’re trying to remove it. Most scallops are already cleaned when sold.
Instead of washing, inspect for shell fragments and pat them dry. If you absolutely feel you must rinse, do it briefly
and then dry them immediately and thoroughly.
2) Remove the Side Muscle
Many scallops have a small crescent-shaped “side muscle” (the abductor muscle) attached. It’s edible, but it can be a
bit chewy. Pinch it and pull it awayit usually peels off easily. (If your scallops don’t have one, congratulations:
someone already did your homework.)
3) Dry Them Aggressively
This is the headline. Dry scallops = browning. Wet scallops = steaming. Lay scallops in a single layer on paper towels
(or a clean dish towel), blot the tops, flip, and blot again. If you have time, let them sit uncovered in the refrigerator
for 15–30 minutes to dehydrate the surface even more. You’re not trying to mummify themjust removing surface moisture
so the pan can sear instead of boil.
4) Season Simplyand at the Right Time
Salt and pepper are enough. You can season right before the pan, or a few minutes earlier while they dry. Avoid sugary
spice rubs on high heat unless you enjoy smoke alarms performing interpretive dance.
The Core Technique: How to Pan-Cook Scallops for a Golden Crust
Choose the Right Pan
Use a stainless-steel skillet or cast iron. These hold heat well and encourage browning. Nonstick can work in a pinch,
but it often doesn’t deliver the same crust because it tends to run cooler and discourages fond (those browned bits
you can turn into sauce).
Use the Right Fat
Start with a high-smoke-point oil (canola, grapeseed, avocado, or a light olive oil). Butter is delicious but can burn
quickly at searing temperatures. The best move is a two-fat strategy: oil first for searing, then butter at the end
for flavor and basting.
Heat and Timing (The Part People Overthink)
Scallops cook fast. Your goal is a hard sear on the first side, then a short finish on the second side.
A common pattern for large sea scallops is roughly 2–3 minutes on the first side and 1–2 minutes on the second,
depending on size and how hot your pan runs.
Step-by-Step: Pan-Cooked Scallops (Serves 2)
Ingredients
- 10–12 large sea scallops (about 1 to 1½ pounds), side muscle removed
- Kosher salt and freshly ground black pepper
- 1–2 tablespoons high-smoke-point oil
- 2 tablespoons unsalted butter
- 1 garlic clove, smashed (optional)
- 1 lemon (zest or wedges), optional
- Fresh herbs like thyme or parsley (optional)
Method
- Dry and season. Blot scallops very dry on all sides. Season with salt and pepper.
- Preheat the pan. Heat a stainless-steel or cast-iron skillet over medium-high to high heat until it’s hot.
Add oil and swirl to coat. The oil should shimmer; a faint wisp of smoke is your “go” signal. - Place scallops carefully. Set scallops in the pan in a single layer with space between them. If they’re crowded,
they’ll steam. Cook in batches if you need to. - Do not touch them. Let them sear undisturbed until a deep golden crust forms on the bottom. This usually takes
about 2–3 minutes for large scallops. If you try to move them too early, they may stick; when the crust forms, they
naturally release more easily. - Flip once. Turn each scallop. Add butter, and if you like, a smashed garlic clove and a sprig of thyme.
Tilt the pan and spoon the foaming butter over the scallops for 30–60 seconds. - Finish quickly. The second side usually needs 1–2 minutes. Pull scallops when they feel slightly springy and look
opaque around the edges with a hint of translucence in the center (or fully opaque if you prefer a more well-cooked finish). - Rest briefly and serve. Move scallops to a plate. Squeeze lemon over them and sprinkle herbs if using. Serve immediately.
How to Tell When Scallops Are Done
Visual cues matter more than strict clocks because scallops vary in size. Look for:
- Color: Deep golden-brown crust on the outside.
- Texture: Slightly springy when pressed, not hard or rubbery.
- Interior: Opaque on the outside; center can be just barely translucent if you like them tender.
If using a thermometer, many cooks aim for a tender finish in the mid-120s °F range, while food-safety guidance often
emphasizes cooking seafood thoroughly. Choose the doneness that fits your comfort level and your guests.
Easy Pan Sauces (Because You Already Did the Hard Part)
1) Brown Butter + Lemon + Capers (Classic “Bistro” Energy)
After removing scallops, keep the pan on medium heat. Add a bit more butter and let it brown lightly (nutty aroma, golden
milk solids). Add a squeeze of lemon and a spoonful of capers. Swirl and spoon over scallops. It’s salty, bright, and
tastes like you own candles that cost $38 each.
2) Garlicky Butter Splash (Fast and Loudly Delicious)
Add butter and a smashed garlic clove to the hot pan for 20–30 seconds after you flip the scallops. Optional: a small
splash of white wine or chicken broth to lift the browned bits. Finish with lemon.
3) Umami Shortcut: Miso-Butter
Mix a teaspoon of white miso into softened butter and melt it into the pan after the scallops come out. Add a tiny splash
of water to emulsify and make it glossy. This is especially good if you serve scallops with rice or noodles.
Troubleshooting: Fix the Usual Scallop Crimes
“My scallops won’t brown.”
- Cause: Too wet, pan not hot enough, or overcrowding.
- Fix: Dry longer. Use a hot stainless/cast-iron pan. Cook in batches with space between scallops.
“They stuck to the pan.”
- Cause: Moved too soon or insufficient heat/oil.
- Fix: Let them sear undisturbed; they release when the crust forms. Add enough oil to coat the surface.
“They’re rubbery.”
- Cause: Overcooking.
- Fix: Shorten the second-side cook. Remove earlier; carryover heat finishes them quickly.
“They’re pale and watery.”
- Cause: Wet-packed scallops releasing liquid.
- Fix: Seek dry-packed next time; meanwhile, dry aggressively and accept that the crust may be lighter.
Serving Ideas That Make Scallops Feel Like a Full Meal
- Simple: Lemon wedges, flaky salt, and a green salad with a sharp vinaigrette.
- Comforty: Creamy polenta, mashed potatoes, or cauliflower puréesomething soft to catch the sauce.
- Bright: Citrus salad, shaved fennel, or quick sautéed spinach with garlic.
- Date-night: Brown butter caper sauce + roasted asparagus + a glass of something cold.
Frequently Asked Questions
Can I use frozen scallops?
Yes. Thaw them in the refrigerator, then dry them extremely well. Frozen scallops often shed more moisture, so plan a
longer blotting/resting step before cooking.
Should I flour scallops?
A very light dusting can help absorb surface moisture and promote browning. It’s optional; purists skip it, pragmatists
enjoy the extra crust. If you dust, keep it lightno one wants “scallop nuggets” unless that’s the plan.
What’s the best heat level?
Medium-high to high, depending on your stove and pan. You want sizzling contact and a fast crust without burning the
oil. If your oil is smoking aggressively, reduce slightly.
Conclusion: The “Golden Rule” of Pan-Cooked Scallops
If you remember only one thing, make it this: dry scallops + hot pan + no crowding. That trio gives you the crust.
Everything else is stylelemon, butter, capers, herbs, or whatever makes you feel like the main character in your own
kitchen.
Extra: Real-World Scallop Experiences (What You Learn After a Few Batches)
The first time most people pan-cook scallops at home, they expect a dramatic “TV sear” moment: scallops hit the pan,
angels sing, and a caramel crust appears instantly like a time-lapse video. Then reality shows up wearing sweatpants.
The pan doesn’t feel quite hot enough, the scallops look damp, and suddenly you’re hovering over the skillet like it
owes you money.
Here’s what experienced home cooks figure out: scallops reward patience in very short bursts. You don’t need to be calm
for an hourjust for about two minutes at a time. If you can leave them alone long enough to form a crust, you’ve done
the hardest part of the recipe. The temptation to “check” them every ten seconds is strong, but checking is basically
the culinary equivalent of interrupting someone mid-sentence. Let them finish the thought.
Another lesson: your kitchen setup matters more than your ambition. People often try to sear scallops in a crowded pan
because they want everyone’s dinner ready at once. Totally understandable. But scallops don’t do group projects.
When packed tightly, they release moisture, the pan temperature drops, and you get pale scallops sitting in a little
puddle of their own disappointment. Cooking in two quick batches feels slower, but it’s faster than trying to “fix”
a steamed batch after the fact. And as a bonus, batch cooking gives you more room to butter-baste without splashing
hot fat onto your sleeves (which, let’s be honest, is not the cozy vibe we’re going for).
People also learn that scallops have a narrow window between “perfect” and “rubber eraser,” and that window closes
faster than you think. The good news? You can stack the odds in your favor. Pull them a touch earlier than your
instincts tell you. They keep cooking for a minute after they hit the plate, and that tiny bit of carryover heat can
be the difference between tender and tough. If you’re nervous, aim for scallops that look opaque around the edges and
slightly translucent in the center, then rest them briefly. You can always return them to the pan for 20 seconds; you
cannot un-cook a scallop that’s already turned into seafood jerky.
Flavor-wise, most cooks have a “first sauce” story. It usually starts with butterbecause butter makes everything taste
like you planned ahead. The first time you add butter after flipping and spoon it over the scallops, you’ll notice how
quickly the kitchen smells like a real restaurant. Then you add lemon and suddenly the richness makes sense. Then you
add capers once and realize you’ve been missing out on salty little bursts of brightness your whole life. This is the
fun part: once you nail the sear, scallops become a canvas. Brown butter one night, miso-butter the next, a quick white
wine pan sauce after that. Same technique, different mood.
Finally, experienced scallop-cookers stop chasing perfection and start chasing repeatability. They buy dry-packed when
possible, dry the scallops like it’s a sacred ritual, and keep the seasoning simple. They stop trying to multitask
during the sear, because scallops don’t wait for you to answer a text. And they learn to trust the cues: the sound of
the sizzle, the feel of the crust releasing from the pan, the springy resistance when you press the side. When you get
those right, scallops go from “intimidating” to “weeknight flex.”