Table of Contents >> Show >> Hide
- Why Butternut Squash Is Worth the Effort
- Microwave vs. Oven: Which Method Should You Choose?
- Before You Cook: How to Prep Butternut Squash Without a Knife Circus
- How to Microwave Butternut Squash
- How to Cook Butternut Squash in the Oven
- Common Problems (and How to Fix Them)
- What to Do With Cooked Butternut Squash
- Storage, Meal Prep, and Reheating Tips
- A Quick “Do This, Not That” Cheat Sheet
- Conclusion
- Real-Life Kitchen Experiences: What I’ve Learned the Hard Way (So You Don’t Have To)
Butternut squash is basically the friend who’s sweet, versatile, and always shows up dressed like a bowling pin.
The only catch? It can be stubborn to cut and slow to cook if you don’t have a game plan.
The good news: you’ve got two foolproof lanesmicrowaving for speed or oven roasting for caramelized, “wow, did I do that?” flavor.
In this guide, you’ll learn how to cook butternut squash in the microwave (whole, halved, or cubed), how to roast it in the oven (halves or cubes),
and how to choose the right method depending on what you’re makingsoup, mash, tacos, salads, meal prep, or “I’m eating it straight off the pan.”
Why Butternut Squash Is Worth the Effort
Butternut squash brings natural sweetness, a creamy texture when mashed, and a sturdy bite when roasted into cubes.
It plays well with savory flavors (garlic, chili, sage), sweet spices (cinnamon, nutmeg), tangy notes (lemon, vinegar), and big umami energy (Parmesan, miso).
If you meal prep, it’s also one of the best “cook once, eat all week” vegetablesespecially when you turn leftovers into soup or puree.
Microwave vs. Oven: Which Method Should You Choose?
Here’s the practical truth: microwaving is the quickest way to get tender squash (and it can even make prep safer),
while oven roasting is the best way to get deep flavor and browning. Choose based on your goal, not your loyalty to one appliance.
| Goal | Best Method | What You’ll Get |
|---|---|---|
| Fast weeknight side | Microwave | Soft, steamy, ready for butter/salt/spices |
| Sweet, caramelized flavor | Oven | Golden edges, deeper taste, better texture |
| Puree for soup or baking | Oven (halves) or Microwave (halves) | Easy scoop-out flesh for silky blends |
| Meal prep cubes for salads/bowls | Oven | Firm-tender cubes that won’t turn to mush |
| Make cutting easier (safety win) | Microwave (briefly) | Softer skin, less wrestling with the knife |
Before You Cook: How to Prep Butternut Squash Without a Knife Circus
Pick the right squash
Look for a squash that feels heavy for its size with firm, matte skin (not shiny, not wrinkly).
A long neck means more solid flesh (great for cubes). A big bulb means more seeds (great if you love roasted pepitas-style snacks).
Wash it (yes, even if you’ll peel it)
Dirt on the skin can hitch a ride to the flesh when you slice through it. A quick scrub is all it takes.
Microwave “soften step” (optional but extremely smart)
If cutting butternut squash feels like arm day at the gym, do this: poke several vent holes in the skin with the tip of a knife or a fork,
then microwave the whole squash briefly (a few minutes) to slightly soften the skin. Let it cool before peeling/cutting.
You’re not trying to cook it herejust taking the edge off the toughness.
How to peel and cut (classic, safest workflow)
- Trim a thin slice off the stem end and bottom end so it stands steady.
- Peel with a sturdy Y-peeler. If the skin is stubborn, peel in sections and rotate the squash.
- Separate the neck and the bulb (where the seeds are).
- Slice and seed the bulb: cut in half lengthwise and scoop seeds out with a spoon.
- Cube into even pieces (about 1-inch cubes roast beautifully).
How to Microwave Butternut Squash
Microwaving is basically steaming with superpowers. The key is venting (so it doesn’t burst) and resting
(so the heat finishes the job and you don’t burn your hands like a cartoon character).
Method 1: Microwave a whole butternut squash (fastest “hands-off” prep)
This is the “I need cooked squash but I’m not emotionally available for chopping right now” method.
It works well when you plan to scoop out the flesh for mash, puree, or soup.
- Scrub the squash clean and pat dry.
- Using a small knife tip or fork, poke 8–12 vent holes all around the squash.
(Do not skip this unless you like surprise sound effects.) - Place it on a microwave-safe plate or shallow dish.
- Microwave on high for about 8–12 minutes (timing depends on size and your microwave).
Rotate halfway through if your microwave has hot spots. - Test doneness by sliding a paring knife into the thickest part. You want it to go in with little resistance.
If it’s still firm, microwave in 1-minute bursts until tender. - Let it rest 5–10 minutes before handling. Then cut it open, scoop out seeds, and scoop the flesh.
Method 2: Microwave halved butternut squash (more even, still very fast)
This is the most reliable microwave method for even cooking. Great for mash, purees, and quick sides.
- Cut squash in half lengthwise. Scoop out seeds.
- Place halves cut-side down in a microwave-safe baking dish.
- Add a small splash of water (just enough to create steamthink a few tablespoons, not a swimming pool).
- Cover with a microwave-safe lid or vented wrap (leave a small gap for steam).
- Microwave on high for 10–15 minutes, until fork-tender.
- Rest 3–5 minutes, then scoop flesh and season.
Method 3: Microwave cubed butternut squash (quick steamy cubes)
If you want cubes fast for a bowl or salad and don’t care about browning, this is your move.
- Peel, seed, and cut squash into even cubes (¾ to 1 inch).
- Put cubes in a microwave-safe bowl. Add a splash of water.
- Cover and microwave on high for 6–10 minutes, stirring once halfway through.
- Drain any extra water, then season or mash as needed.
Microwave flavor upgrades (because plain squash is nice, but we can do better)
- Classic: butter + salt + black pepper.
- Sweet-savory: butter + maple + a pinch of cinnamon + salt.
- Cozy savory: olive oil + garlic powder + smoked paprika + salt.
- Soup starter: stir in a spoon of miso or a splash of broth, then blend.
How to Cook Butternut Squash in the Oven
Roasting is where butternut squash becomes its best self: sweeter, deeper, and slightly caramelized.
If microwaving is sweatpants, roasting is “real pants” (but still comfortable).
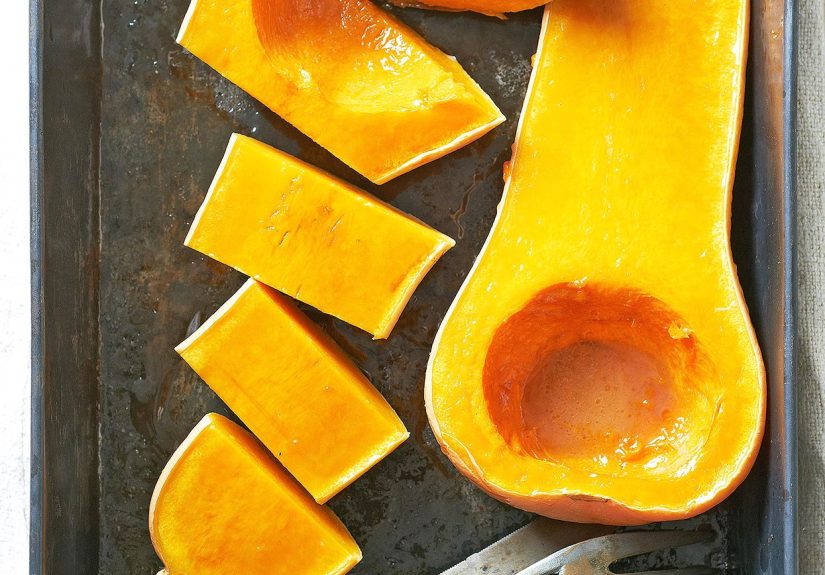
Oven Method 1: Roast butternut squash halves (best for puree and easy scooping)
This method is ridiculously convenient: you don’t have to peel, and the flesh scoops out like a dream.
Perfect for soup, mashed squash, risotto add-ins, baking, or anything that wants a smooth texture.
- Heat oven to 400°F.
- Halve squash lengthwise and scoop out seeds.
- Brush cut sides lightly with oil or melted butter. Season with salt and pepper.
- Place halves on a baking sheet cut-side down for steamy tenderness, or cut-side up if you want more browning on the surface.
- Roast for 35–55 minutes, depending on size, until a fork slides in easily.
- Cool slightly, then scoop and use.
Oven Method 2: Roast butternut squash cubes (best for bowls, salads, and “snackable” bites)
Cubes are the crowd-pleaser: caramelized edges, soft centers, and plenty of surface area for seasoning.
This is the method that makes people say, “Wait… vegetables can taste like this?”
- Heat oven to 425°F (high heat helps browning).
- Peel, seed, and cube the squash into even pieces (about 1 inch).
- Toss with oil, salt, and pepper. Add spices if you like (see ideas below).
- Spread in a single layer on a sheet pan. Give the cubes spacecrowding = steaming.
- Roast for 25–35 minutes, flipping or stirring once halfway through, until browned and tender.
Seasoning ideas for oven-roasted squash
- Sage + garlic: dried sage, garlic powder, black pepper, salt.
- Warm spice: cinnamon, cumin, smoked paprika, salt.
- Chili-lime: chili powder, cumin, lime zest after roasting, flaky salt.
- Honey-mustard: toss with a little Dijon + honey (add in the last 10 minutes so it doesn’t burn).
- Parmesan finish: sprinkle grated Parmesan in the last 5 minutes for a savory crust.
Common Problems (and How to Fix Them)
“My squash is bland.”
Salt is not optional; it’s the difference between “meh” and “more please.”
Also, try acidity (lemon juice, vinegar) and a finishing touch (herbs, cheese, chili crisp).
“My cubes are soft but not browned.”
You probably crowded the pan or used a low temperature. Spread cubes out and roast hotter.
Also, pat the cubes dry if they’re wet from rinsing or sweatingdry surfaces brown better.
“It’s stringy.”
Some squash is just more mature, but cooking longer often helps. For puree, blend thoroughly and add a splash of broth or cream for silkiness.
“My microwave squash is watery.”
Use less water, drain after cooking, and let the squash rest uncovered for a minute so steam can escape.
If you’re mashing it, stir in butter or a spoon of Greek yogurt to bring it back.
What to Do With Cooked Butternut Squash
If you’ve cooked a whole squash and now you’re staring at a mountain of orange goodness, here are easy wins:
- Soup: blend with sautéed onion/garlic, broth, and a splash of cream or coconut milk.
- Bowls: roasted cubes + greens + grains + feta + pepitas + vinaigrette.
- Tacos: roasted cubes + black beans + salsa + lime + cilantro.
- Pasta: puree + Parmesan + a little pasta water = instant sauce.
- Breakfast: stir puree into oatmeal with cinnamon and maple.
Storage, Meal Prep, and Reheating Tips
Cooked butternut squash keeps well, but treat it like any cooked food: cool it promptly, store it sealed, and reheat it thoroughly.
For meal prep, roast cubes for texture or roast halves for pureethen portion into containers for quick meals.
- Refrigerate: store cooked squash in an airtight container.
- Freeze: puree freezes especially well. Freeze flat in zip-top bags for quick thawing.
- Reheat: microwave with a loose cover, or re-crisp roasted cubes in a hot oven or skillet.
A Quick “Do This, Not That” Cheat Sheet
- Do: poke vent holes before microwaving whole squash. Not: trust the laws of physics to “work it out.”
- Do: roast cubes with space between them. Not: build a squash pile and hope for browning.
- Do: roast halves when you want easy puree. Not: peel if you don’t need to.
- Do: season after tasting. Not: assume squash will magically season itself.
Conclusion
If you want speed, the microwave gets you tender butternut squash in minutesperfect for mash, soup, and quick sides.
If you want flavor, the oven delivers caramelized edges and deeper sweetness, especially for roasted cubes.
And if you want the best of both worlds, microwave briefly to make cutting easier, then roast for that golden finish.
Either way, you’re only a few simple steps away from turning a tough winter squash into something you’ll actually crave.
Real-Life Kitchen Experiences: What I’ve Learned the Hard Way (So You Don’t Have To)
The first time I cooked butternut squash, I treated it like a cute little vegetable project. Then it fought back.
Not in a dramatic waymore like a quiet, determined resistance where your knife slowly realizes it’s not the main character.
That’s when I learned Lesson One: the squash doesn’t care about your confidence. It cares about leverage, stability, and whether your knife is sharp.
Trimming a tiny slice off the bottom to make it stand still sounds boring until you’ve watched a squash wobble like a toddler on roller skates.
Stability turns “this is terrifying” into “this is Tuesday.”
Lesson Two was the microwave “soften step,” and it felt like discovering cheat codes. A few minutes in the microwave (after poking vent holes) doesn’t cook the squash,
but it takes the edge off the peeljust enough that a peeler stops skidding and starts cooperating.
The trick is patience: let it cool before peeling. Hot squash is slippery, and slippery squash is how you end up bargaining with your cutting board like,
“Please don’t make this weird.”
Then there’s the big microwave myth: that you can just toss a whole squash in and walk away. You can microwave it whole, yesbut vent holes are non-negotiable.
Steam needs an exit plan. Without it, the squash may split or burst, and you’ll be wiping squash lava off the microwave walls while questioning your life choices.
When I microwave halves instead, everything feels calmer and more predictable. Cut-side down with a little water turns the dish into a steam chamber, and the squash comes out evenly tender.
The rest time matters, toothose few minutes after cooking are when the heat finishes traveling inward. Skip the rest and the center will be stubbornly firm.
Oven roasting taught me a different set of lessons, mainly about space and heat. The biggest mistake I made was crowding the pan.
If cubes are piled up, they steam. Steamed squash is fine… but it’s not that roasty, caramelized, snackable magic you were promised.
Once I started giving cubes breathing room, the edges browned and suddenly the flavor went from “vegetable” to “I could eat this straight off the tray.”
High heat helps, but spacing is the real secret handshake.
I also learned that seasoning timing changes everything. If you add delicate things like honey too early at high heat, it can scorch.
Now I roast with oil, salt, and pepper first, then add sweet glazes in the last chunk of cooking time.
And for purees, roasting halves is the smoothest path: no peeling, no cube wrestling, just scoop and blend. I’ll often roast extra on purpose,
because leftover puree can become soup, pasta sauce, or “stir this into oatmeal and pretend you planned breakfast.”
The final lesson? Butternut squash is a meal prep superheroonce you stop negotiating with it and start using the methods that actually make it easy.