Table of Contents >> Show >> Hide
- What “hanging curtains correctly” actually means
- Decide your “curtain plan” before you drill anything
- The measurements that make curtains look “custom”
- Tools and supplies checklist
- How to hang curtains correctly: step-by-step
- Step 1: Mark your “rod line” (height first)
- Step 2: Mark bracket placement (width second)
- Step 3: Find studs (or choose anchors like you mean it)
- Step 4: Use a level (because “eyeballing it” is how legends are born)
- Step 5: Drill pilot holes
- Step 6: Install brackets securely
- Step 7: Hang the rod and test for level (again)
- Step 8: Add rings/clips (if using), then hang the curtains
- Step 9: Adjust the hem, then “train” the drape
- Special situations (where normal rules need a little remix)
- Common curtain-hanging mistakes (and how to fix them fast)
- Pro-style finishing touches
- Extra: Real-world experiences people run into (and what they learn)
- Conclusion
Hanging curtains feels like it should be simple: put rod up, put fabric on rod, admire your work, move on with your life.
And yet… somehow curtains are where good intentions go to get slightly crooked. The goal of this guide is to help you hang
curtains correctly the first timemeaning level, centered, the right height, the right width, and the right lengthwithout
turning your Saturday into a “why is there drywall dust in my cereal?” kind of weekend.
We’ll cover the design rules that make windows look bigger, the measuring math that makes curtains look custom, and the install
steps that keep your brackets from ripping out of the wall the first time you dramatically “reveal” a view that is actually just
your neighbor’s fence.
What “hanging curtains correctly” actually means
Correct is part style, part function. When your curtains are done right, they should:
- Frame the window (not shrink it).
- Move smoothly without snagging or scraping.
- Block or filter light the way you intended.
- Look intentionaleven if your intention was “I bought these on sale at 11:47 p.m.”
Decide your “curtain plan” before you drill anything
Inside mount vs. outside mount
Inside mount means hardware sits inside the window frame. It’s clean and tidy, but it limits how much glass you can
expose and it works best when you have enough depth in the frame (and a reasonably square window).
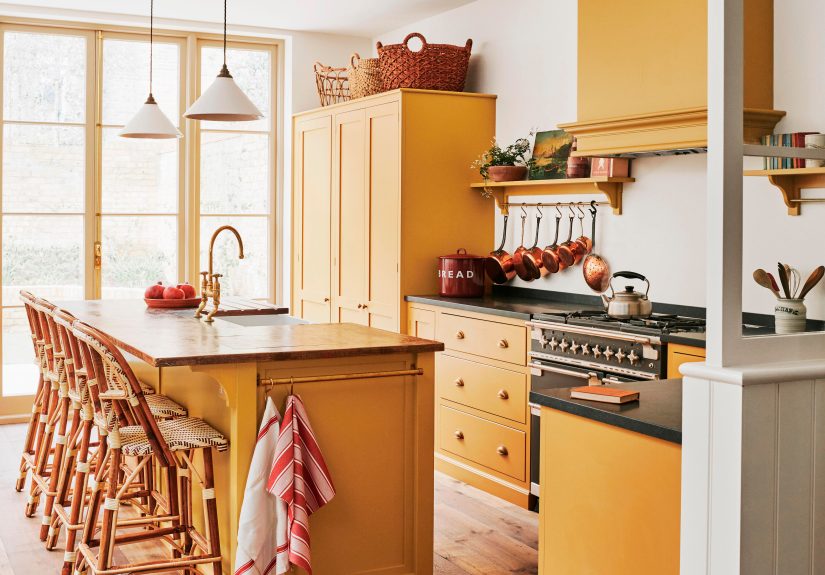
Outside mount means brackets go on the wall above/around the window. This is the most common choice for curtains
because it lets you hang panels high and wide, makes windows appear larger, and helps curtains stack off the glass when open.
Pick the right hardware for how you live
- Standard decorative rod: Best for most rooms; easy to install; lots of style options.
- Traverse rod or track: Best for frequent opening/closing, wide windows, or sliding doors; smoother movement.
- Double rod: Great for layering sheers + blackout panels (privacy by day, darkness by night).
- Tension rod: Fast and drill-free, but limited for heavy curtains and large spans.
The measurements that make curtains look “custom”
If you remember one thing: curtains usually look best when they’re hung higher and wider than the window frame.
That single shift fixes most “something feels off” curtain situations.
1) Curtain rod height: how high should you hang it?
A classic guideline is mounting the rod roughly 4–6 inches above the top of the window frame. If you want more drama
(or you’re working with shorter windows), you can go highersometimes close to the ceilingso long as it still looks balanced.
Use this quick decision guide:
- Standard ceilings (about 8 feet): Start at 4–6 inches above the frame.
- Low ceilings: Go high (closer to the ceiling line) to visually stretch the walljust keep the curtains properly hemmed.
- High ceilings: You can go higher, but keep it proportional so the rod doesn’t float awkwardly above the window.
- Crown molding: Leave breathing room so brackets and finials don’t fight the molding for attention.
The “right” height is the one that makes the window look taller and keeps your curtain length working (more on length next).
2) Curtain rod width: how far past the window should the rod extend?
Width does two jobs: it makes the window look wider and it lets curtains stack off the glass when open (so you get more light).
Many pros recommend extending the rod beyond the window trim by several inches on each side. A common range is about
3–6 inches per side for modest extension, or 8–12 inches per side when you want maximum “bigger window”
effect and better light exposureespecially for outside-mount curtains.
Practical tip: if your window is close to a corner wall, don’t force symmetry. Extend as much as the wall allows on the tight side
and more on the open side, then use a holdback (or just a tidy stack) to keep it looking intentional.
3) Curtain length: the fastest way to look expensive (or… not)
Curtain length is where rooms either look finished or look like they’re wearing pants that shrank in the dryer.
The most popular “designer” look is curtains that kiss the floorthey just barely touch, with no awkward hovering.
- Kiss the floor: Clean, tailored, and forgiving for most rooms.
- Slight break: A soft, relaxed look where fabric rests a touch on the floor.
- Puddle: Dramatic and formal (but higher maintenance and not great if you open/close curtains daily, or if pets think it’s a nap spot).
Measuring tip: floors aren’t always level. Measure your curtain length in a few spots (left, center, right). If there’s variation,
plan for the shortest point so your curtains don’t drag on the “higher” part of the floor.
4) Curtain panel width: how full should curtains be?
Flat curtains can look skimpyeven if the fabric is gorgeous. For a fuller, richer look, aim for total curtain width of about
2x the window width at minimum. Many decorators prefer 2–2.5x for sheers or softer fabrics that look best with extra body.
Translation: if your window is 50 inches wide, you’ll usually want 100–125 inches of fabric width total (split across two panels).
More fullness = more “custom drapery” vibes.
Tools and supplies checklist
Gather everything first. It’s faster than doing the “where’s the drill?” scavenger hunt mid-install.
- Tape measure
- Pencil (and a good eraseroptimism is allowed)
- Level (a small torpedo level works great)
- Stud finder (recommended for heavy curtains)
- Drill/driver + drill bits
- Screwdriver (backup plan when the drill battery dies at the worst moment)
- Wall anchors appropriate for your wall type (drywall vs. plaster)
- Ladder or sturdy step stool
- Curtain rod, brackets, finials, rings/clips (if using)
- Curtain panels (washed/steamed if needed)
How to hang curtains correctly: step-by-step
Step 1: Mark your “rod line” (height first)
Decide your rod height using the guidelines above. Make a small pencil mark on the wall above the window frame where the top of your brackets will sit.
If you’re doing multiple windows in one room, choose one height and stick to it for a cohesive look.
Step 2: Mark bracket placement (width second)
Measure your window width and decide how far the rod will extend past the trim on each side.
Mark the bracket points so the rod will be centered over the window.
Pro move: lightly mark the center of the window first. Then you can measure equal distances left and right for cleaner symmetry.
Step 3: Find studs (or choose anchors like you mean it)
If your curtains are light, good-quality drywall anchors may be enough. If your curtains are heavy (blackout lined, velvet,
thermal, extra-long), you’ll want at least one screw per bracket into a studor use heavy-duty anchors rated for the weight.
Common anchor options:
- Plastic expansion anchors: Fine for light loads, not ideal for heavy drapery.
- Self-drilling anchors: Convenient and stronger, but still not “infinite strength.”
- Toggle bolts: Great for heavy loads in drywall (a little more effort, a lot more confidence).
Step 4: Use a level (because “eyeballing it” is how legends are born)
Hold the rod up near your marks and check level. Adjust your pencil marks as needed. If your ceiling or trim is slightly off-level
(very common), decide what you want to visually “match.” Usually, matching the window looks best, not the ceiling line.
Step 5: Drill pilot holes
Drill small pilot holes where your screws will go. Pilot holes reduce cracking (especially in older plaster walls) and make screws
go in straighter. If you’re using anchors, follow the anchor instructions for hole size.
Step 6: Install brackets securely
Screw the brackets in place. Give them a gentle tugif anything wiggles now, it will definitely wiggle later when curtains start
doing their daily workout routine.
Step 7: Hang the rod and test for level (again)
Place the rod in the brackets and check level. Adjust if needed before you add fabric. If your rod has set screws, tighten them.
If it telescopes, make sure the overlap is sturdy and not sitting right at a bracket (where it can flex).
Step 8: Add rings/clips (if using), then hang the curtains
Rings can make curtains glide more smoothly. Clip rings are beginner-friendly and let you fine-tune curtain length a bit.
If you’re using grommets, tabs, or rod pockets, slide panels directly onto the rod before mounting the rod (some rods can’t be removed easily once installed).
Step 9: Adjust the hem, then “train” the drape
If curtains are too long, hem them (a tailor, iron-on hem tape, or sewing machine all work). If they’re too short… the most honest solution
is replacing them, because “high-water curtains” rarely look deliberate.
For a crisp finish, lightly steam wrinkles and train the folds by loosely tying panels into gentle pleats for a day or two.
It’s like teaching your curtains manners.
Special situations (where normal rules need a little remix)
Bay windows and corner windows
Use angled bay window rods or ceiling-mounted tracks. For corners, consider separate rods meeting at a corner connector so curtains can wrap around.
Keep bracket placement sturdythese setups often put extra stress on hardware.
Sliding glass doors
Choose a traverse rod or track system for smooth daily use. Mount high and wide so panels can stack off the door opening.
If you need serious light control, layer sheers with blackout panels on a double track/rod.
Blackout curtains and light leaks
If you’re installing blackout curtains for sleep or media rooms, extend the rod wider and mount it higher so panels overlap the window edges.
For maximum darkness, consider a wraparound rod or add return brackets so the curtain edge curves back to the wall.
Radiators or baseboard heaters
Full-length curtains can block heat and collect dust. In these areas, consider sill-length or apron-length curtains, or use shades for function
and side panels purely for style.
Common curtain-hanging mistakes (and how to fix them fast)
- Mistake: Rod hung too low.
Fix: Move the rod up. Even a few inches can make the window look taller and the room feel more finished. - Mistake: Curtains don’t look full.
Fix: Add panels (or choose wider ones). Aim for at least 2x window width in total fabric. - Mistake: Curtains are the wrong length.
Fix: Hem long panels or swap short panels for longer ones. Floor-kissing length is the safest bet for most rooms. - Mistake: Brackets wobble.
Fix: Upgrade anchors or hit studs. Heavy curtains need hardware that isn’t “trying its best.”
Pro-style finishing touches
Add “returns” for a tailored look
A return is the small section of curtain that wraps back to the wall at the outer edge. It blocks light gaps and looks polished.
Some rods and brackets are designed to make returns easy; you can also use drapery pins or a discreet stitch to shape the edge.
Use tiebacks or holdbacks strategically
Tiebacks aren’t required, but they’re helpful when you want consistent stacks and more sunlight. Place them around one-third of the way up from the floor
(roughly) and adjust to taste.
Make multiple windows match
In open-concept spaces, hang rods at the same height across the room when possible. Even if window sizes vary, consistent rod height creates visual calm.
Your brain reads it as “planned,” which is interior design’s favorite magic trick.
Extra: Real-world experiences people run into (and what they learn)
If you’ve never hung curtains before, here’s the comforting truth: almost nobody nails it perfectly on the first try without a little
course correction. The “experiences” below are the patterns homeowners and renters run into again and againand the fixes that usually
turn frustration into an “ohhh, that’s why” moment.
1) The “I hung them at the top of the trim like the old photos” surprise.
A lot of people start by mounting the rod right above the window frame because it feels logical. Then they step back and the window
suddenly looks shorter, like it’s wearing a hat pulled down too far. The fix is almost always simple: raise the rod several inches
and watch the whole wall feel taller. It’s one of those rare DIY moves where you do less work (just a few holes higher) and get a bigger
payoff.
2) The “Why do my curtains block half the window when they’re open?” moment.
This happens when the rod doesn’t extend far enough past the window. When you open the curtains, the fabric has nowhere to stack except
over the glassso you lose light and the window feels cramped. People usually fix this by switching to a longer rod and moving the brackets
outward. The room gets brighter, and the window suddenly looks wider even though you didn’t change the window at all. (The best kind of renovation:
the kind that costs nothing in drywall.)
3) The “My ‘84-inch’ curtains are floating above the floor… and judging me” scenario.
Curtain packages don’t know your life. They also don’t know your ceiling height, your rod height, or whether you’re using rings that add
extra drop. Many people buy standard lengths first, then realize the rod placement they want requires longer panels. The lesson:
decide rod height first, then buy curtains long enough to reach the floor. If you’re between sizes, go longer and hem. Hemming feels annoying
until you realize it’s the difference between “custom” and “college apartment energy.”
4) The “Everything was fine until the brackets started leaning” reality check.
Curtainsespecially lined or blackout panelsare heavier than they look. Add daily opening and closing, and the brackets take a beating.
People often learn (the hard way) that anchors matter. The fix is to re-mount into studs when possible, or upgrade to anchors/toggles rated
for heavier loads. Once the brackets are solid, the curtains feel smoother to use and the rod stops sagging like it’s had a long week.
5) The “My floor isn’t level, so my curtains look uneven” discovery.
Even in newer homes, floors can slope a bit. You might hang the rod perfectly level and still see one curtain barely touching the floor while
the other puddles. The practical solution people love is measuring in multiple spots and choosing a length that works with the highest point
of the floorthen hemming both panels to match that reality. It’s less about perfection and more about consistency: matching hems read as intentional,
even when the floor is doing its own thing.
Bottom line: most “curtain problems” aren’t big mistakesthey’re small measurement decisions that compound. Once you know the common
traps (too low, too narrow, too short, not secure), you can avoid them and get that crisp, finished look on your first real attempt.
Conclusion
Hanging curtains correctly the first time isn’t about fancy tools or secret design degreesit’s about three smart choices:
mount the rod higher, extend it wider, and choose curtains with the right length and fullness.
Once the measuring is right, the installation is straightforward: mark carefully, level twice, anchor properly, and finish with a steam and a tidy hem.
Do it this way and your windows will look bigger, your room will feel more polished, and you’ll avoid the classic DIY ending where you
stare at a slightly crooked rod and decide it’s “fine” as long as nobody looks directly at it. (They will. But now you won’t have that problem.)