Table of Contents >> Show >> Hide
- What You’re Making (and Why It Works)
- Materials and Tools
- Before You Start: Prep Your Corn and Husks
- The Build: How to DIY a Rustic Indian Corn Wreath (Step-by-Step)
- Step 1: Pick Your Base and Your “Strength Level”
- Step 2: Plan Your Layout (Do This First, Future You Will Be Grateful)
- Step 3: Attach the CornChoose One of These Methods
- Step 4: Add a Rustic “Base Layer” (Optional but Gorgeous)
- Step 5: Fill Gaps and Make It Look “Styled,” Not “Accidental”
- Step 6: Add the Bow (or Don’tMinimal Rustic Is Still Rustic)
- Step 7: Hang It Securely
- Durability and Weather: How to Keep Your Wreath Looking Great
- Troubleshooting: Fixes for the Most Common “Oh No” Moments
- Design Ideas to Make It Look Custom (Not Copy-Paste)
- Safety Notes (Because Hot Glue Has No Chill)
- Experiences You’ll Have While Making a Rustic Indian Corn Wreath (Yes, Even If You’re “Not Crafty”)
- Conclusion
There are two kinds of fall people: the “I’ll put out one tasteful pumpkin” crowd and the “my front door needs a whole harvest festival” crowd. If you’re here, you’re at least harvest-adjacentso let’s make a rustic Indian corn wreath that looks like you own a charming farmstand (even if your biggest crop this year is a sourdough starter you keep forgetting to feed).
This guide shows you how to build a sturdy, weather-smart wreath using Indian corn (also called decorative corn or flint corn), plus optional corn husks, ribbon, and dried textures for that cozy, “I light candles responsibly” vibe. You’ll get multiple build options (quick, extra-sturdy, and “bring on the drama”), troubleshooting, and styling ideaswithout turning your door into a craft-store explosion.
What You’re Making (and Why It Works)
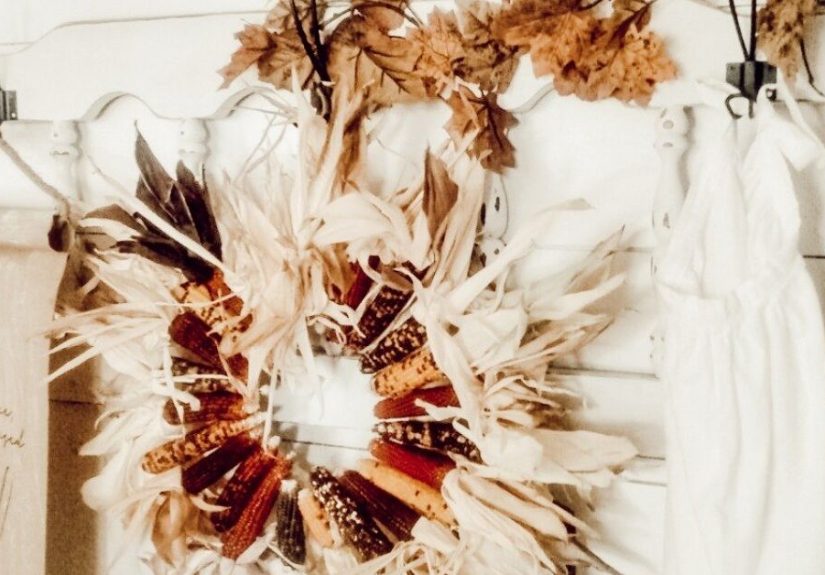
A rustic Indian corn wreath is basically a smart marriage of shape + texture + color. The wreath form gives you structure. The corn and husks add volume and movement. And those naturally varied kernelsivory, burgundy, gold, and browndo the heavy lifting so you don’t have to “decorate” much at all. Nature understood branding before we did.
Choose Your Look: 3 Rustic Styles
- The Classic Corn Ring: Mini Indian corn all the way around a straw, wire, or flat craft ring. Clean and bold.
- The Husk + Corn Layered Wreath: A ruffled husk base with corn on top. More texture, more “wow.”
- The Farmhouse Harvest Cluster: Corn grouped in sections with wheat, burlap ribbon, and dried pods/leaves tucked in.
Materials and Tools
You can make this wreath with a few basics. The “right” supplies depend on where you’ll hang it (covered porch vs. fully exposed to weather) and how heavy your corn is (mini cobs vs. full-size ears).
Core Supplies
- Indian corn / flint corn: mini cobs are easiest for wreaths; full-size ears work but need stronger attachment.
- Wreath base: straw wreath form (great for hot glue), grapevine wreath (rustic), metal/wire ring, or a flat craft ring.
- Hot glue gun + plenty of glue sticks: you’ll use more than you think. (Your glue gun will not accept “I’m trying to be minimal.”)
- Floral wire or paddle wire (optional but recommended): adds security and helps the wreath survive door slams and wind.
- Scissors + wire cutters
- Hanging method: ribbon loop, wreath hanger, or strong fishing line/jute twine.
Optional Rustic Extras (Choose 1–3)
- Burlap ribbon, ticking stripe ribbon, or velvet bow for a modern farmhouse finish
- Dried wheat stems, dried grasses, or faux fall leaves
- Mini pinecones, magnolia leaves/pods, small dried orange slices, or tiny pumpkins
- Neutral raffia or jute twine for tying bundles
Before You Start: Prep Your Corn and Husks
Use Fully Dried Corn (This Matters)
For wreaths, you want fully dried decorative corn (the kind sold for fall decor). If the corn is still fresh or damp, it can mold or softenespecially if it’s hanging outside. Dried corn is lighter, more stable, and less likely to “weep” moisture onto your wreath base.
If you’re harvesting your own, let the ears dry thoroughly in a cool, dry, well-ventilated place. The goal is a hard cob and papery husk. If your husks feel flexible and wet, give them more drying time before crafting.
Softening Corn Husks (So They Don’t Snap)
Corn husks can be brittle when dry. If you’re making a husk-heavy wreath (sunburst/ruffle style), lightly misting husks with water or briefly soaking them can make them easier to fold and shape. Don’t leave them soggyjust pliablethen let the finished wreath dry completely before hanging.
The Build: How to DIY a Rustic Indian Corn Wreath (Step-by-Step)
Step 1: Pick Your Base and Your “Strength Level”
Here’s a quick guide to choose the best wreath form for your door:
- Straw wreath form: easiest for hot glue, fast builds, and a full look with mini corn.
- Grapevine wreath: very rustic, lots of places to tuck wire and extras, but can have gaps (which is finerustic is allowed to breathe).
- Metal/wire ring or flat craft ring: great if you’re wiring bundles and want a crisp ring shape; may need wrap/tape to hide metal.
Step 2: Plan Your Layout (Do This First, Future You Will Be Grateful)
Before gluing anything, lay your corn out around the wreath form on a table or the floor. Start by placing corn at “clock points” (12, 3, 6, 9) so the spacing stays balanced, then fill in between. This prevents that classic DIY problem where you reach the end and realize the only space left is a weird triangle that fits exactly 0.6 corn cobs.
Step 3: Attach the CornChoose One of These Methods
Method A: Hot Glue (Fast, Great for Mini Corn)
- Work in small sections (about 6–8 inches of the wreath at a time).
- Add hot glue to the underside of a cob (and a little to the husk if it’s flaring).
- Press firmly onto the wreath form for a few seconds until set.
- Alternate colors and sizes so the pattern looks intentional, not “grab bag.”
- Continue around, overlapping slightly for a full look.
Pro tip: If your straw form has plastic netting or binding, very hot glue can soften it. Wrapping the form with a little floral wire first can add structure and gives glue something extra to grip.
Method B: Wire + Glue (Best for Wind, Door Slams, and Real Life)
- Anchor floral wire to your wreath base (twist around grapevine or through straw fibers/around a ring).
- Position your first cob and wrap wire around the base of the cob/husk area (not the pretty kernels).
- Twist tight on the back side of the wreath, then add a dab of hot glue where the cob meets the base.
- Overlap the next cob over the wire to hide it, keep going without cutting the wire until you complete the circle.
This method is slightly slower, but it’s the “my wreath has survived three toddlers and a windy Thanksgiving” approach.
Method C: Heavy-Duty Rustic Mount (For Full-Size Ears)
If you’re set on using full-size ears, consider mounting them to a rigid circular backing (some crafters use a cut ring of sturdy board material) and fastening with screws or strong ties. It’s not as light as a traditional wreath, but it’s very secure and intensely rustic.
Step 4: Add a Rustic “Base Layer” (Optional but Gorgeous)
If you want that fluffy, textured look, build a corn husk base layer first:
- Soften husks slightly (mist or brief soak), then blot dry.
- Wrap or tuck husks around the wreath form, overlapping like shingles.
- Secure with pins (straw form), floral wire (grapevine/ring), or hot glue.
- Let the husks flare outward for a ruffled, sunburst effect.
Once the base is set, attach corn on top in clusters or evenly spaced around the ring.
Step 5: Fill Gaps and Make It Look “Styled,” Not “Accidental”
Step back and look for thin spots. Fill gaps with:
- Extra husk pieces tucked under a cob
- Small pinecones or wheat stems glued into the grapevine
- Faux leaves or dried grasses used sparingly for movement
Step 6: Add the Bow (or Don’tMinimal Rustic Is Still Rustic)
A bow isn’t required, but it’s a quick way to “finish” the wreath. For a rustic style, try:
- Burlap ribbon: classic farmhouse
- Velvet ribbon: rustic-meets-elevated
- Black and tan ticking stripe: modern, understated
Attach the bow with wire for strength, then add a small dab of glue to keep it from shifting.
Step 7: Hang It Securely
Indian corn can be heavier than it looks. For hanging, use a strong ribbon loop wired to the back, a sturdy wreath hanger, or fishing line tied through the wreath base. If your door gets a lot of sun, choose a hanger that won’t weaken with heat.
Durability and Weather: How to Keep Your Wreath Looking Great
Where to Hang It
- Best: covered porch, storm door, or protected entryway
- Trickier: fully exposed doors (rain + humidity can shorten the wreath’s life)
Simple Protection Tips
- Start with fully dried materials and let everything dry before hanging.
- Use wire reinforcement if the wreath will be outside.
- Avoid heavy spraying products unless they’re craft-safe and compatible with natural materials.
- If it gets rained on, bring it inside to dry rather than letting it stay damp outdoors.
Storage (So You Can Reuse It Next Fall)
Store your wreath in a large box (or wreath container) in a cool, dry place. Don’t crush the husks. If possible, keep it upright and avoid humid basements. Think “attic shelf,” not “mystery corner near the water heater.”
Troubleshooting: Fixes for the Most Common “Oh No” Moments
Problem: Corn Keeps Falling Off
- Use wire + glue instead of glue alone.
- Make sure you’re gluing to the wreath basenot just gluing husk to husk.
- Hold each cob in place a few seconds longer (hot glue needs a moment to commit).
Problem: Husks Are Cracking or Snapping
- Mist lightly or soak briefly to soften before shaping.
- Work gently and fold husks along natural lines.
- Use smaller husk pieces for the outer layer if the full husks are too brittle.
Problem: The Wreath Looks Lopsided
- Rebalance by adding corn at the “thin” spots rather than rearranging everything.
- Use a bow or a small cluster of wheat/pinecones as a visual anchor.
- Take a photoyour camera will reveal imbalance faster than your eyes.
Design Ideas to Make It Look Custom (Not Copy-Paste)
Color Stories That Always Work
- Classic Harvest: burgundy + gold + cream + natural husk
- Neutral Rustic: mostly husks + a few cream/tan cobs + jute bow
- Moody Modern: deeper cobs + black ribbon + magnolia leaves
- Soft Farmhouse: husk base + muted bow + a few mini cobs clustered off-center
Placement Tricks (Small Moves, Big Upgrade)
- Alternate directions: point some cobs slightly outward and some slightly angled to create movement.
- Cluster strategically: grouping 3–5 cobs in one area can look more designer than perfect symmetry.
- Repeat one accent: a few pinecones or wheat sprigs around the ring makes it cohesive.
Safety Notes (Because Hot Glue Has No Chill)
- Use a silicone finger guard or a scrap piece of cardboard to press items into glue.
- Trim wire ends and tuck them into the back so they don’t scratch your door (or your hands).
- If you have curious pets, hang the wreath higherdried corn is basically a crunchy invitation.
Experiences You’ll Have While Making a Rustic Indian Corn Wreath (Yes, Even If You’re “Not Crafty”)
Making a rustic Indian corn wreath is one of those projects that looks deceptively calm online. The photos say “cozy autumn afternoon.” The reality is more like: “Why is my glue gun stringing spiderwebs across everything I love?” But that’s part of the charmthis craft has a learning curve that’s friendly, a little messy, and oddly satisfying.
First, you’ll probably experience the Layout Optimism Phase. You lay the corn around the ring and think, “Look at me, I’m basically an interior stylist.” Then you start attaching pieces and realize corn has opinions. Some cobs sit perfectly; others lean forward like they’re trying to hear gossip. This is normal. It’s also why wiring a few key pieces (especially your “anchor” cobs at 12, 3, 6, and 9) feels like cheatingin the best way. Once those anchors are locked in, everything else behaves better.
Next comes the Glue Stick Reality Check. The wreath does not care that you bought a “value pack.” If you’re using a straw form, you may go through sticks faster than expected because the straw texture drinks glue like it’s pumpkin spice season. Many crafters end up doing a second reinforcement passadding small dabs of glue where the cob meets the basebecause Indian corn is heavier than it looks, and doors are not gentle. If your wreath will face wind or a frequently used entry, you’ll be very happy you doubled down on attachment.
If you add corn husks, you’ll likely hit the Crunchy Husk Surprise. Dry husks can snap the moment you try to fold them into a ruffle. A light misting or quick soak makes them cooperative, but there’s a sweet spot: too dry and they crack; too wet and they slump. The “aha” moment for most people is realizing you don’t need perfectly smooth husks. A few wrinkles and ripples actually look more rustic and naturallike your wreath came from a farmhouse market, not a factory line.
Then there’s the Step-Back Transformation. About halfway through, the wreath may look chaotic up close: glue strings, uneven spacing, husks flaring in random directions. But when you step back six feet, suddenly it looks intentionallike texture, like movement, like fall. This is one of the most satisfying parts of the project: it teaches you that rustic decor isn’t about perfection; it’s about balance and warmth.
Finally, you’ll have the Hanging and Adjusting Moment. The first hang is rarely the final hang. You might rotate it a few degrees, fluff a husk, tuck a stray piece back in, or decide the bow belongs off-center instead of smack in the middle. And when you’re done, you’ll probably catch yourself opening the door a few extra times just to admire it. That’s not vanitythat’s quality control. Plus, you made something seasonal, textured, and genuinely welcoming. Your front door is now doing the most, and honestly? It deserves that.
Conclusion
A beautiful rustic Indian corn wreath doesn’t require fancy tools or a design degreejust dried corn, a solid base, and a plan that keeps things balanced and secure. Whether you go minimalist with a clean corn ring or layer in husks, wheat, and ribbon for full harvest drama, the secret is the same: anchor your key pieces, vary your colors, and reinforce for real life. Make it sturdy, make it cozy, and make your front door look like it has a fall playlist.