Table of Contents >> Show >> Hide
- Why Cast Iron Is the Filet Mignon Cheat Code
- What You Need (And What You Don’t)
- Choosing the Right Filet Mignon
- Prep Like You Mean It
- Method 1: The Classic Cast Iron Sear + Oven Finish (Most Foolproof)
- Method 2: Reverse Sear (For Extra Even Doneness)
- Steak Doneness Temperatures (Use This Table, Not Vibes)
- Optional: Make a 2-Minute Pan Sauce (Because You’re Already a Legend)
- Common Mistakes (And How to Avoid Them)
- Serving Ideas That Feel Steakhouse Fancy (Without the Steakhouse Bill)
- Storage and Reheating (Because Leftovers Happen)
- Extra: of Real-World “This Is What It Feels Like” Experience
- Conclusion
Filet mignon has a reputation: expensive, fancy, and slightly intimidatinglike it expects you to know the difference between “sear” and “stare at it anxiously.”
The good news? A cast iron skillet is basically filet mignon’s best friend. It gets ripping hot, stays hot, and helps you build that steakhouse crust while keeping the
inside tender and buttery-soft.
In this guide, you’ll learn two reliable methods (the classic skillet-to-oven approach and the reverse sear), how to hit the doneness you actually want, and the small
details that separate “pretty good steak” from “why am I ever paying restaurant prices again?”
Why Cast Iron Is the Filet Mignon Cheat Code
Filet mignon comes from the tenderloin, which is naturally tender but also quite lean. That means it can go from “perfect” to “oops” faster than you can say,
“I thought I set a timer.” Cast iron helps because it delivers:
- Serious heat retention for a deep, even crust.
- Better browning (hello, Maillard reaction) without needing a grill.
- Easy oven finishing if your skillet is oven-safe (most are).
What You Need (And What You Don’t)
Equipment
- Cast iron skillet (10–12 inches is ideal)
- Instant-read meat thermometer (this is your steak insurance policy)
- Tongs (avoid forks; you’re cooking steak, not auditioning for a villain role)
- Oven mitts (cast iron handles stay hot for a surprisingly long time)
- Plate + foil for resting
Ingredients
- Filet mignon (1.5–2 inches thick is easiest to nail)
- Kosher salt and black pepper
- High-heat oil (avocado, canola, grapeseed)
- Butter (2–3 tablespoons per 2 steaks)
- Aromatics (optional but excellent): garlic cloves, thyme, rosemary
Choosing the Right Filet Mignon
Thickness matters more than the label. Very thin filets cook too quickly to develop a good crust without overshooting your doneness. Aim for:
- Best: 1.5–2 inches thick (great for sear + oven finish)
- Works: 1–1.25 inches (skip long oven time; watch temperature closely)
- Tricky: under 1 inch (cook fast, but crust vs. doneness becomes a tightrope act)
If your filets are tied with butcher’s twine, leave it on during cooking. It helps the steak keep its shape and cook evenly.
Prep Like You Mean It
1) Dry the surface (this is non-negotiable)
Pat the filets dry with paper towels. Moisture is the enemy of browning. If the surface is wet, your steak steams before it searsand steamed steak is a sad sentence.
2) Salt smart: quick season or dry-brine
You’ve got two good options:
- Right before cooking: Salt and pepper generously just before the skillet step. Fast, simple, still delicious.
- Dry-brine (best flavor + crust): Salt the steaks and refrigerate uncovered on a rack for a few hours (or overnight).
This dries the surface and improves browning.
3) About “bringing steak to room temp”
You’ll hear this tip a lot. In practice, the center of a steak doesn’t warm up dramatically on the counter, and leaving meat out too long isn’t ideal for food safety.
If you want, you can let the steaks sit out briefly while you preheat the oven and skilletthink minutes, not hours.
Method 1: The Classic Cast Iron Sear + Oven Finish (Most Foolproof)
This is the go-to approach for filet mignon because it gives you strong browning without forcing you to overcook the interior while chasing the crust.
Step-by-step
- Preheat the oven to 400°F.
If your filets are very thick (2+ inches), you can go slightly lower (375°F) to slow things down. - Heat the cast iron skillet.
Place it over medium-high heat for 4–6 minutes. You want it hot enough that the steak sizzles the second it touches the pan. - Add oil, then sear.
Add 1–2 teaspoons of high-heat oil and swirl. Place filets in the pan and sear 2–3 minutes without moving them.
Flip and sear the second side another 2–3 minutes. - Sear the edges (quick but worth it).
Use tongs to stand the filets on their sides for 15–30 seconds per edge, especially if they’re thick. - Butter baste (optional, but this is where the magic lives).
Lower heat to medium. Add butter and aromatics (garlic + thyme/rosemary). Tilt the pan slightly and spoon the melted butter over the steaks for
30–60 seconds, flipping once or twice to keep cooking even. - Finish in the oven.
Transfer the entire skillet to the oven. Start checking temperature early:- For medium-rare: pull at 125–128°F
- For medium: pull at 135–138°F
Typical oven finishing time is 4–8 minutes for 1.5–2 inch filets, but thickness (and skillet heat) can swing it.
The thermometer is the boss here. - Rest.
Move steaks to a plate and rest 5–8 minutes. Carryover heat will raise the temperature a few degrees and juices will redistribute.
Quick timing snapshot (for 1.5–2 inch filets)
- Sear: 2–3 minutes per side
- Butter baste: 1–2 minutes total
- Oven: 4–8 minutes (start checking at 4)
- Rest: 5–8 minutes
Method 2: Reverse Sear (For Extra Even Doneness)
Reverse searing means you warm the steak gently in the oven first, then finish with a fast, high-heat sear in cast iron. This method shines with thicker steaks
because it reduces the “overcooked band” near the surface and gives you a more evenly pink interior.
How to reverse sear filet mignon
- Preheat oven to 275°F.
- Salt the steaks, then bake on a rack.
Place filets on a wire rack over a sheet pan. Bake until they reach:- 110–115°F (aiming for medium-rare after searing)
- 120–125°F (aiming for medium after searing)
This usually takes 20–35 minutes depending on thickness.
- Heat cast iron until very hot.
4–6 minutes on high heat. Add a small amount of high-heat oil. - Sear fast.
Sear 45–75 seconds per side, plus quick edge sears. If you want butter basting, do it briefly at the end (but keep it shortfilet is lean). - Rest 5 minutes, then serve.
Reverse sear bonus: the steak’s surface often dries slightly in the oven, which helps it brown faster when it hits the skillet. Translation: better crust, less panic.
Steak Doneness Temperatures (Use This Table, Not Vibes)
Thermometers remove drama. Insert the probe into the thickest part from the side for the most accurate center reading.
| Doneness | Pull From Heat At (°F) | Finish After Rest (Approx.) | Look & Feel |
|---|---|---|---|
| Rare | 120–123 | 125–128 | Bright red center, very soft |
| Medium-rare | 125–128 | 130–135 | Warm red/pink center, tender |
| Medium | 135–138 | 140–145 | Pink center, firmer bite |
| Medium-well | 145–148 | 150–155 | Mostly brown, small pink area |
| Well-done | 155+ | 160+ | Brown throughout, least juicy |
Food safety note: official minimum guidance for whole cuts of beef is 145°F with a rest period. Many people prefer steak below that for tenderness, but if you need
to follow the most conservative standard, cook to that minimum.
Optional: Make a 2-Minute Pan Sauce (Because You’re Already a Legend)
After the steaks come out of the skillet, you’ll have browned bits (fond) full of flavor. Turn them into a quick sauce:
- Carefully pour off excess fat, leaving about 1 tablespoon in the skillet.
- Add 1/4 cup broth (or water) to deglaze over medium heat, scraping up the browned bits.
- Simmer 30–60 seconds, then whisk in 1 tablespoon butter.
- Finish with a pinch of salt and pepper. Optional: a squeeze of lemon or a spoonful of Dijon for brightness.
Common Mistakes (And How to Avoid Them)
Mistake: The skillet wasn’t hot enough
If the steak doesn’t sizzle on contact, you’re not searingyou’re politely warming beef. Preheat longer and trust the heat.
Mistake: You moved the steak too soon
Leave it alone during the first sear. Once a crust forms, it releases naturally. Early flipping can tear the surface and weaken browning.
Mistake: Butter too early, burned butter everywhere
Add butter after the initial sear and lower the heat. Butter browns quickly; give it a calmer moment to do its nutty, delicious thing.
Mistake: No thermometer, only hope
Filet mignon punishes guesswork. A thermometer gives you repeatable, restaurant-level resultswithout the expensive trial-and-error.
Mistake: You skipped the rest
Resting isn’t a fussy chef ritual. It helps juices settle and prevents them from flooding your plate the second you slice.
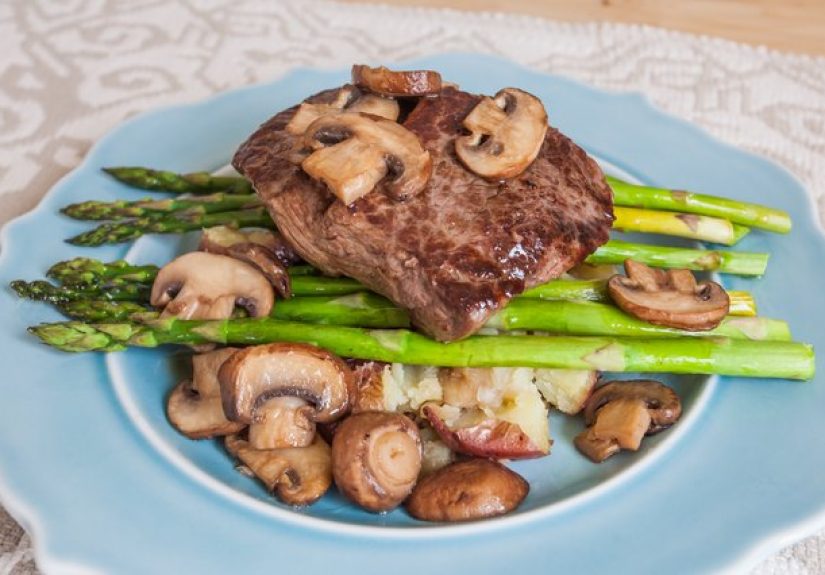
Serving Ideas That Feel Steakhouse Fancy (Without the Steakhouse Bill)
- Classic: mashed potatoes + roasted asparagus
- Light: arugula salad + lemony vinaigrette + blistered tomatoes
- Cozy: buttered mushrooms + crispy smashed potatoes
- Fast: crusty bread + simple green salad + pan sauce
Storage and Reheating (Because Leftovers Happen)
Store leftover filet in an airtight container in the fridge and eat within 3–4 days. For reheating, avoid blasting it in the microwave until it turns into
“tenderloin jerky.” Better options:
- Gentle oven: 250°F until warmed through, then a quick sear to refresh the outside.
- Skillet: low heat with a tiny splash of broth and a lid to warm gently, then uncover for a brief re-crisp.
Extra: of Real-World “This Is What It Feels Like” Experience
The first time you cook filet mignon in cast iron, the most surprising part is how loud success is. A proper sear isn’t quiet. It crackles. It smells like
dinner is about to be impressive. And thenbecause cast iron plays by its own rulesyou realize your kitchen has instantly become a tiny steakhouse with a very
enthusiastic smoke machine.
That’s usually the moment people learn the “ventilation pregame.” Before you even touch the steak, you’ll want the exhaust fan on, a window cracked, and the smoke
alarm mentally reassured that you’re not starting a campfire indoors. The next lesson is handle heat: cast iron is excellent at holding temperature, which is great for
crust and not great for forgetting where you set your thumb. (Oven mitts aren’t optional; they’re part of the uniform.)
The second experience is the confidence boost you get from a thermometer. Without it, you poke the steak like it’s going to confess its doneness. With it, you just
check the number and calmly move onlike a person who definitely has their life together. And because filet is lean, that thermometer feels like a superpower: you can
pull it at the exact moment it’s still juicy and tender, not a moment after.
Then comes the “butter baste era,” where you discover how quickly a simple steak becomes a restaurant-level situation. The smell of butter and herbs hitting the hot
pan is basically edible confidence. The spooning part also changes how you cook: you’re not just waiting; you’re actively building flavor. People who swear they can’t
cook often become suspiciously talented right here.
Another common moment: the temptation to slice immediately because you’re excited and also hungry and also the steak looks incredible. If you slice too soon, juices
run out and you feel personally betrayed by physics. If you rest iteven five minutesyou cut in and the inside stays glossy and tender. That’s when you realize why
steakhouses are so consistent: they respect timing.
Finally, there’s the “I can do this again” feeling. Once you’ve made one great cast iron filet, you stop treating filet mignon like a once-a-year event. You start
thinking in strategies: classic sear + oven for weeknight reliability, reverse sear for thicker steaks and extra-even doneness, quick pan sauce when you want to show
off without trying too hard. And that’s the best kind of cooking experienceone that upgrades your skills and your dinner at the same time.
Conclusion
Cooking filet mignon in a cast iron skillet isn’t complicatedit’s just detail-driven. Dry the surface, use serious heat, lean on a thermometer, and finish with a
short rest. Whether you choose the classic skillet-to-oven method or the reverse sear, you’ll get a tender center and a beautiful crust without the stress. And once
you add a quick butter baste (or a simple pan sauce), you’re officially in “steakhouse energy” territoryminus the steakhouse prices.