Table of Contents >> Show >> Hide
- Quick Navigation
- Recipe at a Glance
- Why These Bars Work
- Ingredients (and Why They Matter)
- Equipment & Pan Options
- Step-by-Step Recipe: Creme Brulee Cheesecake Bars
- Pro Tips (No Cracks, No Stress)
- Flavor Variations (Because Vanilla Is Great, but So Is Adventure)
- Make-Ahead, Storage, and Freezing
- FAQ
- of Real-World “Been-There” Cheesecake Bar Wisdom
Imagine the best parts of two iconic desserts teaming up: the creamy tang of cheesecake and that dramatic, crackly sugar “glass” you get from crème brûlée.
Now imagine you don’t need ramekins, custard anxiety, or a water-bath spa day for your baking pan. These crème brûlée cheesecake bars are the
“fancy restaurant” dessert you can cut into neat squares and casually pretend you make every Tuesday.
Recipe at a Glance
- Difficulty: Confident beginner (with bonus points if you enjoy using a tiny culinary flamethrower)
- Active time: ~25–35 minutes
- Bake time: ~35–45 minutes (varies by pan)
- Chill time: At least 4 hours (overnight is even better)
- Yield: 12–16 bars (depending on how generous you slice)
Why These Bars Work
Traditional crème brûlée is a baked custard topped with caramelized sugar. Cheesecake is… well, cheesecake: rich, tangy, and the reason stretchy pants were invented.
These bars borrow the best structural ideas from cheesecake bars (easy slicing, sturdy base, chill-to-set) and finish with a brûléed sugar topping for that signature
“tap-tap-CRACK” moment.
The magic is mostly about balance:
- Crust: A buttery graham cracker base gives you crunch, sweetness, and a clean slice.
- Filling: Cream cheese plus a little sour cream (or heavy cream) makes the texture smoother and less prone to cracking.
- Finish: A thin layer of sugar, caramelized right before serving, creates a crisp shell that contrasts beautifully with the chilled cheesecake.
Ingredients (and Why They Matter)
For the Graham Cracker Crust
- Graham cracker crumbs: The classic cheesecake bar move. You can crush sheets yourself or use pre-made crumbs.
- Granulated sugar: Adds sweetness and helps the crust brown slightly.
- Melted butter: The glue. It holds crumbs together and makes the crust taste like “vacation in dessert form.”
- Pinch of salt: Not optional if you want the flavor to pop.
For the Vanilla Cheesecake Layer
- Cream cheese (full-fat): This is the foundation. Reduced-fat can bake up looser and less luxurious.
- Granulated sugar: Sweetens and helps create a creamy texture.
- Sour cream (or heavy cream): Adds moisture and a gentle tang; also helps the filling stay silky.
- Eggs + egg yolk: Eggs set the filling; an extra yolk leans the flavor closer to a custardy crème brûlée vibe.
- Vanilla: Use pure extract. If you want that “bakery aroma,” vanilla bean paste is a great upgrade.
- Salt: A small amount makes everything taste more like itself (including vanilla).
- Optional: cornstarch or flour (1–2 teaspoons): Helps bars slice cleanly and reduces the chance of a too-soft center.
For the Brûlée Topping
- Granulated sugar (or superfine sugar): Fine crystals melt evenly and form a thinner, shatterier crust.
- Optional pinch of flaky salt: Only if you like a sweet-salty finish (highly recommended for “wait, why is this so good?” reactions).
Equipment & Pan Options
- 8×8-inch pan: Thicker bars, classic “dessert square” height. Great for a dramatic crème brûlée crack.
- 9×9-inch pan: Slightly thinner bars, similar bake time.
- 9×13-inch pan: Party-size batch. Bars are thinner, bake faster, and disappear at gatherings like they’re being vacuumed into another dimension.
- Parchment paper: A sling makes lifting and slicing so much easier.
- Electric mixer: Hand mixer or stand mixer works. You’re aiming for smooth, not whipped.
- Kitchen torch: Best for the brûlée topping. (Yes, you can use the broilersee FAQ.)
- Instant-read thermometer (optional): Helpful if you love certainty more than surprise.
Step-by-Step Recipe: Creme Brulee Cheesecake Bars
Ingredients (8×8-inch pan, about 12–16 bars)
Crust
- 1 1/2 cups graham cracker crumbs
- 2 tablespoons granulated sugar
- 6 tablespoons unsalted butter, melted
- Pinch of salt
Cheesecake Layer
- 16 oz (2 blocks) full-fat cream cheese, room temperature
- 2/3 cup granulated sugar
- 1/2 cup sour cream (or heavy cream), room temperature
- 2 large eggs, room temperature
- 1 large egg yolk, room temperature
- 2 teaspoons pure vanilla extract (or 1 teaspoon vanilla bean paste)
- 1/4 teaspoon fine salt
- Optional: 1–2 teaspoons cornstarch (for extra clean slicing)
Brûlée Topping
- 3–5 tablespoons granulated or superfine sugar (enough for a thin layer)
1) Prep the pan and oven
- Preheat oven to 325°F.
- Line an 8×8 pan with parchment paper, leaving overhang on two sides (your future self will thank you).
- Lightly grease the parchment and exposed sides.
2) Make and bake the crust
- In a bowl, mix graham crumbs, sugar, salt, and melted butter until it resembles wet sand.
- Press firmly into the bottom of the pan (use the bottom of a measuring cup for a flat, tight crust).
- Bake for 8–10 minutes. Set aside while you make the filling.
3) Mix the cheesecake filling (smooth, not fluffy)
- Beat the cream cheese on low-to-medium speed until smooth, scraping the bowl often.
- Add sugar and beat just until combined.
- Mix in sour cream, vanilla, salt, and (if using) cornstarch.
- Add eggs and yolk one at a time, mixing on low just until incorporated. Don’t whip air into the batterair is the sworn enemy of perfectly smooth cheesecake.
4) Bake until set with a gentle wobble
- Pour filling over the warm crust and smooth the top.
- Bake at 325°F for 35–45 minutes, or until edges are set and the center has a slight wobble (not slosh, not soupthink “jiggly pillow”).
- Turn the oven off, crack the door open, and let the pan rest inside for 10 minutes. This helps avoid sudden temperature shock.
- Cool at room temperature for 30–45 minutes, then refrigerate for at least 4 hours (overnight is ideal).
5) Slice like a pro
- Lift the chilled cheesecake out using the parchment sling.
- Use a sharp knife dipped in warm water, wiping between cuts for clean edges.
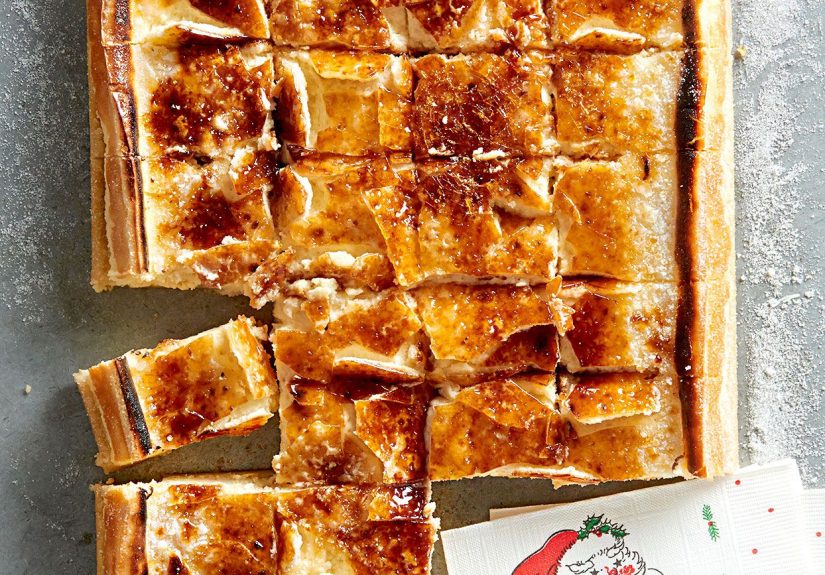
6) Brûlée the tops (right before serving for best crunch)
- Place bars on a heat-safe surface (a metal baking sheet works great).
- Sprinkle a thin, even layer of sugar over each bar. Thin is keythick sugar layers can melt unevenly and turn into sticky candy armor.
- Use a kitchen torch to caramelize the sugar, moving constantly until it turns deep golden with a glossy finish.
- Let sit 1–2 minutes so the sugar hardens. Tap gently with a spoon. Smile when it crackles.
Serving note: Brûlée topping is at peak crispness right after torching. If it sits too long in the fridge, moisture can soften it.
For maximum drama and crunch, torch close to serving time.
Pro Tips (No Cracks, No Stress)
Room-temperature ingredients are not a suggestion
Cold cream cheese mixes lumpy, and lumpy batter leads to overmixing, and overmixing leads to air, and air leads to cracks. This is the dessert version of
“one small decision changes the whole timeline.”
Mix low and slow
You want a silky batter, not a whipped one. Mixing too aggressively incorporates air that expands in the oven, then collapses as it cools.
Translation: your cheesecake goes from smooth to “why does this look like a dried riverbed?”
Don’t overbake
Cheesecake continues to set as it cools. Pull it when the center still jiggles slightly. If the center is fully firm in the oven, it may be overbaked,
which can make it drier and more likely to crack.
Chill longer than you think you need
Four hours is the minimum. Overnight is the “I love myself” option. A well-chilled bar slices cleaner and brûlées more beautifully because the sugar
caramelizes on top without warming the filling too much.
Brûlée in thin layers
If you want an extra-shattery top, do two thin layers: sprinkle, torch, sprinkle again, torch again. It’s a small step that looks wildly impressivelike
adding a cape to a cupcake.
Flavor Variations (Because Vanilla Is Great, but So Is Adventure)
Citrus-bright
Add 1–2 teaspoons lemon zest (or orange zest) to the batter. Serve with fresh berries for a “brunch menu” vibe.
Espresso crème brûlée cheesecake bars
Mix 1–2 teaspoons espresso powder into the sugar, or add 1 tablespoon strong cooled espresso to the batter (reduce sour cream slightly to keep texture balanced).
Berry swirl
Spoon a few tablespoons of thick berry jam on top before baking and swirl gently with a knife. Keep the swirl lightyou’re aiming for elegant ribbons, not a
purple tie-dye situation.
Chocolate moment
Add 1/2 cup mini chocolate chips (tossed with 1 teaspoon flour first so they don’t sink), or use a chocolate cookie crust instead of graham.
Holiday spice
Add 1/2 teaspoon cinnamon and a tiny pinch of nutmeg to the crust. It’s subtle, cozy, and makes your kitchen smell like you’re hosting a movie montage.
Make-Ahead, Storage, and Freezing
Make-ahead strategy
- Best plan: Bake and chill the bars 1 day ahead. Slice, keep covered in the fridge, and brûlée right before serving.
- Why: The sugar topping stays crispest when freshly caramelized.
Refrigerator storage
Store bars covered in the refrigerator. For best texture, enjoy within a few days. Keep them chilled except when serving.
Freezing (yes, you can!)
- Freeze unbrûléed bars for best results (sugar topping doesn’t love freezer moisture).
- Wrap bars individually and store in a freezer-safe container.
- Thaw overnight in the refrigerator, then brûlée just before serving.
FAQ
Do I need a water bath for these cheesecake bars?
Usually, no. Cheesecake bars are smaller and bake more evenly than a tall cheesecake, especially at a moderate temperature.
If you’re an ultra-cautious baker or using a larger, thicker batch, a water bath can helpbut this recipe is designed to work without one.
What’s the best sugar for the brûlée topping?
Regular granulated sugar works great. If you want a thinner, more even melt, superfine sugar is also excellent. The key is an even, thin layer.
No kitchen torchcan I use the broiler?
Yes, with extra attention. Chill bars thoroughly, then place them on a baking sheet. Sprinkle with a thin sugar layer.
Broil on a high rack position, watching constantly (think 30–90 seconds, not “I’ll just answer this text real quick”).
If your broiler runs hot, freeze the bars for 10 minutes before broiling to reduce the risk of warming the cheesecake layer.
Why did my bars crack?
The usual suspects: overmixing (too much air), overbaking (too firm in the oven), or sudden temperature changes.
Don’t panicbrûlée topping is basically the world’s fanciest cover-up, and it tastes even better than denial.
How do I get super clean slices?
Chill overnight if possible, use a sharp knife warmed under hot water, and wipe the blade between cuts.
It’s a tiny ritual that makes bars look bakery-level.
of Real-World “Been-There” Cheesecake Bar Wisdom
If you’ve ever made a dessert that feels fancy, you already know the secret: half the “wow” factor is presentation, and the other half is timing.
Crème brûlée cheesecake bars are the perfect example. They’re surprisingly low drama while baking, then suddenly become the main character once you pull out the torch.
(A kitchen torch is basically a tiny dragon you keep in a drawer. Use responsibly. Try not to name it. Or dono judgment.)
One thing home bakers often notice the first time: the cheesecake part feels almost too easy. Mix, pour, bake, chilldone. Then the brûlée step arrives and
you realize you’ve been saving the theatrics for last. The sugar topping is where people tend to overdo it. It’s tempting to pile on a thick layer like you’re
trying to build a caramel roof. But thick sugar can melt unevenly and end up sticky instead of shatteringly crisp. The best results usually come from a thin,
even sprinkleenough to cover the surface, not enough to look like fresh snow in a holiday movie.
Another real-life detail: moisture is sneaky. Cheesecake is cold, sugar is dry, and condensation is the uninvited party guest. If the bars are very cold and the
room is warm or humid, a little moisture can form on top. Patting the tops gently with a paper towel before adding sugar can help the brûlée layer set up crisp.
It’s not glamorous, but neither is soggy sugar. If you’re serving these at a gathering, the smartest move is to bake and chill ahead, then do the brûlée topping
right before you put the bars out. That’s when you get the loudest crackle, the cleanest “glass,” and the most impressed faces.
Speaking of gatherings: these bars are a social dessert. People love watching the torching step (from a safe distance, like spectators at a very small, delicious
fireworks show). If you want to make it feel extra special without changing the recipe, torch the sugar in two thin layers. The first layer bonds to the cheesecake
top; the second layer builds that dramatic shell. When someone taps it with a fork and it cracks, you’ll hear a very specific kind of silencethe respectful
hush of people realizing you did not come to play.
Finally, the cheesecake-baking “experience” lesson everyone learns eventually: patience tastes better than rushing. If you cut too soon, the center can be soft
and the edges messy. If you chill properly, slice carefully, and brûlée at the last minute, you get a dessert that looks sharp, tastes rich, and feels like a
special occasion even if the occasion is “I survived my inbox today.” And if anything goes slightly offtiny cracks, uneven sugar color, one bar that looks like
it lost a fightremember: crème brûlée cheesecake bars are inherently forgiving. They’re creamy, sweet, and topped with caramelized sugar. That’s not a dessert.
That’s a strategy.


