Table of Contents >> Show >> Hide
- Why Humidifier Hygiene Matters More Than You Think
- Before You Start: A 2-Minute Cleaning Checklist
- How to Clean a Humidifier Step by Step
- How Often Should You Clean a Humidifier?
- Maintenance Tips That Actually Extend Humidifier Life
- Filter and Part Replacement: What to Replace and When
- When to Replace the Entire Humidifier
- Cool Mist vs. Warm Mist: Cleaning and Safety Notes
- Top 10 Humidifier Cleaning Mistakes to Avoid
- A One-Week Practical Routine (Busy Household Version)
- Final Takeaway
- Real-Life Experiences: Lessons Learned After Living With Humidifiers (Extended 500+ Words)
Your humidifier is supposed to help you breathe easier, not audition for the role of “tiny swamp in your bedroom.”
Yet that’s exactly what can happen when mineral buildup, standing water, and skipped cleanings team up.
The good news? Keeping a humidifier clean is not hard, expensive, or dramatic. With a simple routine, you can cut down
on mold, bacteria, white dust, funky smells, and surprise coughing fits that make you side-eye your own air.
In this guide, you’ll learn exactly how to clean a humidifier step by step, how often to do it, how to maintain it
through the season, and when replacing a filter or the whole unit makes more sense than pretending “it still works”
while it sounds like an old coffee maker. We’ll also cover common mistakes, safety tips for homes with kids, and practical
examples so your humidifier stays helpfulnot sketchy.
Why Humidifier Hygiene Matters More Than You Think
Humidifiers add moisture to dry indoor air, which can help with dry skin, irritated sinuses, stuffy noses, and winter
discomfort. But once water sits in a tank too long, microorganisms and mineral deposits can build up. When that happens,
the device may release those particles right back into the room. That means the machine designed to make your home
feel better can actually lower indoor air quality if it isn’t maintained.
Another common issue is white dustfine mineral residue from tap water, especially with ultrasonic or impeller
units. If you’ve ever seen a chalky film on nearby furniture, that’s your clue. Distilled or demineralized water helps reduce it,
and regular descaling keeps the problem from snowballing.
Humidity level matters, too. The sweet spot for most homes is generally around 30% to 50%. Above that, mold and dust mites
can thrive; below that, your skin and airways may feel desert-level dry. A cheap hygrometer is one of the smartest purchases
you can make if you run a humidifier regularly.
Before You Start: A 2-Minute Cleaning Checklist
Gather these supplies first so you’re not wandering around with a dripping tank:
- Distilled white vinegar (for scale and mineral buildup)
- 3% hydrogen peroxide or manufacturer-approved disinfectant
- Mild dish soap
- Soft brush or bottle brush
- Microfiber cloth or clean towel
- Cotton swabs for corners and tight seams
- Clean water for thorough rinsing
- Optional gloves
Safety first: unplug the unit before cleaning, and never mix cleaning chemicals.
If your manual has specific instructions, follow that first. Manufacturer guidance always wins for your model.
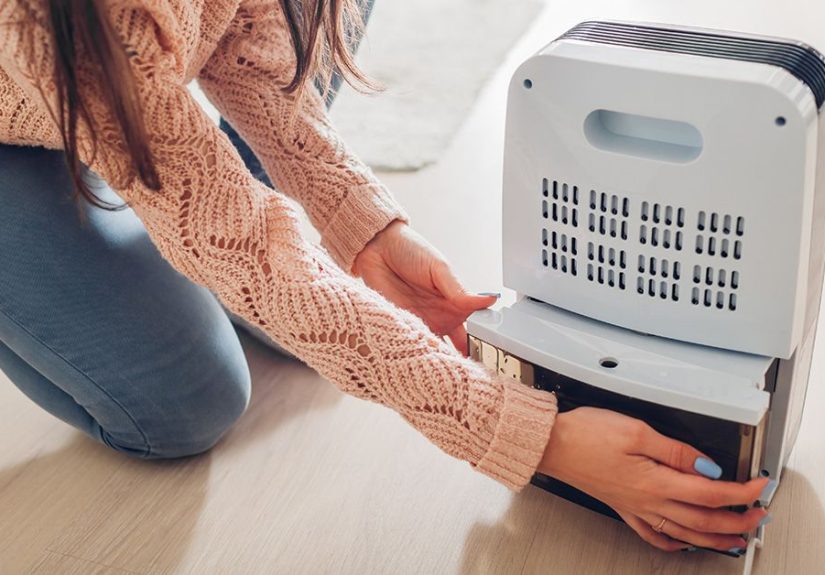
How to Clean a Humidifier Step by Step
Step 1: Unplug and Disassemble
Turn the unit off, unplug it, and separate the tank, base, mist nozzle, filter, and any removable parts.
Empty all leftover water. No “just topping it off.” Fresh water is your friend.
Step 2: Wash Removable Parts with Mild Soap
Rinse parts under warm water and wash gently with mild dish soap. Use a soft brush on slippery film or visible residue.
Avoid abrasive scrubbers that can scratch surfaces and create tiny grooves where future grime hangs out.
Step 3: Descale with Vinegar
Mineral scale is the silent performance killer. Fill the tank (or affected area) with a vinegar-water solution based on your
manufacturer’s guidance. A common approach is letting vinegar solution soak for 15–20 minutes, then gently scrubbing.
Focus on corners, seams, and the area around transducers or nebulizers in ultrasonic units.
Step 4: Disinfect (If Recommended for Your Model)
After descaling and rinsing, disinfect using a model-safe method. Many guides recommend hydrogen peroxide or a diluted bleach
solution depending on the device instructions. If your manual doesn’t specify, choose a gentle approach and rinse thoroughly.
The goal is to kill microbesnot perfume your living room with cleaning chemicals.
Step 5: Rinse Thoroughly
This step is non-negotiable. Rinse all cleaned surfaces with fresh water multiple times until no vinegar or disinfectant smell remains.
Residual chemicals can become airborne during operation.
Step 6: Dry Completely Before Reassembly
Wipe all parts dry and air-dry them fully before putting the unit back together. Damp storage or damp reassembly invites
the very growth you just worked to remove.
Step 7: Refill with Fresh, Low-Mineral Water
Refill with distilled or demineralized water when possible, especially for ultrasonic and impeller humidifiers.
This helps reduce white dust and slows mineral crust formation.
How Often Should You Clean a Humidifier?
Use this practical routine as your baseline:
- Daily: Empty tank, wipe dry, refill with fresh water.
- Every 2–3 days: Clean to remove film/scale and reduce microbial growth.
- Weekly: Do a deeper clean (descale + disinfect where applicable).
- Monthly: Inspect filters/wicks/cartridges and replace as needed.
- End of season: Deep clean, dry completely, and store in a dry place.
If anyone in your home has asthma, allergies, or chronic lung issues, lean toward more frequent cleaning.
Think of it like brushing your teeth: skipping once isn’t the end of the world, but skipping repeatedly gets expensive fast.
Maintenance Tips That Actually Extend Humidifier Life
1) Use the Right Water
Distilled or low-mineral water helps prevent scale and white dust, especially in ultrasonic units.
If your unit supports demineralization cartridges, use and replace them on schedule.
2) Don’t Let Water Sit
Standing water is a breeding ground. If you won’t use the humidifier for a day or two, empty and dry it completely.
3) Keep Humidity in the Healthy Range
Run a hygrometer and aim for roughly 30%–50% relative humidity. If windows are fogging or walls feel damp, dial output down.
More humidity is not always better.
4) Clean the Area Around the Unit
Place the humidifier on a water-resistant surface, away from upholstered furniture and electronics.
Wipe nearby surfaces weekly so moisture and dust don’t accumulate.
5) Follow Filter Schedules
Filters and wicks are consumables. Once they’re clogged, crusted, discolored, or smelly, performance drops and contamination risk rises.
Replace on scheduleeven if your budget says, “maybe one more month.”
Filter and Part Replacement: What to Replace and When
Replacement intervals vary by model, water quality, and usage. Always defer to your unit’s manual, but here are practical cues:
- Wick filters: Replace when stiff, discolored, crusty, or if output drops noticeably.
- Demineralization cartridges: Replace when white dust returns or according to manual timing.
- HEPA/carbon filters in combo units: Replace when the machine alerts you or at the manufacturer interval.
- Seals and gaskets: Replace if cracked, warped, or leaking.
- Water tank cap valves: Replace if flow is inconsistent or if leaking persists after cleaning.
Manufacturer examples vary: some evaporative wick systems suggest every 1–2 months, some modern evaporative units suggest
roughly 3–6 months, and some combo purifier-humidifier filters are around yearly intervals. Translation: your model matters.
When to Replace the Entire Humidifier
Sometimes replacing the unit is the smart call. Consider retiring it if:
- Odor returns quickly even after proper cleaning and disinfection.
- Scale buildup is severe and repeatedly clogs core components.
- The tank or base is cracked, leaking, or visibly damaged.
- Mist output is consistently weak despite new filters and clean parts.
- The unit has recurring electrical issues, noise spikes, or shutoff failures.
- Replacement parts are discontinued or cost almost as much as a new machine.
A new humidifier can be cheaper than repeated repairs, especially if newer models offer easier cleaning designs
(wider tank openings, dishwasher-safe components where allowed, and better humidity controls).
Cool Mist vs. Warm Mist: Cleaning and Safety Notes
Cool-Mist Humidifiers
Common in family homes and pediatric settings because there’s no hot steam burn risk.
But cool-mist units still need consistent cleaning to avoid bacteria/mold buildup.
Warm-Mist Humidifiers / Vaporizers
Often quieter and may release fewer minerals in some setups, but hot water/steam can burn children and pets.
If you use one, keep it out of reach and never place it where it can be knocked over.
Top 10 Humidifier Cleaning Mistakes to Avoid
- “Refill only” instead of emptying old water first.
- Using tap water in high-mineral areas with ultrasonic units.
- Skipping rinses after disinfecting.
- Using harsh tools that scratch plastic parts.
- Ignoring manufacturer instructions for your model.
- Letting filters run far beyond their service life.
- Running humidity above 50% for long periods.
- Placing the unit against walls or on absorbent surfaces.
- Storing the unit damp at season end.
- Assuming “no smell” means “no problem.”
A One-Week Practical Routine (Busy Household Version)
Sunday: Deep clean (descale + disinfect + rinse + dry), inspect filter.
Monday–Wednesday: Morning empty/refill, quick wipe at night.
Thursday: Mini clean (tank + base vinegar soak, rinse, dry).
Friday: Check humidity range with hygrometer and adjust output.
Saturday: Spot-clean surrounding surfaces and check for white dust.
This “light but consistent” routine prevents the dreaded two-hour emergency scrub when guests are coming over
and your humidifier smells like a pond.
Final Takeaway
If you remember only three things, make them these: fresh water daily, clean every few days, and control humidity.
That trio does more for healthy indoor air than any fancy feature list. Use distilled water when possible, replace filters on schedule,
and don’t wait for visible grime before acting. A humidifier should quietly support your comfort, not become a weekly science experiment.
And yes, cleaning it is a chore. But it’s a short chore that protects your lungs, helps your machine last longer, and keeps winter
from turning your home into a static-charged sandstorm. Worth it.
Real-Life Experiences: Lessons Learned After Living With Humidifiers (Extended 500+ Words)
The first winter a lot of people use a humidifier feels magical for about 48 hours. Skin stops feeling like parchment, nasal passages
calm down, and mornings are less “why is my throat made of gravel?” Then week two arrives, and someone notices a faint smell or a dusty
ring on the dresser. That’s usually when real humidifier education begins.
One common experience goes like this: a family buys an ultrasonic unit because it’s quiet and stylish. They fill it from the sink, run it
nightly, and feel great. A few days later, there’s a powdery film on the nightstand and TV stand. Nobody connects the dots until they wipe
it off and it returns by the next morning. Switching to distilled water dramatically reduces the residue, and they start a simple every-three-day
clean. Problem solved, arguments over “mystery dust” ended, and the humidifier keeps doing its job without redecorating the room in chalk.
Another frequent story comes from parents: a toddler has a cold, the air is dry, and everyone is desperate for sleep. They use a cool-mist model,
run it overnight, and notice easier breathing by morning. But after a busy week, they skip cleaning. Soon the tank feels slimy inside. That’s the
wake-up call. They create a fridge note: “Empty AM, rinse PM, deep clean Sunday.” It takes less than 15 minutes each session, and now maintenance
happens automatically. The biggest insight? The best humidifier routine is the one you can repeat even on exhausting days.
People with allergies often report a different pattern. They buy a humidifier hoping to soothe irritated sinuses, but if humidity creeps too high,
symptoms can actually feel worse. The fix is rarely “throw the humidifier away.” It’s usually better humidity control. Adding an inexpensive hygrometer
and keeping indoor levels in range changes everything. Instead of running the unit at max all night, they pulse it for shorter periods and monitor
results. Comfort goes up, stuffiness goes down, and the room no longer feels like a tropical greenhouse.
Then there are the “I hate maintenance” usershonestly, understandable. Many of them eventually move to models with easier-to-clean tanks, wider openings,
and better reminders. Design matters. A tank you can actually reach with a brush gets cleaned more often than one with tiny corners and impossible angles.
Some users find that spending a little more upfront on easy maintenance saves money later because filters last closer to their intended life and the unit
avoids premature failure.
Experienced users also learn small habits that make a big difference:
- They keep a dedicated cleaning caddy near the unit (vinegar, brush, cloth).
- They schedule cleaning with an existing routine, like laundry day.
- They never store the machine wet at season end.
- They replace filters before they look “totally done,” not after.
- They treat weird odors as action signals, not annoyances to ignore.
Over time, humidifier use becomes less about gadgets and more about rhythm. Fresh water, short cleanings, smart humidity settings, and part replacement
before failurethose habits keep the air comfortable and the device reliable. People who stick with that rhythm usually say the same thing by spring:
“I thought humidifiers were high-maintenance, but it was really just about having a system.”
That’s the core experience across households, climates, and device types. When cleaning and maintenance are predictable, humidifiers feel like quiet helpers.
When they’re neglected, they become loud reminders. If your goal is healthier indoor air and fewer winter complaints, consistency beats perfection every time.