Table of Contents >> Show >> Hide
- Why This Budget Backsplash Idea Works So Well
- Where This Project Shinesand Where You Should Be Careful
- What You Need for a Beautiful, Durable Finish
- How to Turn Dollar Store Glass Beads Into a Chic Backsplash
- How to Make It Look Stylish, Not Cheap
- Common Mistakes That Can Ruin the Effect
- Cleaning and Maintenance
- Is a Dollar Store Glass Bead Backsplash Actually Worth It?
- Experiences With This DIY: What People Often Discover Once It’s on the Wall
- Final Thoughts
There are two kinds of kitchen upgrades in this world: the kind that politely empty your savings account, and the kind that make guests say, “Wait, you made that?” without requiring a second mortgage. A backsplash made from dollar store glass beads belongs firmly in the second category. It is shiny, playful, surprisingly elegant, and just quirky enough to feel custom rather than cookie-cutter. In other words, it is the home decor equivalent of showing up to a potluck with a dish that cost twelve bucks and somehow steals the spotlight.
If you have ever wandered through a dollar store and noticed those little glass gems, vase fillers, or flat marbles catching the light, you have already seen the raw material for a budget-friendly backsplash idea. With the right layout, proper adhesive, thoughtful grout color, and a little patience, those humble glass beads can become a reflective mosaic feature that looks far more expensive than it has any right to. This project is part craft, part practical renovation, and part delightful act of DIY rebellion against overpriced finishes.
Done well, a glass bead backsplash can brighten a dark corner, add texture behind a coffee station, give a laundry room some personality, or bring a small kitchen wall to life. The key is treating the project like a real backsplash installation, not like a school art project that accidentally wandered into the kitchen. That means planning for moisture, cleanup, durability, grout lines, and heat exposure. Pretty is great. Pretty that can survive tomato sauce splatter is even better.
Why This Budget Backsplash Idea Works So Well
The beauty of dollar store glass beads is simple: they reflect light like tiny little overachievers. Because glass catches and bounces brightness around a room, even a small backsplash can make a compact kitchen feel more open and polished. That gleam is why glass has stayed popular in backsplash design for years. It looks clean, modern, and a little glamorous, even when the budget is refreshingly unglamorous.
Glass beads also create texture without visual heaviness. A bulky stone backsplash can feel dramatic, but it can also make a small kitchen feel busy. Flat-backed glass gems offer a softer effect. They add dimension, shimmer, and color while still feeling airy. That is especially helpful in apartments, older homes, or narrow galley kitchens where every inch of visual breathing room counts.
Another reason this idea works is flexibility. You can go monochrome and sleek, choose sea-glass tones for a beachy look, create an ombre pattern, or mix clear beads with a few metallic or iridescent accents. You are not locked into one expensive tile sheet or one designer collection with a name like “Moonlit Truffle Mist.” You are free to experiment without the emotional burden of ruining a $38 tile sample.
What “Glass Beads” Really Means in DIY Design
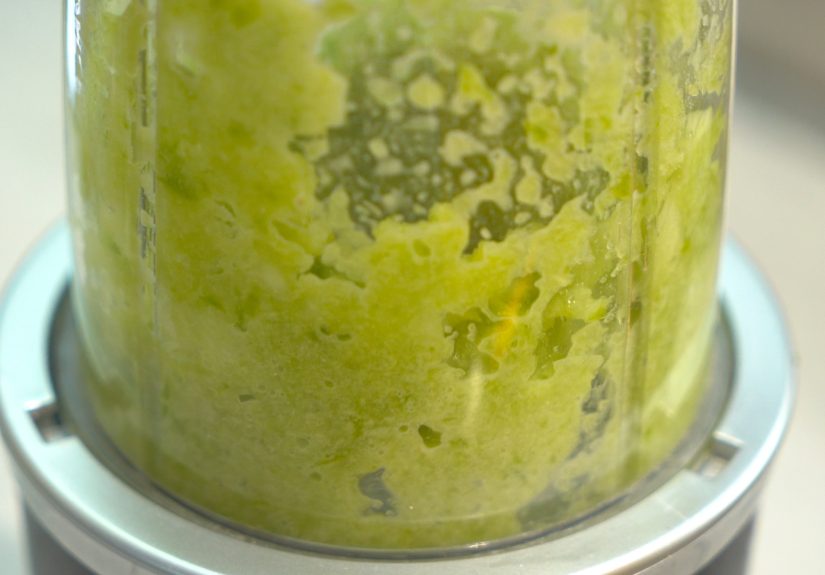
In this context, “glass beads” usually refers to decorative flat marbles, clear gems, vase fillers, or smooth glass pebbles. Some are perfectly round, some are slightly irregular, and some come with frosted or iridescent finishes. The flatter and more uniform they are, the easier they are to install and grout. Extremely rounded pieces can still work, but they may create wider gaps, trickier grout lines, and more opportunities for adhesive drama.
For the best result, think of these beads as a mosaic material. They are not pretending to be subway tile. They are creating a custom, jewel-like surface with sparkle and movement. That distinction matters, because once you stop expecting crisp tile symmetry and start leaning into mosaic charm, the whole project starts looking intentional.
Where This Project Shinesand Where You Should Be Careful
A dollar store glass bead backsplash works best in low- to moderate-splash areas where you want a decorative statement with real function. Great spots include a coffee bar, bar cart nook, laundry room wall, bathroom vanity backsplash, mudroom sink area, or a small kitchen section away from extreme heat. It can also work behind a prep counter or along a side wall when installed with backsplash-rated materials.
The caution zone is behind a high-heat cooking surface. Glass itself can handle moisture well, but the overall installation is only as strong as the adhesive, grout, and substrate behind it. If you want to install it near a stove, use products rated for that environment, follow the manufacturer’s heat and clearance instructions, and test your full method on a sample board first. This is not the moment for mystery glue and blind optimism.
Another thing to consider is cleanability. A glass surface wipes down nicely, but many tiny grout lines mean more places for grease and grime to settle. That does not make the project a bad idea. It just means smart placement matters. A glass bead backsplash behind a beverage station is adorable. One directly behind a frying zone where bacon regularly stages a rebellion may require more upkeep.
Good Design Starts With Honest Expectations
This project is not about fooling people into thinking you installed imported artisan tile from a boutique showroom in Brooklyn. It is about making an affordable material look elevated through careful execution. If you embrace that mission, the result can be stunning. If you rush it and hope for magic, the result can look like your wall lost an argument with a craft aisle.
What You Need for a Beautiful, Durable Finish
To make dollar store glass beads become a beautiful backsplash, the materials matter almost as much as the design. The bead itself may be cheap, but the installation system should not be flimsy.
- Flat-backed glass beads or gems in a coordinated color palette
- Backsplash-rated adhesive or mortar compatible with glass
- Clean, smooth wall surface or backer board
- Tile spacers if needed for a more even pattern
- Unsanded or manufacturer-appropriate grout for narrow joints
- Matching caulk for inside corners and the counter-to-backsplash joint
- Grout sealer if recommended for the grout you use
- Rubber float, sponge, microfiber cloth, bucket, and painter’s tape
- Optional edge trim for a more finished border
The biggest mistake beginners make is assuming the beads are the whole story. They are not. The real magic comes from the supporting cast: a white adhesive that does not dull the glass, a grout color that flatters the layout, a clean edge treatment, and proper sealing where needed. Even a bargain material can look high-end when the finish details are tight.
How to Turn Dollar Store Glass Beads Into a Chic Backsplash
1. Plan the Color Story Before You Touch the Wall
Start by pouring out your glass beads and sorting them by tone, finish, and size. This sounds fussy, but it makes a huge difference. A good palette usually sticks to two or three core colors, plus a small accent if you want sparkle or depth. Too many random hues can make the wall look chaotic. The goal is curated shimmer, not carnival prize counter.
Lay out a dry sample on a piece of cardboard or foam board. Step back. Squint dramatically like you are judging a design show. Move a few pieces around. This preview helps you catch clashing colors, spacing issues, and accidental heavy spots before adhesive enters the chat.
2. Prep the Surface Like a Pro
Backsplashes fail for boring reasons. Dust. Grease. Uneven drywall. Old caulk. Tiny bumps that seem harmless until your rows start drifting like a shopping cart with one bad wheel. Clean the wall thoroughly, remove grease, patch damage, and make sure the surface is dry and smooth. Tape off countertops, cabinets, and outlets for a cleaner install.
If the area has seen years of kitchen life, do not skip cleaning. Grease is the enemy of adhesion, and it has a sneaky way of making itself at home exactly where you want your backsplash to stick.
3. Choose a Layout That Looks Intentional
You can place beads individually for a custom mosaic effect or pre-arrange them on mesh sheets to speed installation. Individual placement gives you the most artistic control. Mesh sheets give you more consistency and less chance of spending your entire weekend nudging glass pebbles with the intensity of a museum curator.
Popular layout ideas include:
- All one color: clean, modern, and surprisingly sophisticated
- Ombre fade: darker at the bottom, lighter at the top
- Mixed clear and colored beads: bright and light-reflective
- Bead border or inset panel: a focal-point look without covering the whole wall
- Mixed with simple tile: ideal if you want more structure and fewer grout lines
4. Install With Patience, Not Panic
Spread your adhesive in small sections so it stays workable. Press the beads in gently and consistently. Keep your pattern aligned, check spacing often, and wipe away excess adhesive before it hardens. Glass shows everything, including sloppy blobs trapped where you really do not want them.
Work around outlets carefully, and do not be afraid to pause and rethink a section. Good DIY is not fast DIY. Good DIY is “I am slightly annoyed now, but I will be thrilled later” DIY.
5. Grout for Cohesion
Once the adhesive cures, grout brings the whole backsplash together. This is the moment when the wall stops looking like scattered beads and starts looking like a real surface. Use a grout color that supports your design. White or light gray keeps things bright. Charcoal adds contrast. Beige or taupe can warm up cooler glass tones.
Apply grout with a rubber float, working it into the joints. Wipe with a barely damp sponge, rinse often, and avoid overwatering the surface. After the haze dries, buff it off with a microfiber cloth. That final buff is deeply satisfying. Suddenly the glass wakes up and starts doing its shiny little job.
6. Finish the Edges and Seal the Details
Use caulk, not grout, where the backsplash meets the countertop and in inside corners. Those areas move slightly, and flexible caulk handles that better. If your grout requires sealing, follow the product instructions once it has fully cured. A sealed, finished backsplash is easier to keep looking fresh and less likely to absorb stains over time.
How to Make It Look Stylish, Not Cheap
The difference between “budget genius” and “what happened here?” often comes down to editing. The prettiest glass bead backsplashes are restrained. They use repetition, balanced color, and thoughtful contrast. They do not try to include every shiny thing ever manufactured.
Here are the design moves that elevate the look:
- Stick to a tight palette of two to four shades
- Repeat colors evenly so no area feels accidental
- Use bead size consistently for a cleaner field
- Add trim or a defined border for a polished edge
- Pair the backsplash with simple countertops and hardware
- Let the glass be the star instead of crowding it with busy decor
If your kitchen already has loud countertops, dramatic wallpaper, and cabinet hardware that looks like jewelry, consider using clear or frosted beads instead of bold colors. If the room is mostly neutral, this is your chance to introduce a little shimmer and personality without committing to a full-color tile wall.
Common Mistakes That Can Ruin the Effect
First: using the wrong adhesive. A backsplash is not a hot-glue-gun situation. Second: skipping the sample board. What looks magical in a plastic bag can look murky on a wall. Third: choosing too many bead colors, which often creates visual static instead of elegance.
Another big one is ignoring edges. Even a lovely field of beads can look unfinished if the border is jagged or abruptly stops. Trim, framing, or a clear stopping point gives the eye a place to rest. Also, do not rush grout cleanup. Leftover haze can dull the sparkle and make the whole project look dusty forever, which is rude after all that work.
Cleaning and Maintenance
One reason glass remains popular in backsplashes is that it is generally easy to wipe clean. For everyday maintenance, use a soft cloth or microfiber towel with a mild, nonabrasive cleaner. A little dish soap and warm water usually handles routine splatters just fine. For stubborn grease, gentle degreasing cleaners can help, but harsh abrasives are a bad idea if you want the glass to stay glossy.
Pay attention to the grout lines, because they do most of the dirt-collecting. Clean them regularly instead of waiting until they look like they have been through a small natural disaster. If the backsplash is in a splash-prone area, drying it occasionally after heavy use can help it stay brighter and cleaner longer.
In other words, the beads themselves are low-drama. The grout is the diva. Treat it accordingly.
Is a Dollar Store Glass Bead Backsplash Actually Worth It?
Yes, if your goal is to create a custom-looking accent with serious personality on a very friendly budget. It is especially worth it for small areas where even an inexpensive tile project could feel overpriced. This idea lets you invest where it matters most: prep, adhesive, grout, and finishing products. The decorative material stays affordable, while the installation quality carries the visual weight.
It is also worth it if you enjoy creative DIY and want something more distinctive than a standard peel-and-stick panel. The final result has more depth, more light play, and more “Where did you get that?” energy. It feels crafted rather than mass-produced, which is often exactly what gives a home character.
Of course, this project is not for someone who wants a quick, zero-thought update. It takes planning, patience, and a willingness to fuss over small details. But if that sounds satisfying rather than horrifying, this backsplash idea has a lot going for it.
Experiences With This DIY: What People Often Discover Once It’s on the Wall
One of the most common experiences people have with a dollar store glass bead backsplash is surprise. Not polite surprise. Genuine, slightly smug surprise. The beads rarely look impressive sitting in a package under fluorescent store lighting. But once they are arranged on a wall, grouted, cleaned, and hit by natural or under-cabinet light, they change personality completely. What looked like a cheap craft supply suddenly behaves like a custom mosaic. That transformation is a big part of the project’s appeal.
Another frequent experience is learning that color matters more than expected. Many DIYers go in thinking, “Glass is glass, sparkle is sparkle,” and then realize some beads read too blue, too green, too yellow, or oddly muddy once installed in a kitchen. Warm bulbs can shift the tone. Gray cabinets can make clear beads look icy. Wood counters can make cool colors pop harder than expected. That is why sample boards tend to save the day. They give you a chance to see the beads in your actual room, with your actual lighting, instead of trusting a tiny plastic bag to tell the whole truth.
People also discover that grout is the make-or-break moment. Before grouting, the project can look unfinished, overly busy, or even a little questionable. Then the grout goes in, the pattern settles visually, and the whole design starts making sense. It is the design equivalent of brushing your hair after a windy walk. Suddenly everything looks intentional again. Choosing the right grout color becomes one of those small decisions that quietly determines whether the backsplash feels sophisticated or chaotic.
There is usually a practical lesson, too: this project rewards patience and punishes rushing. The folks who love their result are usually the ones who laid out the beads first, kept the palette controlled, wiped haze carefully, and treated edges like they matter. The ones who end up frustrated often tried to improvise everything at once. A backsplash, even a playful one, still behaves like finish work. It notices when you cut corners.
Another interesting experience is how often this kind of project changes the feel of the whole room. Because glass reflects light, a dark nook can suddenly feel brighter. A plain coffee corner can look styled. A tiny kitchen can seem a little more layered and alive. You may start with “I just want to cover this boring strip of wall” and end with “Why does this entire room look more expensive now?” That is the sneaky power of reflective surfaces.
Then there is the conversation factor. A dollar store glass bead backsplash tends to get noticed because it does not look like the usual big-box tile choice. Friends ask what it is. Family members do the classic DIY double take. Visitors touch it. Somebody always says they never would have thought of using glass gems that way. And honestly, that is part of the fun. The project has a story built into it, which is more than you can say for a lot of standard finishes.
Finally, many people come away from this project with a new appreciation for budget design in general. It proves that low cost does not automatically mean low style. With the right planning, basic materials can become something memorable. That is the bigger lesson hiding behind all the sparkle: a beautiful home is not always about buying the fanciest thing. Sometimes it is about spotting potential in the humble thing, then giving it enough care to shine.
Final Thoughts
Dollar store glass beads become a beautiful backsplash when creativity meets solid installation. That is really the whole secret. The beads bring the charm, but the prep, layout, grout, caulk, and restraint bring the polish. If you treat the project like a real design decision instead of a random craft experiment, the result can be bright, clever, and genuinely lovely.
For homeowners, renters working on removable panels, or DIY lovers chasing a budget kitchen refresh, this idea delivers something rare: personality without a punishing price tag. It turns an overlooked material into a conversation piece and a functional surface at the same time. Not bad for something that may have started life next to plastic flowers and seasonal party supplies.