Table of Contents >> Show >> Hide
- Before You Build: The Three Decisions That Make (or Break) Movie Night
- Screen Materials: What Actually Works Outside
- Build #1: The “Hang It Tonight” Screen (30–60 minutes)
- Build #2: The Classic PVC Freestanding Screen (portable + sturdy)
- Build #3: EMT Conduit or Wood Frame (the “I’m serious about this” screen)
- Projector + Audio Setup: Make the Picture Bright and the Dialogue Understandable
- Picture Quality Upgrades That Cost Almost Nothing
- Troubleshooting: Quick Fixes for Common Backyard Screen Problems
- Make It Feel Like a Real Outdoor Movie Theatre
- Conclusion: Your DIY Backyard Movie Theatre Screen Is the Main Character
- Extra: Real-World Backyard Movie Night Experiences (Lessons You’ll Be Glad You Learned)
Some people buy fancy patio furniture. Other people build an outdoor cinema and instantly become the most popular house on the block (until the neighbors realize you’re showing Jurassic Park and not a “quiet documentary about moss”).
If you want a DIY backyard movie theatre screen that looks crisp, holds up to breezes, and doesn’t turn into a wrinkly bedsheet disaster mid-climax, you’re in the right place. Below are practical, field-tested ways to build a screenplus the setup tips that separate “wow, this is amazing” from “why is the actor’s face shaped like a trapezoid?”
Before You Build: The Three Decisions That Make (or Break) Movie Night
1) Pick your screen size based on your yard (not your ego)
Bigger isn’t always betterespecially outdoors where wind, projector brightness, and seating distance matter. A great “sweet spot” for most backyards is a 100–135 inch diagonal screen (16:9), which feels cinematic without demanding stadium-level brightness or a 40-foot throw distance.
Here are common 16:9 viewable area dimensions (rounded):
- 100″ diagonal: about 87″ wide × 49″ tall
- 120″ diagonal: about 105″ wide × 59″ tall
- 135″ diagonal: about 118″ wide × 66″ tall
- 150″ diagonal: about 131″ wide × 74″ tall
Pro reality check: the bigger the screen, the more it behaves like a sail. If your yard gets gusty, a slightly smaller screen will look better because it stays tighter and steadier.
2) Choose the location like a director, not like a raccoon
Set your screen where you’ll have:
- Low ambient light (away from streetlights, porch lights, and that neighbor who believes floodlights are a personality).
- A flat-ish viewing zone for seating so heads aren’t blocking the bottom of the picture.
- Room behind the seating for walkingpeople will absolutely need more snacks.
- A safe power plan (no cords across high-traffic paths unless secured).
3) Match projector placement to screen width (the throw ratio thingmade painless)
Projectors have a throw ratio that determines how far back they must sit to create a given image width. The simple formula:
Throw Distance = Throw Ratio × Image Width
Example: If your projector throw ratio is 1.2 and your screen image width is 105 inches (a 120″ diagonal 16:9 screen), then:
1.2 × 105″ = 126″ (about 10.5 feet)
Don’t guess. Look up your projector’s throw range in the manual or the manufacturer spec sheet. Outdoors, a clean placement is everythingespecially if people are walking around.
Screen Materials: What Actually Works Outside
A screen is just a surface that reflects light evenly. The best DIY surfaces do three things:
- Stay smooth (wrinkles kill sharpness)
- Stay flat (sagging bends the picture)
- Reflect light consistently (no weird hot spots or blotches)
Option A: Bedsheet (fastest, cheapest, most “summer camp”)
Best for: first-time setup, small screens, testing your projector.
Pros: dirt cheap, easy to store, quick to hang.
Cons: wrinkles easily, can be slightly see-through, may flutter.
Upgrade trick: use a thick white sheet and add a dark backing (another sheet, blackout curtain, or even a dark tarp behind it) to improve contrast and reduce “ghosting” from light passing through.
Option B: Canvas drop cloth (the “paint it once, use it forever” move)
Best for: a cleaner look without buying specialty screen fabric.
Canvas painter’s drop cloth can be painted matte white for a more uniform surface. It’s heavier than a bedsheet, so it hangs flatter and flaps less. If you go this route, thin your paint slightly and use light coats to avoid a stiff, crack-prone finish.
Option C: Blackout cloth (popular DIY screen fabric)
Best for: sharper picture than a sheet, still budget-friendly.
Blackout cloth is designed to block light, which helps with contrast. The key is tension: stretch it tight on a frame or use grommets and bungees so it stays flat. If it’s loose, it’ll ripple like the surface of a lake during a dramatic monologue.
Option D: Spandex (the wrinkle-resistant hero)
Best for: a smooth, premium-looking DIY screen.
Stretch spandex can look fantastic because it pulls tight and resists creasing. Many DIY builders use a white layer over a black layer for better contrast and less light bleed-through. It’s especially nice if you want a portable screen that still looks “legit.”
Option E: Vinyl/PVC screen material (closest to “real screen”)
Best for: the most consistent image and easiest cleanup.
Purpose-made screen material often has consistent reflectivity and a nice uniform finish. It’s also easy to wipe clean after an ambitious popcorn moment. If you’re building a screen you’ll use often, this can be worth it.
Build #1: The “Hang It Tonight” Screen (30–60 minutes)
What you’ll need
- White sheet, canvas cloth, or blackout cloth
- Clips (spring clamps), binder clips, or a grommet kit
- Rope/paracord or bungees
- Two sturdy anchor points (fence posts, trees, pergola, wall hooks)
Steps
- Choose a flat surface behind the screen area if possible (house wall, fence, or open space).
- Create a top line with rope/paracord, pulled tight.
- Clip the fabric along the top edge, spacing clips evenly.
- Tension the bottom using bungees or weights (small sandbags, water jugs, or a thin pole sewn/rolled into the bottom hem).
- Kill the wrinkles: iron the sheet first or pull it tight enough that folds disappear.
Make it better in 5 minutes: add a black border (black duct tape, black fabric, or even a dark blanket behind the edges). Borders make the image look sharper by giving your eyes a clear frame.
Build #2: The Classic PVC Freestanding Screen (portable + sturdy)
This is the go-to DIY for a backyard cinema: affordable, easy to break down for storage, and scalable. You can build it with push-fit PVC (no glue) so it disassembles, or glue the main rectangle and keep the legs removable.
Recommended size example: ~120″ diagonal (16:9)
For a 120″ diagonal image (about 105″ × 59″ viewable), you’ll want a frame opening slightly larger so your fabric can mount cleanly. Many builders aim for an opening around 106–110″ wide and 60–64″ tall, depending on how you plan to attach the material.
What you’ll need (typical)
- PVC pipe (often 1″ for smaller screens, 1¼”–1½” for bigger screens or windy yards)
- PVC fittings: elbows + tees (and optional couplers if you want the frame to break into shorter pieces)
- Screen fabric (sheet/blackout cloth/spandex/vinyl)
- Grommet kit or clips + bungee cords
- Stakes, sandbags, or guy lines (wind insurance)
Simple build concept (no confusing cut list)
- Build a rectangle for your screen frame (top, bottom, left, right).
- Add legs using tee fittings at the bottom corners so the frame can stand.
- Add rear braces (diagonal or back “feet”) so it won’t tip backward.
- Attach the screen using grommets + bungees (best for tension) or clamps (fastest).
- Anchor it with stakes or sandbags. Remember: wind sees your screen as a challenge.
How to get the screen tight (the part everyone wishes they did first)
- Use grommets every 8–12 inches and run bungee cords so tension is even.
- If the top edge bows, use non-stretch ties (like zip ties) at the top and bungees on the sides.
- Start tensioning from the middle, then work outward, like tightening lug nuts on a wheel.
Wind tip: If gusts are common, consider a slightly smaller screen or a thicker pipe diameter. A wobbly frame will show up as a wobbly picture, and no one wants “motion blur” created by weather.
Build #3: EMT Conduit or Wood Frame (the “I’m serious about this” screen)
If you want a stiffer frame than PVCor you’re building a semi-permanent setupEMT conduit (metal electrical conduit) or a wood frame can level up stability. EMT is especially popular because it’s strong for the weight and can be modular with clamp-style connectors.
EMT conduit frame
Best for: windy yards, frequent movie nights, bigger screens.
- Use conduit for the outer frame.
- Add a center brace to reduce flex on wide screens.
- Attach fabric with grommets + bungees for consistent tension.
Wood frame (fixed-frame style)
Best for: the flattest screen surface and a “real theater” look.
- Build a rectangular frame with a center brace.
- Wrap the frame edge with black fabric/tape for a border.
- Stretch and staple spandex or blackout cloth tightly (this is where spandex shines).
Design note: Wood frames look fantastic but don’t love being stored in damp garages. Seal/paint the wood if it’s going to live outdoors.
Projector + Audio Setup: Make the Picture Bright and the Dialogue Understandable
Brightness (lumens): plan for dusk, not midnight
Outdoor movie nights usually start at dusk, not in a perfectly dark theater. That means you need more brightness than you thinkespecially for larger screens. A few practical guidelines:
- Full dark (after sunset): many setups can work starting around 500+ ANSI lumens, depending on screen size and how dark your yard actually gets.
- Early evening with some ambient light: aim more like 1,500–3,000 ANSI lumens for a punchier image on a 100–135″ screen.
Translation: if you can delay the start time by 20–30 minutes, your “brightness problem” mostly disappears. Nature’s dimmer switch is undefeated.
Audio: Bluetooth is convenient… and sometimes annoying
Built-in projector speakers are fine for one person. For a crowd, you want powered speakers. If you use Bluetooth, you may notice audio delay (lip-sync issues). Workarounds:
- Use a wired connection (AUX cable) when possible.
- If streaming, connect your streaming device to a speaker system that supports low-latency audio.
- Do a 60-second test clip before guests arrivefuture you will be grateful.
Power and safety (because tripping in the dark isn’t a vibe)
- Use outdoor-rated extension cords and keep connections dry.
- Avoid daisy-chaining multiple cords; use one properly rated cord of the right length.
- Route cords along edges, secure them, and cover high-traffic crossings.
- If possible, plug into a GFCI-protected outlet outdoors.
Picture Quality Upgrades That Cost Almost Nothing
Add a black border
A border makes the image look more contrasty and hides minor overscan or imperfect alignment. Black cloth, felt tape, or matte black duct tape can all work.
White vs. gray screen (when your yard isn’t fully dark)
If you have unavoidable ambient light (streetlight glow, nearby windows), a gray screen can help preserve perceived black levels and contrast. White screens are great in darker conditions and tend to maximize brightness.
Keep the screen flat
The sharpest image comes from a surface that’s tight and planar. If you’re seeing waves, ripples, or “smiles” on the edges, add more attachment points, increase tension, or add a center brace to the frame.
Troubleshooting: Quick Fixes for Common Backyard Screen Problems
- Wrinkles showing up in the picture: switch to spandex or add more tension points with grommets + bungees.
- Image looks washed out: wait for darker conditions, reduce nearby lights, or try a darker backing / gray material.
- Keystone looks weird: move the projector so it’s centered and level instead of relying on digital correction.
- Screen flaps in wind: anchor legs, add guy lines, and avoid oversized screens in gusty areas.
- Audio doesn’t match lips: avoid Bluetooth or use a device/speaker combo with low-latency support.
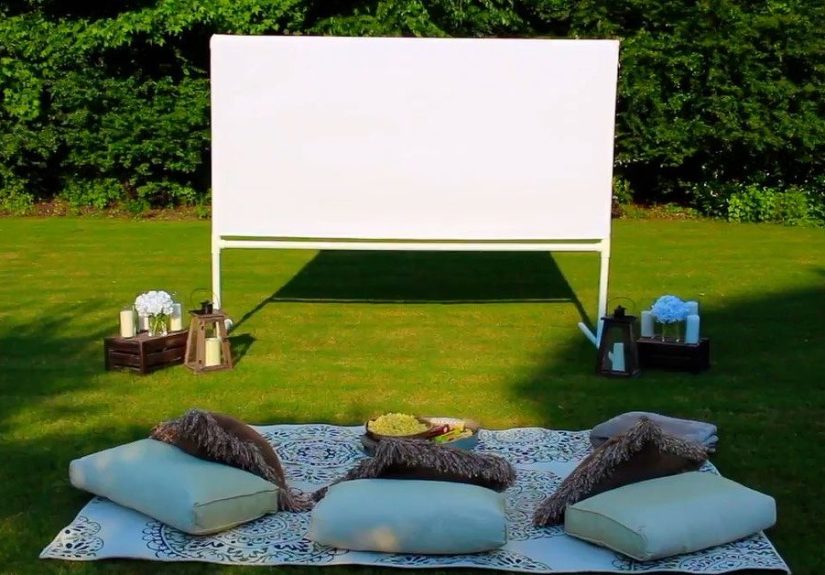
Make It Feel Like a Real Outdoor Movie Theatre
Once your outdoor projector screen is dialed in, the rest is pure fun. A few crowd-pleasers:
- Seating zones: blankets up front, chairs behind (so nobody blocks the picture).
- Soft lighting: string lights behind seating (not near the screen).
- Snack station: popcorn + candy + drinks on a small table so people aren’t constantly walking in front.
- Bug strategy: fans near seating, citronella off to the side, and avoid placing lights right by the audience.
Conclusion: Your DIY Backyard Movie Theatre Screen Is the Main Character
A backyard movie night doesn’t need a huge budgetjust smart choices: a screen surface that stays smooth, a frame that stays steady, and a setup that respects light, wind, and human snack needs. Start simple with a hanging screen, then upgrade to PVC or EMT once you’ve found your favorite spot in the yard.
Build it once, tweak it twice, and then enjoy the moment when someone says, “Wait… you made this?” as if you just handcrafted a spaceship instead of a really excellent rectangle.
Extra: Real-World Backyard Movie Night Experiences (Lessons You’ll Be Glad You Learned)
The first time you set up a backyard movie screen, it’s easy to focus on the “big” stuffframe size, fabric choice, projector placementand forget the tiny details that decide whether the night feels magical or mildly chaotic. The good news is that the most common problems are predictable, and once you plan for them, movie night becomes almost unfairly easy to repeat.
Wind is the surprise villain. Even a gentle breeze can turn a large screen into a living, breathing creature. If your screen is hanging, it may sway and ripple. If it’s freestanding, it may wobble. The fix is rarely dramatic: anchor the legs, add guy lines, and tighten your screen evenly. People often add tension on the corners and wonder why the middle still sags. Think “even pressure,” like tightening a drum or lacing a shoe. More attachment points beat “yank harder.”
Timing matters more than specs. Many outdoor projector complaints disappear when you simply start a little later. A projector that looks “meh” at 7:15 p.m. can look shockingly good at 7:45 p.m. The easiest upgrade you’ll ever do is letting the sun go away. If you have kids, turn the waiting time into a pre-show: snacks, a short cartoon, or a “choose the movie” vote. By the time the main feature starts, it’s darker and everyone is settled.
Seating layout is half the experience. The fastest way to ruin the vibe is having a line of tall chairs in front of a blanket zone. Put low seating (blankets, floor pillows) in front and chairs behind. If you want to get fancy, create “rows” with a walkway on one side so people can get up without crossing in front of the screen. This sounds small, but it’s the difference between a relaxed crowd and a parade of silhouettes doing the awkward “sorry, sorry” shuffle.
Audio can be trickier than video. A bright picture is great, but if dialogue is muddy, people disconnect fast. If Bluetooth lag shows up, you’ll notice it immediately in close-ups. The practical move is to test audio with a two-minute clip before guests arrive. If there’s delay, swap to a wired connection or adjust settings on your streaming device/projector if available. When the audio is right, the whole setup feels more expensiveeven if your screen is literally a drop cloth with ambition.
Expect “snack physics.” Outdoors, snacks travel. Someone will set a drink down in grass. Someone will spill popcorn. Someone will step on a cord if it isn’t secured. Plan for it: put snacks on a stable table, keep cords routed along edges, and keep a small trash bag nearby. These tiny “host moves” prevent the kind of mess that makes you dread doing it again.
Your second movie night will be wildly better than your first. The first run is a dress rehearsal. You’ll learn where the projector should sit, how tight the screen needs to be, which chair blocks the view, and how to keep light from hitting the screen. Once those are solved, your DIY backyard movie theatre screen becomes a repeatable traditionnot a one-time project you brag about and never touch again.