Table of Contents >> Show >> Hide
- Why Eggshell Mosaics Work (and Why They Look Fancier Than They Should)
- Materials and Tools
- Step-by-Step: How to Make an Eggshell Mosaic Coaster
- Step 1: Collect and prep eggshells (clean, sanitize, dry)
- Step 2: Color your shells (optional, but it’s where the magic happens)
- Step 3: Prep the base (so your coaster doesn’t “craft-fail” later)
- Step 4: Break shells into usable pieces (controlled chaos)
- Step 5: Glue the eggshells down (the satisfying part)
- Step 6 (Option A): Skip grout for a clean “eggshell crackle” look
- Step 6 (Option B): Grout for a true mosaic finish (and serious durability)
- Step 7: Seal it like you mean it (water + heat resistance)
- Design Ideas: Make It Look Intentional (Even If You Wing It)
- Troubleshooting and Pro Tips
- Safety and Cleanup (Because Crafting Shouldn’t Require a Medical Drama)
- Care Instructions: Keep Your Coaster Looking Good
- Conclusion: Tiny Shells, Big Payoff
- Real-Life Experiences: What I Learned the Messy Way (So You Don’t Have To)
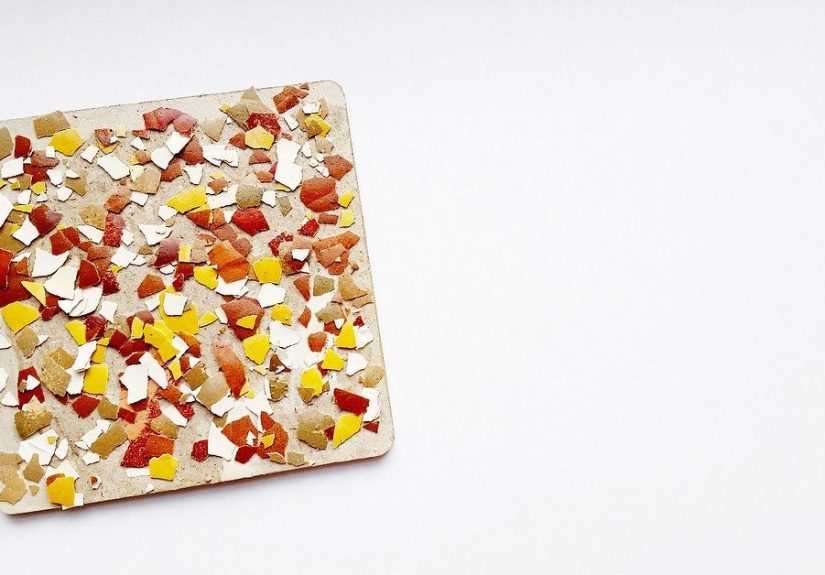
You know that moment when you crack an egg and the shell splits into a million jagged pieceslike it’s auditioning for a tiny kitchen drama?
Good. Don’t toss it. Those “trash” shards are basically free mosaic tiles with a built-in crackle texture that looks weirdly high-end once you seal it.
Today we’re turning cracked eggshells into a mosaic coaster that’s equal parts eco-friendly, giftable, and “Wait… you made THAT from breakfast?”
This guide goes deep (but stays fun): how to prep shells safely, how to get that clean mosaic look without losing your mind,
when to grout vs. skip it, and how to seal everything so your coaster doesn’t melt into a sad puddle under a hot mug.
Let’s craft like responsible goblins.
Why Eggshell Mosaics Work (and Why They Look Fancier Than They Should)
Eggshells create a natural “craquelure” effectthose spiderweb cracks that make surfaces look textured and intentional.
When you press shells into glue, they fracture into smaller plates with tiny lines between them, which reads as “mosaic” even if you didn’t measure a single thing.
Painted shells can mimic terrazzo, faux marble veining, or a speckled stone finishperfect for coasters that look boutique without the boutique price tag.
The safety note nobody wants, but everybody needs
Eggshells can carry bacteria (yes, including salmonella risk), so the “art” part starts with the “kitchen hygiene” part.
The good news: prep is simplewash, sanitize (boil or bake), then dry thoroughly before crafting.
Bonus: properly dried shells also glue better and smell like… nothing. Which is the goal.
Materials and Tools
The beauty of this project is flexibility. You can make a coaster from a ceramic tile, a wood blank, or a cork base.
Choose your base based on the vibe you want: “sleek and modern,” “rustic and cozy,” or “I had this in a drawer.”
Core supplies
- Cracked eggshells (white, brown, or mixedvariety = visual interest)
- Base: ceramic tile (classic), unfinished wood coaster blank, or thick cork coaster
- Adhesive: decoupage glue/sealer (like Mod Podge), tacky glue, or white PVA glue
- Paint or dye (optional): acrylic craft paint, food coloring dye bath, or markers for small accents
- Topcoat/sealer: brush-on clear sealer, heat-resistant clear spray, or resin for the most durable finish
- Optional grout: sanded or unsanded grout (more on that soon)
- Tools: small brush, tweezers (optional), scissors, disposable gloves, sponge/paper towels
Nice-to-have add-ons (that make the result feel professional)
- Cork or felt backing to protect furniture
- Painters tape to keep edges clean if grouting
- Fine sandpaper for wood prep
- Disposable tray for grout mixing and spreading
Step-by-Step: How to Make an Eggshell Mosaic Coaster
Step 1: Collect and prep eggshells (clean, sanitize, dry)
- Rinse shells to remove egg residue. A quick soak in warm soapy water helps loosen the inner membrane.
- Remove the membrane if you can. It’s not mandatory, but it helps shells lay flatter and reduces “mysterious peeling later.”
Tip: after soaking, the membrane often pulls off in satisfying sheets. - Sanitize by either:
- Boiling shells for ~10–15 minutes, then draining, or
- Baking shells low-and-slow (around 200–225°F) for roughly 20 minutes to dry and sanitize.
- Dry completely. Spread shells on a towel or baking sheet until they’re bone-dry. Moisture is the enemy of strong glue bonds.
Step 2: Color your shells (optional, but it’s where the magic happens)
You can keep shells natural for a clean, minimalist lookor color them for a terrazzo “confetti stone” vibe.
Three easy approaches:
- Food coloring dye bath: like dyeing eggsgreat for soft, translucent color.
- Acrylic paint: more opaque, bold, and consistent. Paint the outer side and let dry.
- Mixed tones: keep some shells natural, paint others in two accent colors, and you’ll get dimension without trying too hard.
Step 3: Prep the base (so your coaster doesn’t “craft-fail” later)
- Tile coaster: wipe clean and dry. If you want a colored background, paint it first and let cure.
- Wood coaster: lightly sand, wipe dust, then paint or prime. Let dry fully.
- Cork coaster: choose thick cork and plan on sealing well. Cork is absorbent, which is great for moisturebut not great for raw glue without a topcoat.
Step 4: Break shells into usable pieces (controlled chaos)
Put shells in a zip-top bag and gently press with your fingers to break them. You want pieces roughly the size of a pinky nail for a coaster:
small enough to curve and fit, big enough to look intentional.
Pro tip: keep a few larger pieces for “anchor” shapes and fill gaps with smaller bits.
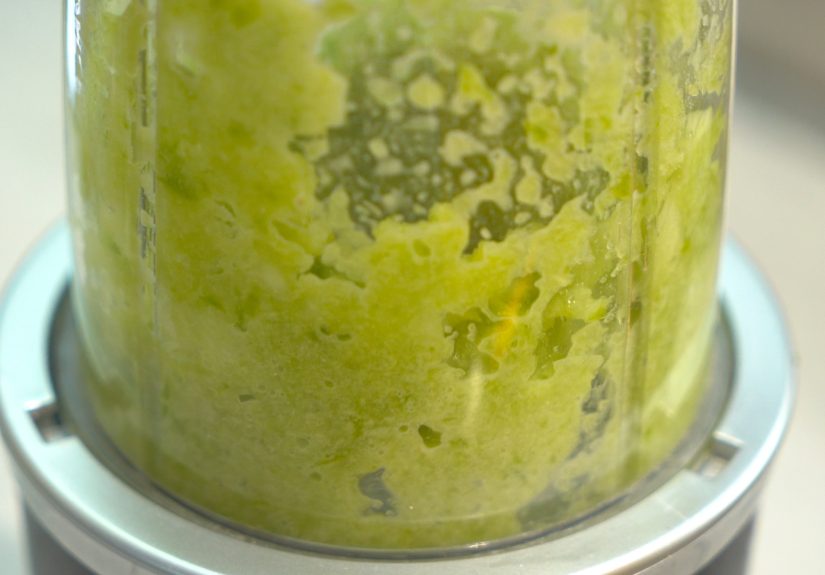
Step 5: Glue the eggshells down (the satisfying part)
- Brush on a medium-thick layer of glue over a small section of your coaster (work in zones so it doesn’t dry on you).
- Place shell pieces outer side up (prettier texture) and gently press. When you press, the shell will crack into smaller segments.
That crackle is your design. Congratulations, you’re now “an artist.” - Keep spacing consistent if you plan to grout. If you’re skipping grout, tighter placement looks cleaner.
- Let dry fullyat least a few hours, ideally overnight. Don’t rush: shifting shells are how mosaic nightmares are born.
Step 6 (Option A): Skip grout for a clean “eggshell crackle” look
If your shells are placed close together, you can skip grout entirely. This method is faster and less messy.
Once the glue is dry, brush on a sealing coat over the shells to lock everything down, then build up protective coats.
This approach is great for beginners and for coasters with detailed patterns (like a monogram or geometric stripes).
Step 6 (Option B): Grout for a true mosaic finish (and serious durability)
Grout gives that classic mosaic look by filling gaps and creating contrast. For coasters, it also adds stabilityespecially if your shell pieces have bigger spaces.
Choose grout based on your gaps:
- Unsanded grout for very narrow gaps (smooth finish).
- Sanded grout for wider gaps (stronger, less shrinkage).
- Tape edges if your base is wood or if you want crisp sides.
- Mix grout to a thick, peanut-butter consistency. (Too runny = messy haze; too dry = crumbly sadness.)
- Spread grout over the surface, pushing it into gaps with a gloved hand or a flexible scraper.
- Wait a few minutes, then wipe excess with a barely damp sponge. Rinse sponge often.
- Buff haze with a dry cloth once it firms up. Let grout cure per package directions before sealing.
Step 7: Seal it like you mean it (water + heat resistance)
A coaster’s whole job is to meet moisture and heat and not panic. Sealing is what makes this craft functional.
Here are reliable sealing approaches:
- Brush-on clear sealer (easy): multiple thin coats, drying between coats.
Great for everyday drinks, but not always ideal for very hot mugs unless you choose a heat-resistant topcoat. - Heat-resistant clear spray (stronger): adds protection against sticking and heat.
Use outdoors or in a well-ventilated space and follow label directions. - Resin topcoat (most durable): creates a glossy, glass-like surface and excellent water resistance.
It’s more advanced (and fussier), but it’s the “I want these to last forever” option.
Pro tip: if you used a wood base, consider sealing the bottom and edges too. Sealing both sides helps prevent warping over time.
Finish by adding cork or felt backing so your coaster doesn’t scratch furniture like an overly confident raccoon.
Design Ideas: Make It Look Intentional (Even If You Wing It)
1) Terrazzo confetti
Paint shells in 3–4 colors (think: white + muted blue + warm clay + a tiny bit of black). Scatter pieces randomly,
leaving small gaps, then grout in white or light gray. The result looks like trendy terrazzowithout the trendy price tag.
2) Faux marble with “gold veins”
Use mostly white shells over a black-painted base. After sealing, add thin metallic lines (gold paint pen works) in a few “veins,”
then seal again. It’s dramatic, modern, and suspiciously photogenic.
3) Monogram center
Sketch a letter lightly on the base. Fill the letter with one color family, and the background with another.
Skip grout for sharper edges, and build up a smooth topcoat so the monogram feels like it’s under glass.
4) Coastal speckle
Mix natural shells with pale blues and sea-glass green tones. Use light grout and a satin sealer.
Pair with cork backing for a beachy, “I summer on the coast” illusion (even if you mostly summer on your couch).
Troubleshooting and Pro Tips
“My shells won’t lay flat.”
Usually that’s membrane or curvature. Remove membrane when possible, and break pieces smaller. Also, press gently into glue
and let the crackle happenforcing flatness is how shells snap into unusable crumbs.
“My coaster is sticky or my mug sticks to it.”
That’s often a heat-and-finish issue. Add a more durable final topcoat (heat-resistant clear spray or resin),
and let it cure longer. Many sealers feel dry quickly but need extra time to harden fully.
“My grout looks cloudy/hazy.”
Grout haze happens when too much grout dries on the surface. Wipe earlier with a barely damp sponge and buff later with a dry cloth.
If it’s already dry, a gentle buff and patience usually help. (Aggressive scrubbing can pull grout from gaps.)
“My printed design smeared under glue.”
Inkjet prints can smear when wet. If you’re adding paper art beneath shells or mixing decoupage with the mosaic,
pre-seal prints with a spray sealer or use laser prints for better durability. Let everything dry before topcoating.
Safety and Cleanup (Because Crafting Shouldn’t Require a Medical Drama)
- Wear gloves for grout and adhesives, especially if you have sensitive skin.
- Ventilate if using spray sealers or resin.
- Consider a dust mask if you’re crushing shells aggressively or sanding wood.
- Keep shells away from petssmall sharp pieces and curious noses are not a great combo.
- Protect your surface with paper or a craft mat. Grout has a talent for getting everywhere.
Care Instructions: Keep Your Coaster Looking Good
Treat your finished coaster like a little handmade object with feelings:
- Let it cure fully (often 24–72 hours depending on sealer) before heavy use.
- Wipe with a damp cloth; don’t soak it in water.
- Avoid dishwashers unless you’ve specifically built it with products rated for that environment.
- If it’s a gift, include a tiny care notepeople love that, and it prevents “my coaster melted” texts.
Conclusion: Tiny Shells, Big Payoff
An eggshell mosaic coaster is the kind of craft that checks all the boxes: it’s cheap, surprisingly classy, and satisfying to make.
You get a functional object, a conversation piece, and the smug joy of upcycling breakfast into home décor.
Whether you go full grout-and-resin or simple glue-and-seal, the real secret is the same: prep well, layer patiently, and seal like your mug depends on it.
(Because it does.)
Real-Life Experiences: What I Learned the Messy Way (So You Don’t Have To)
The first time I tried an eggshell mosaic coaster, I confidently assumed I could “eyeball” everything: glue thickness, shell size,
drying time, even the idea of sealing. You can probably guess how that went. My shells were still a little damp (because I got impatient),
and when I brushed on glue, the pieces started curling like they were trying to escape the project. I pressed harder, which made them crack into dust,
and then I had a coaster that looked less like “artisan mosaic” and more like “I dropped a cookie and panicked.”
The second attempt went better, mostly because I treated shell prep like the foundation of the whole thing. I soaked the shells, peeled the membrane,
and actually let them dry completely. That one step alone changed everything: the pieces stayed flatter, they cracked in a controlled way when pressed into glue,
and they didn’t pop up at the edges like tiny white shark fins. I also learned that working in small sections makes you calmer.
If you spread glue across the entire coaster at once, the first area starts drying while you’re still fiddling with the last area,
and suddenly you’re speed-running a craft like it’s an extreme sport.
Then came the “grout confidence era.” I thought grouting would instantly make my coaster look professional, which is trueif you grout correctly.
My first grout mix was too watery, and I basically painted the coaster with sadness. It seeped everywhere, took forever to set,
and left a haze that made my bright painted shells look dull. On the next try, I mixed grout thicker and wiped it off sooner with a barely damp sponge.
That timing mattered: too early and you pull grout from the gaps; too late and you’re buffing haze like you’re polishing a tiny countertop.
I also started taping the edges, which made the finished coaster look crisp instead of “handmade in the dark.”
The biggest lesson, though, was sealing. The first “finished” coaster I used under a hot mug got tacky, then slightly sticky,
and then it did that humiliating thing where it tries to cling to the mug like an insecure friend. That’s when I realized:
coasters don’t just need to be sealedthey need to be sealed for heat and moisture. After that, I used multiple thin coats of a tougher topcoat,
gave it real curing time (not “feels dry so we’re good”), and the performance improved dramatically. I also started sealing the underside on wood bases,
because one coaster warped slightly after a week of use, like it had developed a strong opinion about being flat.
Now, eggshell mosaic coasters are one of my favorite “small project, big impact” crafts. They’re perfect for gifts, because each one is different,
and they feel personal without being fussy. If you’re making a set, the trick is to pick a limited color palette and repeat it across coasters
so they look coordinatedlike a collection, not a pile of experiments. And if you mess one up? Congratulations, you’ve created a “rustic prototype.”
Sand the edges, paint over the background, add a new layer of shells, and call it a design evolution. Crafting is basically problem-solving,
but with more glue.