Table of Contents >> Show >> Hide
- What Makes Sourdough “Artisan” (Besides the Vibe)?
- The Starter: Your Tiny Jar of Bread Chaos (and Joy)
- Ingredients: Keep It Simple, Then Get Nerdy
- Tools That Make Artisan Sourdough Easier (Not Fancier)
- The Process: From Flour to Flex (a Practical Roadmap)
- Baking for the Big Crust: Heat + Steam + Timing
- Troubleshooting: When Your Loaf Has “Character” (a.k.a. Problems)
- Flavor, Nutrition, and the “Is Sourdough Healthier?” Question
- History Bite: Why San Francisco Sourdough Became a Thing
- Popular Artisan Sourdough Variations (Once You’ve Got the Basics)
- Real-World Kitchen Experiences: The Stuff Recipes Don’t Tell You (About )
- Conclusion
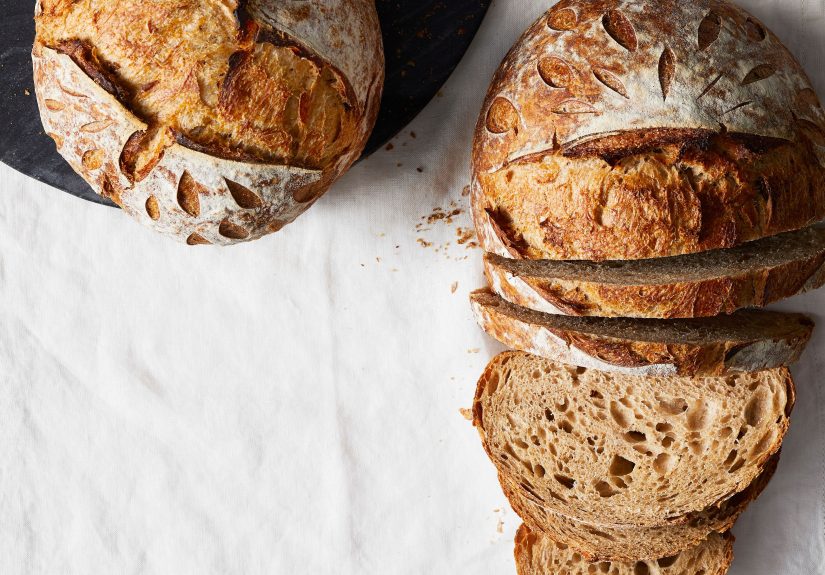
Artisan sourdough is basically the delicious lovechild of patience, microbes, and a little bit of ego.
It’s the loaf with the crackly crust that sings when it cools, the airy crumb that makes butter melt on contact,
and the signature tang that quietly whispers, “Yes, I did plan my weekend around bread.”
But here’s the twist: artisan sourdough isn’t about being fancy. It’s about being intentional.
You’re guiding fermentation, building gluten without overworking it, and learning to read dough like it’s a moody novel
with plot twists at every temperature change. Let’s turn that “Why is my dough a puddle?” energy into
“Look at that oven spring!” energy.
What Makes Sourdough “Artisan” (Besides the Vibe)?
“Artisan” isn’t a secret ingredientit’s a method. Artisan sourdough is typically
naturally leavened (no commercial yeast), shaped by hand, fermented longer for flavor and structure,
and baked hot for a bold crust. The goal isn’t uniform perfection; it’s character:
blistered crust, irregular holes, and a loaf that looks like it has stories to tell.
Key traits of artisan sourdough
- Wild yeast + lactic acid bacteria do the lifting and flavor-building.
- Long fermentation develops complexity and strengthens dough.
- High heat + steam create oven spring and a crisp crust.
- Hand shaping builds surface tension for better rise and that coveted “ear.”
The Starter: Your Tiny Jar of Bread Chaos (and Joy)
A sourdough starter is a living culture made from flour and water. Over time, it becomes home to wild yeasts
and friendly bacteria that convert sugars into carbon dioxide (lift) and organic acids (flavor).
Translation: it’s a self-sustaining flavor engine that also occasionally needs a snack.
Starter basics that actually matter
- Hydration: Many starters are kept at 100% hydration (equal weights flour and water), which makes timing and math easier.
- Feeding ratios: A common minimum maintenance feed is 1:1:1 (starter:water:flour by weight). Higher ratios can slow fermentation and reduce acidity.
- Strength signals: An active starter rises predictably after feeding, forms bubbles, and smells pleasantly tangynot like regret.
Pro tip: the “float test” (a spoonful of starter floating in water) can be a helpful clue,
but it’s not law. A starter can sink and still make good bread if fermentation is otherwise strong.
Your best tools are timing, rise, aroma, and consistency.
Ingredients: Keep It Simple, Then Get Nerdy
Great artisan sourdough doesn’t require a secret flour imported from a mountaintop monastery.
It requires balanced ingredients, good fermentation, and consistent technique.
The core four
- Flour: Bread flour (higher protein) helps build structure and trap gas for an open crumb.
- Water: Filtered is nice; heavily chlorinated water can slow fermentation.
- Salt: Flavor + dough strength + fermentation control. Don’t skip it.
- Starter (or levain): The leavening culture that brings the party.
A beginner-friendly artisan formula (one loaf)
If you want a practical starting point that behaves well and still looks artisan:
- 500g flour (try 450g bread flour + 50g whole wheat)
- 350g water (70% hydration)
- 100g active starter (20%)
- 10g salt (2%)
Once you’re comfortable, nudge hydration upward (72–78%) for a more open crumbjust know that higher hydration
dough is like a puppy: adorable, chaotic, and not automatically well-behaved.
Tools That Make Artisan Sourdough Easier (Not Fancier)
You can absolutely bake sourdough with a bowl and stubborn optimism, but a few tools make results more consistent.
- Digital scale: The difference between “artisan” and “bread soup.”
- Dutch oven (or covered baker): Traps steam for maximum oven spring.
- Bench scraper: Helps shape without tearing dough.
- Banneton (or towel-lined bowl): Supports the loaf during proofing.
- Lame/razor: Cleaner scoring for better expansion.
- Instant-read thermometer (optional): Great for checking doneness (often ~205–210°F internal).
The Process: From Flour to Flex (a Practical Roadmap)
1) Autolyse: Let flour and water become friends
Mix flour and most of the water, then rest 20–60 minutes. This hydrates the flour and kickstarts gluten development
with less mixing. It often improves extensibility, fermentation performance, and overall dough handling.
2) Mix: Add starter and salt, then build strength gently
Add your starter (or levain), mix until incorporated, then add salt with a splash of reserved water.
Mix by hand until the dough feels cohesive. You’re not trying to “knead forever”you’re building a strong network
without squeezing out all the gas later.
3) Bulk fermentation: The main event
Bulk fermentation begins right after mixing and ends when you shape. This stage develops flavor, gas, and structure.
At a warm room temperature (roughly low-to-mid 70s°F), bulk often takes about 3–5 hours, but dough doesn’t own a watch
it owns a mood ring. Your job is to read cues.
Strength-building folds
Perform 3–4 sets of stretch-and-folds (or coil folds) during the first half of bulk, spaced about 20–40 minutes apart.
Each set builds dough strength, organizes gluten, and helps create that airy crumb.
Bulk fermentation “done” cues
- Dough looks smoother and slightly domed, not slack and shapeless.
- Noticeable rise (often ~30–60%, depending on style and temperature).
- Bubbles visible at the edges or under the surface.
- Dough feels lighter, jigglier, and more elastic.
4) Pre-shape and bench rest: Set the stage
Turn the dough onto an unfloured or lightly floured counter. Gently pre-shape into a round or log,
then let it rest 15–30 minutes. This relaxes the gluten so final shaping is easier and cleaner.
5) Final shaping: Surface tension = lift
Shaping is where artisan sourdough becomes artisan. You’re stretching the outer “skin” of the dough to create
surface tension. That tension helps the loaf hold its shape and rise upward in the oven.
If your dough keeps spreading like it’s auditioning for pancake status, it’s usually a sign of
underdeveloped gluten, overproofing, too much hydration for your flour, or just a warm kitchen moving faster than expected.
6) Proofing: Room temp or cold (choose your adventure)
Proofing happens after shaping. You can proof at room temperature for a shorter window, or cold proof in the fridge
overnight (often 8–16 hours). Cold proofing boosts flavor, makes scoring easier, and helps the loaf hold its shape.
Baking for the Big Crust: Heat + Steam + Timing
Artisan sourdough shines when baked hot with steam. Steam keeps the crust flexible early on, allowing maximum expansion.
A preheated Dutch oven basically creates a mini steam chamberno fancy oven injection required.
A reliable Dutch oven bake method
- Preheat oven to 450–500°F with the Dutch oven inside for at least 30–60 minutes.
- Turn out cold-proofed dough onto parchment. Dust with rice flour if you like the bakery look.
- Score with a confident slash (about 30° angle for a nice ear).
- Bake covered 20–25 minutes.
- Remove lid and bake 15–25 minutes more, until deep golden brown.
- Cool at least 1–2 hours before slicing (your crumb will thank you).
How to tell it’s done (without guessing wildly)
- Deep color: pale sourdough is usually underbaked and can be gummy.
- Hollow-ish sound when tapped on the bottom (helpful, not perfect).
- Optional: internal temp often lands around 205–210°F.
Troubleshooting: When Your Loaf Has “Character” (a.k.a. Problems)
Dense crumb
- Likely causes: weak starter, underproofed dough, not enough gluten development, too cold fermentation.
- Fix: strengthen starter feeding routine, extend bulk fermentation, add an extra fold, or ferment warmer.
Flat loaf
- Likely causes: overproofing, weak shaping tension, too much hydration, or flour with lower protein.
- Fix: shorten proof, tighten shaping, reduce hydration 2–5%, or blend in bread flour.
Gummy interior
- Likely causes: underbaked, sliced too early, or fermentation imbalance.
- Fix: bake darker, cool longer, and verify fermentation cues before baking.
Burnt bottom
- Likely causes: Dutch oven too close to bottom heat or a very dark/heavy pot.
- Fix: move rack higher, place a sheet pan under the Dutch oven, or reduce preheat temp slightly.
Mold or weird colors in starter
If you see fuzzy mold or suspicious pink/orange streaks, the safest move is to discard and start over.
Starters are acidic and generally resistant to spoilage when cared for, but visible mold is a “nope.”
Use clean jars/utensils, feed consistently, and store appropriately.
Flavor, Nutrition, and the “Is Sourdough Healthier?” Question
Sourdough fermentation can improve flavor complexity and may support digestibility for some people.
The organic acids produced during fermentation can influence how starches behave and may help with a steadier blood sugar response
compared to some fast-risen breads. Whole grain flours add fiber and micronutrients, and long fermentation can reduce certain anti-nutrients.
That said: sourdough is not gluten-free, and anyone with celiac disease should avoid it unless it’s truly made from gluten-free grains
in a controlled environment.
History Bite: Why San Francisco Sourdough Became a Thing
Sourdough has been around for ages, but in the U.S., it got a special spotlight during the Gold Rush era.
Bakers in Northern California noticed their bread tasted distinctly tangypartly due to local microbial communities and baking practices.
San Francisco sourdough became iconic, and it’s still a delicious reminder that microbes are basically tiny culinary historians.
Popular Artisan Sourdough Variations (Once You’ve Got the Basics)
Whole wheat + rye for deeper flavor
Try 10–25% whole wheat and 5–10% rye. Rye boosts fermentation activity and flavor, but too much can make dough stickier and denser.
Open crumb “country loaf” style
Increase hydration to 75–80%, handle gently, and focus on strong fermentation timing.
This style rewards you with dramatic holesperfect for soup, less perfect for jelly unless you enjoy chaos.
Discard-friendly bakes
Sourdough discard can add tang to pancakes, waffles, crackers, muffins, and quick breads.
Since discard is usually roughly equal parts flour and water by weight, it can replace some of both in a recipe with a bit of math.
Real-World Kitchen Experiences: The Stuff Recipes Don’t Tell You (About )
If you hang around sourdough long enough, you start collecting oddly specific experienceslike realizing your home has “microclimates.”
The counter by the stove ferments faster. The corner near the window is basically a dough time capsule.
And the top of your fridge? Congratulations, you’ve discovered the penthouse suite of yeast activity.
One of the most common “first artisan sourdough” moments is starter anxiety. You feed it, it bubbles, it smells great
then the next day it acts like it’s on a silent retreat. That’s normal. Starters aren’t machines; they’re ecosystems.
Flour type, temperature, feeding ratio, and timing all change the speed. Many home bakers find that a simple rhythm
feeding at consistent intervals and keeping the starter somewhere moderately warmdoes more than any complicated hack.
Then there’s the classic hydration overconfidence. You see photos of wildly open crumb and think,
“Sure, I can do 82% hydration on my second loaf.” That dough will promptly teach you humility.
High hydration can be incredible, but it demands stronger flour, better fermentation instincts, and gentler handling.
A lot of bakers quietly become happier when they embrace the “boring” 70–75% zone and nail consistency first.
Ironically, consistent bread is what starts looking truly artisan.
Another experience: learning that “time” isn’t a real instruction. Temperature is the hidden conductor.
A dough that bulks in 4 hours at 76°F might need 6–8 hours at 70°F, and that’s not failureit’s physics and biology.
Many bakers start keeping a little notebook: room temp, water temp, bulk duration, how the dough looked,
and how the loaf baked. Within a few bakes, patterns show up like breadcrumbs.
Shaping is also a rite of passage. The first time you try to build surface tension, you might tear the dough slightly,
over-flour the counter, or end up with something that resembles a lopsided beanbag chair. Totally fine.
With practice, you’ll feel the dough tighten under your hands. That’s the moment you realize artisan sourdough is partly technique
and partly learning to be calm while holding a squishy, fermenting balloon.
And yesburnt bottoms happen. So do pale loaves, gummy crumbs, and “why did it explode on the side?” moments
(usually a scoring issue). The good news is that sourdough is forgiving in the long run. Each bake gives feedback:
darker crust often means better bake-through, colder proofing often means cleaner scoring, and patient cooling often means the crumb sets properly.
The most relatable experience of all is this: you’ll swear you’re done baking for a while, then you’ll slice a good loaf,
hear that crust crackle, and immediately start planning the next one.
Conclusion
Artisan sourdough is the rare project that rewards both precision and play. Feed your starter like it’s a beloved pet,
ferment based on dough cues (not the clock), shape with intention, and bake hot with steam.
Once you learn the rhythm, you’re not just making breadyou’re making a repeatable craft:
crackly crust, open crumb, bold flavor, and a kitchen that smells like you’ve got your life together (even if you don’t).