Table of Contents >> Show >> Hide
- First Principles: What “Chipping” Actually Means
- The Core Mechanism: Knife + Anvil + Rotating Mass
- Two Big Families: Disc Chippers vs Drum Chippers
- Feed Systems: Gravity, Self-Feed, and Hydraulic “Nope” Rollers
- Power and Throughput: Why “3-Inch Capacity” Isn’t a Magic Spell
- Chip Size Control: The Hidden Dials
- Maintenance From First Principles: Keep the System Predictable
- Safety Is Also First Principles
- Choosing a Wood Chipper Like a Grown-Up
- Conclusion: The Whole Machine Is a Loop
- Field Notes: Real-World Experiences (The Kind You Learn Fast)
A wood chipper is basically a snack machine for trees. You feed it awkward, branchy chaos and it spits out tidy, uniform-ish chips that make mulch piles look like they have their life together. But under the steel and noise is something surprisingly elegant: a wood chipper is a controlled fracture factory. It converts long, tough, fibrous material into short pieces by forcing the wood to fail in a predictable wayover and overat high speed.
This article builds a wood chipper from “first principles,” meaning we start with the physics of cutting and then work outward: rotating inertia, knife geometry, feed systems, chip sizing, power demands, and the safety features that exist because wood chippers do not negotiate.
First Principles: What “Chipping” Actually Means
Wood is a bundle of aligned fibers glued together by lignin. It’s strong along the grain, weaker across it, and it behaves differently when wet, dry, knotty, stringy, or full of juvenile wood that refuses to act its age. “Chipping” is the act of slicing and levering those fibers until a small wedge of material breaks free.
Conceptually, a chipper does three things in a loop:
- Grabs the material and moves it into the cutting zone (feed).
- Applies a concentrated force with a sharp edge against a fixed surface (cut).
- Throws the chip out before it can become a jam, a wrap, or a regret (discharge).
If you understand that loop, the rest of the design reads like a set of practical answers to one question: “How do we keep that loop stable when the input is a branch with knots, forks, bark, and questionable intentions?”
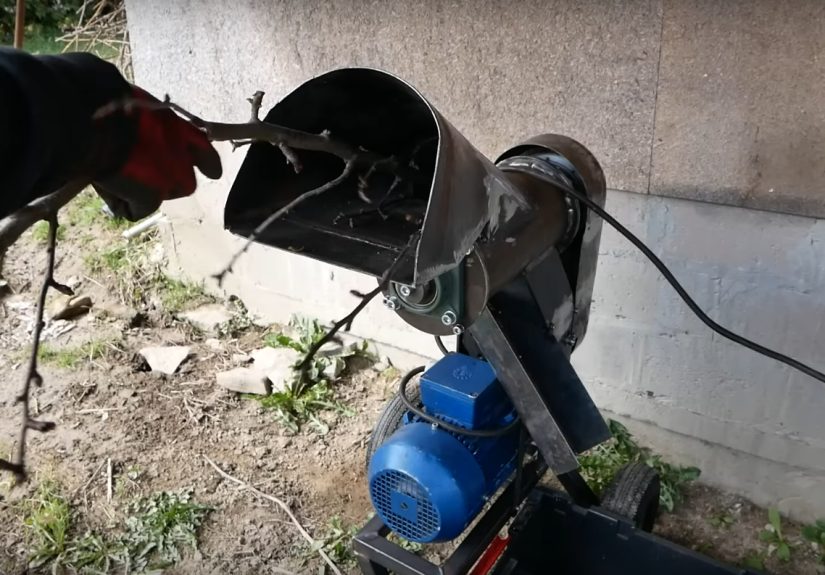
The Core Mechanism: Knife + Anvil + Rotating Mass
At the heart of most chippers is a rotating mass (often a flywheel, drum, or disk) with knives mounted to it. The knife passes close to a fixed edge called an anvil (sometimes “bed knife” or “counter-knife”), creating a scissor-like action. The wood is pinched, sliced, and fractured into a chip.
Why the Flywheel Matters (Inertia = Attitude)
Cutting wood is not a smooth, steady load. It’s spiky. Every “bite” is a burst of resistance as fibers give up their day job. A heavy rotating mass stores energy as rotational inertia. That stored energy smooths the peaks: the engine (or PTO) doesn’t have to deliver the full cutting power instantaneously; it replenishes the flywheel between bites.
That’s why many consumer and mid-duty machines emphasize a substantial flywheel with a knife mounted to it: the flywheel is the buffer that keeps the rotor from bogging when the wood gets stubborn. Manuals for consumer chippers commonly describe the “revolving chipper knife mounted on a flywheel” as the core action turning branches into chips, which is exactly the inertia story in plain English.
Knife-to-Anvil Clearance: The Small Gap With Big Consequences
If you want to predict chip quality and feeding behavior, stare at the knife-to-anvil clearance like it owes you money. Too wide and the knife starts tearing and crushing instead of slicing cleanlychips get stringy, the machine pulls unevenly, and power demand rises. Too tight and you risk contact, heat, accelerated wear, and expensive noises.
Many chipper/shredder manuals specify a typical blade-to-anvil clearance on the order of 1/16 inch to 1/8 inch and recommend checking it on a routine interval (often around every 8 operating hours) because vibration, wear, and knife servicing slowly change the relationship. The numbers vary by model, but the principle is consistent: chip size and cutting efficiency live in that gap.
Two Big Families: Disc Chippers vs Drum Chippers
Most brush chippers used in tree care and landscaping fall into two main cutting architectures: disc (or “flywheel/disc”) and drum. Both can produce excellent chips; they just solve the feed-and-cut problem differently.
Disc Chippers: Flywheel With an Opinion About Geometry
A disc chipper uses a large rotating disc/flywheel with knives mounted near the perimeter. The disc often has pockets or openings that help move chips toward the discharge. The “feel” of a disc chipper can be crisp: each knife pass is a defined slicing event, and chip uniformity can be very good when the material is fed consistently.
Disc designs can reward clean, straight feeding. When you present material predictably, the knife can take predictable bites. When you present a curly forked branch like it’s auditioning for modern art, the machine may still winbut it might win in a louder, more dramatic way.
Drum Chippers: Continuous Cutting, Big Appetite
A drum chipper uses a rotating cylindrical drum with knives mounted along the drum. It tends to create a more continuous cutting action as material is pulled through. Drum chippers are often associated with high productivity and wide infeed openings, making them popular when volume and feeding convenience matter.
Industry guidance aimed at tree care fleets often notes practical differences: drum machines are commonly chosen for productivity and feeding performance on certain stringy materials (think fronds and similar “grabby” vegetation), while disc machines are often valued for chip consistency and a different maintenance/access pattern. The punchline: neither is “better” universally; the best one is the one that matches your material and your workflow.
Feed Systems: Gravity, Self-Feed, and Hydraulic “Nope” Rollers
The feed system is where a chipper stops being a cutter and becomes a machine with a personality. You’ll typically see three broad behaviors:
- Gravity feed: common on smaller homeowner chipper/shredders; you guide material and gravity helps.
- Self-feed (inertia/knife pull): the cutting action “bites” and draws material in; simpler but can surge.
- Hydraulic feed rollers: common on larger brush chippers; controlled feed rate and strong pull-in force.
Hydraulic feed rollers are a major reason commercial chippers feel so capable: they can meter the material into the knives at a rate the engine can handle. But they also introduce a serious hazard: the machine can pull material (and anything attached to it) into the infeed very quickly.
The Controls You Hope You Never Need (But Must Have)
Because the infeed can capture clothing, gloves, or a moment of bad judgment, modern guidance emphasizes accessible emergency controls. Safety bulletins and prevention resources describe devices like feed control bars, bottom stop bars, emergency pull ropes, and features such as feed tray extensions that keep operators farther from the infeed mechanism. The goal is simple: if something goes wrong, you can stop or reverse the feed immediately without playing “find the button” in a panic.
For consumer chipper/shredders and related products, industry safety standards exist that define requirements and safety expectations (including guarding and operating safety concepts). You don’t need to memorize the standard number to benefit from ityou just need to recognize that reputable equipment is designed around predictable hazards, and cheap mystery machines sometimes act like they’ve never met a hazard in their life.
Power and Throughput: Why “3-Inch Capacity” Isn’t a Magic Spell
Capacity ratings (like “chips up to 3 inches” or “up to 5-3/4 inches”) are helpful, but they’re not a promise that every 3-inch branch will glide through like a noodle. First-principles reality check:
- Diameter is only one variable. Species, knots, moisture, and forks matter.
- Feed rate sets power demand. Push faster, demand more power.
- Dull knives impersonate smaller engines. The machine “loses power” because cutting gets inefficient.
In physics terms, power is the rate of doing work. The work per chip depends on how the knife fractures the wood, and the number of chips per second depends on rotor speed and feed. If you double the feed rate (all else equal), you roughly double the wood volume being cut per secondso the power demand climbs fast.
This is why “self-feeding” can feel amazing right up until it doesn’t. When the machine bites aggressively, it can momentarily demand more torque than the engine can deliver, bogging the rotor and turning your afternoon into a troubleshooting hobby.
Chip Size Control: The Hidden Dials
People talk about chip size like it’s a single knob labeled “Small / Medium / Landscaping-Friendly.” In reality, chip size emerges from a handful of interacting settings:
1) Knife Sharpness and Edge Geometry
Sharp knives slice fibers cleanly with lower force. As knives dull, they crush and tear more, increasing power demand and producing stringier output. Dull knives can also change how the machine feeds, because the bite becomes less predictable.
2) Knife-to-Anvil Clearance
That small clearance gap strongly influences chip thickness and consistency. Many manufacturers specify a narrow acceptable range and advise checking it frequently. If chips get stringy or the machine starts acting “grabby,” clearance and knife condition are the first suspects.
3) Screens (Mostly on Chipper/Shredders)
Combination chipper/shredders often include screens in the shredding chamber. A screen forces material to stay in the chamber until it’s small enough to pass through, producing finer output. Remove the screen and you usually get higher throughput and coarser material. (Great for compost structure; less great if you wanted decorative mulch that looks like it came from a catalog.)
4) Discharge Chute Angle and Deflectors
Chip trajectory matters for productivity and sanity. Many machines use adjustable discharge flaps/deflectors to control distance and height of discharge. That doesn’t change chip size, but it absolutely changes whether the chips land in the truck… or in your collar… or in the neighbor’s iced coffee.
Maintenance From First Principles: Keep the System Predictable
A chipper is happiest when it behaves predictably. Predictability comes from sharp edges, proper clearances, tight fasteners, sound bearings, and clean feed paths. First-principles logic makes maintenance feel less like chores and more like “keeping the laws of physics on your side.”
- Sharpen/replace knives on schedule: dull edges raise cutting force and vibration.
- Check clearance routinely: the blade-to-anvil relationship drifts with wear and service.
- Inspect fasteners and guards: vibration loosens things; loose things escalate quickly.
- Keep debris/foreign objects out: rocks and metal turn knife edges into modern sculpture.
- Respect lubrication points: bearings and pivots need to stay cool and aligned.
The “tell” that maintenance is due is often behavioral: feeding becomes erratic, the engine loads harder, the output looks stringy, or the machine starts sounding like it’s arguing with itself. Don’t wait for a breakdown to confirm the obvious.
Safety Is Also First Principles
The primary hazard is brutally straightforward: the infeed can grab and pull a person into the machine. Public safety resources describe how workers can become caught in the feed mechanism and pulled toward the knives, and incident reports show that unsafe feeding methods (like using a foot to push material) can result in catastrophic injury. There is no “quick reflex” that beats a machine designed to pull wood in on purpose.
Practical Safety Rules That Actually Match the Physics
- Keep hands and feet out of the feed chute. Use a push tool for short pieces, not body parts.
- Let go when the feed grabs. Once the rollers or knives take the wood, your job is to step back.
- Stand to the side of the infeed. Don’t position your whole self in the line of pull.
- Know the emergency controls. Feed control bars, stop bars, and pull ropes exist for a reason.
- Don’t work alone. Some safety guidance explicitly recommends having someone able to hit the shutoff.
- Avoid entanglement traps. Loose clothing, ropes, and snaggy gear can become the “branch you didn’t mean to feed.”
Notice how these rules track the machine’s behavior: it pulls, it bites, and it doesn’t care why you’re near the chute. The safest operators treat the infeed like a shoreline in a storm: you can work there, but you don’t turn your back on it.
Choosing a Wood Chipper Like a Grown-Up
If you’re shopping (or speccing a fleet), “first principles” becomes a checklist:
Match the Machine to the Material
- Mostly small yard debris? A consumer chipper/shredder may be enoughand screens can help if you want finer output.
- Regular brush and limbs? A dedicated brush chipper with a serious flywheel and real infeed geometry matters.
- High volume or frequent forks/crotches? Prioritize infeed opening, feed roller control, and service access.
Prioritize Control and Serviceability
- Accessible knives and anvil adjustment.
- Clear, reachable feed control bar/stop devices.
- Discharge control that fits your jobsite (truck loading vs ground piling).
- Documentation and parts support from a known manufacturer.
The best chipper isn’t the one with the biggest number on the sticker. It’s the one that stays stable and predictable when your branches stop being polite.
Conclusion: The Whole Machine Is a Loop
From first principles, a wood chipper is a controlled loop of feed, cut, and discharge, made stable by inertia, sharpened edges, and sensible clearances. Disc and drum designs are two valid ways to keep that loop productive. The most important “settings” are often invisible: knife condition, anvil gap, and the operator’s respect for the infeed.
If you remember one thing, make it this: chippers are designed to pull wood in relentlessly. Your job is to make sure the only thing that gets pulled in is… wood.
Field Notes: Real-World Experiences (The Kind You Learn Fast)
Ask anyone who’s spent time around chippers and you’ll hear the same theme: the machine teaches with immediate feedback. Not “pop quiz” feedbackmore like “the syllabus is written in hydraulic pressure.” These are common, lived-in lessons operators pick up when theory meets bark.
1) The chipper reveals your knife maintenance schedule. On paper, dull knives mean “reduced efficiency.” In practice, they mean the chipper starts acting moody: the feed surges, the engine loads harder, chips look stringy, and the whole job feels like you’re trying to cut steak with a spoon. The moment you swap or sharpen knives and reset the knife-to-anvil gap, the machine often returns to calm, steady behaviorlike it forgave you for your negligence.
2) “Self-feed” is a personality trait, not a guarantee. When a chipper is biting well, it feels almost magical: branches get pulled in smoothly and you start to trust it. That’s when people make mistakes. A knotty fork or a whippy, viney piece can change the load instantly. The chipper doesn’t slow down to ask permission; it either grabs hard or it spits back. Experienced operators keep their stance and escape path consistent because the branch can pivot, whip, or roll as it gets pulled.
3) Short pieces are where trouble tries to rent a room. Long branches give you distance and leverage. Short chunks tempt people to “just push it a little.” That’s why push paddles and push sticks exist and why safety guidance repeats “keep hands and feet out of the feed chute.” The machine is strongest exactly where you least want to be: at the mouth of the infeed.
4) Chip control is half material, half discipline. If you feed a mix of twiggy brush, dry hardwood, wet softwood, and leafy stuff, the output will look like a party where nobody dressed to the same theme. Operators who want nicer chips do surprisingly boring things: they sort material, they keep knives sharp, they don’t overload the chamber, and they don’t treat the chipper like a trash can for “whatever is nearby.”
5) Discharge direction is a jobsite strategy. Adjustable discharge chutes and flaps sound like convenience features until you’re trying to fill a truck evenly, avoid blasting chips into traffic, or keep a work zone clean. The first time a gust of wind returns half your discharge to your face, you’ll understand why “aiming” matters. Small adjustments can turn chaos into a tidy pileand keep chips out of places chips should never be, like inside protective eyewear (which is somehow always possible).
6) Foreign objects are the fastest way to buy new knives. Yard debris can hide rocks, wire, nails, and the occasional mystery metal. Safety resources warn against feeding contaminated material for good reason: it damages equipment and can create dangerous projectiles. Operators who do this work regularly develop a quick “scan and shake” habit before feeding. It’s not paranoia; it’s budget control.
7) The safest crews treat the shutoff like a shared responsibility. Some best-practice guidance recommends not working alone and having someone able to hit the emergency shutoff because a person caught in a commercial chipper may not be able to reach a safety device. In real operations, that translates into simple habits: everyone knows where the controls are, the operator communicates before feeding, and the crew keeps the infeed zone clear of distractions.
In the end, “experience” with a chipper is less about bravado and more about respect for predictable mechanics. The best operators aren’t the ones who feed fastest. They’re the ones whose machines run smoothly all day because they keep the physics boring: sharp knives, correct clearances, controlled feeding, and zero improvisation near the chute.


