Table of Contents >> Show >> Hide
- Why bother cleaning shoe soles?
- Quick supplies checklist
- Before you start: 3 fast safety tips
- 1) The “Classic” scrub: warm soapy water + brush
- 2) The “tread detail” method: toothpicks for packed-in gunk
- 3) Baking soda paste for stubborn grime and funky buildup
- 4) Melamine foam sponge for scuffs and “why is it black?” marks
- 5) Quick disinfect-and-wipe for everyday “public place” shoes
- 6) Ice to remove gum (a.k.a. the sidewalk betrayal)
- 7) Degrease sticky tar and oily gunk with dish soap + warm water (and optional adhesive remover)
- 8) The “mud apocalypse” rinse: hose + brush + patience
- How to keep the bottom soles of your shoes cleaner (so you do this less)
- FAQ: quick questions people actually ask
- Real-life experiences and lessons learned from cleaning shoe soles
Shoe soles are basically tiny, portable parking lots for everything you’d never willingly bring inside: sidewalk grime, wet leaves,
mystery gum, and that one sticky spot near the trash can that absolutely had a backstory. The good news? Cleaning the bottom soles of your shoes
doesn’t require a hazmat suit or a PhD in “What Is That?”just a few household tools and the right method for the mess.
In this guide, you’ll learn 8 simple ways to clean the bottom soles of your shoes, plus how to keep them cleaner longer.
These methods are practical, low-drama, and designed for real lifebecause nobody has time to hand-polish tread patterns like they’re museum artifacts.
Why bother cleaning shoe soles?
Cleaning the bottom soles of your shoes isn’t just about aesthetics (though, yes, crusty treads are not a vibe). It also helps:
- Reduce tracked-in dirt on floors and carpets
- Improve traction by clearing packed mud and debris
- Cut down odors caused by grime stuck in grooves
- Protect shoe materials by preventing buildup that can harden and crack
Quick supplies checklist
You don’t need everything on this list, but having a small “sole-cleaning kit” makes life easier:
- Old toothbrush or small scrub brush
- Dish soap (mild)
- Warm water
- Microfiber cloth or paper towels
- Toothpick / wooden skewer / plastic pick
- Baking soda
- Melamine foam sponge (a “magic eraser” style sponge)
- Rubbing alcohol (70% is fine) or disinfecting wipes
- Optional: adhesive remover (citrus-based) for sticky gunk
Before you start: 3 fast safety tips
- Test first: If your shoes have painted soles or special coatings, test any cleaner in a small spot.
- Don’t soak the whole shoe: Most soles can get wet, but soaking can loosen glue or warp certain materials.
- Air-dry only: Skip direct heat (hair dryers, radiators) to avoid cracking or separating the sole.
1) The “Classic” scrub: warm soapy water + brush
This is the dependable, everyday method that handles most dirt, dust, and light mud without drama. It’s also the gentlest place to start,
especially if you’re cleaning athletic shoes, sneakers, or casual footwear with rubber outsoles.
How to do it
- Mix a few drops of dish soap into a bowl of warm water.
- Dip an old toothbrush or scrub brush into the soapy water and scrub the tread in small circles.
- Use a damp cloth to wipe away loosened grime.
- Repeat until the grooves look cleaner, then pat dry with a towel.
Pro tip: If the tread is deep (like hiking shoes), use a slightly stiffer brush and scrub along the grooves, not just across them.
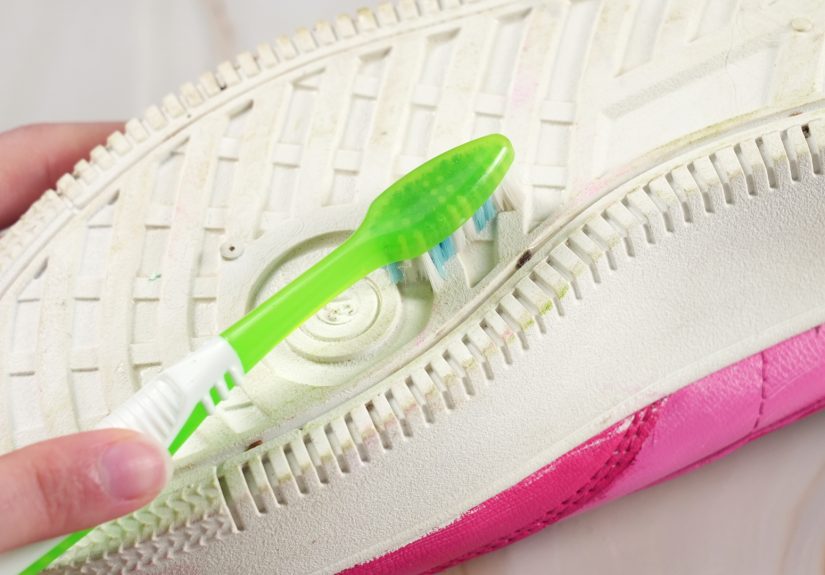
2) The “tread detail” method: toothpicks for packed-in gunk
Ever look at your shoe sole and realize it’s basically a waffle iron that collected mud? A pick tool is the fastest way to remove pebbles,
dried dirt, and compacted mystery debris from tread patterns.
How to do it
- Let wet mud dry fully (it’s easier to remove when it’s not sticky).
- Use a wooden toothpick or skewer to gently lift debris from grooves.
- Brush away crumbs with a dry toothbrush.
- Finish with a quick soapy-water scrub to remove residue.
Keep it simple: Avoid metal picks on soft rubberthey can gouge the tread and create little “dirt parking spots” for later.
3) Baking soda paste for stubborn grime and funky buildup
Baking soda is mildly abrasive (in a friendly way) and helps lift grime, especially on rubber soles that look gray or stained.
It’s a great choice when plain soap doesn’t quite cut it.
How to do it
- Make a paste: 2 tablespoons baking soda + 1 tablespoon water (adjust as needed).
- Apply the paste to the sole with a toothbrush.
- Scrub the tread and edges for 1–2 minutes.
- Wipe with a damp cloth, then rinse the cloth and wipe again to remove residue.
Best for: Rubber and durable synthetic soles. Skip it on delicate painted soles unless you test first.
4) Melamine foam sponge for scuffs and “why is it black?” marks
Melamine foam sponges (often sold as “magic eraser” sponges) can lift scuffs and grime on rubber surfaces with minimal effort.
Think of it as a tiny, polite sanding actioneffective, but you shouldn’t overdo it.
How to do it
- Lightly dampen the sponge (don’t soak it).
- Gently rub the outsole and the edges of the sole where marks collect.
- Wipe the area with a damp cloth, then dry.
Important: Melamine foam is abrasive. Use gentle pressure and avoid glossy finishes or printed logos on the sole.
5) Quick disinfect-and-wipe for everyday “public place” shoes
If you’ve been in crowded places (airports, public transit, hospitals, big box stores during peak chaos), a simple wipe-down can reduce
whatever you may have picked up. This method is about fast hygienenot deep cleaning.
How to do it
- Brush off visible dirt first (paper towel or dry brush).
- Wipe the sole with a disinfecting wipe or a cloth dampened with rubbing alcohol.
- Let it air-dry fully before putting shoes away.
Use case: Great for smooth rubber soles and quick maintenance. If the tread is muddy, do a scrub firstwipes aren’t miracle workers.
6) Ice to remove gum (a.k.a. the sidewalk betrayal)
Gum stuck to the bottom of a shoe is a classic “why me?” moment. Heat makes gum smear. Cold makes it brittle. So we’re going cold.
How to do it
- Put the shoe in a plastic bag (sole facing out so the bag doesn’t stick to the gum).
- Freeze for 1–2 hours, or press an ice cube against the gum for several minutes.
- Once hardened, scrape the gum off with a plastic scraper or an old credit card.
- Finish with soapy water to remove the last sticky film.
Tip: If a thin residue remains, a small dab of cooking oil can help lift itthen wash with dish soap to remove the oil.
7) Degrease sticky tar and oily gunk with dish soap + warm water (and optional adhesive remover)
Tar, asphalt sealant, and “what is that black stuff?” are tougher than dirt because they’re designed to stick. Start with the gentlest option:
dish soap, which is made to cut grease. If that’s not enough, a small amount of citrus-based adhesive remover can helpcarefully.
How to do it
- Wipe away excess gunk with a paper towel (don’t rub it deeper into tread).
- Scrub with warm water + dish soap using a toothbrush.
- If residue remains, apply a tiny amount of adhesive remover to a cloth and dab the sticky area.
- Scrub again with soapy water to remove remover residue, then wipe dry.
Do: Ventilate and test in a hidden area. Don’t: Pour strong solvents directly on the solesome can damage glue or finishes.
8) The “mud apocalypse” rinse: hose + brush + patience
When your soles are caked in thick mud, the best strategy is to remove the bulk first. This is the method for trail runners,
gardeners, dog-walkers, and anyone who accidentally stepped into a puddle that turned out to be a small swamp.
How to do it
- Let mud dry (or rinse immediately if you can do it outdoors without making your bathroom hate you).
- Knock the shoes together outside to break off chunks (gentlyno need to reenact a drum solo).
- Rinse the soles with a hose or under an outdoor faucet.
- Scrub the tread with a stiff brush and a little dish soap.
- Rinse again, then air-dry.
Bonus tip: If mud is stuck deep in tread, combine this with Method #2 (toothpicks) after the rinse.
How to keep the bottom soles of your shoes cleaner (so you do this less)
- Create a “shoe stop”: Place a sturdy doormat outside and a washable rug inside to catch dirt.
- Brush first, wash second: Dry brushing takes off most debris and makes wet cleaning faster.
- Rotate pairs: Let shoes fully dry between wears, especially after wet weather.
- Store smart: Keep “outdoor shoes” near the door, not in the closet next to clean clothes.
FAQ: quick questions people actually ask
Can I use bleach on shoe soles?
For most shoes, bleach is overkill and can discolor materials or weaken adhesivesespecially if it touches uppers. If you need disinfection,
rubbing alcohol or disinfecting wipes are usually safer for quick cleaning of rubber soles.
How often should I clean the bottom soles of my shoes?
Light wipe-downs can be weekly (or after messy outings). Deeper scrubs are best “as needed”like after rain, hikes, or the dreaded gum incident.
What if my soles still look stained?
Some rubber stains are permanent, especially on older shoes. Aim for “clean enough to not track grime indoors,” not “brand-new showroom glow.”
Real-life experiences and lessons learned from cleaning shoe soles
Most people don’t wake up thinking, “Today, I’ll clean the bottom soles of my shoes.” It usually starts with a moment of discoverylike noticing
a trail of dirt across a freshly vacuumed floor, or realizing your sneakers are making a faint crunching sound because they’re carrying half a gravel path.
Over time, you learn there are two types of shoe-sole messes: the ones you see, and the ones you feel when you step.
One common scenario: the “quick grocery run” that turns into a parking-lot puddle adventure. The soles look fine until you get home and step onto tile,
where the water spreads and leaves a gritty ring behind. People often try to fix that with a random wet paper towel swipe, but the paper towel
mostly skates over the surface while the dirt stays packed inside the tread. That’s when the toothbrush earns its retirement plan. A 60-second scrub
with warm soapy water usually pulls out way more grime than you expectenough to make you wonder what your shoes have been doing while you weren’t looking.
Another classic experience is the “mud souvenir.” Hiking shoes and trail runners are built with deep grooves for traction, which is great outdoors and
less great indoorsbecause those grooves can store mud like it’s prepping for winter. Many people find it easiest to let mud dry completely and then
pop it out with a toothpick or skewer. It feels oddly satisfying, like cleaning out a keyboard, except the keyboard is your shoe and the crumbs are
nature’s confetti. The key lesson here is not to fight wet mud when you don’t have to. Wet mud smears. Dry mud flakes.
Then there’s the villain of the sidewalk: gum. People try hot water, scraping, vigorous regretnone of it works well because gum loves warmth.
The freezer trick tends to be the turning point. Once gum hardens, it changes from “sticky curse” to “breakable problem,” and you can scrape it off
without turning it into a glossy smear. The first time someone tries this, they usually wonder why they didn’t do it sooner. The second time it happens,
they immediately reach for a plastic bag and accept that life is a series of tiny maintenance tasks.
Sticky tar is its own category because it makes your soles feel like they’re stepping on tape. People often learnsometimes the hard waythat harsh solvents
can damage the shoe if you go too aggressive. The more reliable approach is to start with dish soap (because it’s designed to break up greasy stuff),
then use a small amount of adhesive remover only if you truly need it. The “lesson learned” is patience: dab, lift, wash, repeat. When you rush, you rub
the sticky mess deeper into the tread, and suddenly your shoes are collecting lint like they’re auditioning to be rollers.
Over time, most people develop a simple routine: brush off visible dirt before entering the house, do a deeper scrub after messy outings, and keep a cheap
toothbrush near the door as a dedicated “sole brush.” It’s not glamorous, but it’s effective. And the payoff is realcleaner floors, fewer weird marks, and
that small, quiet satisfaction of knowing your shoes aren’t bringing the entire outside world into your living room. If nothing else, it’s a great reminder:
sometimes the easiest way to feel more “put together” is to clean the part of your life that literally touches the ground.