Table of Contents >> Show >> Hide
- First: What “CNC corners” really means
- How to choose the right corner joint (without overthinking it)
- 19 ways to join CNC corners
- 1) The classic butt joint (glue-only)
- 2) Butt joint + screws (pre-drilled on the CNC)
- 3) Pocket-hole corner joinery (CNC-cut parts, drill pockets off-machine)
- 4) Dowels in a corner (CNC-drilled alignment holes)
- 5) Biscuit-assisted corners (CNC slots or a biscuit joiner)
- 6) Loose tenons (Domino-style, but CNC cut)
- 7) Rabbet joint (step-and-seat corner)
- 8) Locking rabbet (a rabbet that actually locks)
- 9) Dado corner capture (dado + end panel)
- 10) The CNC box joint (finger joint)
- 11) CNC dovetails (through-dovetail for boxes)
- 12) The plain miter (best when reinforced)
- 13) Miter + splines (the classic strength upgrade)
- 14) Miter + contrasting keys (decorative and tough)
- 15) Corner blocks / gussets (CNC-cut triangles to the rescue)
- 16) Half-lap corner joint
- 17) Bridle joint (open mortise-and-tenon style corner)
- 18) Tab-and-slot press-fit joinery (flat-pack favorite)
- 19) Knock-down hardware (cam locks, cross dowels, threaded inserts)
- Make any CNC corner joint fit better: the “inside corner” toolkit
- Common CNC corner mistakes (and how to dodge them)
- Conclusion
- Extra: Shop-floor experiences (the stuff you only learn after a few builds)
CNC routers are incredible at turning flat sheet goods into “wait, you made that?!” projects. But they’re also incredible at one other thing: reminding you that router bits are round. Which means your “perfectly square” internal corners aren’t actually squareuntil you design around it.
This guide is your maker-friendly menu of 19 CNC-friendly corner jointsfrom quick-and-sturdy plywood box joints to slick flat-pack connectors that assemble like IKEA… except you don’t end up with three “mystery screws” and a mild identity crisis.
First: What “CNC corners” really means
When people say “CNC corners,” they usually mean one (or more) of these realities:
- Internal corner radius: inside pockets/slots come out rounded because the cutter is round.
- Sheet-goods variability: plywood labeled “3/4 in.” is often not exactly 0.750 in., and it’s not always consistent.
- Assembly goals: you want corners that are strong, aligned, repeatable, and (sometimes) knock-down/removable.
How to choose the right corner joint (without overthinking it)
Ask these three questions and you’ll narrow the field fast:
- Is it permanent or knock-down? (Glue forever vs. disassemble later.)
- Is it structural or cosmetic? (Tool cabinet vs. gift box.)
- Do you want it to be visible? (Some joints scream “craftsmanship!” others whisper “I own clamps.”)
19 ways to join CNC corners
Each option below includes what it’s best for and how to make it CNC-friendly. Mix and matchbecause in the real world, projects are basically just a series of compromises you decorate nicely.
1) The classic butt joint (glue-only)
Best for: quick boxes, shop jigs, prototypes. CNC tip: cut edges clean, then add a tiny chamfer so squeeze-out has somewhere to go. It’s simple, fast, and surprisingly strong if the glue surfaces are flat and clamped well. If you can’t clamp it square, it will not magically become square.
2) Butt joint + screws (pre-drilled on the CNC)
Best for: shop furniture, utility cabinets, “I need this done today” builds. CNC tip: let the router spot-drill pilot holes and countersinks. You get speed, decent strength, and easy repairs. Add glue for “screws as clamps,” or skip glue for removable parts.
3) Pocket-hole corner joinery (CNC-cut parts, drill pockets off-machine)
Best for: face frames, boxes, quick cabinet carcasses. Pocket holes aren’t a CNC operation for most folks, but CNC-cut parts + pocket-hole assembly is a very real workflow. Great for right angles, fast for batch production, and friendly for beginners who don’t want to worship at the altar of perfect dovetails.
4) Dowels in a corner (CNC-drilled alignment holes)
Best for: clean-looking corners, repeatable alignment. CNC tip: drill dowel holes in the same setup as your profiles so registration is dead-on. Dowels add glue surface and alignment. Use a test piece to confirm fit (too tight and you’ll invent new words; too loose and you’ll invent excuses).
5) Biscuit-assisted corners (CNC slots or a biscuit joiner)
Best for: alignment help on miters and butt joints, especially panels and frames. CNC tip: a CNC can cut biscuit-like slots with an end mill (size to your stock and hardware). Biscuits shine at “keeping things flush” while glue does the heavy lifting.
6) Loose tenons (Domino-style, but CNC cut)
Best for: strong corners in boxes, frames, and cabinet partswithout visible joinery. CNC tip: pocket matching mortises and use store-bought loose tenons or mill your own strips. It’s basically “mortise-and-tenon’s practical cousin” who always shows up on time.
7) Rabbet joint (step-and-seat corner)
Best for: boxes and carcasses where you want more glue area and better alignment than a butt joint. CNC tip: cut a shoulder (rabbet) with a pocket toolpath. Rabbets are forgiving, fast, and excellent in plywood.
8) Locking rabbet (a rabbet that actually locks)
Best for: square boxes that need extra mechanical strength. CNC tip: combine a rabbet and a mating tongue/step so the corner self-aligns. This reduces clamp wrestling and increases glue surfacelike giving your corner joint a seatbelt.
9) Dado corner capture (dado + end panel)
Best for: cabinet boxes and drawer-like builds where one panel nests into another. CNC tip: dados are easy to machine; just remember sheet thickness varies. Measure your material and set the dado width for a “firm slide” fit, not a “hydraulic press” fit.
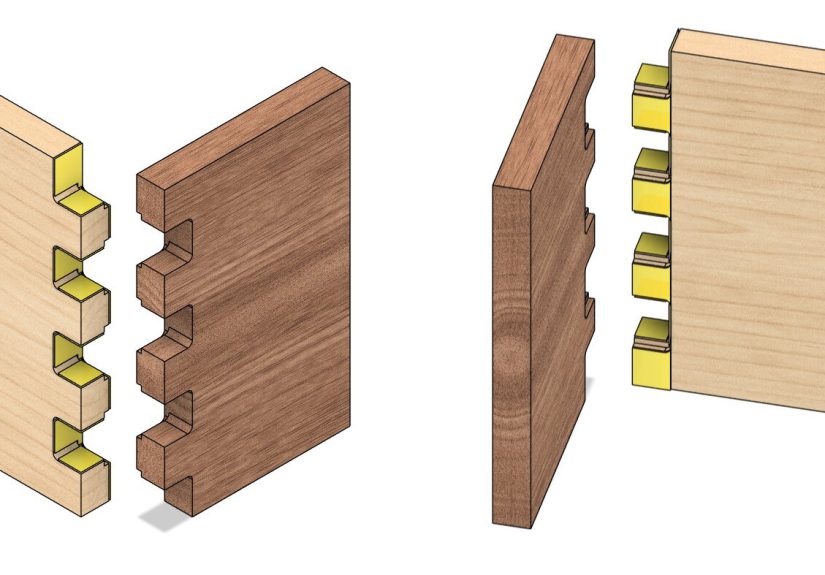
10) The CNC box joint (finger joint)
Best for: strong, iconic box corners with lots of glue area. CNC tip: size fingers to your bit and material thickness, and add tiny lead-ins so assembly doesn’t splinter plywood veneers. It’s strong, it’s repeatable, and it looks like you meant it to be fancy.
11) CNC dovetails (through-dovetail for boxes)
Best for: showpiece boxes, drawers, and corners that need mechanical resistance to pulling apart. CNC tip: plan your toolpaths carefully: dovetails are sensitive to fit, cutter angle, and tear-out. The payoff is hugeboth structurally and for bragging rights.
12) The plain miter (best when reinforced)
Best for: clean, continuous grain wrap-around looks. CNC tip: a CNC can cut accurate miters with fixtures, but a plain miter needs reinforcement because it’s mostly end grain. If you stop here, the joint may look amazing right up until gravity learns about it.
13) Miter + splines (the classic strength upgrade)
Best for: boxes, frames, and corners where you want a strong miter without changing the exterior look. CNC tip: cut spline slots with an end mill or V-bit strategy, then add long-grain splines. Strong, elegant, and it makes your corner look like it has a secret.
14) Miter + contrasting keys (decorative and tough)
Best for: gift boxes and display pieces. CNC tip: cut key slots after glue-up using a jig, or machine keys and pockets before assembly if you can hold parts safely. Contrasting wood keys say “artisan.” Matching keys say “stealth mode.”
15) Corner blocks / gussets (CNC-cut triangles to the rescue)
Best for: utility builds and furniture where corners take abuse. CNC tip: cut repeatable gussets from scrap and glue/screw them inside corners. This is the woodworking equivalent of adding extra rebar: not glamorous, extremely effective.
16) Half-lap corner joint
Best for: frames, box edges, and “I want it square without drama” builds. CNC tip: pocket each half to exactly half thickness, then assemble flush. It’s strong, self-registering, and doesn’t require fancy cuttersjust accurate depth control.
17) Bridle joint (open mortise-and-tenon style corner)
Best for: frame corners and strong right-angle connections. CNC tip: machine the open mortise (slot) and the matching tenon (tab) in the same program. Great strength and alignment, especially in hardwood or high-quality plywood.
18) Tab-and-slot press-fit joinery (flat-pack favorite)
Best for: CNC furniture, shelves, enclosures, and “no clamps” assembly. CNC tip: design tabs/slots based on actual measured material thickness, then dial in clearance. Add small chamfers to tabs for easier starting, and add corner relief so square tabs can seat fully.
19) Knock-down hardware (cam locks, cross dowels, threaded inserts)
Best for: furniture you need to move, ship flat, or disassemble. CNC tip: let the CNC drill perfectly placed holes and recesses for cam locks, barrel nuts/cross dowels, and threaded inserts. The result is repeatable, professional assembly that can be taken apart without turning your project into firewood.
Make any CNC corner joint fit better: the “inside corner” toolkit
Even the best joint fails if the parts can’t seat. Here are CNC-friendly ways to handle internal corners and improve fit:
- Dogbone relief: add circular relief at internal corners so square tabs fit into rounded pockets.
- T-bone relief: extend relief in one direction when you want a cleaner look than full dogbones.
- Smaller cutter for pockets: slower, but reduces corner radius.
- Manual corner squaring: if aesthetics matter, clean corners with a chisel after machining.
- Test coupons: cut a small tab/slot sample before committing a whole sheet.
Common CNC corner mistakes (and how to dodge them)
- Assuming plywood thickness: measure it. Then measure it again. Then accept that it’s still weird.
- Over-tight press fits: aim for “snug” not “requires a mallet and therapy.”
- No allowance for glue: glue adds thickness; tiny clearances disappear fast.
- Ignoring grain direction on solid wood: movement happensdesign joints accordingly.
- Weak workholding: a perfect toolpath can’t fix a part that shifts mid-cut.
Conclusion
The “best” way to join CNC corners depends on what you’re building and how you want it to live in the world: forever glued, proudly displayed, knocked down for moving day, or rebuilt five times because you keep “improving the design.”
If you want fast and functional, start with rabbets, dados, and reinforced butt joints. If you want strength and style, box joints and dovetails bring the drama (the good kind). If you want modern maker magic, tab-and-slot and knock-down hardware let you build furniture like a grown-up Lego setminus the foot pain.
Extra: Shop-floor experiences (the stuff you only learn after a few builds)
The first time you try tab-and-slot corners, you’ll probably design them like a textbook: perfect 0.750-inch slots for “3/4-inch” plywood, crisp 90° internal corners, and a confident belief that the universe respects your CAD drawings. Then you’ll cut the parts, try to assemble them, and discover three things at once: (1) your slots are too small, (2) your “square” tabs don’t fit into rounded corners, and (3) confidence is not an approved assembly lubricant.
After that, most makers develop a ritual: measure the sheet with calipers in a few places, average it, and cut a tiny test coupon. That coupon is your fortune teller. If it slips together with gentle hand pressure, you’re in the sweet spot. If it drops in like a hot dog down a hallway, tighten the fit. If you need a mallet, widen the slot a hair or add a slightly bigger corner relief. And if you split a tab, congratulationsyou’ve learned why chamfers and fillets are not “optional flair,” but actual sanity tools.
You also learn which joints forgive real life. Rabbets and locking rabbets are wonderfully tolerant when your plywood thickness is off by a few thousandths. Box joints look intimidating, but once you dial in finger width and tool diameter, they become repeatable and strongespecially if you keep the grain/ply orientation in mind and avoid leaving razor-thin fingers in fragile veneer layers. Dovetails are a joy when they fit and a comedy sketch when they don’t, so it helps to treat dovetail cuts like you’d treat baking: small adjustments, test pieces, and no sudden “eh, close enough.”
Another experience you’ll run into is the “invisible glue problem.” When you design a press-fit joint that’s perfect dry, then add glue, it suddenly becomes not perfect. Glue takes up space, swells fibers, and turns your beautiful assembly into a wrestling match. A tiny bit of clearanceplus chamferscan make glue-up calmer and cleaner. And don’t underestimate simple corner blocks or gussets. They’re not glamorous, but they make a box feel like a box, not like four panels having a group chat about separating.
Finally, there’s the joy of knock-down hardware: the first time you CNC-drill accurate holes for cam locks or threaded inserts and the parts pull together square, you’ll feel like you just unlocked “manufacturing mode.” It’s also the moment you realize why production shops love repeatable references, jigs, and standardized hole patterns. The CNC doesn’t just cut shapesit can quietly handle the boring precision that makes assembly smooth. And smooth assembly is the difference between “I made this!” and “I made this, but please don’t touch it.”