Table of Contents >> Show >> Hide
- Why Loudness Problems Happen (And Why It’s Not Just “Your Speakers Being Dramatic”)
- What “Volume Leveling” in WMP 12 Really Means
- Step-by-Step: Turn On Auto Volume Leveling in WMP 12
- Make It Automatic for New Music You Add
- How to Apply Volume Leveling to an Existing Library (Without Losing a Weekend)
- What You Should Hear After It’s Working
- Troubleshooting: When Volume Leveling “Does Nothing”
- Best Practices (So You Fix Loudness Without Creating New Weirdness)
- Quick Recap
- of Real-World “This Is What It’s Like” Experiences
- Conclusion
If your music library feels like it was mastered by a committee of toddlers fighting over a volume knob,
you’re not imagining things. One track whispers like it’s sharing secrets, the next one arrives like a
marching band that did three espresso shots. The good news: Windows Media Player 12 (WMP 12) has a built-in
fix called Auto Volume Levelingand it can dramatically reduce those “why is this suddenly SO LOUD?”
moments.
In this guide, you’ll learn how to turn on volume leveling in WMP 12, how it actually works (and what it
absolutely does not do), how to apply it to new and existing files, and what to try when it seems
like WMP is pretending it never met your music collection.
Why Loudness Problems Happen (And Why It’s Not Just “Your Speakers Being Dramatic”)
Loudness differences usually come from mixed sources: ripped CDs, downloaded purchases, older MP3s from
the era when “bitrate” was a personality trait, live recordings, and newer tracks mastered louder than a
lawnmower at noon. When you shuffle all of that together, the loudness jumps can be severeeven if your
player volume slider never moves.
Volume leveling (also called normalization in everyday conversation) aims to make playback feel consistent
by adjusting gain during playback. In WMP 12, it does this in a way that’s designed to be non-destructive:
it doesn’t rewrite the audio waveform like an editor would; it relies on stored leveling information.
What “Volume Leveling” in WMP 12 Really Means
WMP 12’s Auto Volume Leveling measures a track and stores a “volume-leveling value” so it can compensate
later during playback. The important part is that the file needs that value availableeither already present
or created by WMP when it analyzes the track.
Key limitations to know up front
- Format matters: Volume leveling is available for MP3 and WMA files
that contain (or can receive) a volume-leveling value. If you’re playing WAV or many other formats, don’t be shocked
if WMP shrugs politely. - It may need a “first play” analysis: WMP typically adds leveling info after the file is analyzed
often by playing the whole track through at least once with auto-leveling enabled. - It’s not a studio remaster: It won’t magically remove distortion, fix clipped audio, or restore dynamics.
It simply helps reduce perceived volume swings.
Step-by-Step: Turn On Auto Volume Leveling in WMP 12
The setting you want lives under WMP’s Enhancements menubut you usually need to be in
Now Playing mode to see it.
1) Switch to Now Playing mode
- Open Windows Media Player.
- If you’re in Library mode, switch to Now Playing (there’s typically a “Switch to Now Playing” button).
If you can’t find the right menus, you’re almost always stuck in the wrong view. It’s like looking for your car keys
while you’re still inside the grocery storeyou can do it, but you’ll feel silly later.
2) Open the Enhancements menu
- Right-click an empty area in the Now Playing window.
- Choose Enhancements.
If you don’t see the menu bar, pressing Alt can reveal it in some setups, then you can reach
enhancements through the View menu.
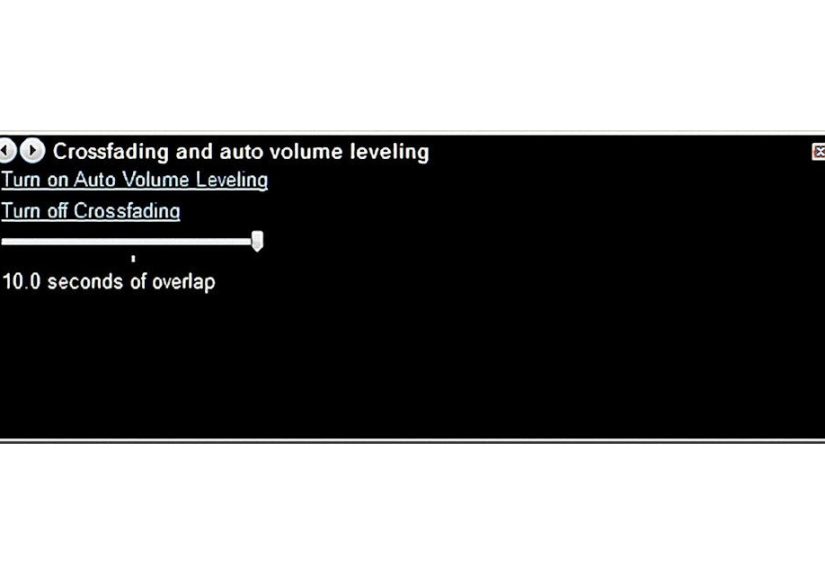
3) Choose “Crossfading and auto volume leveling”
From Enhancements, select Crossfading and auto volume leveling. A small control panel appears
over the player controls.
4) Click “Turn on Auto Volume Leveling”
Click Turn on Auto Volume Leveling. If it says “Turn off,” it’s already enabled (congrats,
you’re ahead of the plot).
Make It Automatic for New Music You Add
Turning on Auto Volume Leveling helps during playback, but you also want WMP to generate leveling info for
new files as they’re added to your library. There’s a separate checkbox for that.
Enable “Add volume leveling information values for new files”
- In WMP, go to Organize > Options.
- Open the Library tab.
- Check Add volume leveling information values for new files.
- Click Apply and then OK.
This helps ensure newly added MP3/WMA tracks get the leveling metadata without you having to remember to “do the thing” later.
How to Apply Volume Leveling to an Existing Library (Without Losing a Weekend)
Here’s the part that surprises people: some tracks won’t have a volume-leveling value until they’ve been analyzed.
One common method is to play each track all the way through at least once with auto-leveling enabled. WMP then uses
that stored value whenever you play the track in the future.
Practical ways to speed this up
- Let a playlist run while you do literally anything else: Build a long playlist (or shuffle your whole library)
and let it play quietly in the background so WMP can analyze tracks over time. (No, it’s not instant. Yes, it’s annoying.
Think of it as meal-prepping, but for your ears.) - Re-add the library approach: Some users report better results by removing items from the WMP library (not deleting
the actual files), turning on the “add volume leveling info” option, then re-adding the music. This can trigger analysis on import,
depending on how your setup behaves.
What You Should Hear After It’s Working
Once tracks have leveling info and Auto Volume Leveling is enabled, shuffle should feel less like a loudness rollercoaster.
A quiet acoustic song should come up a bit; a brick-walled modern master should calm down. It won’t make everything identical,
but it should reduce the biggest jumps.
A quick example
Imagine a playlist that mixes:
- A 1980s CD rip that’s relatively quiet
- A modern pop track mastered loud
- A live recording with wide dynamics
With volume leveling, the first track shouldn’t force you to crank the speakers, and the second track shouldn’t punish you
for doing so. The live track may still feel dynamic (because it is), but it should be less likely to jump from whisper to roar
compared to un-leveled playback.
Troubleshooting: When Volume Leveling “Does Nothing”
Problem: You can’t find the option
- Fix: Switch to Now Playing, then right-click and look under Enhancements.
That’s where “Crossfading and auto volume leveling” usually lives in WMP 12.
Problem: It’s turned on, but tracks still vary wildly
- Check file types: MP3/WMA are the typical supported formats for WMP’s leveling. If your library is mostly WAV/FLAC,
WMP’s built-in leveling may not apply the way you expect. - Confirm the track has leveling info: Many files need to be analyzed (often by playing the entire file with auto-leveling enabled)
before WMP consistently levels them. - Turn on the library import checkbox: Make sure Add volume leveling information values for new files is enabled so future imports
don’t arrive “raw.”
Problem: Enhancements or audio drivers are messing with the result
Audio can be processed in multiple places: inside WMP, in your sound driver, and in Windows itself. If the output sounds strange
(pumping, dull, or inconsistent), try simplifying the chain:
- Disable extra audio enhancements: Windows provides an option to disable enhancements/sound effects in device properties,
which can help isolate what’s doing what. - Update/reinstall audio drivers if things are broken: Some troubleshooting guides recommend reinstalling audio drivers when
enhancement features behave unpredictably.
Backup plan: Use Windows “Loudness Equalization” for system-wide leveling
If you want something that affects all audio (not just WMP), Windows may offer a playback-device enhancement called
Loudness Equalization (availability depends on your audio device/driver). You’ll typically find it under
Sound settings > Playback device properties > Enhancements.
Think of WMP Auto Volume Leveling as “library-aware track leveling,” while Windows Loudness Equalization is “everything on your PC gets a seatbelt.”
Either can help; which one is best depends on whether your problem is only music playback or your entire system.
Best Practices (So You Fix Loudness Without Creating New Weirdness)
1) Give WMP time to learn your library
If you enable volume leveling today and expect perfection by the next song, WMP might disappoint you. Some tracks need a full playback pass to store
a reliable leveling value. Treat the first few sessions as “training mode.”
2) Use volume leveling for shuffle-heavy listening
Auto Volume Leveling shines when you shuffle across decades, genres, and file origins. If you only listen to one album at a time from a single source,
you might not notice muchbecause the original mastering is already consistent within that album.
3) Don’t confuse leveling with compression
Volume leveling targets overall perceived loudness. It’s not the same as heavy dynamic compression (the effect that can make quiet and loud
moments unnaturally similar). If you need late-night “everything is audible” listening, Windows Loudness Equalization or a dedicated audio tool may be
more aggressive than WMP’s approach.
Quick Recap
- Turn on Enhancements > Crossfading and auto volume leveling > Turn on Auto Volume Leveling.
- Enable Add volume leveling information values for new files under Options > Library.
- Let tracks get analyzed (often by full playback) so leveling becomes consistent over time.
- If WMP isn’t enough, consider Windows Loudness Equalization (if your device supports it).
of Real-World “This Is What It’s Like” Experiences
Here’s what people commonly experience when they start using volume leveling in WMP 12because the settings are simple, but the reality is wonderfully
human (and occasionally hilarious).
Experience #1: “I turned it on and nothing happened.”
This is the classic opener. The feature is enabled, but the loud songs still blast and the quiet ones still whisper. What’s usually happening is that
the music files don’t yet have a volume-leveling value stored. WMP often needs to analyze tracks before it can level them reliablysometimes by playing
the entire track once with auto-leveling turned on. The moment it “clicks” is usually a week later when you shuffle and realize you haven’t touched the
volume knob all evening. That’s when you feel like you’ve discovered fire… or at least discovered a setting that should have been in neon.
Experience #2: “Now Playing mode: the hidden doorway.”
Another common story: someone searches every menu, every ribbon, every tiny icon… and concludes the feature was removed. Then they switch to Now Playing
mode, right-click the empty space, and suddenly Enhancements appears like a secret level in a video game. It’s not that WMP is broken; it’s that WMP is
extremely committed to making you find settings only when you stand in the correct spot and face north.
Experience #3: “My library is huge, and WMP is… learning slowly.”
If you’ve got tens of thousands of tracks, the idea of “play each song all the way through once” sounds like a retirement plan. In practice, people tend
to handle it in chunks: they run long playlists overnight, let shuffle play while working, or re-add the library with the “add volume leveling info for new
files” option enabled to encourage WMP to analyze on import. The emotional arc usually goes: optimism → mild annoyance → acceptance → satisfaction when the
worst loudness jumps disappear.
Experience #4: “It helped… but some tracks still feel off.”
This happens most with recordings that have intentional dynamic swings (live concerts, classical, jazz) or with files sourced from older analog transfers.
Volume leveling can reduce average loudness differences, but it won’t rewrite artistic dynamics. Sometimes the “problem” track is actually the most honest
recording in your whole library. The trick is deciding whether you want consistent background listening or true dynamicsand then choosing the right tool.
Experience #5: “Windows Loudness Equalization saved my sanitywhen it existed.”
Some users try WMP leveling and then realize the bigger issue is everything else: browser audio, games, streaming, and system sounds. That’s when Windows’
Loudness Equalization becomes the heroif your audio driver exposes it. When it’s missing, the usual rabbit hole involves device properties, enhancements
tabs, and sometimes driver updates. It’s not glamorous, but when you finally get consistent volume across apps, the reward is immediate: fewer jump-scares,
fewer frantic volume dives, and fewer “SORRY!” shouted across the house.
Conclusion
WMP 12’s Auto Volume Leveling is one of those rare, delightful features that can make a big difference with a small changeespecially if you
shuffle music from mixed sources. Turn it on in Now Playing mode, enable the library option to add leveling info for new files, and give WMP time to analyze
your collection. If your loudness problems extend beyond WMP, Windows Loudness Equalization (when available) can provide a system-wide safety net.