Table of Contents >> Show >> Hide
- Why Old Window Frames Make Such Great Upcycling Projects
- Safety First: The Unsexy (But Important) Part
- Where to Find an Antique Window Frame (Without Becoming a Full-Time Treasure Hunter)
- Choosing the Right Window for Your Project
- Prep Like a Pro (Without Over-Complicating It)
- 12 Upcycling Ideas for an Old Antique Window Frame
- 1) Photo Grid Family Gallery
- 2) Seasonal Wreath Backdrop
- 3) Memo Board That Doesn’t Look Like an Office Supply Aisle
- 4) Antique Window Mirror Statement Piece
- 5) Jewelry and Accessories Organizer
- 6) “Floating” Botanical Display
- 7) Headboard Accent (Leaned or Mounted)
- 8) Room Divider Panel (For Small Spaces)
- 9) Corkboard or Fabric Pinboard Insert
- 10) Porch or Entryway Sign Frame
- 11) Cabinet Door or Hutch Insert
- 12) Garden Cold-Frame “Inspiration Piece” (Display-Only Version)
- Style It So It Looks Intentional
- Care and Maintenance (So Your Project Ages Gracefully)
- Cost, Time, and “How Much Chaos Will This Create?”
- FAQ: Common Questions About Upcycling Antique Window Frames
- Conclusion: Give That Window a Second Life
- Real-World Experiences: What People Actually Run Into (And How They Get Past It)
An old antique window frame is basically a time machine with hinges. It once separated “inside” from “outside,” heard decades of conversations,
survived at least one questionable paint color trend, and now it’s waiting for its second actpreferably somewhere more glamorous than the back of a shed.
If you’ve ever spotted one at a salvage shop and felt your DIY senses tingle, you’re not alone. Reclaimed window frames are a sweet spot where charm,
sustainability, and creativity overlap… like a Venn diagram wearing a cute apron.
In this guide, we’ll look at how to choose the right vintage window, how to prep it safely (especially if it’s from the pre-1978 era),
and a menu of upcycling ideasfrom wall art to functional organizers. You’ll also get styling tips so your project looks “collected” instead of
“I found this in a dumpster and now we’re roommates.”
Why Old Window Frames Make Such Great Upcycling Projects
Today’s mass-produced décor often has the personality of a plain rice cake. Antique window frames, on the other hand, bring instant texture:
aged wood grain, wavy glass (sometimes), chunky muntins, original hardware, and those perfectly imperfect paint layers that whisper,
“I have stories, and I’m not sharing them with just anyone.”
- They’re architectural art. The grid of panes naturally frames photos, notes, greenery, or seasonal décor.
- They’re sustainable. Reusing salvage keeps usable material out of landfills and reduces demand for new raw materials.
- They’re flexible. Lean it, hang it, hinge it, prop it, or build around itwindow frames play well with other materials.
- They fit multiple styles. Farmhouse, cottage, industrial, modern vintageold windows are décor shapeshifters.
Safety First: The Unsexy (But Important) Part
Before we get dreamy, let’s get real. Vintage windows can come with hazards: lead-based paint, fragile glass, splinters, old nails, and mystery grime.
If you’re working with a frame from an older home, assume you need to be cautiousespecially with sanding, scraping, or any process that creates dust.
Quick Safety Checklist
- Lead paint risk: If the window is from a home built before 1978, treat paint as potentially lead-based. Avoid dry sanding or aggressive scraping.
- Glass and sharp edges: Cracked panes can cut easily. If glass is damaged, consider leaving it in place and sealing edges, or removing it with help from someone experienced.
- Ventilation matters: Work outside or in a well-ventilated area, especially when cleaning or painting.
- Protective gear: Gloves, eye protection, and a well-fitting mask are smart moves. If lead is possible, use lead-safe practices and keep kids/pets away from the work zone.
- When in doubt: Ask a knowledgeable adult or a professional for helpespecially with heavy frames, glass removal, or paint stripping.
Think of safety like seasoning: it’s not the main dish, but skipping it makes everything worse.
Where to Find an Antique Window Frame (Without Becoming a Full-Time Treasure Hunter)
The best part about hunting for reclaimed windows is that you don’t need to wear a fedora or carry a whip (though I won’t stop you).
Start with places that already specialize in reusable building materials and architectural salvage:
- Architectural salvage stores: Often the biggest selection, from tiny sash windows to dramatic multi-pane pieces.
- ReStore locations: Great for budget-friendly finds, and inventory changes often.
- Estate sales and flea markets: Ideal if you’re after older, more detailed frames.
- Local demolition and deconstruction companies: Some sell salvage directly or donate to resale organizations.
Pro tip: Bring a tape measure, a few photos of your space, and a plan for transport. That “cute little window” becomes less cute when it doesn’t fit in your car.
Choosing the Right Window for Your Project
Not every old window is destined to become wall art. Choose based on what you want it to do.
Look for These Green Flags
- Sturdy joinery: A little looseness is fixable; a frame that flexes like a noodle is a pass.
- Interesting features: Arched tops, chunky muntins, original latches, or layered paint can be part of the charm.
- Pane layout that matches your goal: Many small panes are great for photo grids; large panes are better for mirrors or message boards.
And Watch Out for These Red Flags
- Extensive rot: Soft wood that crumbles easily can be unsafe and hard to stabilize.
- Severe pest damage: Tiny holes and sawdust-like debris can be a sign of wood-boring insects.
- Heavily flaking paint: Especially if lead is possiblechoose a frame with less paint disturbance if you want a simpler project.
Prep Like a Pro (Without Over-Complicating It)
The goal isn’t to erase historyit’s to make the piece safe, stable, and ready to live indoors without shedding dust, splinters, or drama.
There are two main approaches: preserve the patina or refinish for a cleaner look.
Option A: Preserve the Patina
If you love the chipped paint and weathered wood, focus on gentle cleaning and stabilization. Wipe grime with mild soap and water,
let it dry completely, then seal it with a clear finish that locks in the look. This is the “keep it vintage” path.
Option B: Refinish for a Fresh Start
If you want a crisp painted finish (hello, bright white cottagecore), clean first, then repair loose joints and fill small gaps.
Avoid dusty methods on older paint. If you suspect lead paint, use lead-safe practices and consider professional help for any paint removal.
After the surface is sound, prime and paint. A low-luster finish often looks more authentic than high-gloss.
Basic Prep Steps (Safe + Simple)
- Clean: Remove dirt and cobwebs with a damp cloth. A soft brush helps in crevices.
- Stabilize: Tighten loose hardware, and reinforce wobbly corners if needed.
- Seal: Use a clear sealer or appropriate paint finish to reduce shedding and make it wipeable.
- Plan the hanging/leaning setup: Decide how it will be displayed before you decorate it.
If you’re aiming for “antique shop beautiful,” remember: most vintage décor looks better when it’s clean enough to be loved but not so perfect that it looks brand new.
12 Upcycling Ideas for an Old Antique Window Frame
Here’s the fun part. Pick an idea that matches your space, your patience level, and how many times you want to say, “I can totally finish this in one weekend.”
1) Photo Grid Family Gallery
Use each pane as a mini frame for family photos, travel pics, or kid artwork. For a cohesive look, stick to one photo style (black-and-white, warm-toned, or all color).
If you want it extra polished, keep the backing consistent so the panes feel like a gallery wall in one piece.
2) Seasonal Wreath Backdrop
A window frame behind a wreath creates instant depthlike a stage for your décor. Swap the wreath seasonally: greenery in winter, wildflowers in spring,
citrus in summer, and dried leaves in fall. It’s a simple update with big visual payoff.
3) Memo Board That Doesn’t Look Like an Office Supply Aisle
Turn panes into sections for notes, reminders, or meal planning. This works especially well in kitchens, mudrooms, or entryways where life gets hectic.
Bonus: The pane grid naturally keeps your scribbles organized, even if your brain is not.
4) Antique Window Mirror Statement Piece
Mirror panels behind the muntins create an elegant, vintage vibe. It’s great above a mantel, in a hallway, or behind a console table.
If you love “old world” style, this one delivers instant drama without needing more clutter.
5) Jewelry and Accessories Organizer
Add discreet hooks along the frame to hang necklaces, bracelets, and scarves. If the window has multiple panes, you can sort by type or color.
The result is functional and looks like boutique display styling.
6) “Floating” Botanical Display
If the panes are intact, you can create a pressed-botanical look by placing dried leaves or flowers where they’ll be visible in the grid.
This works beautifully for cottage, farmhouse, and nature-inspired interiors.
7) Headboard Accent (Leaned or Mounted)
For a cozy bedroom twist, use a large window frame as a decorative headboard element. Lean it securely behind the bed or mount it safely,
then style it with subtle garland or string lights. The look is romantic without being over-the-top.
8) Room Divider Panel (For Small Spaces)
Pair two or three frames with hinges to create a folding divider. It can define a reading nook, hide workout gear, or give privacy in a shared space.
Choose lighter frames and keep stability in mind if pets or younger kids are around.
9) Corkboard or Fabric Pinboard Insert
Replace glass with cork or stretch linen behind the muntins. This makes a classy pinboard for invitations, notes, or inspiration images.
It’s especially handy in a home office that wants to look like a magazine spread.
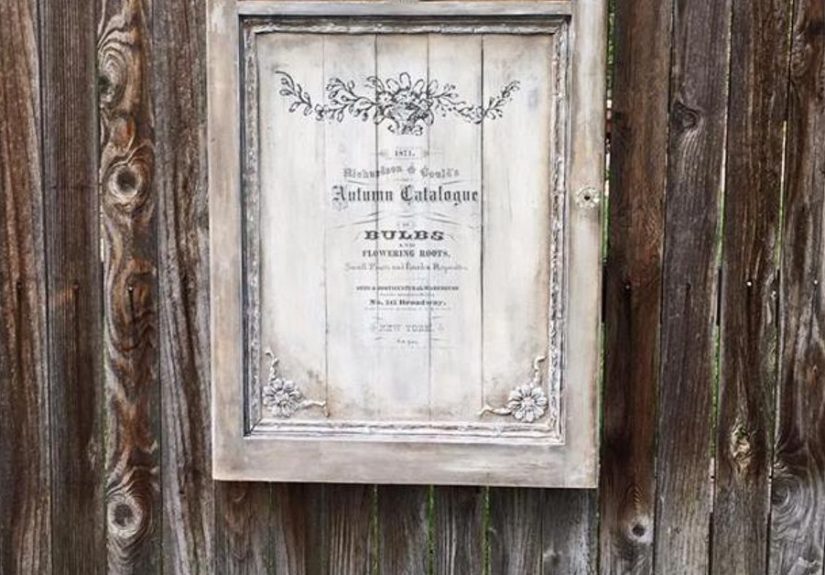
10) Porch or Entryway Sign Frame
Add a painted panel behind a large pane area for a welcome sign, family name, or house number.
Keep lettering simple so the frame remains the star of the show.
11) Cabinet Door or Hutch Insert
If you have a built-in, a pantry, or an old cabinet that needs personality, an antique window frame can become a door front or decorative insert.
This is a bigger project, but the character payoff is huge.
12) Garden Cold-Frame “Inspiration Piece” (Display-Only Version)
You’ve probably seen greenhouses made from reclaimed windows. They’re gorgeousand they can be complex.
A simpler, safer alternative is using a window frame as garden décor: lean it against a fence behind plants or hang it on an exterior wall as a decorative feature.
You still get the vintage greenhouse vibe without committing to a full build.
Style It So It Looks Intentional
The difference between “curated vintage” and “grandpa’s garage” is usually styling. Try these approaches:
Farmhouse and Rustic
Keep the frame distressed, pair it with black metal accents, and add greenery. Neutral backdrops (cream, tan, warm gray) let the texture shine.
Cottage and Coastal
Lighter paint colors and softer details work well here. Consider pale whites, sandy tones, or muted blues. Pair with woven textures and natural elements.
Modern Vintage
Let the window be the only “old” element. Mount it cleanly, keep surrounding décor minimal, and use it as a bold focal point in a modern room.
Care and Maintenance (So Your Project Ages Gracefully)
- Indoors: Dust with a soft cloth and avoid soaking old wood. A sealed finish makes it easier to wipe clean.
- Outdoors: Weather is relentless. Use exterior-rated sealers and place the piece where it’s protected from direct rain and harsh sun.
- Glass: Clean gently. If panes are wobbly, prioritize stabilizing them before hanging.
Cost, Time, and “How Much Chaos Will This Create?”
Most antique window frame upcycles are budget-friendly compared to buying new statement décor. You’ll usually spend more time than money.
A simple “clean + seal + decorate” can be done in a day. Projects involving inserts, hinges, or structural changes take longer.
A realistic mindset helps: plan for a little mess, allow drying time, and accept that the last 10% of a DIY project takes 50% of the time.
That’s just math. Unfair, but consistent.
FAQ: Common Questions About Upcycling Antique Window Frames
Should I remove the glass?
Not always. If the glass is stable and unbroken, leaving it can preserve the authentic look. If it’s cracked or dangerously loose, consider removal with experienced help.
Can I paint over the existing paint?
Often, yesespecially if you’re sealing in a vintage finish. But if the paint is peeling heavily or you suspect lead, use lead-safe practices and avoid creating dust.
How do I hang a heavy window frame safely?
Treat it like a heavy mirror: use appropriate wall anchors, secure hanging hardware, and place it where it won’t be bumped.
When it’s very heavy, lean it on a sturdy surface instead of hanging.
Conclusion: Give That Window a Second Life
Upcycling an old antique window frame is one of those rare projects that feels both creative and meaningful. You’re not just decorating
you’re preserving character, reducing waste, and creating a piece that no big-box store can duplicate.
Whether you turn it into a photo display, a message board, a mirror, or a seasonal backdrop, the magic is the same:
something old becomes useful again, and your space gets a story worth telling.
So go rescue that window. Clean it up, give it a purpose, and let it shine. It’s waited long enough.
Real-World Experiences: What People Actually Run Into (And How They Get Past It)
Let’s talk about the part that doesn’t show up in glossy “after” photos: the in-between moments. If you’ve ever started a DIY project feeling unstoppable
and ended the day sitting on the floor, covered in dust, whispering “why,” congratulationsyou’re officially part of the upcycling community.
Based on common DIYer experiences, antique window frames tend to come with a few predictable plot twists.
Experience #1: The window is heavier than it looks. People often assume an old frame will be “light like décor.”
Then they pick it up and realize it’s “light like a small oak tree.” The fix is simple: plan the display first.
If you’re unsure about hanging, leaning it on a mantel, shelf, or console can look just as intentional and reduces the risk of wall damage.
Many DIYers end up happier with a leaned look because it’s flexibleyou can restyle it anytime without patching holes.
Experience #2: Cleaning is oddly satisfying… until it’s not. The first wipe reveals gorgeous wood grain.
The tenth wipe reveals… more grime. A lot of people discover that “vintage charm” sometimes includes sticky residue, mystery paint drips,
and what can only be described as “historic dust.” The win here is pacing: clean in stages and let it dry fully.
The best-looking results usually come from “clean enough to be safe and loved,” not “sterile like a hospital hallway.”
Experience #3: The glass is either magical or terrifying. Some panes are wavy and gorgeous; others are cracked and make you nervous.
Many DIYers choose to keep intact panes because they add authenticity and depthespecially when the window is used as a photo grid.
When panes are damaged, the most common lesson is to stop improvising and get help. It’s not a failure; it’s just smart.
Nobody gets extra points for wrestling antique glass like it’s an extreme sport.
Experience #4: Paint decisions can spiral. People start with, “Maybe just a quick white coat,”
then end up debating warm white vs. cool white vs. “white but make it nostalgic.”
A helpful approach is to match the finish to the room’s mood: soft matte for cozy spaces, low-luster for classic farmhouse,
and cleaner lines for modern vintage. DIYers who test a small, hidden spot first usually avoid the heartbreak of repainting an entire frame.
Experience #5: Styling is where the project becomes personal. The window may be the structure,
but what you put inside the panes is the story: family photos, pressed botanicals, seasonal wreaths, postcards from trips,
kids’ drawings, even a rotating “currently obsessed with” collage. Many people say this is the moment the project feels less like a craft
and more like a piece of their home’s identity. It’s also the stage where you can update the look whenever you want
no tools required, just a fresh set of photos or a new seasonal accent.
The overall takeaway from real-world upcycling: expect a little unpredictability, keep safety in the front of your mind,
and give yourself permission to change plans. The best antique window frame projects aren’t the ones that go perfectly.
They’re the ones that end up feeling like they belonged in your home all along.