Table of Contents >> Show >> Hide
- Why a Light Fixture Makes a Shockingly Good Terrarium
- What to Look for When Thrifting the Perfect $3 Fixture
- Tools and Materials
- Safety First: De-Energize Like You Mean It
- Step-by-Step: Turn the Fixture Into an Open Succulent Terrarium
- Step 1: Disassemble and clean
- Step 2: Decide how it will sit (or hang)
- Step 3: Build a “false bottom” drainage layer
- Step 4 (optional but helpful): Add a thin charcoal layer
- Step 5: Add a fast-draining soil mix
- Step 6: Choose the right succulents for the space
- Step 7: Plant, style, and top dress
- Step 8: The first watering (don’t get excited)
- Design Ideas That Look High-End (Even If Your Budget Isn’t)
- Care Guide: How to Keep Your Succulent Terrarium Alive
- Troubleshooting: Common Problems and Quick Fixes
- Cost Breakdown: The $3 Myth (And Why It’s Still a Deal)
- Conclusion: Your Light Fixture Has Officially Found Its Purpose
- Real-World Experiences and Lessons (The Stuff You Only Learn After You Build One)
- 1) The first week is a confidence trap
- 2) You’ll learn what “bright light” actually means
- 3) Precision watering becomes weirdly satisfying
- 4) The design evolves (because plants are not furniture)
- 5) You’ll become picky about soil (and that’s a good thing)
- 6) The thrift-store hunt becomes part of the hobby
There are two kinds of thrift-store light fixtures: the ones that look like they belong in a 1997 dentist office,
and the ones that look like they belong in a 1997 dentist office… but with potential.
If you’ve ever spotted a dusty glass globe pendant for $3 and thought, “Why is this giving haunted hallway vibes?”
congratulationsyou’re holding the perfect shell for a chic, modern open succulent terrarium.
This project is part home décor glow-up, part plant science, and part “I swear I’m not a hoarderI’m an upcycler.”
You’ll strip the fixture down to its pretty parts, build a breathable mini landscape inside, and end up with a
statement piece that looks boutique, not bargain-bin.
Why a Light Fixture Makes a Shockingly Good Terrarium
Many older fixtures already have what terrarium builders crave: glass, structure, and drama.
Think about itpendant globes, lantern-style fixtures, and glass domes are basically ready-made display cases.
The only thing missing is a tiny desert scene and the confidence to say, “Yes, I meant to do that.”
The one rule: succulents need an open terrarium
Closed terrariums trap humidity, which is basically a spa day for fungi and a nightmare for succulents.
Your goal is airflow, fast-draining soil, and a watering schedule that’s more “light mist of responsibility”
than “tropical monsoon.”
What to Look for When Thrifting the Perfect $3 Fixture
- Glass globe pendants (open bottom or side opening): easiest to plant and maintain.
- Lantern fixtures with glass panels: great airflow and a built-in frame.
- Wall sconces with a glass shade: perfect for a “living art” moment.
- Chandelier parts (single glass cup or globe): ideal for mini terrariums in multiples.
Quick inspection checklist: avoid cracked glass, razor-sharp chips, and anything that smells like an electrical fire
had a long, meaningful relationship with it. A little rust is finemoldy wiring insulation is not.
Tools and Materials
Core supplies
- Outdated light fixture (glass globe/lantern/sconce style)
- Small rocks or LECA (expanded clay pebbles) for a drainage layer
- Optional: horticultural or activated charcoal
- Fast-draining cactus/succulent soil mix (or DIY gritty mix)
- Mini or slow-growing succulents
- Top dressing: pebbles, lava rock, coarse sand, or grit
- Small trowel/spoon, tweezers, and a soft brush
Nice-to-have upgrades
- Mesh screen (to separate drainage layer from soil)
- Microfiber cloth + rubbing alcohol for glass cleanup
- Small watering bottle, pipette, or squeeze bottle (precision = fewer plant funerals)
- A base (wood round, metal tray, or the fixture’s canopy piece if it works)
Safety First: De-Energize Like You Mean It
If the fixture is still wired, treat it like it’s starring in a suspense film titled Surprise Voltage.
Turn off power at the breaker before touching any wires, and verify power is off with a voltage tester.
If electrical work makes you nervous (valid), buy a fixture that’s already disconnected or have someone qualified
remove the wiring. You only need the fixture’s body and glass for this projectnot a functioning light.
Step-by-Step: Turn the Fixture Into an Open Succulent Terrarium
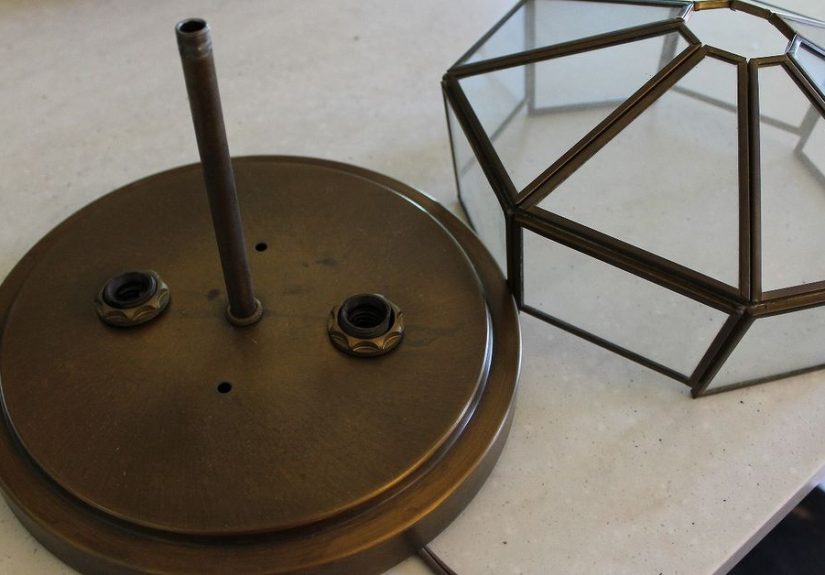
Step 1: Disassemble and clean
Remove bulbs, sockets, wiring, and any dusty mystery bits. Wash the glass with warm soapy water, then wipe with
rubbing alcohol for a streak-free finish. For metal frames, a damp cloth and mild cleaner usually does it.
Let everything dry completelysucculents don’t enjoy sitting in “leftover rinse water ambiance.”
Step 2: Decide how it will sit (or hang)
You’ve got two main styles:
- Tabletop terrarium: set the globe/lantern on a stable base. A wood round, shallow tray, or
even the fixture’s canopy plate can work as a stand. - Hanging terrarium: keep the chain/frame and hang it near bright light. Just remember:
heavier than it looks is a real design aesthetic, so anchor properly.
Step 3: Build a “false bottom” drainage layer
Most terrariums don’t have drainage holes, so you’re creating a buffer zone where excess water can settle away from
roots. Add about 1 inch of LECA, aquarium gravel, or small stones (more if your container is large).
This doesn’t magically fix overwatering, but it does give you a little forgivenesslike training wheels for hydration.
Step 4 (optional but helpful): Add a thin charcoal layer
Sprinkle a thin layer of horticultural/activated charcoal to help keep things fresher. Is it mandatory? No.
Is it nice, especially in glass containers that can trap odors? Yes. Keep it thinthis is not a charcoal briquette
cosplay event.
Step 5: Add a fast-draining soil mix
Succulents want soil that dries quickly and stays airy. Use a cactus/succulent mix, or make your own by combining
potting mix with gritty amendments like perlite/pumice and coarse sand. The goal is a loose, well-aerated blend that
won’t stay wet around the roots.
Easy DIY option: mix roughly equal parts potting soil and coarse drainage material (like perlite
or pumice), then add a smaller amount of coarse sand/grit if you want it even faster-draining. Avoid fine play sand,
which can compact and hold moisture.
Step 6: Choose the right succulents for the space
Pick varieties that stay compact and tolerate indoor conditions. Good candidates include:
- Haworthia (great for bright, indirect light)
- Gasteria (slow-growing and forgiving)
- Small echeveria (needs brighter light; dramatic rosettes)
- Mini crassula (some types stay tidy and upright)
- Sedum varieties (choose slower, compact types for containers)
Avoid mixing succulents with plants that want consistent moisture (like mosses or many ferns). That’s not a “cute
eclectic mix”it’s incompatible roommates.
Step 7: Plant, style, and top dress
- Scoop soil into gentle slopes for a natural landscape look.
- Create planting holes, set succulents in place, and firm soil lightly around roots.
- Add top dressing (pebbles, grit, lava rock) to keep leaves off damp soil and reduce fungus gnats.
- Brush soil off leavessucculents look best when they’re not wearing a dirt scarf.
Step 8: The first watering (don’t get excited)
If you planted dry-rooted cuttings, wait a few days before watering so any root disturbances can settle.
When you water, do it sparinglyuse a squeeze bottle or pipette and aim for the soil, not the leaves.
In a hole-less container, the phrase “just a little more” is how overwatering becomes a lifestyle.
Design Ideas That Look High-End (Even If Your Budget Isn’t)
1) The “Modern Desert Dome”
A clear globe on a simple wood base, with one haworthia, one mini echeveria, and clean white gravel.
Minimalist, bright, and suspiciously expensive-looking.
2) The “Vintage Lantern, But Make It Botany”
Use a lantern fixture with glass panels, add black lava rock, and plant upright gasteria for a sculptural vibe.
Great for shelves and entry tables.
3) The “Chandelier Mini-Series”
If you find a sad, half-broken chandelier, harvest the glass cups and make several tiny terrariums.
Line them up like a succulent boy band: small, coordinated, and here to steal the show.
Care Guide: How to Keep Your Succulent Terrarium Alive
Light
Bright light is non-negotiable. Most succulents need very bright indoor conditions (often near a sunny window).
If they stretch, fade, or lean dramatically, they’re begging for more light.
Rotate the terrarium every week or two for even growth.
Water
Water only when the soil is fully dry. Indoors, that might be every 2–3 weeks (sometimes longer in winter).
When you do water, do it carefully and sparinglyespecially in containers without drainage holes.
If you can see standing water in the bottom layer, you’ve gone too far. Let it dry out completely before watering again.
Airflow and humidity
Keep it open. If your fixture has a removable lid or tight cloche-style top, leave it off.
Succulents want low humidity and airflowthink “dry breeze,” not “rainforest sauna.”
Maintenance
- Remove dead leaves promptly (they trap moisture and invite rot).
- Watch for pests like mealybugsdab with rubbing alcohol if spotted.
- Prune leggy growth and re-root cuttings if needed.
- Skip misting. Succulents aren’t impressed by fog machines.
Troubleshooting: Common Problems and Quick Fixes
“My succulent is getting squishy.”
Usually overwatering or poor airflow. Remove the plant, cut away rot, let it callus, and replant into drier, grittier soil.
Then water less like it’s a New Year’s resolution.
“It’s stretching and turning pale.”
Not enough light. Move closer to a brighter window or add a grow light. A terrarium can be pretty and bright
it doesn’t have to live in the emotional support corner.
“There’s algae or funk on the glass.”
Too much moisture and light hitting wet surfaces. Let it dry out longer between waterings, improve airflow, and wipe glass clean.
Top dressing helps keep soil from splashing up.
Cost Breakdown: The $3 Myth (And Why It’s Still a Deal)
Yes, the fixture is $3, but your total might land closer to $20–$40 depending on what you already have.
The good news: you’ll have leftover soil, grit, and charcoal for future projectsaka your next excuse to buy more plants.
- Thrifted light fixture: $3–$15
- Succulents (2–4 small plants): $8–$25
- Soil + grit (if you don’t have it): $8–$20
- Top dressing: $4–$10
Conclusion: Your Light Fixture Has Officially Found Its Purpose
Turning a thrift-store light fixture into a succulent terrarium is the kind of project that delivers maximum
“Wow, where did you buy that?” with minimum regret. You’re repurposing something overlooked, creating a living
centerpiece, and learning the secret truth of succulent success: airflow, gritty soil, and restraint.
So the next time you see an outdated glass globe for pocket change, don’t walk past it. Adopt it. Give it a glow-up.
And then casually act like you always have a designer terrarium budget. Your succulents don’t need to know the truth.
Real-World Experiences and Lessons (The Stuff You Only Learn After You Build One)
Here’s what people typically discover when they actually live with a light-fixture succulent terrarium for a few weeks
the little “ohhh” moments that don’t show up in the glamorous after photo.
1) The first week is a confidence trap
Right after planting, everything looks incredible. The glass is spotless, the gravel is perfectly raked, and your haworthia
is sitting there like it’s posing for an album cover. This is also the exact moment many folks overwaterbecause the setup
feels “new,” and new things must be watered, right? Not here. In a container without drainage holes, the best early-care move
is patience. Let roots settle. Let soil dry. Admire your work from a safe, non-soggy distance.
2) You’ll learn what “bright light” actually means
Plenty of homes feel bright to humans while still being dim to succulents. If your terrarium is across the room from a window,
your plants may slowly stretch toward the light like they’re reaching for the last slice of pizza. Most people end up relocating
their terrarium once or twicecloser to a sunny window, onto a brighter sill, or under a small grow light. The upside: once your
plants get the light they want, they stay compact, colorful, and tidy. The downside: you’ll start judging the lighting in every
room like you’re a plant real estate agent.
3) Precision watering becomes weirdly satisfying
A squeeze bottle or pipette feels optional until you use one. Then it becomes the difference between “I watered responsibly”
and “I created a swamp in the bottom layer.” Many terrarium owners develop a tiny ritual: check the soil, feel the weight of the
container, inspect leaves for firmness, then add a small measured drink only when truly dry. It’s less like watering a houseplant
and more like adding a controlled splash of espresso to your morningsmall, intentional, and absolutely not something you do every day.
4) The design evolves (because plants are not furniture)
Even slow-growing succulents change. Leaves drop, offsets appear, one plant decides it’s the main character, and suddenly your
“balanced arrangement” looks like a botanical reality show. Most people end up tweaking the layout: moving a plant, adding top
dressing, swapping in a new rosette, or turning leggy growth into cuttings. The project becomes less “set it and forget it” and
more “set it and lightly curate it,” which is honestly half the fun.
5) You’ll become picky about soil (and that’s a good thing)
The biggest long-term difference between a thriving terrarium and a mushy tragedy is the soil. People often start with whatever
“succulent soil” they grabbed, then learn that many bagged mixes are still too moisture-retentive indoors unless you amend them.
After a while, you’ll notice the signs: soil staying wet too long, fungus gnats showing up, or leaves getting soft. The fix is usually
simpleadd more grit (pumice/perlite/coarse sand), water less, and improve airflow. Once the mix dries quickly, your terrarium becomes
genuinely low-maintenance instead of low-key stressful.
6) The thrift-store hunt becomes part of the hobby
After one success, people tend to start “seeing terrariums everywhere.” A lantern becomes a plant case. A sconce becomes wall décor.
A broken chandelier becomes a set of mini gardens. You’ll walk into a thrift store and immediately scan for glass shapes, metal frames,
and sturdy bases. The upside is creative momentum (and very cool home décor). The only caution is to set a personal rule before you end up
with seven “future terrariums” and one small living room. Consider it your friendly reminder: you don’t have to rescue every sad pendant globe.
Just the ones that spark joyand have good airflow.