Table of Contents >> Show >> Hide
- Why Washing Machines Get Clogged in the First Place
- Simple Ways to Unclog a Washing Machine: 13 Steps
- Step 1: Unplug the washer and turn off the water
- Step 2: Confirm the problem is drainage, not just the cycle setting
- Step 3: Remove the standing water
- Step 4: Check for an unbalanced load or a suds problem
- Step 5: Pull the washer away from the wall and inspect the drain hose
- Step 6: Disconnect and flush the drain hose
- Step 7: Check the standpipe or laundry sink drain
- Step 8: Clean the drain pump filter
- Step 9: Inspect the pump area for hidden debris
- Step 10: Check the door gasket, tub outlet, and visible interior passages
- Step 11: Reconnect everything and run a short test cycle
- Step 12: Deep-clean the washer to clear residue and odor
- Step 13: Know when to stop and call a professional
- Extra Tips to Prevent Future Washer Clogs
- Common Mistakes to Avoid
- Conclusion
- Real-World Experiences With Washer Clogs: What Homeowners Usually Learn the Hard Way
If your washing machine is full of murky water and acting like it has emotionally checked out, don’t panic. A washer that won’t drain is one of the most common laundry-room problems, and in many cases, the fix is surprisingly simple. The culprit is often a clogged drain hose, a blocked pump filter, trapped lint, a small item from a pocket, too many suds, or a load that threw the machine off balance. In other words, your washer may not be broken. It may just be annoyed.
This guide walks you through 13 simple steps to unclog a washing machine safely and thoroughly. You’ll learn how to spot the most likely cause, clear common blockages, test the machine, and prevent the issue from happening again. Whether you have a top-load or front-load model, the troubleshooting logic is mostly the same: get the water out, find the restriction, clear it, and help the machine drain like it means business.
Why Washing Machines Get Clogged in the First Place
Before diving into the fix, it helps to know what usually causes the trouble. Most washer clogs start with everyday stuff: lint, hair, soap residue, coins, socks, tissues, pet fur, and the occasional mystery object that seems to have entered the drum through a portal. Over time, these bits collect in the drain hose, pump filter, or drain pump area. In other cases, the problem is not a clog inside the washer at all. A kinked hose, improper hose placement, a slow household drain, or excessive detergent can also prevent water from leaving the tub properly.
Common signs include standing water after a cycle, clothes that come out soaking wet, draining that seems painfully slow, bad smells, gurgling sounds, or a washer that refuses to spin. If your machine stops mid-cycle and gives you attitude in the form of an error code, poor drainage is still one of the top suspects.
Simple Ways to Unclog a Washing Machine: 13 Steps
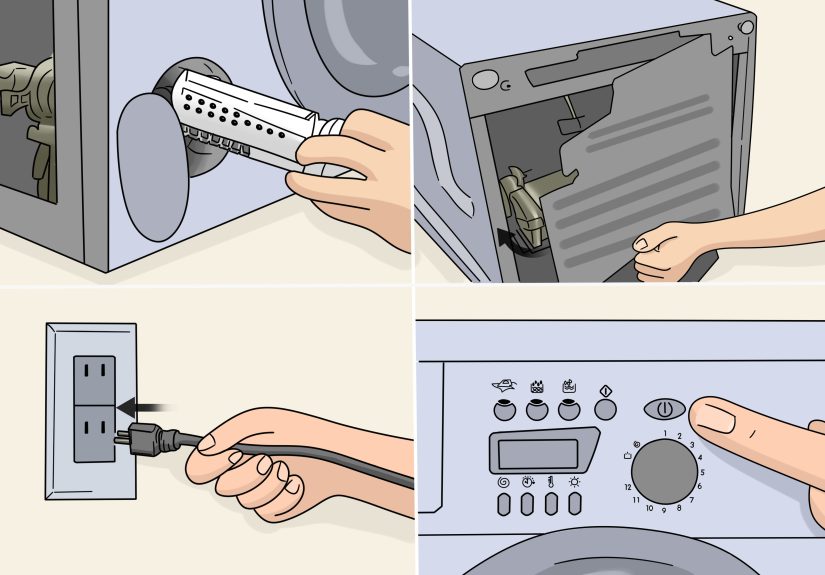
Step 1: Unplug the washer and turn off the water
Start with safety. Unplug the washing machine from the wall before doing anything else. If your washer is hardwired or difficult to reach, turn off power at the breaker. Then shut off the hot and cold water supply valves. This step is not glamorous, but neither is getting shocked while standing in a puddle. Safety gets first billing for a reason.
Step 2: Confirm the problem is drainage, not just the cycle setting
Sometimes the issue is simpler than a clog. Check whether the washer is set to a rinse hold, delicate, no-spin, or low-spin setting. Some cycles leave more water behind than others. If the tub is full and the machine never moved into a proper spin or drain phase, try running a dedicated drain and spin cycle first. If it still refuses to empty, move on.
Step 3: Remove the standing water
You need a dry-ish workspace before you can troubleshoot effectively. If your washer has standing water in the drum, remove as much as possible using a cup, small container, or wet/dry vacuum. Keep towels nearby because laundry-room optimism often ends in splashing. Front-load washers may also have a small emergency drain hose near the pump filter access door. If your model includes one, use it slowly and drain into a shallow pan or bucket.
Step 4: Check for an unbalanced load or a suds problem
A washer that is overloaded or badly unbalanced may refuse to spin and drain properly. Heavy items such as blankets, rugs, or a pair of shoes can bunch up and throw the drum off. Redistribute the items and remove some if the machine is packed too tightly. Also look for excess foam. Too much detergent, especially the wrong kind, can create a bubble party your washer never agreed to host. If you see thick suds, run a rinse and spin cycle with no added soap after clearing the clog.
Step 5: Pull the washer away from the wall and inspect the drain hose
The drain hose is one of the most common trouble spots. Carefully pull the machine forward and inspect the hose at the back. Look for kinks, twists, crushing, pinching, or obvious bends that restrict water flow. Straightening the hose may solve the problem immediately. Also check whether the hose is shoved too deeply into the standpipe. If it is inserted too far, it can create drainage or siphoning problems. The hose should sit securely, but not like it is trying to move in permanently.
Step 6: Disconnect and flush the drain hose
If the hose looks fine on the outside, the blockage may be inside. Place towels and a bucket behind the washer, then disconnect the drain hose carefully. Expect leftover water to spill out because it absolutely will. Once removed, inspect the hose for lint buildup, hair clogs, fabric scraps, or small objects. Flush it with water at a sink, tub, or outside with a garden hose. A flexible cleaning brush can help remove buildup, but avoid stabbing at the hose with sharp tools that can puncture or weaken it.
Step 7: Check the standpipe or laundry sink drain
Sometimes the washer is innocent and your household drain is the real villain. If the washer drains into a standpipe or utility sink, inspect that drain opening for slow flow, visible gunk, or backup. Pour a little water into it and see whether it drains normally. If the standpipe is clogged, the washer water has nowhere to go, so it backs up into the machine or spills out nearby. In that case, you may need to clear the plumbing drain separately before blaming the washer any further.
Step 8: Clean the drain pump filter
Many front-load washers and some newer top-load models have an accessible drain pump filter, often behind a small panel near the bottom front of the machine. Open the panel, place towels and a shallow tray underneath, and slowly loosen the filter cap. Water will likely come out first, followed by a collection of lint, hair, buttons, coins, and possibly the one missing Lego piece that has haunted your household for months. Clean the filter thoroughly, rinse it, wipe the housing, and reinstall it securely.
Step 9: Inspect the pump area for hidden debris
With the filter removed, look into the pump cavity using a flashlight. Check for debris wrapped around the impeller or lodged in the opening. Small objects can slip past the drum and end up blocking the pump from moving water. If you can safely remove visible debris by hand or with non-sharp tweezers, do it. Don’t force anything. If the impeller seems jammed, damaged, or loose, that may point to a failing drain pump rather than a simple clog.
Step 10: Check the door gasket, tub outlet, and visible interior passages
On front-load machines, inspect the rubber door gasket for trapped lint, hairpins, baby socks, and detergent sludge. On top-load washers, look around the tub edge and any visible outlet areas for stray debris. While these spots may not be the main clog, buildup here often signals that more debris is circulating through the system than the machine can handle gracefully. Give these areas a quick clean so loosened debris does not end up right back in the drain path.
Step 11: Reconnect everything and run a short test cycle
Once the hose, filter, and drain areas are cleaned, reconnect the drain hose securely and return it to the proper drain position. Push the washer back carefully without crushing the hose. Restore water and power, then run a short rinse, drain, or spin cycle with no clothes inside. Watch closely. The machine should drain smoothly, without backing up, leaking, or making strange grinding sounds. If it drains well now, congratulations: you have defeated the clog and probably saved a service call.
Step 12: Deep-clean the washer to clear residue and odor
Even after the main clog is gone, soap scum and mildew can linger. Run a washer-cleaning cycle or a hot cycle recommended by your manufacturer to remove leftover residue. Wipe the door gasket, detergent drawer, and drum. If your washer has been draining slowly for a while, there is a good chance stink has been quietly setting up camp. A good cleaning helps prevent new blockages and keeps your clothes from smelling like they were washed in a damp basement memory.
Step 13: Know when to stop and call a professional
If the washer still won’t drain after cleaning the hose and filter, the issue may be a damaged drain pump, faulty lid switch, door lock problem, bad control board, or an internal blockage that is not easy to access safely. A machine that hums but won’t pump, leaks from underneath, trips the breaker, or gives repeated drain-related error codes may need professional repair. DIY is wonderful. DIY while guessing at electrical or pump failure is how a small repair becomes a dramatic budget event.
Extra Tips to Prevent Future Washer Clogs
Once your machine is back in action, a few habits can help keep it that way. Empty pockets before every wash. Tissues, coins, screws, and hair ties are tiny chaos agents. Use the correct amount of detergent, especially HE detergent in high-efficiency machines. Too much soap leads to residue, odor, and drainage trouble. Wash pet bedding carefully, and shake out heavily linted items before tossing them in. Clean the pump filter periodically if your model has one. And every now and then, inspect the drain hose before it turns into a lint highway.
Common Mistakes to Avoid
Do not keep restarting the washer without checking the drain system. That usually gives you the same problem, just with more frustration. Do not attack the hose with knives, screwdrivers, or random garage tools that look “about right.” Do not ignore slow drainage, because today’s sluggish drain is tomorrow’s soggy laundry emergency. And do not assume that more detergent means cleaner clothes. It often means more residue, more suds, and more reasons to kneel on the floor with towels.
Conclusion
Learning how to unclog a washing machine is one of those home-maintenance skills that feels intimidating right up until you do it once. Then it becomes strangely satisfying. In many cases, the problem is not a major repair at all, but a clogged drain hose, dirty pump filter, drain-pipe blockage, excess suds, or a load that threw the machine off balance. By working through these 13 steps in order, you can often fix the issue safely, restore normal drainage, and avoid a bigger mess later.
The big takeaway is simple: act early. A washer that drains slowly is already asking for help. If you deal with the blockage before it becomes a full-on indoor swamp, you will save time, stress, and probably a few towels. And if the problem turns out to be a bad pump or another internal failure, at least you’ll know you ruled out the easy stuff first. That is smart troubleshooting, even if it happens while wearing mismatched socks and holding a flashlight in your teeth.
Real-World Experiences With Washer Clogs: What Homeowners Usually Learn the Hard Way
One of the most relatable things about a clogged washing machine is that it almost never announces itself at a convenient time. It does not happen when you are calmly doing two towels on a Saturday afternoon with a podcast playing in the background. No, it usually happens when school uniforms are needed by morning, a giant comforter is halfway done, or guests are coming and every washable item in the house is in rotation. That is why so many people remember their first washer clog like a tiny domestic disaster movie.
A common experience starts with denial. The clothes come out wetter than usual, and the first thought is, “Huh, that’s weird.” The next load does the same thing. By the third load, the washer is basically marinating the laundry instead of washing it, and suddenly everyone becomes an amateur appliance detective. In many homes, the fix ends up being something wonderfully annoying, like a single coin in the pump filter, a child-sized sock in the drain path, or a drain hose bent into a shape that resembles modern sculpture.
Another frequent lesson is just how much chaos hides in pockets. People often discover bobby pins, paper clips, receipts, pet hair, puzzle pieces, and enough lint to knit a small emotional-support squirrel. These little items do not seem important one at a time, but together they create the kind of blockage that leaves a machine slow-draining and grumpy. After one cleanup session like that, even the most relaxed homeowner becomes the person who asks, “Did everyone check their pockets?” in a tone that suggests hard-earned wisdom.
Front-load washer owners often talk about the surprise factor of opening the pump filter for the first time. They expect a little water. What they get is a miniature flood and a new appreciation for towels. It is also the moment many people realize that routine maintenance is not just something manufacturers write to sound busy. Cleaning the filter every so often can make a real difference. It is a little like flossing: easy to ignore until the consequences become dramatic.
There is also the detergent lesson. Plenty of people discover that using extra soap does not make clothes extra clean. It just makes the washer foam like a bubble machine at a fourth-grade talent show. Excess suds can interfere with proper draining, trap residue, and leave the machine smelling less “fresh linen” and more “humid regret.” Once homeowners see that firsthand, they usually become much more precise with detergent caps.
Perhaps the most useful experience people share is the confidence that comes afterward. The first time a washer clogs, it feels mysterious and expensive. The second time, it feels manageable. By then, you know where the hose is, where the filter hides, how many towels to grab, and which bucket is the real MVP of the laundry room. That confidence matters. It turns a stressful household problem into a step-by-step process. And honestly, that may be the most satisfying part of the whole ordeal. Not the lint. Definitely not the lint.


