Table of Contents >> Show >> Hide
Looking for a creative DIY project that combines functionality with style? How about transforming an old, repurposed tabletop into an oversized garden clock? This simple yet stunning project is perfect for giving your garden a timeless, rustic touch. Whether you’re an avid DIY enthusiast or just looking for a weekend project, the process of turning an unused table into an eye-catching garden clock is both fun and rewarding. In this article, we’ll show you step-by-step how to take your repurposed tabletop and turn it into an oversized garden clock that’s sure to impress anyone who sees it.
Why Repurpose a Tabletop into a Garden Clock?
Repurposing furniture has become a popular trend in recent years, and for good reason! Not only does it help reduce waste and give new life to old items, but it also allows you to create something truly unique and personalized for your space. A repurposed tabletop is the perfect base for creating an oversized garden clock because of its durability, size, and rustic charm.
Imagine the impact of having a clock that not only serves a practical purpose but also doubles as a statement piece in your garden. Whether you’re going for a vintage, industrial, or farmhouse aesthetic, a repurposed tabletop clock can elevate your outdoor decor effortlessly. Plus, it’s a great conversation starter and will make your garden stand out in a crowd.
Materials Needed for the Project
Before you get started, let’s gather the materials you’ll need to create your oversized garden clock:
- An old tabletop or large wooden disc (for the clock face)
- Clock mechanism (which can be purchased from a craft store or online)
- Clock hands (available in various sizes and styles)
- Paint or stain (for the clock face and numbers)
- Ruler or measuring tape
- Wooden numbers or stencils for the clock face
- Drill
- Sandpaper
- Strong adhesive (optional for decorative elements)
- Outdoor weatherproof sealant (for durability)
Step-by-Step Guide: Turning Your Tabletop into a Garden Clock
Step 1: Preparing the Tabletop
Start by selecting a tabletop that has the right size and shape for your garden. If you’re using a round tabletop, it will naturally lend itself to a clock face. Sand the surface of the wood to remove any rough spots or imperfections. This will ensure that the paint or stain adheres properly to the surface. Make sure to smooth out any scratches or nicks to give your clock a polished finish.
Step 2: Marking the Center for the Clock Mechanism
Once your tabletop is prepped and smooth, measure the exact center of the table. This is where the clock mechanism will be installed. Use a ruler or measuring tape to find the middle, and mark it with a pencil. This step is crucial, as it ensures the clock hands will move correctly once everything is assembled.
Step 3: Installing the Clock Mechanism
Next, drill a hole in the center of the tabletop where you’ve marked. Make sure the hole is large enough to fit the clock mechanism. Most clock mechanisms come with a set of instructions, so follow those carefully for assembly. Insert the mechanism through the hole and secure it in place according to the manufacturer’s directions.
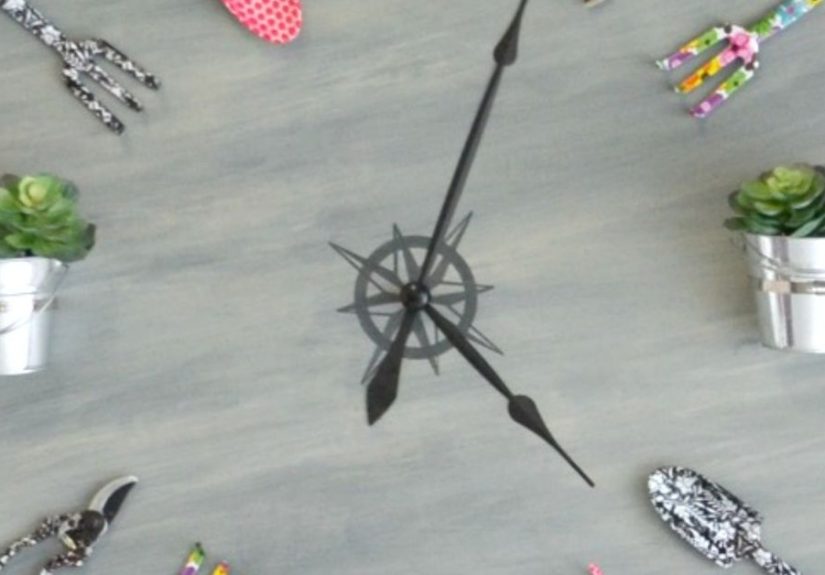
Step 4: Decorating the Clock Face
Now comes the fun part: decorating the clock! You can paint the tabletop to match your desired aesthetic. Consider using outdoor-safe paint or stain to ensure the clock will last through all weather conditions. Choose colors that complement your garden’s theme or your home’s exterior. For a rustic look, a simple whitewash or distressed paint technique will work beautifully. For a more industrial look, opt for darker shades with metal accents.
Step 5: Adding Numbers or Markings
The next step is adding the numbers to your clock. You can either use pre-made wooden numbers or create your own using stencils. If you’re feeling extra creative, you could even incorporate decorative elements like flower shapes or roman numerals. Apply the numbers evenly around the clock face, making sure they are clear and easy to read from a distance. Use strong adhesive or nails to secure the numbers in place.
Step 6: Attaching the Clock Hands
Once the numbers are in place, it’s time to attach the clock hands. The clock hands should be inserted into the clock mechanism, and they should fit securely. If the hands are too large, you may need to trim them or adjust the clock mechanism accordingly. Be sure to follow the instructions for the clock mechanism closely to ensure proper installation.
Step 7: Sealing the Clock
To protect your garden clock from the elements, apply a coat of outdoor weatherproof sealant to the entire surface of the clock. This will help keep it from fading, cracking, or warping when exposed to rain or sun. Be sure to allow enough time for the sealant to dry before hanging or installing the clock in your garden.
Step 8: Displaying Your Oversized Garden Clock
Once your garden clock is complete, it’s time to find the perfect spot to display it. Choose a place where it can be easily seen from all angles, such as near a seating area or along a garden path. You can hang it on a sturdy wall or post, or even place it on a stand or pedestal for added effect. The oversized clock will instantly become a focal point in your outdoor space.
Creative Ideas for Your Repurposed Garden Clock
Not only is this DIY project a great way to upcycle an old tabletop, but it also gives you the freedom to personalize the design. Here are a few creative ideas to inspire you:
- Vintage Garden Clock: Use antique-style clock hands and a distressed paint finish to create a vintage look. Add small faux plants around the base for a more garden-inspired touch.
- Industrial Garden Clock: Incorporate metal accents like gears or cogs for an industrial vibe. Use darker colors like charcoal gray and matte black to give it a sleek, modern feel.
- Farmhouse Clock: Opt for neutral tones like beige and white, and consider adding a farmhouse-style sign or quote around the clock face.
Conclusion
Repurposing a tabletop into an oversized garden clock is a fantastic way to combine creativity with functionality. This simple yet elegant project allows you to add a personalized touch to your garden while giving an old item a new life. Whether you’re looking for a rustic accent piece or a bold statement clock, the possibilities are endless with this DIY project. Best of all, it’s a fun and satisfying way to enhance your outdoor space while showcasing your crafty side.
So, get your tools, grab an old tabletop, and let your imagination run wild! Transform your garden into a charming, timeless space with a beautiful repurposed tabletop clock.
sapo: Looking to add a creative touch to your garden? Learn how to repurpose a tabletop into an oversized garden clock with this simple DIY project. Perfect for all skill levels, this guide will walk you through every step to create a unique outdoor statement piece. Turn old furniture into something functional and stylish that will impress guests and stand the test of time.
Personal Experiences with Repurposing a Tabletop into a Garden Clock
Creating a repurposed tabletop garden clock is an incredibly rewarding experience, and I can personally vouch for how satisfying it is to see your hard work pay off. I first stumbled upon the idea while scrolling through Pinterest, and I was immediately hooked. My garden was missing something bigliterally and figuratively. I knew an oversized clock would be the perfect statement piece to fill the empty space along my garden wall. After months of gathering materials and brainstorming design ideas, I finally got to work.
The hardest part was selecting the right tabletop. I wanted something with a bit of historyan old, wooden table that had been sitting in my garage for years. It had scratches, nicks, and a faded finish, but it was perfect for the project. I spent a Saturday sanding and prepping it, then spent the next few days painting and assembling the clock mechanism. I opted for a farmhouse design with a shabby-chic vibe, using a soft white paint and adding some faux plants around the edges. The clock hands were the final touch, and when everything came together, I was absolutely thrilled with the result.
Now, my oversized garden clock stands proudly in my garden, and it’s become a conversation starter for anyone who visits. Every time I look at it, I feel proud of the work I put into it. Repurposing furniture isn’t just about giving old items a second lifeit’s about infusing your personal style and creativity into something that will be enjoyed for years to come. If you’re on the fence about taking on this project, I highly recommend it! Not only is it fun, but it’s also incredibly rewarding to have a piece of art that you created yourself.
In conclusion, repurposing a tabletop into an oversized garden clock is a fantastic project that combines creativity, sustainability, and practicality. Whether you’re a seasoned DIY enthusiast or a beginner looking for your next challenge, this project will transform your garden and bring a personal touch to your outdoor space. So gather your materials, roll up your sleeves, and let’s get started on this exciting transformation!