Table of Contents >> Show >> Hide
- What a “Push Button One Gang Coverplate” Actually Is
- Why This Tiny Plate Matters More Than You Think
- Compatibility: The Part That Makes People Buy the Wrong Plate
- Wall Plate Sizes: Standard, Midsize, Jumbo (Pick Your Coverage Level)
- Materials and Finishes: What You’re Paying For
- Choosing the Right Push Button One Gang Coverplate
- Installation: How to Swap a Coverplate Without Drama
- Troubleshooting Common Push-Button Plate Problems
- Design Ideas: Make It Look Like You Meant To Do It
- Buying Examples (Real-World Scenarios)
- Conclusion: The Small Upgrade That Makes a Big Difference
- Real-World Experiences With Push Button One Gang Coverplates (The “I’ve Been There” Section)
Every home has at least one tiny, unsung hero: the wall plate. It’s the “picture frame” for your switch, the little rectangle that keeps wiring where it belongs (inside the wall) and keeps your room looking finished (instead of “construction chic”). And if you’ve got an old-school push-button light switchthe kind that makes you feel like you’re launching a spaceshipthen you need a very specific kind of wall plate: the push button one gang coverplate.
This guide breaks down what it is, why it matters, how to choose the right one, and how to install it without turning a five-minute “simple swap” into a weekend-long episode of Why Did I Start This?.
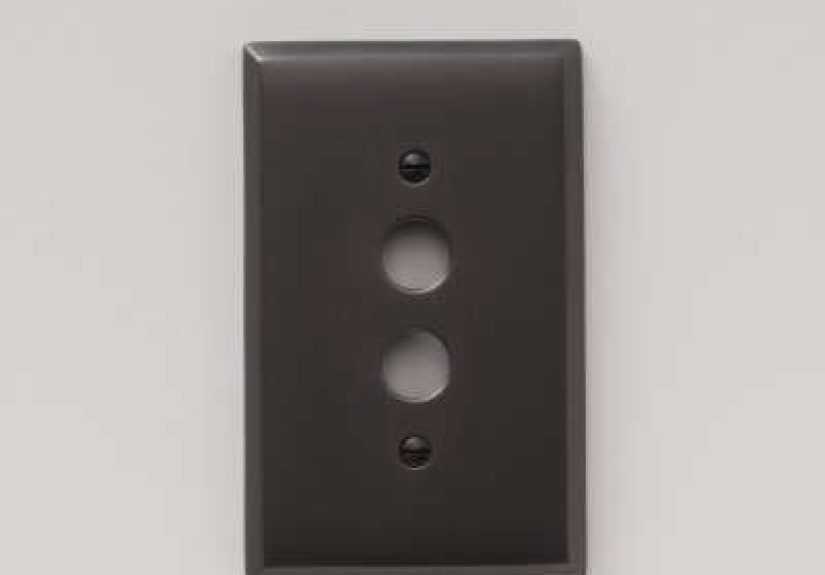
What a “Push Button One Gang Coverplate” Actually Is
Let’s translate the name from Electrician into English:
- One gang = one device space in the electrical box. (One switch, one dimmer, or one outlet-sized opening.)
- Push button = a switch style with one or two small round buttons (often “ON” and “OFF”) rather than a toggle lever or rocker paddle.
- Coverplate (aka wall plate / switch plate) = the faceplate that covers the box opening, protects you from exposed parts, and gives everything a clean finish.
The key detail: a push-button switch typically needs a plate cutout that matches the button layout. A regular toggle plate won’t line up, and a decorator (Decora-style) plate won’t magically work either. You need the right cut: usually two round holes for the buttons plus mounting holes aligned to the device strap.
Why This Tiny Plate Matters More Than You Think
1) Safety and code-friendly coverage
Wall plates are designed to cover the electrical box opening and help prevent accidental contact with wiring and device parts. If the plate doesn’t fully cover the openingespecially around old plaster walls or sloppy drywall cutsyou’re not just looking at a cosmetic issue; you’re leaving gaps that shouldn’t be there.
2) Durability in high-touch real life
Push buttons invite pressing. Kids press them. Guests press them. You press them because it’s satisfying. A flimsy plate (or the wrong plate) can crack, warp, or loosenespecially if the switch sits slightly proud of the wall or the box is a bit crooked.
3) The “vintage charm” factor
Push-button switches are often found in older homes, and the right coverplate can preserve that period look. The wrong coverplate screams “I couldn’t find the right part, so I improvised,” and not in a charming way.
Compatibility: The Part That Makes People Buy the Wrong Plate
Before you buy anything, identify what you actually have on the wall. In the world of wall plates, shape is destiny.
Push-button switch vs. “push-to-turn” dimmer vs. modern push-button controls
- Classic push-button switch: two small buttons, often round, sometimes labeled ON/OFF. Needs a plate made specifically for push-button openings.
- Push-to-turn dimmer: looks like a knob (often a round dial you push to click). Usually uses a different plate opening (often a standard dimmer opening or specific kit).
- Modern push-button controls (some smart switches/dimmers): many are decorator-style devices and use a decorator wall plate (rectangular opening). “Push-button” here refers to function, not the vintage hardware style.
Measure (yes, really) if your switch is vintage or reproduction
Many push-button plates follow common sizing, but older homes can have surprises: reproduction switches, antique switches, and “renovation mysteries” don’t always agree on spacing. Some push-button plates list precise hole diameters and center-to-center spacingexactly the info you want when you’re trying to avoid the “two holes that are almost right” tragedy.
If your plate listing includes details like overall dimensions, button hole diameter, and button spacing, that’s a good sign you’re shopping in the correct aisle of the internet.
Wall Plate Sizes: Standard, Midsize, Jumbo (Pick Your Coverage Level)
One-gang plates come in three common size categories. The differences are mainly about how much wall area they coversuper useful if your drywall cutout is… let’s call it “energetic.”
- Standard: the everyday size for clean cutouts and neat installations.
- Midsize (Midway): slightly larger to hide small gaps or uneven paint lines.
- Jumbo (Oversized): big coverage for repaired plaster, oversized holes, or boxes that sit a little off.
Practical tip: if you’re replacing a plate in an older home and you notice chipped plaster edges, hairline cracks, or old paint shadows around the plate, midsize or jumbo can make the wall look instantly cleaner without any patching.
Materials and Finishes: What You’re Paying For
A push button one gang coverplate can be plastic, metal, or specialty material, and your choice should match where it’s going and how you live.
Thermoplastic / nylon / polycarbonate
These are common because they’re affordable, easy to clean, and available in lots of colors. Many are designed to resist cracking and fading in normal conditions. They’re also forgiving if you over-tighten the screw a little (a littledon’t get confident).
Metal (stainless steel, brass, aluminum, etc.)
Metal plates feel “finished” and tend to hold up well in high-traffic areas. Stainless steel is popular in kitchens, workshops, and rentals because it’s tough and easy to wipe down. Brass and antique finishes are popular for restoring vintage character in older homes.
Finish-matching: the underrated upgrade
Matching your coverplate to door hardware, light fixtures, or cabinet pulls makes a room feel intentional. A single mismatched plate can stand out more than you thinklike wearing a tux with running shoes.
Choosing the Right Push Button One Gang Coverplate
Use this checklist to buy once and install once (the dream):
- Confirm it’s one gang: one device opening, not a multi-gang plate.
- Confirm it’s for a push-button switch: look for two round button openings (or your specific layout).
- Check plate size: standard for clean walls, midsize/jumbo for ugly cutouts.
- Match material to location: plastic for most rooms; metal for tougher environments or a premium look.
- Look for included screws: preferably matching finish screws (because tiny details matter).
- Choose the right color/finish: white is safe; aged brass is a vibe; stainless is “I mean business.”
- Verify spacing specs if provided: especially for true antique hardware.
Installation: How to Swap a Coverplate Without Drama
Replacing a wall plate is usually quick, but you’re working near electrical devices. If you’re unsure, call a pro. If you’re comfortable doing basic DIY, here’s the safe, clean way.
Step 1: Turn off the power (recommended, even if you’re “just changing the plate”)
The plate screws are close to the device strap, and mistakes happen. Flipping the breaker is easy insurance.
Step 2: Remove the old coverplate
Use the right screwdriver and keep steady pressure so you don’t slip and scratch the plate or wall. Save the screw if the new plate doesn’t include one (but ideally it does).
Step 3: Inspect the switch and box alignment
If the switch is crooked, the new plate will look crooked. This is the moment to straighten the device (usually by slightly loosening the device mounting screws, aligning, then tightening).
Step 4: Install the new push-button plate
Align the button openings carefully. Tighten the plate screw until snugnot until the plate bows. Over-tightening is the #1 cause of cracked plastic plates and warped looks.
Step 5: Test the buttons
The buttons should move freely without rubbing the plate. If they stick, the plate may be misaligned, the device may be tilted, or you may have the wrong cutout style.
Troubleshooting Common Push-Button Plate Problems
“My buttons stick after I install the plate.”
Usually alignment. Loosen the plate slightly, re-center, and retighten gently. If it still sticks, the device may be sitting crooked in the box, or the plate cutout isn’t meant for your exact switch.
“The wall opening is bigger than the plate.”
Upgrade to midsize or jumbo. Bigger plates are a standard fix for oversized cutouts and patched walls.
“The plate doesn’t sit flush.”
The box may be set too deep or the wall surface may be uneven (common with plaster). In some cases, spacers or a deeper plate style can help create a clean fit.
“The old plate had weird spacing and nothing matches.”
Older homes can have non-standard quirks, especially if a previous owner used mix-and-match parts. Look for plates that publish exact measurements, or consider a restoration supplier that specializes in vintage layouts.
Design Ideas: Make It Look Like You Meant To Do It
A push button one gang coverplate can be a design feature, not just a functional cover.
- Lean into vintage: antique brass or oil-rubbed finishes pair nicely with push-button switches in older homes.
- Go minimal: clean white or stainless steel helps the push-button switch feel intentional, not outdated.
- Create consistency: match all plates in a room so the switch wall doesn’t look like a thrift-store collage.
- Use midsize/jumbo strategically: hide wall imperfections without repainting the entire room.
Buying Examples (Real-World Scenarios)
Example 1: 1920s bungalow restoration
You have original push-button switches and you want to keep them. The wall has slight plaster chipping around the box. A midsize or jumbo push-button plate in an antique finish hides the rough edges and keeps the period look.
Example 2: Rental upgrade for durability
The push-button switch works fine, but the plate is cracked and yellowed. A metal plate (like stainless steel) is harder to break, easy to clean, and doesn’t show wear as quickly.
Example 3: Quick cosmetic fix after painting
Fresh paint looks greatexcept the old plate leaves a visible outline. A midsize plate often covers the paint shadow so you don’t have to do touch-ups that never quite match.
Conclusion: The Small Upgrade That Makes a Big Difference
A push button one gang coverplate is one of those tiny home details that quietly improves everything: it protects the opening, finishes the wall, and makes your push-button switch feel like a feature rather than a relic. Choose the right cutout for your button layout, pick a size that covers your wall neatly, and match a finish that fits your space. Five minutes later, you’ll wonder why you waited so long.
Real-World Experiences With Push Button One Gang Coverplates (The “I’ve Been There” Section)
The first time people deal with a push-button coverplate, it usually starts the same way: you notice the old plate is cracked, painted over, or slightly warped. You think, “No problemwall plates are wall plates.” Then you remove it and realize the switch underneath looks like it belongs in a classic movie set, and your standard toggle plate is about as compatible as a smartphone case for a flip phone.
In older houses, especially ones with plaster walls, the plate swap becomes an unexpected “wall reality check.” You take the old plate off and discover the opening around the box isn’t perfectly rectangular anymoremaybe it never was. The edges might be chipped, the paint line might show ten years of color history, and the box might sit just slightly off level. This is where midsize and jumbo plates feel like a cheat code. Instead of patching plaster, sanding, priming, and repainting, you install a slightly larger coverplate and suddenly the whole wall looks calmer. It’s the DIY equivalent of putting on a jacket that makes the whole outfit work.
Another common experience: realizing how much “feel” matters. Push-button switches are tactile. The click is satisfying, and the buttons usually have a little resistance that feels deliberate. A well-fitting coverplate keeps that feel crisp. If the plate is misaligned by even a hair, you’ll noticebecause the button might graze the edge, or it might not return smoothly. People often assume the switch is failing, but the fix is sometimes as simple as loosening the plate screw, re-centering the plate, and tightening it gently. Tiny adjustments can make the switch feel brand-new again.
Then there’s the “finish decision” storywhere someone starts out just trying to replace a broken plate and ends up rethinking the whole room. A brushed metal plate in a kitchen can make an older switch look intentional and clean. Antique brass in a hallway can amplify the home’s character. And once you replace one plate, you suddenly notice the others. That’s how people accidentally start a mini project: “Well, if I’m doing this one…” (Congratulations, you now own a screwdriver that lives in the junk drawer forever.)
The best experience is when the replacement plate solves multiple annoyances at once: it hides wall gaps, makes the switch operate smoothly, and gives the wall a finished edge. It’s one of the few upgrades where you can spend a small amount, do it quickly, and still get that “nice” feeling every single daybecause you touch it constantly. In the world of home improvement, that’s a surprisingly strong return on investment.


