Table of Contents >> Show >> Hide
If you’ve ever wanted bakery-style focaccia without wrestling a ball of dough on your counter, this no-knead skillet focaccia recipe is your new party trick. It’s the kind of bread that makes people think you’ve secretly enrolled in culinary school, even though you mostly stirred things in a bowl and walked away.
This method uses time instead of muscle: a wet, no-knead dough that rises slowly, so gluten develops on its own and bakes up into an insanely airy, bubbly crumb. High-hydration focaccia like this is a staple among modern bread recipes because it’s low effort, big payoff, and ideal for beginners.
The best part? You bake it in a trusty cast iron or oven-safe skillet, which gives the focaccia a deeply golden, crispy crust and crackly edges while the inside stays soft and chewy. Skillet focaccia recipes from multiple test kitchens and food publications rave about how cast iron delivers that restaurant-style crunch at home.
Why You’ll Love This No-Knead Skillet Focaccia
- Almost zero effort: No stand mixer, no kneading, no dough gymnastics.
- Hands-off rising: Let the dough rest for several hours or overnight for maximum flavor.
- Perfect texture: Crispy, olive-oil-rich bottom with a light, airy crumb and big bubbles.
- Flexible timing: Mix it in the evening, bake it the next day, or do a same-day room-temperature rise.
- Endless toppings: Classic rosemary and flaky salt, or dress it up with cherry tomatoes, olives, onions, or cheese.
What Is No-Knead Focaccia, Exactly?
No-knead bread became wildly popular after New York baker Jim Lahey’s method hit the spotlight in the mid-2000s, showing that a wet dough and long rise can build gluten strength without traditional kneading. Focaccia is the perfect candidate: it’s a naturally rustic, high-hydration Italian flatbread that thrives on olive oil and time.
Instead of kneading, you simply stir flour, water, yeast, and salt together. The dough looks messy and sticky at first (don’t panic), but as it rests, gluten strands form and the dough becomes stretchy, full of gas bubbles, and ready to bake into something impressive.
Key Ingredients for Skillet Focaccia
Flour
Most no-knead focaccia recipes use either all-purpose flour or bread flour. Bread flour (with higher protein) tends to give a chewier, slightly more elastic texture, while all-purpose flour produces a slightly softer crumb. Both work; choose whatever you normally keep in your pantry.
Yeast
Instant or active dry yeast both work here. You need only a small amount because the dough rises for a long time. Longer fermentation gives better flavor and that distinctive bakery aroma.
Water
High hydration is the secret sauce of this recipe. A wet dough (often around 75–80% hydration in professional recipes) leads to big, shiny holes and a tender, open crumb.
Olive Oil
Olive oil isn’t just for flavor; it’s structural. You’ll oil the bowl, the skillet, and the top of the dough. Generous oil under the dough helps “fry” the bottom as it bakes, giving that golden, crisp crust that skillet focaccia is famous for.
Salt
Salt is non-negotiable in focaccia. You’ll add fine salt to the dough itself and finish with flaky sea salt on top to highlight the olive oil and toppings.
Toppings
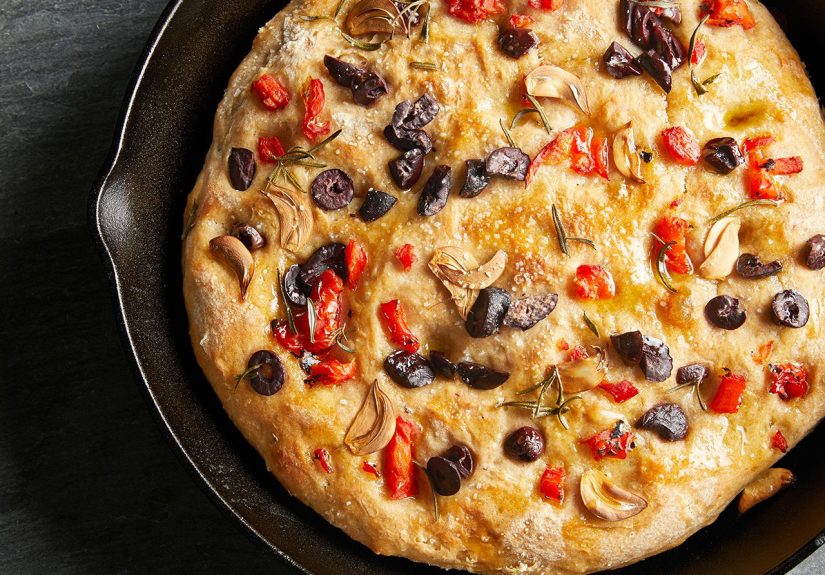
Classic toppings include fresh rosemary and flaky salt, but you can also use halved cherry tomatoes, olives, onions, thinly sliced potatoes, or even a sprinkle of cheese. Many modern focaccia recipes recommend avoiding dried herbs and raw garlic on top, which can burn; instead, use fresh herbs or infused oil.
Step-by-Step No-Knead Skillet Focaccia
Ingredients
- 3 1/4 cups (about 400 g) all-purpose or bread flour
- 2 teaspoons instant or active dry yeast
- 1 1/2 teaspoons fine sea salt
- 1 3/4 cups (about 415 ml) lukewarm water
- 1/4 cup extra-virgin olive oil, plus more for the skillet and topping
- 2–3 sprigs fresh rosemary, chopped (or other fresh herbs)
- Flaky sea salt for finishing
1. Mix the Dough
In a large bowl, whisk together the flour, yeast, and salt. Pour in the water and 2 tablespoons of olive oil. Stir with a spatula or wooden spoon until no dry patches of flour remain. The dough will look shaggy, sticky, and slightly loosethat’s perfect for no-knead focaccia.
Scrape down the sides, drizzle a little olive oil around the edges, and turn the dough so it’s lightly coated. This prevents sticking and adds flavor.
2. Let It Rise (Slowly)
Cover the bowl tightly with plastic wrap or a lid and let the dough rise:
- Overnight option: Refrigerate for 12–24 hours for deeper flavor and easier handling.
- Same-day option: Leave at room temperature for 3–4 hours, or until doubled and very bubbly.
By the time it’s ready, the dough should have expanded noticeably and be full of bubbles. If it looks alive and jiggly when you shake the bowl, you’re on track.
3. Prepare the Skillet
Generously oil a 10–12 inch cast iron skillet or other heavy, oven-safe panabout 2–3 tablespoons of olive oil. Swirl it around and up the sides. That layer of oil is what gives you the crisp, almost fried crust that makes skillet focaccia so memorable.
4. Transfer and Second Rise
Gently scrape the dough into the oiled skillet. It will be sticky; use an oiled spatula or your oiled hands. Fold the edges of the dough toward the center a couple of times to help build a bit of structure, then flip it over so the smooth side faces up.
Cover the skillet loosely and let the dough rise again at room temperature for 45–60 minutes, or until puffy and spread toward the edges of the pan.
5. Dimple, Top, and Olive Oil Everything
Preheat your oven to 425–450°F (220–230°C). Once the dough is puffy, drizzle another 1–2 tablespoons of olive oil over the top. With oiled fingers, press straight down into the dough to create deep dimples all over the surface. Don’t be shythose dimples are the signature look and help trap pockets of oil and flavor.
Sprinkle the chopped rosemary (or your favorite herbs) over the dough, add any extra toppings like cherry tomatoes or olives, and finish with a generous pinch of flaky sea salt.
6. Bake to Golden Perfection
Bake for 20–25 minutes, or until the top is deeply golden, the edges are crisp, and the focaccia pulls slightly away from the sides of the skillet. If the top browns too quickly, you can loosely tent it with foil during the last few minutes.
Let the focaccia rest in the skillet for about 10 minutes, then carefully transfer it to a wire rack so the bottom stays crisp.
7. Serve and Store
Serve warm, cut into wedges or squares. Focaccia is best the day it’s baked, but leftovers can be stored at room temperature for up to 2 days and reheated in a low oven (around 300°F) until warmed through and lightly crisp again.
Flavor Variations to Try
Classic Rosemary and Sea Salt
The ultimate crowd-pleaser: just olive oil, rosemary, flaky salt, and maybe a little cracked black pepper. This version pairs with everything from tomato soup to charcuterie boards.
Tomato and Olive Skillet Focaccia
Press halved cherry tomatoes and pitted olives into the dough after dimpling. The tomatoes roast into little flavor bombs, and the olives add briny contrast to the rich bread. Many home bakers love this topping combo for skillet focaccia because it turns a simple bread into a one-pan appetizer.
Caramelized Onion and Herb
Top the dough with cooled, caramelized onions and a sprinkle of thyme or rosemary before baking. The onions melt into the surface of the focaccia and add sweetness that’s amazing with cheese or roasted meats.
Cheesy Skillet Focaccia
Scatter shredded mozzarella, fontina, or Parmesan on top during the last 5–8 minutes of baking so it melts and browns without burning. Serve with marinara or a salad for a cozy weeknight dinner.
Serving Ideas
- As an appetizer: Cut into small squares and serve with olive oil, balsamic, and marinated olives.
- For sandwiches: Slice horizontally and fill with grilled vegetables, mozzarella, and pesto.
- With soup or salad: Dip into tomato soup, minestrone, or serve alongside a big green salad.
- Brunch upgrade: Top warm slices with soft scrambled eggs and prosciutto.
Common Mistakes and How to Avoid Them
Using Too Little Oil
If you’re shy with the olive oil, the crust may turn pale and dry instead of golden and crisp. Skillet focaccia should almost shimmer with oilthis is not the moment to go low-fat.
Rushing the Rise
Under-proofed dough won’t develop that open, airy crumb. If the dough still looks dense or hasn’t grown much, give it more time. A long, cool rise (such as overnight in the fridge) gives you better texture and complex flavor, which is why so many no-knead recipes rely on slow fermentation.
Overbaking
While you do want nice browning, leaving it in too long can dry out the interior. Start checking at the earlier end of the suggested baking time and pull it when the top is deep golden and the edges are crisp.
Cutting Too Soon
Let the bread rest for at least 10 minutes before cutting. This helps the crumb set so you don’t squash all those beautiful air pockets.
My No-Knead Skillet Focaccia Experiences
Once you’ve made this no-knead skillet focaccia a couple of times, it becomes the bread version of that friend who’s always down to hang outlow-maintenance, reliable, and always welcome. The first time many home cooks try it, they’re convinced the dough is wrong. It looks too wet, too sticky, too…unruly. But after a long rest, that messy dough puffs up, full of bubbles, and suddenly everyone thinks you’re a bread wizard.
One of the most satisfying parts of the process is the dimple stage. Pressing your fingertips into the pillowy dough feels a little like popping bubble wrap, only more delicious. If you have kids around, this is the moment they’ll want to “help,” and honestly, they can’t mess it upas long as hands are oiled, more dimples just mean more pockets for olive oil and herbs to settle into.
In practice, this focaccia is incredibly forgiving. Did your schedule change and you can’t bake when you planned? No problem. Many bakers report leaving no-knead focaccia dough in the fridge longer than intendedsometimes up to 24 hoursand ending up with even better flavor. The dough is flexible enough that as long as it’s kept cool and covered, it rewards a little neglect with deeper, slightly tangy notes.
It’s also the ultimate “bring to the party” bread. A skillet of fresh focaccia, still warm, disappears faster than almost any other appetizer on the table. People tear off pieces, dip them into olive oil, wrap them around slices of cheese, or drag them through sauces. It’s casual and communalno slicing perfection required. If you want to impress without stress, bake one batch plain rosemary and one with toppings like tomatoes and olives. Suddenly you look like you’ve catered the event.
The leftovers (if there are any) are secretly the best part. Day-old focaccia makes excellent panini or grilled sandwiches. A quick reheat in a skillet or oven revives the crisp edges, and the interior softens right back up. Some home cooks even cube leftover focaccia for ultra-lux croutons or use it as the base for savory bread pudding. It’s hard to feel bad about making a big batch when it morphs into entirely new, delicious things the next day.
Once you get comfortable with the basic no-knead skillet focaccia, it becomes a blank canvas for flavor experiments. You can swirl pesto into the top before baking, scatter on thin lemon slices and thyme, layer caramelized onions and goat cheese, or go bold with spicy chiles and garlic-infused oil. The method stays the same; you’re just remixing the toppings. That’s the beauty of this recipe: it gives you a rock-solid foundation and then invites you to play. After a few rounds, you’ll probably have “your” house focacciathe one friends start requesting by name.
SEO JSON