Table of Contents >> Show >> Hide
- Why Painting Your Own Garden Hits Different
- My No-Drama Botanical Watercolor Setup
- My Garden-to-Painting Process (With Fewer Tears)
- My 37 Best Botanical Watercolor Works (All Grown In My Garden)
- How I Keep Botanical Watercolors Accurate (Without Killing the Vibe)
- of Real-Life Experience From Painting What I Grow
- Final Thoughts
- SEO Tags
There are two kinds of gardeners: the “I grow tomatoes” kind and the “I whisper motivational speeches to my tomatoes” kind.
I amregrettably for my familythe second kind. And somewhere between watering schedules, seed packets, and that one zucchini
that thinks it’s a submarine, I started painting what I grow.
Botanical watercolor illustration is basically a love letter to plants: equal parts science (accurate shapes, structures, and details)
and art (composition, color, mood). If a photograph says “Here’s the plant,” a botanical painting says, “Here’s the plant… and also,
here’s the personality it developed while I was weeding in 90-degree heat.”
Why Painting Your Own Garden Hits Different
When you paint plants you grow, you’re not copying a referenceyou’re collaborating with a living subject that changes daily.
Leaves unfurl, petals bruise, bugs commit crimes. Painting forces you to notice the “botanical identifiers” (leaf edges, venation,
flower anatomy, seed pods) that make a plant unmistakably itself, not just “green-ish.”
It also makes gardening better. You start planting with intention: “I want more chartreuse foliage,” “I need a flower with dramatic
shadows,” “I require a seed pod that looks like it belongs in a fantasy novel.” Suddenly, your garden becomes both pantry and palette.
My No-Drama Botanical Watercolor Setup
Paper: where detail either shines or cries quietly
For botanical work, I lean toward smooth paper because crisp edges and tiny details matter. Hot press paper (smooth surface) is great
when you want clean linework, controlled washes, and fine detail; cold press paper has more texture and can add beautiful granulation
when you want a softer, more painterly feel. Rough paper is the wild childgorgeous texture, but it will absolutely humble you if you’re
trying to paint a delicate stamen.
Pigments: fewer colors, more control
You don’t need 48 greens. You need a few trustworthy pigments and the willingness to mix. My goal is clean, transparent color that can
be layered without turning into swamp soup. I keep a warm and cool version of the basics (yellow, red, blue), plus a couple of earth
tones for stems, shadows, and “my garden soil is everywhere” realism.
Brushes and small tools that save your sanity
- A pointed round brush for petals, veins, and the thousand micro-decisions inside a leaf.
- A smaller detail brush for stamens, serrations, and the botanical equivalent of eyebrow hairs.
- A kneaded eraser to lift sketch lines without scuffing the paper.
- A waterproof fineliner (optional) if you like ink + watercolor for extra structure.
- Scrap paper for testing mixesbecause guessing is how you get neon lettuce.
My Garden-to-Painting Process (With Fewer Tears)
1) Observe like a botanist, but stay fun about it
I start with the plant in good light and take quick notes: what’s the overall silhouette, where are the darkest darks, and what details
make it identifiable? (A tulip isn’t just “a cup.” It’s a cup with specific petal overlap, a particular curve, and a certain attitude.)
2) Sketch lightly, commit slowly
Light pencil sketch firstbig shapes before tiny details. I place the main stem lines, leaf groupings, and flower structure, then refine.
The goal is accuracy without heavy graphite that muddies watercolor.
3) Layer color instead of “fixing” color
Watercolor rewards patience. I build form with transparent layers (glazing), letting each layer dry before adding the next. This keeps petals
luminous and greens believable. The trick is to let the paper do the glowing and use layers for depthnot to muscle your way into realism.
4) Add the “botanical proof” details last
Veins, serrated edges, pollen textures, subtle specklesthese come near the end. It’s easier to place details once the larger light-and-shadow
structure is established. Also, this is where I stop painting and start negotiating with my own perfectionism.
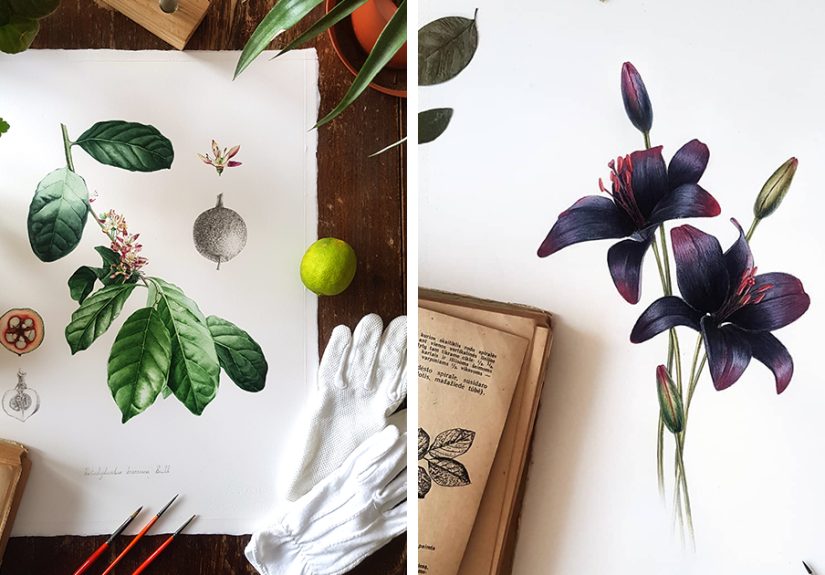
My 37 Best Botanical Watercolor Works (All Grown In My Garden)
Here’s the heart of it: 37 pieces inspired by what I’ve grown, harvested, admired, and occasionally apologized to. I grouped them by season and
garden role, because plantslike peopledeserve categories. (Mine include: “thrives,” “survives,” and “dramatic.”)
Spring Blooms (aka “hope returns, briefly”)
- Daffodil (Narcissus) Bright trumpet form; layered yellows to keep it sunny, not flat.
- Tulip Smooth petals demand soft gradients; edges stay crisp or it turns into a blob.
- Peony A ruffled masterpiece; I used multiple pale glazes to suggest depth without heaviness.
- Iris The drama queen of petals; painted the velvety falls with deep, transparent washes.
- Lilac cluster Tiny florets as a mass; I let negative space do half the work.
- Magnolia bloom Thick petals with subtle shadows; I kept highlights clean for that porcelain glow.
- Bleeding heart Heart-shaped blooms; delicate edges needed a steady hand and a calmer personality than mine.
Summer Stars (the season of “why is everything thirsty?”)
- Rose (garden variety) Petal spirals; I mapped shadows first so it reads as a bloom, not a cabbage.
- Hydrangea mophead Hundreds of petals, zero patience; painted clusters as shapes, then picked focal details.
- Sunflower Bold center texture; dry-brush suggestions kept the disk from looking like a cookie.
- Zinnia Graphic layers; crisp edges and clean reds made it pop without overworking.
- Dahlia Geometry in flower form; careful value shifts showed depth through the petal maze.
- Coneflower (Echinacea) Spiky center, drooping petals; texture contrasts made it feel alive.
- Bee balm (Monarda) Firework petals; I used quick strokes and controlled chaos (a personal brand).
- Lavender sprig Tiny blooms plus silvery stems; cool shadows kept it airy, not gray.
- Cosmos Tissue-thin petals; light washes and barely-there edges sold the delicacy.
- Black-eyed Susan Yellow petals with bold contrast; simple shapes, strong values, instant joy.
Kitchen Garden Vegetables (edible still life, but make it botanical)
- Heirloom tomato (sliced) Paintable anatomy: gel pockets, seeds, sheen. Also: now I’m hungry.
- Cherry tomato vine Little spheres with highlights; I kept stems loose and fresh green.
- Bell pepper Glossy skin; layered color and preserved bright highlights for shine.
- Hot pepper (chili) Saturated reds; glazing kept it vivid without chalky buildup.
- Cucumber Wax bloom + bumps; subtle texture made it look crisp, not plastic.
- Zucchini blossom Soft, buttery petals; gentle transitions captured that “morning bloom” feel.
- Eggplant Purple-black gradients; careful color shifts prevented it from becoming a void.
- Carrot with greens Frilly tops contrasted the root; I let greens be loose and lively.
- Radish bunch Pink-red bulbs with leaf drama; I emphasized the crisp, peppery vibe visually.
- Beet with leaves Magenta veins are a gift; transparent layers made the color glow.
Herbs & Leaves (small plants, big personality)
- Basil Smooth leaves with bright highlights; I used simple shapes and confident edges.
- Rosemary Needle leaves; dry-brush hints suggested texture without turning into a hedgehog.
- Sage Velvety surface; muted greens and soft shadows captured the fuzziness.
- Thyme Tiny leaves, huge detail risk; I painted it as a cluster, then refined selectively.
- Mint Serrated edges and strong veins; sharper linework kept it unmistakable.
- Parsley Ruffles everywhere; I simplified the silhouette first, then added shadow rhythm.
- Cilantro Lacy leaves; quick, light strokes made it feel fresh-picked and slightly chaotic.
Fruits & Berries (sweet subjects, tricky surfaces)
- Strawberry Seeds + shine; preserved highlights and dotted texture for that “just rinsed” look.
- Blueberries Powdery bloom; soft edges and cool shadows made them feel real, not candy.
- Fig (cut open) Tiny interior details; glazing built depth so it reads as luminous, not busy.
How I Keep Botanical Watercolors Accurate (Without Killing the Vibe)
Botanical illustration lives on accuracy. The trick is balancing “true to the plant” with “pleasant to look at.” My cheat codes:
- Paint in good light and rotate the plant to understand form, not just surface color.
- Record key identifiers (leaf arrangement, margins, venation, flower structure) before the plant wilts.
- Include multiple views when helpfula bud, a bloom, and a seed pod can tell the full story.
- Test mixes so your “sage green” doesn’t become “hospital hallway mint.”
of Real-Life Experience From Painting What I Grow
Painting my own garden has taught me lessons I didn’t expectmostly about patience, observation, and how plants have absolutely no respect for my schedule.
The first surprise was timing: the “perfect” bloom is often a narrow window, and it doesn’t care if I’m in a meeting, cooking dinner, or pretending I’m
an organized adult. I’ve learned to work in stages. I’ll sketch fast while the flower is still perky, take a few reference photos for insurance, and then
paint later when the bloom has started to look like it needs a nap. That alone reduced the pressure, and my paintings got better because I wasn’t panic-painting.
The second lesson is that gardening and watercolor are secretly the same hobby with different messes. In the garden, you layer compost, mulch, and patience.
On paper, you layer washes, glazes, and humility. Both punish overworking. If I keep fussing with a leaf wash, I get muddy paint. If I keep fussing with the
soil, I get compacted dirt. The best results come from doing the right thingthen stepping back and letting the system work.
I’ve also become way more observant about plant anatomy. Before painting, I knew basil had “leaves.” Now I know basil leaves have a particular curve, a central
vein that catches light differently than the lamina, and edges that can read as crisp or soft depending on moisture and age. Painting trained my eye to notice
what makes each plant uniquehow mint’s serrations announce themselves, how sage goes matte and fuzzy, how a tomato’s calyx looks like a little green star.
That awareness made me a better gardener, too, because I spot stress signs earlier: droop patterns, discoloration, insect damage, even subtle changes in leaf texture.
And then there’s the emotional side. Some paintings are basically souvenirs. The first strawberry that ripened in my patch? Painted. The sunflower that towered
over the fence like it was applying for a job as a streetlight? Painted. Even the “failed” crops have valuebecause they still teach me something about color,
form, and resilience. When a heatwave fries my lettuce, I can still paint the surviving leaves and laugh at the drama. The garden becomes less about perfection
and more about paying attention.
Finally, painting what I grow has made my seasons feel longer. Even after the last frost or the first cold snap, I still have those plantscaptured in watercolor,
preserved as a tiny, colorful archive of what worked, what didn’t, and what I want to grow again. It’s part sketchbook, part garden journal, part reminder that
beauty shows up when you slow down enough to see it.