Table of Contents >> Show >> Hide
- What “Minamil” means (and what it’s trying to prove)
- The big idea: a CNC mill you can build from common parts
- Anatomy of a minimal CNC mill
- What can the Minamil actually do?
- Where the minimalism bites back (limitations you should respect)
- A practical workflow that works well on a minimal mill
- Why PCB milling is a great “hello world” for the Minamil
- Safety: small machines can still cause big injuries
- Minamil vs. buying a desktop CNC
- Who the Minamil is perfect for
- Conclusion
- Maker Experiences: What it feels like to build and use a Minamil
There’s a certain kind of joy in owning a machine that can turn a boring rectangle of material into a real, useful thing.
Unfortunately, “machine tools” and “budget-friendly” don’t always hang out in the same friend group.
That’s where the Minamil shows up: a tiny, stripped-down CNC mill concept that aims to make the leap from “I wish” to “I built it.”
This isn’t a luxury machining center, and it doesn’t pretend to be. The whole point is to get something that moves in three axes,
follows toolpaths, and makes chipswithout needing a second mortgage, a forklift, or a personal relationship with a granite surface plate.
Think of it as the minimalist’s CNC: fewer parts, fewer specialized components, and fewer reasons to postpone your first cut.
What “Minamil” means (and what it’s trying to prove)
The name is basically a wink: “minimal mill.” The idea is to carve away the usual CNC mill complexity until you’re left with the smallest
set of parts that still behaves like a real machine. That means commodity hardware, simple motion components, and a “good enough” spindle choice
that many makers already own (or can get cheaply).
It’s also a gentle reminder that “mini mills” already exist as a category. The Minamil lives in a different neighborhood: “sub-mini,” where expectations
are managed, compromises are honest, and the win condition is learning + capability, not industrial throughput.
The big idea: a CNC mill you can build from common parts
The Minamil philosophy is brutally practical: use what’s easy to source, easy to assemble, and easy to replace.
Motion comes from straightforward mechanical elements you’ll recognize from hobby CNC builds.
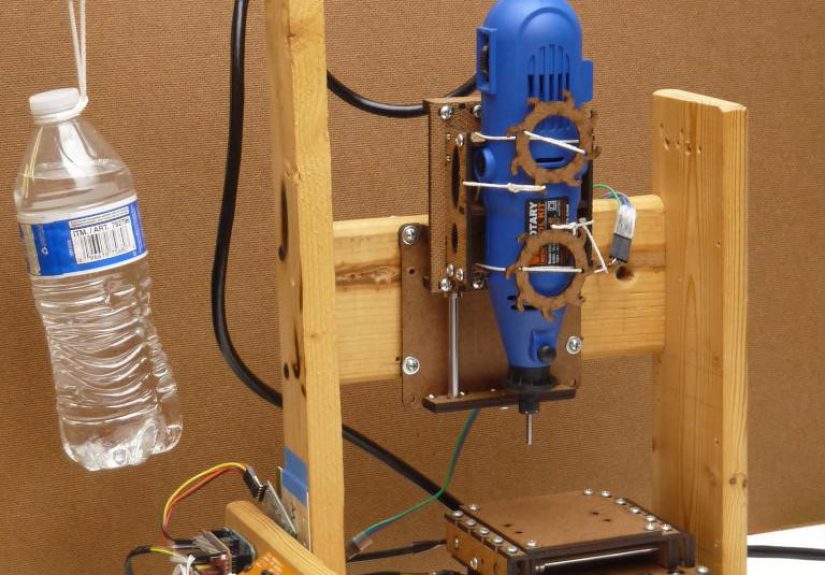
The cutting head is typically a compact rotary tool (the kind designed for hand use), clamped into a simple Z-axis arrangement.
Control is handled by a small microcontroller-based setup paired with stepper motor driverspopular, well-documented, and widely cloned.
That combination does something important: it lowers the “activation energy” of CNC.
Instead of a shopping list full of specialty rails, ball screws, and precision spindles, you’re working with a build that can be approached like a weekend project
(plus a few extra evenings for calibration… because physics loves character-building).
Anatomy of a minimal CNC mill
1) Structure and rigidity: the silent hero
In any milling machine, rigidity is destiny. The Minamil’s structure is intentionally simple, which makes it approachablebut also means rigidity has to be earned.
Every joint, every bracket, and every fastener matters more when the frame is lightweight. The machine can absolutely be functional,
but it rewards careful assembly: square everything, tighten consistently, and avoid “it’s probably fine” energy.
A useful mental model: if you can flex a component by hand, the cutter will flex it tooexcept the cutter will do it repeatedly,
at high speed, while making a noise that sounds like a robot chewing aluminum foil. Stiffness doesn’t just improve accuracy;
it improves surface finish, tool life, and your mood.
2) Motion components: simple, serviceable, and tunable
Minimal CNC builds typically rely on common linear motion approaches rather than high-end precision components.
This keeps cost low and repairs straightforward: if something binds, you can see it; if something wobbles, you can shim it.
The tradeoff is that you’ll spend more time tuning backlash, alignment, and friction than you would on a pricier machine with premium motion parts.
The upside is educational gold. You’ll quickly learn what causes lost steps, why “slightly misaligned” is still misaligned,
and how a tiny bit of slop becomes a visible problem the moment you try to pocket a square.
3) The spindle choice: why a rotary tool makes sense (and where it hurts)
Using a handheld rotary tool as a spindle is the classic “minimalist” move. It’s inexpensive, readily available, and fast enough for small cutters.
It can also be loud, not especially torque-rich at low speed, and not engineered for side-loading like a dedicated CNC spindle.
Practically, that means you’ll get the best results by keeping cuts light, using sharp tooling, and favoring multiple shallow passes.
If you treat it like a beefy spindle and try to hog material, you’ll get chatter, deflection, and a growing collection of snapped end mills.
(End mills are like pencils: the thinner they are, the more they break when you get emotionally attached.)
4) The control stack: from toolpath to motion
The Minamil-style control approach is usually built on a simple chain:
CAD to design the part, CAM to generate toolpaths, then a lightweight CNC controller firmware that translates motion commands into step pulses.
Stepper drivers handle the electrical heavy lifting, and the machine follows instructions one tiny step at a time.
This ecosystem is popular for a reason: it’s documented, inexpensive, and surrounded by community knowledge.
It also makes troubleshooting approachable. When something goes wrong, you can typically narrow it down to “mechanical binding,” “electrical noise/power,”
“incorrect settings,” or “I told the machine to do something rude and it complied.”
What can the Minamil actually do?
A minimal mill shines when you ask it to do small, realistic jobs: engravings, light facing operations, shallow pockets,
and detailed work on softer materials. It’s especially compelling for tasks that benefit from CNC precision even when material removal is modest.
Common “sweet spot” materials and tasks include:
- Acrylic and plastics: Great for brackets, enclosures, and clear parts where laser cutting isn’t ideal.
- Wood products (MDF/HDF and similar): Useful for templates, fixtures, and small mechanical parts.
- Copper-clad board: PCB isolation milling and prototype circuit work, when done carefully.
- Soft metals (with restraint): Light aluminum work is possible with shallow passes and sensible feeds.
The recurring theme is restraint. If you keep the cutter engaged lightly and let the tool do the work over time,
the machine’s modest rigidity and spindle limitations become manageable rather than fatal.
Where the minimalism bites back (limitations you should respect)
Minimal CNC mills are honest machines: they don’t hide physics behind mass and premium components.
The Minamil concept comes with predictable limitations, and acknowledging them upfront makes the experience better.
Rigidity and chatter
Milling produces lateral forces. If the structure flexes, the cutter deflects, and your “circle” becomes “a circle… that’s going through something.”
Chatter can show up as rough edges, squealing, and poor surface finish. The fix is usually a combination of better rigidity,
better workholding, sharper tooling, and gentler cuts.
Backlash and repeatability
Lower-cost motion systems can have more backlash. That doesn’t mean the machine is useless; it means you should plan around it.
Use CAM strategies that reduce direction changes during finishing passes, keep tolerances realistic,
and measure results so you can adjust settings rather than arguing with your calipers like they insulted your family.
Work area and speed
A minimal mill is usually compact, so work area is limited. And because it relies on lighter cuts,
it trades speed for capability. You can still make excellent partsjust not at industrial production rates.
A practical workflow that works well on a minimal mill
Start with “small win” projects
Your first projects should be boring on purpose: a simple engraved plate, a shallow pocket, a small bracket.
You’re not just making a partyou’re validating that motion is smooth, steps are accurate, and your toolpaths make sense.
Small wins help you separate “my machine needs tuning” from “my CAM settings are unhinged.”
Feeds and speeds: the difference between cutting and rubbing
Minimal mills often fail not because they’re incapable, but because they’re asked to cut like bigger machines.
If feed is too slow for a given RPM and cutter, the tool can rub instead of cut. That builds heat, dulls edges, and worsens finish.
The goal is to maintain a sane chip load while keeping cutting forces low.
Practical tactics:
- Use smaller stepdowns and stepovers.
- Favor multiple passes over aggressive depth.
- Choose sharp tools designed for the material (and replace them before they get “mysteriously bad”).
- When in doubt, reduce engagement first, not RPM.
Tooling choices that make life easier
For plastics and wood products, sharp flat end mills are usually straightforward.
For PCB isolation milling, engraving bits (V-bits) are commonly used because they can cut fine isolation paths without requiring ultra-tiny flat end mills.
The trick is consistency: consistent Z height, consistent board flatness, and conservative passes.
Why PCB milling is a great “hello world” for the Minamil
PCB milling fits the minimal mill mindset: tiny material removal, high value from precision, and rapid iteration.
You’re not carving deep pockets; you’re removing thin copper traces.
When the workflow is dialed in, you can go from design to a physical board quicklyespecially for single-sided prototypes.
To make it go smoothly:
- Design with generous clearances and realistic trace spacing.
- Flatten or spoilboard your work surface so the board sits consistently.
- Use careful Z probing or manual height setting to avoid undercut/overcut.
- Expect iterationyour first board is often a “calibration board” in disguise.
Safety: small machines can still cause big injuries
A minimal mill may look harmless, but it still has rotating parts, sharp tools, and flying chips.
Treat it like a real machine tool:
- Wear eye protection every time.
- Tie back hair, avoid loose sleeves, and remove dangling jewelry.
- Use proper workholdingnever “hand-hold” stock during cutting.
- Keep a clear emergency stop habit (even if it’s just power-off + sender stop).
- Respect dust: some plastics and composites create nasty debrisuse ventilation and cleanup.
If you take only one lesson: spinning things don’t care if you’re a beginner.
Minamil vs. buying a desktop CNC
If your goal is to make parts reliably with minimal tinkering, a commercial desktop CNC is the smoother path.
Many consumer machines are designed to cut wood and plastics comfortably, and some are capable with soft metals within certain thickness ranges.
They typically come with better enclosures, more rigid structures, and a support ecosystem.
But the Minamil has a different superpower: it teaches you CNC from the inside out.
When you build a minimal mill, you learn how motion systems behave, how firmware settings matter,
and why workholding is an entire discipline disguised as “just clamp it.”
In other words:
- Buy a desktop CNC if you want results quickly and consistently.
- Build a Minamil-style machine if you want capability + deep understanding at a low cost.
Who the Minamil is perfect for
A minimal mill concept is especially good for:
- Makers who want CNC capability on a tight budget.
- Students and educators teaching CNC fundamentals.
- Electronics tinkerers who want to experiment with PCB milling.
- People who enjoy building tools as much as using them.
If you love the idea of learning-by-buildingand you’re okay with tuning, iterating, and occasionally re-printing/re-cutting a partthis is your vibe.
Conclusion
The Minamil is a reminder that CNC isn’t reserved for big shops and big budgets.
With a minimalist approach, common parts, and a realistic understanding of limitations, a small CNC mill can be genuinely useful
not just as a novelty, but as a practical tool for prototyping, learning, and small fabrication tasks.
Respect the constraints, embrace the tuning, and you’ll end up with something valuable:
a machine that makes partsand a builder who understands why it works.
Maker Experiences: What it feels like to build and use a Minamil
What follows is a composite of common maker experiencespatterns you’ll hear from people who build minimalist CNC mills and share their progress publicly.
It’s not a single person’s diary, but it will feel familiar if you’ve ever tried to turn a pile of parts into a machine that obeys instructions.
The first “experience” is optimism. The parts look simple on the bench: hardware, brackets, motion pieces, motors, and a controller setup that promises
a clean three-axis life. Assembly starts fast, because the whole point of a minimal design is that it’s buildable.
Then you square the frame… and discover that “square” is not a yes/no question. It’s a relationship.
The second experience is tuning. You’ll jog an axis and it will movevictory!but maybe it sounds crunchy,
or binds near one end, or makes a noise that suggests it’s chewing gravel.
This is where minimal mills teach you their biggest lesson: alignment is everything.
You loosen fasteners, re-seat parts, tighten in sequence, and suddenly the motion becomes smooth enough that you start trusting it.
That trust will be tested later, but for now, enjoy it.
Then comes wiring and settings. Motors hum. Drivers get warm. The controller connects.
The first time you send a command and the machine moves in exactly the direction you expected,
you’ll feel like you just taught a toaster to dance. The first time it moves the wrong way, you’ll learn that “invert axis” options exist for a reason.
The first time it loses steps, you’ll discover the holy trinity of troubleshooting: friction, current limits, and acceleration.
The first cut is almost never a masterpiece. It’s usually a shallow engraving in something forgiving.
The toolpath runs, and you see real chips (or at least dust with ambition). The edges might look fuzzy.
Corners might not be perfectly crisp. But it’s CNC, and it’s yours.
After that, the projects become more intentional: a small bracket that actually fits,
a pocket that holds a component snugly, a face cut that makes the stock look “machined” instead of “survivor of a garage.”
PCB milling, for many builders, is the moment the machine feels magical. The material removal is tiny,
but precision matters. The first board might have broken traces or isolation that’s too shallow in places.
So you flatten the setup, adjust Z height strategy, and try again.
When it works, it’s a special kind of satisfaction: you’ve turned design files into functioning hardware in your own space.
Eventually, makers talk about “knowing the machine.” They learn what it likes:
lighter cuts, sharper tools, simpler jobs, careful workholding.
And they learn what it hates: aggressive depths, dull cutters, loose clamps, and wishful thinking.
That’s the real experience at the end of a minimal mill build: not just owning a tool, but understanding it.