Table of Contents >> Show >> Hide
- What Are Engineer Prints (and Why Are They So Cheap)?
- Where to Print Engineer Prints in the U.S.
- Choose the Right Image: The Secret Sauce for “Looks Expensive”
- How to Prep Your File (Without Becoming a Graphic Designer Overnight)
- Large DIY Wall Decor Ideas Using Engineer Prints
- 1) The Oversized Thrift-Frame Glow-Up
- 2) The “Poster Hanger” Look (Modern, Minimal, Fast)
- 3) Binder Clips, But Make It Chic
- 4) Foam-Board Mount = “Giant Canvas” Energy
- 5) The DIY “Floating Frame” Hack
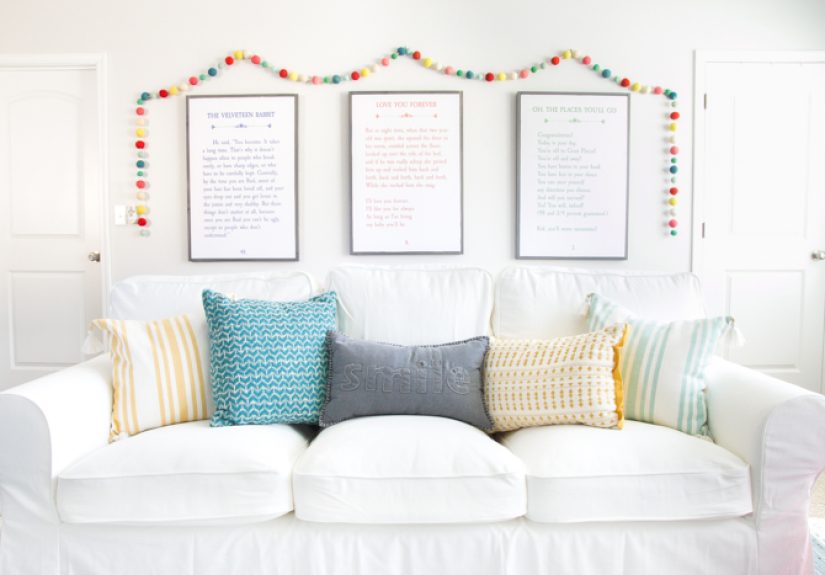
- 6) The Triptych: One Image, Three Big Panels
- 7) Oversized Map Wall for Office or Entryway
- 8) Architectural Sketches for a Calm, Grown-Up Look
- 9) The “Wallpaper Panel” Without the Commitment
- 10) Kids’ Room Giant Coloring Poster
- 11) “Seasonal Rotation” Gallery Spot
- 12) The Monochrome Photo Moment (Big, Moody, Beautiful)
- 13) Oversized Quote, Done the Right Way
- 14) The “Mat Built Into the Print” Trick
- 15) The Staircase Storyline
- 16) The “Oversized Mood Board” Panel
- 17) DIY Wood Frame from Basic Lumber
- 18) The “Lean It, Don’t Hang It” Oversized Statement
- Hanging & Protecting Your Engineer Print
- Common Mistakes (and How to Fix Them Fast)
- Budget Snapshot: Big Wall Art Without Big Spending
- Real-World Experiences: What It’s Like the First Time You Try Engineer Print Wall Art (500+ Words)
- Final Thoughts
You know that one wall in your housethe big, blank one that stares back at you like it pays rent? Filling it with
oversized art can get expensive fast… unless you use a delightfully “boring” printing option meant for blueprints.
Enter: engineer prints (also called blueprint, draft, or technical prints). They’re large-format,
budget-friendly, and perfect for turning “my wall looks empty” into “wow, you have your life together.”
In this guide, you’ll learn what engineer prints are, where to get them, how to prep images so they look intentional
(not like a crumpled receipt you taped up), and a pile of large DIY wall decor ideas that look high-end
while staying very low-drama for your wallet.
What Are Engineer Prints (and Why Are They So Cheap)?
Engineer prints are large-format prints typically used for construction plans, CAD drawings, and architectural
blueprints. They’re printed on lightweight bond paper rather than thick photo paper, which keeps the
cost down. Many print shops offer black-and-white or color options, and the output is designed to be crisp and readable
for line art, diagrams, and technical details.
Translation: you can “borrow” this print format for home decor. The finish is usually matte, the paper is thin, and it
won’t look like a glossy photo lab print. But once it’s framed, mounted, or hung with a clean DIY method, it reads as
modern, oversized artespecially if you choose images with strong contrast and simple composition.
Where to Print Engineer Prints in the U.S.
The easiest places to start are big print providers and office-supply print departments. Look for categories like
blueprints, engineering prints, architectural drawings, or technical printing.
Many offer standard large sizes (like 18″ × 24″, 24″ × 36″, and 36″ × 48″) plus black-and-white or color options.
Common options DIYers use
- Office-supply print centers (often labeled “Blueprints” or “Engineering/Architectural Prints”):
great for fast turnaround and budget pricing. - Shipping/print stores (often labeled “Architecture, Construction & Engineering Prints”):
convenient, widely available, and typically offer both color and black-and-white. - Local blueprint and reprographics shops: sometimes the best quality for the price, especially if you
want consistent color or specialty sizes.
Pro tip: If you’re printing a photograph, don’t panic if the product description says “not intended for
photo images.” That warning is about expectations (bond paper isn’t photo paper), not a magic force field that stops your
picture from existing. Choose images that play nicely with matte, lightweight paper and you’ll get a great result.
Choose the Right Image: The Secret Sauce for “Looks Expensive”
Engineer prints shine when the image is simple, bold, and readable from across the room. If you pick a busy image with
tiny details, it can look muddy on bond paper. Aim for clarity and contrast.
Image styles that work especially well
- Black-and-white photography with strong light/dark separation (portraits, landscapes, city scenes)
- Line drawings (architecture sketches, continuous-line art, botanical outlines)
- Vintage maps or transit diagrams (great in offices, hallways, and kids’ rooms)
- Typography posters (short quotes, coordinates, single wordsbig and clean)
- Minimalist illustrations with large shapes and lots of negative space
Quick quality checklist before you print
- Crop to the final size ratio (24″ × 36″ is a 2:3 ratio; 18″ × 24″ is 3:4)
- Use a high-resolution file: for large wall art, higher is better. If your file looks soft at full
size on your screen, it won’t magically sharpen on paper. - Boost contrast slightly for black-and-white prints; bond paper can flatten midtones.
- Add a border if you want breathing room inside a frame (instant “gallery” feel)
How to Prep Your File (Without Becoming a Graphic Designer Overnight)
You don’t need fancy software to get a clean, frame-ready printjust a little planning. The goal is to avoid awkward
cropping, surprise stretching, and “why is my dog’s face now an oval?”
Simple prep workflow
- Pick your final size first (decide based on wall space and frame availability).
- Crop your image to match the size ratio.
- Optional: add a white border for a matted look.
- Export as PDF if the print portal prefers it (many accept JPG/PNG too).
- Double-check the preview in the ordering tool before you pay.
If you want a super-polished look on a budget, one of the best tricks is to design a “mat” digitally by adding a wide
white border around the image. That lets you use cheaper frames without custom matting.
Large DIY Wall Decor Ideas Using Engineer Prints
Below are practical, good-looking ways to turn inexpensive engineer prints into large wall decor. Mix and match these
ideas depending on your style: modern, farmhouse, minimalist, eclectic, or “I just want my living room to feel finished.”
1) The Oversized Thrift-Frame Glow-Up
Find a large frame at a thrift store (or reuse one you already have). Print an engineer print slightly smaller than the
frame opening, then use a simple backing (foam board or mat board) to keep it flat. This is the easiest way to make bond
paper look intentional.
2) The “Poster Hanger” Look (Modern, Minimal, Fast)
Use a top-and-bottom hanging rail (wood slats + magnets, or a simple clamp-style hanger). This works great for tall
prints and makes swapping art ridiculously easyperfect for seasonal decor without a closet full of frames.
3) Binder Clips, But Make It Chic
Clip the top corners with medium binder clips and hang them from small hooks or pins. You get a subtle drop-shadow that
looks purposeful, plus you can change prints in seconds. Bonus: you don’t damage the print with tape.
4) Foam-Board Mount = “Giant Canvas” Energy
Mount the engineer print to foam board for a clean, rigid, frameless look. You can hang it with removable strips (check
weight ratings) or lightweight hooks. This is a great option for renters who want a big visual impact without glass.
5) The DIY “Floating Frame” Hack
Attach the print to a slightly smaller backing board, then set it inside a larger frame so it looks like it’s floating.
This adds depth and makes budget paper look elevatedlike a gallery piece that costs more than your streaming subscriptions.
6) The Triptych: One Image, Three Big Panels
Split one panoramic photo into three vertical sections and print each as a separate engineer print. Hang with equal gaps.
It’s dramatic, modern, and the math-y alignment makes your brain feel productive.
7) Oversized Map Wall for Office or Entryway
Print a vintage map, a city street grid, or a national park map large-format. Add pushpins for favorite spotsor keep it
clean and monochrome for a more “designer office” vibe.
8) Architectural Sketches for a Calm, Grown-Up Look
Line drawings, floor plans, and building sketches look especially sharp on bond paper (because that’s literally what the
print format was made for). Great for hallways, stair landings, or over a console table.
9) The “Wallpaper Panel” Without the Commitment
Print a large repeating pattern (or a high-contrast photo texture like linen, marble, or terrazzo), then mount it to a
panel or foam board. Hang it like art. You get wallpaper impactwithout scraping paste off your walls later.
10) Kids’ Room Giant Coloring Poster
Print a line-art scene (animals, space, cityscape) as a massive engineer print and hang it low enough for kids to color
with washable markers. It’s decor + activity, which is basically parenting’s dream bundle deal.
11) “Seasonal Rotation” Gallery Spot
Create one consistent frame or hanger in a high-visibility spot (mantel, entryway, kitchen). Swap engineer prints for
seasons: cozy winter landscape, spring botanicals, summer beach photo, fall typography.
12) The Monochrome Photo Moment (Big, Moody, Beautiful)
Choose one high-impact black-and-white photo (trees, waves, a city skyline) and go as large as your wall can handle.
Monochrome hides the “not photo paper” reality and leans into a modern editorial look.
13) Oversized Quote, Done the Right Way
Keep it short. One sentence max. Choose a clean font. Lots of white space. This isn’t the place for a 200-word manifesto
about coffeeunless the coffee is paying rent too.
14) The “Mat Built Into the Print” Trick
Add a thick white border around your image before printing so it looks matted when framed. It’s one of the best ways to
make budget printing look custom.
15) The Staircase Storyline
Print a series of similarly edited images (family photos, travel shots, nature scenes) in matching sizes. Arrange them up
the stairs. The consistency makes everything look curatedeven if you chose the photos while eating leftovers over the sink.
16) The “Oversized Mood Board” Panel
Create a collage of photos, textures, paint colors, and typography in one large layout, then print it as a single engineer
print. Mount it to a board in your office or studio. It’s practical and very “creative director.”
17) DIY Wood Frame from Basic Lumber
Build a simple frame from 1x2s (or have the hardware store cut pieces). Staple or tape the print to a backing board, then
fit it into the wood frame. Stain or paint the frame for a custom finish.
18) The “Lean It, Don’t Hang It” Oversized Statement
If you hate measuring (valid), frame your engineer print and lean it on a shelf, mantel, or console. Add a small object in
front for depth. This is the lowest-effort way to look like you read design magazines recreationally.
Hanging & Protecting Your Engineer Print
Because engineer prints are thin bond paper, they can wrinkle, wave, or crease if handled roughly. The solution is simple:
give them support (frame, mount, hanger rails) and keep them away from humidity and direct splashes.
Best display methods (from easiest to most “polished”)
- Poster rails or magnetic hangers: easiest for swapping prints.
- Frame with glass or acrylic: best protection and the most finished look.
- Mount to foam board: modern, frameless, lightweight.
- Mount + float frame: most “designer” look on a budget.
How to avoid wall damage
If you’re using removable hanging strips, follow the product instructions carefullyespecially cleaning the wall surface,
respecting weight limits, and removing by pulling the tab in the correct direction. For heavier framed pieces, consider
drywall hooks designed for higher weight ratings instead of pushing removable adhesives past their comfort zone.
Common Mistakes (and How to Fix Them Fast)
“My print looks wavy.”
Bond paper can curl from being rolled. Flatten it under books overnight or frame it so the backing holds it taut. Mounting
to foam board also eliminates waves.
“The image looks a little dull.”
That’s normal for matte bond paper. Choose higher-contrast images, slightly deepen shadows in editing, or lean into a
black-and-white style that looks intentionally soft and artistic.
“The size I want doesn’t match any frame.”
Either (1) print to a standard frame size, (2) add a digital border and print smaller, or (3) buy an inexpensive poster
frame and let the border act as your “mat.”
“I’m afraid it will look cheap.”
Three upgrades fix that fear: consistent sizing, intentional whitespace (borders), and a clean hanging method (frame,
rails, or mounted panel). Cheap happens when it looks accidental. Polished happens when it looks planned.
Budget Snapshot: Big Wall Art Without Big Spending
- Engineer print: typically low-cost compared to posters or photo enlargements
- Display method: thrifted frame, DIY wood rails, or foam-board mount
- Hanging: appropriate wall hooks or removable strips based on weight
The real win is flexibility: once you have a frame or hanger system you like, future updates are basically just “print new
art, swap it in, pretend you redecorated.”
Real-World Experiences: What It’s Like the First Time You Try Engineer Print Wall Art (500+ Words)
The first time you try engineer prints for wall decor, it usually starts with a burst of optimism: “This will be easy,
cheap, and life-changing.” And honestly? That optimism is not wrong. But there are a few totally normal “first-timer”
moments that can make the process feel slightly chaoticlike assembling furniture when the instructions are 40% pictures
and 60% emotional resilience.
The biggest surprise for most people is the paper itself. Engineer prints are typically printed on thin bond paper, so
when you pick it up at the counter (or unroll it at home), it can feel almost too simplelike, “Wait, I paid for this?
This feels like it should come free with a math textbook.” That’s the moment to remember: the magic isn’t the paper, it’s
the scale. Once that same print is flattened and framed, your brain stops thinking “paper” and starts thinking
“oversized art.”
Unrolling is also an experience. Your print may arrive rolled tight enough to qualify as a defensive weapon. If you try to
force it flat immediately, you’ll fight curling corners and waves. The easiest real-world fix is boring but effective:
lay it face-up on a clean surface and gently weigh the corners with books for several hours (or overnight). If you’re in a
hurry, you can reverse-roll it loosely the other direction for a minute or two, then let it rest under light weight. The
goal is to relax the paper fibers before you mount or frame it.
Next comes the image reality check. On a computer screen, everything looks crisp and bright because screens are basically
tiny billboards made of light. On matte bond paper, images can look softerespecially photos with lots of midtone detail
(foggy landscapes, beige-on-beige interiors, or that artsy shot of your coffee that’s mostly “vibes”). The people who end up
happiest tend to choose images with clear contrast: bold shadows, bright highlights, clean shapes, and simple subjects.
Black-and-white edits often look more expensive than color because they feel intentional and hide small imperfections.
The hanging method is another “learn it once” moment. If you tape an engineer print straight to the wall like a college
poster, it will look… like a college poster. If you put the same print in a simple frame, a poster rail, or a foam-board
mount, suddenly it looks curated. This is why many DIYers end up declaring frames “worth it” even when the entire point was
saving money. The trick is to spend strategically: thrift the frame, reuse hardware, or build a simple hanger rail from
basic wood stripsthen swap prints whenever you’re bored.
Finally, there’s the most satisfying part: stepping back. Large wall decor changes a room faster than almost anything else.
People often notice the room feels “done” even if nothing else changed. And once you’ve printed one successful piece,
you start seeing empty walls as opportunities instead of problems. The real experience is less “I made one cheap poster”
and more “I accidentally built myself an affordable art system.” Which is the best kind of accident.