Table of Contents >> Show >> Hide
- What Are Lady Locks?
- Lady Locks vs. Cream Horns vs. Clothespin Cookies
- Lady Locks Recipe (Easy, Reliable, and Delicious)
- Classic Filling Options (Choose Your Style)
- Scratch Dough vs. Puff Pastry Shortcut
- Pro Tips for Perfect Lady Locks
- Storage and Make-Ahead Tips
- Food Safety Note for Egg-Based Fillings
- Flavor Variations to Keep Things Interesting
- Why Lady Locks Are a Cookie Table Superstar
- Kitchen Experiences With Lady Locks (Extended Reading)
- Conclusion
Lady Locks are the kind of cookie that make people do a double take at the dessert table. Are they cookies? Tiny pastries? Little edible trumpets of joy? The answer is yes. These flaky, cream-filled treats (also called cream horns or clothespin cookies in many families) are a classic for holidays, bridal showers, and especially Pittsburgh-style cookie tables. They look fancy enough to impress guests, but they’re absolutely doable at homeeven if your baking track record includes one dramatic pie incident and a smoke alarm cameo.
In this guide, you’ll get a complete Lady Locks recipe, plus practical tips on pastry handling, filling choices, storage, and make-ahead prep. I’ll also break down the differences between the most common styles (scratch dough vs. puff pastry shortcut, whipped filling vs. buttercream), so you can choose the version that fits your schedule, your kitchen confidence, and your dessert goals.
What Are Lady Locks?
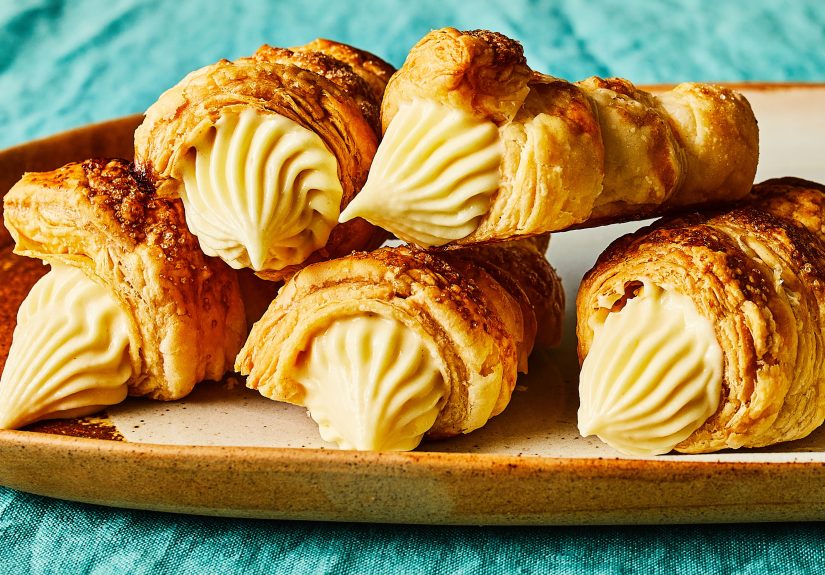
Lady Locks are delicate pastry tubes baked around molds (or old-fashioned round clothespins wrapped in foil), then filled with a sweet cream and dusted with powdered sugar. Depending on your region or family tradition, they may also be called clothespin cookies or cream horns. In Pittsburgh and surrounding areas, they’re a beloved staple on wedding cookie tables and holiday cookie trays.
The flavor is all about contrast: crisp, flaky shell on the outside and a fluffy, creamy filling on the inside. Think “light and elegant,” not “one-bite sugar bomb.” If made well, they feel old-school in the best possible waylike a handwritten recipe card that survived three generations and one kitchen remodel.
Lady Locks vs. Cream Horns vs. Clothespin Cookies
These names are often used interchangeably, but there are subtle differences depending on the recipe:
- Lady Locks: Common Pittsburgh and Eastern European-influenced name, especially for cookie table versions.
- Cream Horns: More general term for cone-shaped puff pastry shells filled with cream.
- Clothespin Cookies: Often refers to the same pastry, especially when dough is wrapped around clothespins or narrow molds.
Some families swear Lady Locks should use a scratch-made pastry dough. Others happily use frozen puff pastry and save their energy for perfect piping. Both camps are correct. Dessert diplomacy is possible.
Lady Locks Recipe (Easy, Reliable, and Delicious)
This version uses frozen puff pastry for a crisp shell and a creamy, lightly sweet filling. It captures the classic Lady Lock experience while keeping the process manageable for home bakers.
Yield
About 24–32 Lady Locks (depending on mold size and strip width)
Ingredients
For the Pastry Shells
- 2 sheets frozen puff pastry, thawed but still cold
- 1 large egg
- 1 tablespoon water
- Powdered sugar, for dusting
- Nonstick spray (for molds)
For the Cream Filling
- 8 ounces cream cheese, softened
- 3/4 cup powdered sugar (plus more to taste)
- 1 teaspoon vanilla extract
- 1–2 tablespoons lemon juice (optional, for brightness)
- 2 cups heavy cream, cold
- Pinch of salt
Equipment
- Cream horn molds, mini cannoli forms, or foil-wrapped clothespins
- Baking sheet
- Parchment paper
- Rolling pin
- Pastry brush
- Piping bag (or zip-top bag with corner snipped)
Step-by-Step Instructions
- Prep the molds and oven. Preheat your oven to 400°F. Line a baking sheet with parchment. Lightly spray your molds so the pastry slides off more easily after baking.
- Thaw the puff pastry correctly. Let the pastry thaw just until it unfolds easily but still feels cold. If it gets soft or sticky, pop it back in the fridge for a few minutes. Cold pastry = better layers.
- Cut the pastry into strips. On a lightly floured surface, gently roll one sheet to smooth folds (don’t crush the layers). Cut into strips about 1/2 inch to 1 inch wide. Narrower strips make a more delicate shell; wider strips bake faster and feel sturdier.
- Wrap the molds. Starting at the pointed end, wrap each strip around the mold, overlapping slightly as you go. Press the seam gently to secure. Place seam-side down on the baking sheet.
- Egg wash and bake. Whisk the egg and water. Brush each pastry shell lightly with egg wash. Bake for 12–16 minutes, or until puffed and golden brown. (Some recipes go a little longer depending on strip thickness and mold size.)
- Cool, then remove from molds. Let the shells cool brieflyjust enough to handle safelythen carefully twist and slide them off. Don’t leave them on the molds too long or they can stick or crack as they cool.
- Make the filling. Beat the softened cream cheese, powdered sugar, vanilla, salt, and optional lemon juice until smooth. In a separate bowl, whip the cold heavy cream to stiff peaks. Fold the whipped cream into the cream cheese mixture until fluffy.
- Fill the shells. Transfer filling to a piping bag. Pipe into both ends of each shell so the center is fully filled. (This is the part where everyone suddenly “just wants to help.”)
- Finish and serve. Dust generously with powdered sugar before serving. Lady Locks are best the same day, especially if you love a crisp shell.
Classic Filling Options (Choose Your Style)
One of the best things about a Lady Locks recipe is how flexible the filling can be. Here are the most popular styles:
1) Whipped Cream Filling
Light, airy, and very classic. Usually made with heavy cream, powdered sugar, and vanilla. This gives you the most “bakery cream horn” texture. It’s delicate and delicious, but it softens the shells faster, so fill closer to serving time.
2) Cream Cheese Whipped Filling
The best of both worlds: fluffy but more stable than plain whipped cream. The cream cheese adds body and a slight tang, which balances the sweetness. This is a great choice for parties or holiday trays.
3) Buttercream Filling
Richer and sturdier, often used in clothespin cookie recipes. If your family grew up with Lady Locks that held their shape beautifully for hours, this may be your nostalgia version. It also pipes very cleanly and is great for transporting.
4) Cooked Milk-Flour Buttercream (Old-School Style)
Some traditional recipes use a cooked milk-and-flour base mixed into a sweet butter filling. It sounds unusual if you’ve never tried it, but it creates a fluffy, silky texture that many old-fashioned bakers swear by.
Scratch Dough vs. Puff Pastry Shortcut
Purists and practical bakers have been debating this for years (probably while standing near the powdered sugar). Here’s the honest breakdown:
Use Frozen Puff Pastry If You Want:
- A faster prep process
- Reliable flakiness
- A beginner-friendly method
- Beautiful results with less fuss
Use Scratch Dough If You Want:
- A more traditional family-style bake
- More control over richness and texture
- A slightly more tender cookie-like shell (depending on recipe)
- The satisfaction of saying, “Yes, I made all of it” while accepting applause
There’s no wrong answer here. For most home bakers, puff pastry is the easiest path to a flaky, crowd-pleasing result. If you want the full old-school experience, try a scratch dough version next time.
Pro Tips for Perfect Lady Locks
Keep the Dough Cold
Warm pastry gets sticky, tears easily, and bakes less cleanly. Work in batches, keep unused dough chilled, and return it to the refrigerator if it starts feeling soft.
Don’t Overlap Too Thickly
A slight overlap is perfect. Too much overlap creates doughy spots that may not crisp properly.
Watch the Bake Color
Go for golden brown, not pale beige. Underbaked shells look okay at first, then get soggy fast after filling.
Remove Shells Carefully
Let them cool just enough to handle, then gently twist off the molds. Waiting too long can make removal harder; removing too soon can crush the shell. A little patience here saves a lot of pastry heartbreak.
Pipe From Both Ends
This makes the filling look generous and polished, and it helps avoid the dreaded “hollow middle” surprise.
Storage and Make-Ahead Tips
Best Texture Rule
For the crispiest shells, fill Lady Locks the day you plan to serve themideally within 24 hours of the event. Once filled, the shell slowly softens as it absorbs moisture from the cream.
How to Store Filled Lady Locks
- Store in an airtight container in the refrigerator.
- Best within 1–2 days for top texture.
- Still enjoyable up to 3 days, though the shells soften.
How to Store Unfilled Shells
- Cool completely first.
- Store in a cool, dry place in a covered container.
- Fill later for the best crunch.
Can You Freeze Them?
Yesmany bakers freeze them successfully. Use a freezer-safe airtight container and layer with parchment to prevent sticking. Thaw gently in the fridge or at room temperature. If you’re making these for a big holiday spread, this is a sanity-saving move.
Food Safety Note for Egg-Based Fillings
Most home-style Lady Lock fillings skip raw eggs, which makes life easier. But if you use a meringue-style or custard-style filling, follow safe egg practices. Use pasteurized eggs or cook egg-containing mixtures properly, and keep filled pastries chilled. This matters extra for children, older adults, pregnant guests, and anyone with a weakened immune system.
Flavor Variations to Keep Things Interesting
Once you master the base recipe, Lady Locks become a choose-your-own-adventure dessert:
- Lemon Vanilla: Add lemon zest and a little extra lemon juice to the filling.
- Chocolate Swirl: Fold in a spoonful of cocoa powder or drizzle melted chocolate on top.
- Almond Cream: Swap some vanilla for almond extract (go easyit’s strong).
- Holiday Spice: Add a pinch of cinnamon or nutmeg to the filling.
- Berry Finish: Garnish the tray with fresh raspberries or strawberries for a bakery-style presentation.
Why Lady Locks Are a Cookie Table Superstar
Lady Locks are visually dramatic, surprisingly light, and easy to arrange on trays. They also fit beautifully into the “make a lot, share a lot” spirit of cookie table culture. They look like a lot of effort (and yes, they do take some patience), but they reward you with a big wow factor and an even bigger “Who made these?” reaction.
And that’s the magic: they’re nostalgic and elegant at the same time. Lady Locks can sit next to peanut butter blossoms, pizzelles, sugar cookies, and buckeyesand still manage to steal the spotlight without making a scene. Well, not a loud scene. Maybe just a powdered sugar scene.
Kitchen Experiences With Lady Locks (Extended Reading)
Making Lady Locks is one of those baking experiences that teaches patience in a very specific way: not “life lesson” patience, but “don’t touch the pastry while it’s still warm” patience. The first time many bakers try them, the process feels a little fussy. There are molds, strips, seams, cooling time, piping bags, and powdered sugar drifting through the kitchen like a tiny winter storm. But after one batch, something clicks. You stop trying to rush the steps and start enjoying the rhythm.
A common experience is realizing that Lady Locks are less about difficult techniques and more about repetition. The first few shells might look a little uneven. The next few look better. By the second tray, you suddenly have a groove: cut, wrap, place seam-side down, bake, cool, slide off, repeat. It turns into a satisfying assembly line, and the kitchen starts to smell like butter and pastry-shop ambition.
Another shared experience is discovering how much filling preference matters. Some families want a fluffy whipped cream center that tastes light and fresh. Others want a sturdier buttercream filling that feels more traditional and holds up longer on the table. A few bakers split the batch and make both styles, which is honestly the most diplomatic solution if you’re feeding a crowd with opinions. And there will always be opinions. Lady Locks tend to inspire strong ones.
There’s also the practical joy of make-ahead baking. Lady Locks are a favorite for holidays because the shells can be baked ahead, then filled closer to serving time. That single trick changes everything. Instead of doing the whole recipe in one tiring session, bakers can spread it out over two days and keep the process fun. Day one: shells and cleanup. Day two: filling, dusting, and the very important quality-control taste test.
Presentation is another memorable part of the experience. Lady Locks look instantly special on a platter, especially with a light snowfall of powdered sugar. They don’t need fancy decoration, but they always look like they came from a bakery box tied with ribbon. If you’re taking them to a party, people notice. If you’re putting them on a holiday table, they disappear quickly. If you’re making them for a wedding-style cookie spread, expect at least one person to ask for the recipe before the evening ends.
The best part, though, is the feeling of making something a little old-fashioned. Lady Locks connect bakers to family traditions, regional food culture, and the kind of recipes that were passed around on index cards long before everyone started filming their desserts. Even when you use the shortcut version with puff pastry, the result still carries that same charm. They taste festive. They look nostalgic. And they make the whole kitchen feel like it’s preparing for something worth celebrating.
Conclusion
If you’re looking for a dessert that feels both classic and impressive, this Lady Locks recipe is a fantastic choice. You get flaky pastry, creamy filling, and a dessert that works for holidays, weddings, cookie exchanges, and “I just want to bake something beautiful” weekends. Start with the easy puff pastry method, get comfortable with the wrapping and piping, and then experiment with fillings to make the recipe your own.
The biggest secret to great Lady Locks isn’t a fancy ingredientit’s timing. Keep the dough cold, bake the shells golden, and fill them close to serving. Do that, and you’ll have a tray of pastries that look stunning and taste even better.