Table of Contents >> Show >> Hide
- Why Leather Makes Surprisingly Great Creatures
- Pick Your Hide: Leather Choices That Actually Matter
- My Creature-Making Toolkit (No, You Don’t Need a Medieval Forge)
- From Sketch to Snarl: My Build Process
- 1) Design the personality first
- 2) Pattern like a tailor, think like a sculptor
- 3) Cut cleanleather remembers your mistakes
- 4) Shape with water: casing + wet forming
- 5) Add texture: tooling, carving, and “fake biology”
- 6) Stitching: saddle stitch for strength (and drama)
- 7) Dye, paint, and finish without turning it into a sticky mess
- 8) Edges: the tiny detail that screams “professional”
- Three Projects to Try (With Specific, Realistic Examples)
- Common Mistakes That Make Monsters… Just Not the Cute Kind
- Safety: Keep Your Workshop From Becoming the Final Boss
- Finish Like a Pro: Patina, Care, and Longevity
- Selling Leather Creatures: Pricing, Photos, and “Yes, This Is Handmade”
- of Maker Experiences: The Leather Creature Life
- Conclusion
If you’ve ever looked at a scrap of leather and thought, “This could be a wallet,” you’re not wrong. But you’re also missing a huge opportunity to make something far more important: a tiny leather gremlin that stares into your soul from the bookshelf.
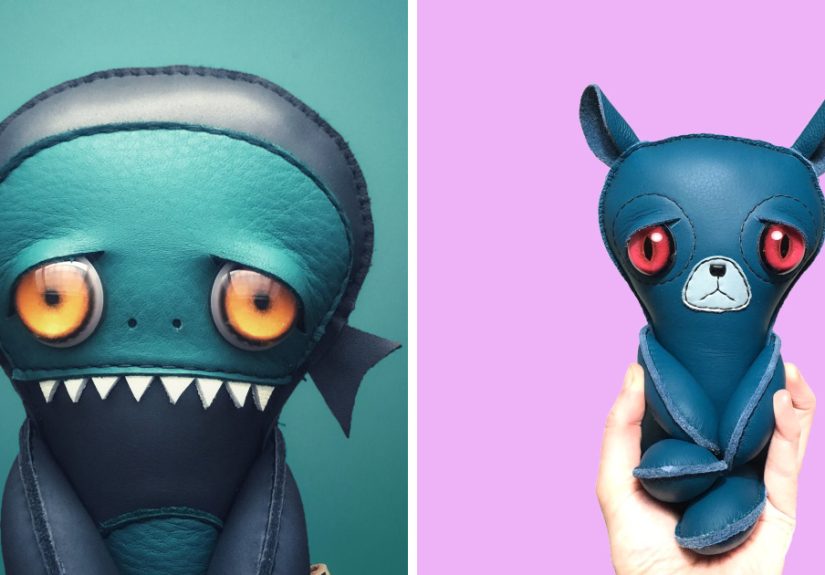
I make animals and monsters from leathersometimes cute, sometimes spooky, sometimes “why does it have TEETH?”and I do it with the same building blocks traditional leathercrafters use for belts, holsters, and bags. The difference is that I’m chasing character: floppy ears that feel alive, scales that catch the light, a grin that’s equal parts charming and mildly threatening.
This is a practical, workshop-ready guide to how leather creature-making works: the best leathers for sculpting, the tools that actually matter, shaping and stitching methods, finishing tricks, and a few real project examples you can steal (politely) for your own menagerie.
Why Leather Makes Surprisingly Great Creatures
Leather is a weirdly perfect “creature material” because it can be both structured and expressive. Vegetable-tanned leather can be carved, stamped, and wet-formed into crisp shapes, then hold them like it’s proud of itself. Softer leathers drape and fold like skin, fur, or wings. And over time, leather develops patinaso your creatures don’t just exist; they age. They acquire backstory. They look like they’ve been through at least one dramatic plot twist.
There’s also a delightful contradiction: leather is tough, but it can look soft. It’s sturdy, but it can be delicate. It’s serious, but you can turn it into a duck with attitude. That tension is basically the entire monster-making vibe.
Pick Your Hide: Leather Choices That Actually Matter
Vegetable-tanned vs. chrome-tanned (and why you’ll want both)
Vegetable-tanned leather (veg-tan) is the go-to for sculptural creature parts: faces, horns, claws, armor plates, and anything you want to tool, carve, or wet-form. It firms up beautifully when shaped with water, and it’s the easiest to stamp texture intoscales, wrinkles, fur patterns, you name it.
Chrome-tanned leather is usually softer and more flexible. It’s great for bellies, wings, floppy ears, tails, and anything you want to move a little when someone picks up the piece. It can also work well as a lining or interior layer when you want comfort against skin (like masks or wearable pieces).
Thickness, temper, and the “tiny creature math”
Leather thickness is often measured in ounces (oz). For small animals and monsters, you’ll commonly want:
- 2–4 oz for wet-formed faces, small panels, and details that need curve without becoming a brick.
- 4–7 oz for structured parts that must keep shape (horns, armor-ish plates, sturdy mask elements).
- Thin, soft leather for gussets, bellies, and “squish zones.”
Temper (how stiff or floppy the leather feels) is just as important as thickness. A firm temper makes crisp expressions and clean edges. A softer temper makes your creature look more “alive” and less like a tax document.
Sourcing with a conscience (and a budget)
If you want your work to feel good in every sense, start with transparency. Many makers buy from reputable suppliers and tanneries, and a lot of creature work can be done with offcuts and “scrap packs.” That’s not just cheaper; it’s also a smart way to reduce wasteespecially when you’re experimenting with shapes.
And if you’re curious about American leather heritage, the U.S. has long-running tanneries known for consistent, high-quality leathers. Knowing the source can help you predict how a leather will carve, dye, and agebasically, whether it’ll become a noble dragon or a sad pancake.
My Creature-Making Toolkit (No, You Don’t Need a Medieval Forge)
You can build leather beasts with a small, sensible tool lineup. Here’s what matters most:
Cutting + shaping
- Sharp knife (utility knife, craft knife, or head knife if you’re fancy)
- Cutting mat and a metal ruler for clean lines
- Skiving knife (or a skiver tool) to thin edges so seams don’t bulk up
- Wing divider or scratch awl to mark stitch lines
Stitching + assembly
- Two needles and waxed thread for saddle stitching
- Pricking irons or stitching chisels (or an awl if you like living dangerously)
- Stitching pony (optional, but your hands will send you thank-you notes)
- Clamps/clips for holding odd shapes during glue-up
Texture + finishing
- Stamping/tooling set (even a few basic stamps can create fur, scales, or “mystery skin”)
- Dyes, paint, and finishers
- Edge beveler, sandpaper, and burnishing agents (water, gum tragacanth, Tokonole, beeswaxpick your flavor)
That’s the core. Everything else is an accessory to your particular brand of chaos (googly eyes are not required, but I won’t stop you).
From Sketch to Snarl: My Build Process
1) Design the personality first
Before I draw a single pattern piece, I decide what this creature is. Shy? Menacing? A misunderstood goblin who just wants soup? Personality drives shape: big round cheeks read friendly; sharp angles read dangerous; wide-set eyes read cute; narrow eyes read “I know what you did.”
I sketch a front view and a side view. Then I decide where seams can hidealong jawlines, under chins, behind hornsso the construction supports the illusion.
2) Pattern like a tailor, think like a sculptor
Creature patterns are basically soft sculpture. I often prototype in paper or cheap fabric first. For 3D heads, I break the form into panels: face plate, cheeks, forehead, snout, jaw, and a gusset or two to help curvature.
Two rules keep you sane:
- Add seam allowance (because leather doesn’t magically grow extra material when you need it).
- Label everything (grain side, flesh side, “this is the left ear, not the other left ear”).
3) Cut cleanleather remembers your mistakes
Leather rewards patience. I mark with an awl (lightly) and cut in multiple light passes instead of trying to power through in one heroic slice. Sharp blades reduce fuzzing and wandering cuts, which is great because “oops” is not a design style.
4) Shape with water: casing + wet forming
Wet forming is where leather creature-making starts to feel like magic. For veg-tan, I case the leather (get it to the right moisture level) and then mold it over a form: a wooden shape, a 3D-printed mold, a foam ball, a carved block, even a carefully wrapped object you don’t mind getting damp.
When you mold, you’re not just bending leatheryou’re persuading the fibers to accept a new identity. I press contours slowly, clamp or clip the leather into place, then let it dry fully so it “sets.” Once dry, it holds curves like cheekbones, brows, and snarls.
5) Add texture: tooling, carving, and “fake biology”
Tooling is your shortcut to believable creature skin. A few approaches I lean on:
- Carved lines for wrinkles, eyelids, and mouth folds.
- Repeated stamps for scales, fur, pores, or bark-like texture.
- Layering (thin overlays for ridges, horns, plates) to create depth.
For monsters, realism is optionalbut consistency isn’t. If you decide it has scales, commit. Nothing breaks the spell faster than a creature that’s scaly on the forehead and mysteriously smooth on the neck like it got halfway through a spa day.
6) Stitching: saddle stitch for strength (and drama)
Saddle stitching is perfect for creatures because it’s strong, repairable, and it looks intentional. I punch holes, run two needles from opposite sides, and lock each stitch in place. It’s slower than machine stitching, but it lets you steer around curvesjawlines, horns, wing baseswhere a machine might throw a fit.
7) Dye, paint, and finish without turning it into a sticky mess
Color is where your monster goes from “nice leather project” to “why is it looking at me like that?”
Dye penetrates and keeps the leather’s natural character visible. I apply in circular motions to reduce streaking, build color gradually, and let it dry before sealing.
Paint is for high-contrast details: eyes, teeth, gums, spots, gradients, and anything fantastical. Prepping the surface matters (cleaning/deglazing when needed), and using a finisher helps protect paint from scuffs. If you’ve ever seen paint crack on leather, it’s usually because the surface wasn’t prepped, the layers were too thick, or the leather flexed more than the paint expected.
8) Edges: the tiny detail that screams “professional”
Edges can make or break the illusion. A beautiful burnished edge looks like the creature was born that way. My typical flow:
- Trim clean
- Bevel
- Sand
- Apply burnishing agent
- Burnish (repeat as needed)
If I’m going for a sleek, modern look (or a “toxic slime” vibe), I’ll edge-paint instead. It’s especially useful on layered edges that don’t burnish evenly.
Three Projects to Try (With Specific, Realistic Examples)
A Tiny Leather Dragon (Desk Guardian)
Concept: A palm-sized dragon with a wet-formed head, stitched body, and tooled scales.
- Head: Wet-form a 3–4 oz veg-tan face over a small rounded mold. Define brows and snout while damp. Let dry fully.
- Texture: Stamp scales along the forehead and cheeks; carve eyelids for expression.
- Body: Use softer leather for a stuffed torso. Add a gusset belly panel so it doesn’t look like a flat ravioli.
- Wings: Thin leather, lightly shaped, with stitched “vein” lines for structure.
- Finish: Dye base color, then dry-brush lighter paint on raised scales. Seal.
A “Gremlin” Key Fob (Cute Menace in Your Pocket)
Concept: A small monster head with exaggerated features: big ears, tiny teeth, and a face only a mother (or a goblin) could love.
- Use a simple two-panel head with a center gusset for volume.
- Skive edges so seams stay neat.
- Add tiny stitched-on ears and a little tongue (optional, but emotionally powerful).
- Paint eyes last. Always paint eyes last. Eye contact changes everything.
A Wearable Monster Mask (Not for Sneaking Snacks, Obviously)
Concept: A half mask with dramatic cheekbones, a sculpted brow, and optional horns.
- Wet-form a veg-tan mask base over a face form (or a safely wrapped mannequin head).
- Carve wrinkles and brow creases while properly cased.
- Layer horn bases from thicker leather; stitch or rivet securely.
- Finish edges carefullyyour face will be inches away from your workmanship.
Common Mistakes That Make Monsters… Just Not the Cute Kind
- Over-wetting veg-tan: You’ll lose crisp detail and risk warping as it dries.
- Skipping skiving: Bulky seams make small creatures look lumpy (unless “lumpy” is the brand).
- Rushing dye: Dye needs time to dry before you seal, or you’ll trap tackiness and sadness.
- Thick paint layers: Thin coats flex better and look cleaner.
- Ignoring edges: If the edges look rough, the whole creature looks unfinishedeven if the face is perfect.
Safety: Keep Your Workshop From Becoming the Final Boss
Leathercraft is friendly… until it isn’t. A few practical safety habits keep the hobby fun:
- Blade safety: Cut away from yourself, use a stable surface, and keep blades sharp (dull blades force you to push harder, which is how “oops” becomes “urgent care”).
- Ventilation matters: Some dyes, deglazers, and solvent-based cements give off fumes and can be flammable. Work with good airflow and keep them away from sparks and open flame.
- Protect your skin and eyes: Gloves and eye protection are boring until they’re heroic.
- Read product safety info: If the label says “use with adequate ventilation,” it’s not being poetic.
Finish Like a Pro: Patina, Care, and Longevity
Leather creatures are meant to be handled. That’s the pointthey’re tactile little weirdos. A protective finish helps reduce scuffs and keeps color from transferring. If your piece is meant to flex (keychains, wearable items), choose finishes and paints that can tolerate movement.
And don’t underestimate simple care: store away from harsh heat, avoid soaking, and condition when the leather feels dry. If you build a creature that lasts years, it becomes a companion objectnot just a craft project.
Selling Leather Creatures: Pricing, Photos, and “Yes, This Is Handmade”
If you decide to sell your animals and monsters, pricing is usually about materials + time + complexity. Creature work often takes longer than “flat goods” because you’re building in 3D, doing more finishing, and making details that don’t exist on a basic wallet (like tiny nostrilswhy do I do this to myself?).
For photos, treat the creature like a character:
- Use simple backgrounds so the silhouette reads clearly.
- Show scale (in-hand shots work great).
- Capture texture close-ups (scales, stitches, eyes).
- Include a “personality angle” (the face-on stare that convinces people it has a soul).
of Maker Experiences: The Leather Creature Life
The first leather monster I ever made was supposed to be a fox. It looked like a fox in the same way a potato “looks like” a sports car if you squint hard enough. The ears were uneven, the seam wandered like it was sightseeing, and the eyesoh, the eyeshad the blank optimism of a cartoon character who hasn’t learned about taxes yet.
But here’s the thing: the moment I held it up, my friend laughed and said, “I love him.” Not “it.” Him. That’s when I realized leather creatures don’t have to be perfectthey have to be believable. Believable means intentional choices: a consistent texture, a shape that supports the expression, and details that guide the viewer toward the story you’re telling.
At my first craft market, I brought a neat line of “safe” items: a couple wallets, a few keychains, some coasters. Then I put one little leather goblin on the table as a joke. Guess what people picked up first? The goblin. Every time. People didn’t just glance at itthey held it. They talked to it. One woman introduced it to her daughter like it was a new family pet. The wallets sat there like they were waiting for the goblin to sign their permission slip.
I started listening to the questions customers asked, because those questions taught me how to build better creatures. “Is it heavy?” told me to watch thickness. “Will the paint crack?” told me to improve prep and finish. “Can you make it in green?” told me to stock colors that photograph well. And the big one“Can you make one that looks like my dog?”taught me that the line between animal and monster is thinner than you’d think, especially when a chihuahua is involved.
My biggest learning curve was edges. Early on, I’d spend hours sculpting a face and then leave the edge looking fuzzy, like the creature had just survived a small explosion. The first time I burnished an edge properlybeveled, sanded, burnished, repeated until it shinedI swear the whole piece leveled up. It was the difference between “craft project” and “object.”
Now my workflow is full of tiny rituals: sharpening blades before cutting small parts, marking stitch lines carefully, testing dye on scrap, and letting wet-formed pieces dry completely before I touch them again. I also build “happy accidents” into the process. If a wrinkle forms during molding, I might enhance it and turn it into a signature expression line. If a dye gradient looks uneven, I’ll lean into it and make it look like natural mottling or scales.
The best moment still happens the same way it did with that first potato-fox: when someone picks up a finished creature, pauses, and smiles like they just met a tiny stranger with a huge personality. Leather is durable, surebut the real magic is that it can hold a story in its shape.
Conclusion
Making animals and monsters from leather is part leathercraft, part sculpture, and part theater. You’re choosing materials that shape well, using time-tested techniques like wet forming and saddle stitching, and then adding your own mischief through texture and color. Start small, practice the fundamentals, and give yourself permission to make a few weird little failures on the way to your first truly lovable monster. The shelf space they demand is worth it.