Table of Contents >> Show >> Hide
- First, What Counts as “Individual False Eyelashes”?
- Safety Rules (So You Don’t Turn Lash Removal Into an Eye Drama)
- What You’ll Need (Pick From What You Already Own)
- Method 1: The Safest Way to Remove Individual Lashes (Classic Top-Lash Application)
- Method 2: Removing Under-Lash DIY Clusters (Bond + Seal Systems)
- What About Professional Lash Extensions?
- Stubborn Glue? Try This Troubleshooting Ladder
- Aftercare: Keep Your Natural Lashes Happy
- How to Avoid Lash Damage Next Time
- FAQ: Quick Answers to Common “Help!” Moments
- Wrap-Up: Gentle Wins the Lash Game
- Real-World Experiences: What It’s Actually Like Removing Individual Lashes at Home (And What People Learn Fast)
Individual false eyelashes are the “just one more” of the beauty world. One lash turns into three, then suddenly you’re
blinking in HD. The only catch? Taking them off shouldn’t feel like you’re peeling a sticker off a balloon.
If your lash glue is clinging harder than a group chat that won’t die, don’t panicthere’s a safe, gentle way to remove
individual falsies at home without sacrificing your natural lashes (or your patience).
This guide covers the safest at-home removal methods for individual lashes (singles, flares, and clusters),
plus what to do if you’re dealing with DIY “lash extension” clusters placed under the lash line.
I’ll also be very honest about when you should stop and let a pro handle itbecause your eyes are not the place to “wing it.”
First, What Counts as “Individual False Eyelashes”?
“Individual lashes” can mean a few different things, and removal depends on what adhesive you used and where the lash is placed.
Here are the usual suspects:
- Singles / flares: Tiny lash pieces applied along the upper lash line, typically with strip-lash glue.
- Clusters: Small bundles applied above the lash line (classic) or sometimes underneath the natural lashes (DIY kits).
- Professional lash extensions: Individually bonded to your natural lashes with salon-grade adhesive.
(These are not the same as at-home individualseven if they look similar.)
If you used regular lash glue and applied the lashes to the skin right above your lashes, you’re in the easiest category.
If you used a DIY bond/seal system under the lashes, you’ll want the remover made for that bond.
If these are professional extensions, the safest move is professional removalmore on that below.
Safety Rules (So You Don’t Turn Lash Removal Into an Eye Drama)
- No yanking, peeling, or “just ripping it off.” That’s how natural lashes get pulled out.
- No acetone or harsh solvents near the eye. Your eyeball will file a complaint.
- Remove contact lenses first. Oils and removers can coat lenses and irritate eyes.
- Work with clean hands and clean tools. Lids and lash lines are sensitive and can get irritated or infected.
- Stop if you feel burning, sharp pain, swelling, or blurred vision.
Rinse with clean water or sterile saline and get medical advice if symptoms persist.
Teen note: If you’re 13–17 and doing this at home, it’s smart to have a parent/guardian nearby the first time,
especially if you’ve never used eye makeup remover oils before.
What You’ll Need (Pick From What You Already Own)
You don’t need a fancy “lash removal laboratory.” You mainly need something that safely loosens adhesive and a gentle touch.
- Oil-based eye makeup remover or cleansing oil/balm (great for dissolving lash glue)
- Micellar water (especially if you have sensitive skin; may take longer on stronger glues)
- Cotton swabs (precision tool for the lash line)
- Soft cotton pad or a makeup remover cloth (less snagging than fluffy cotton)
- Clean spoolie brush (optional, for aftercare)
- Warm water + clean washcloth (for compress/steam)
- Tweezers (optional)only if you’re steady-handed and using them far from the eyeball
- DIY lash bond remover (if your clusters were applied under-lash with a bond/seal system)
Method 1: The Safest Way to Remove Individual Lashes (Classic Top-Lash Application)
Use this method if your individual falsies were applied along the upper lash line (on the skin) with regular lash glue.
The goal is to soften the glue so the lashes slide off without pulling your real lashes.
Step 1: Clean the area gently
If you’re wearing eyeliner or shadow, remove the bulk first. A little micellar water on a pad works well.
Don’t scrub your lash line like you’re sanding furnituregentle strokes only.
Step 2: Add warmth (optional but helpful)
Warmth makes adhesives less stubborn. Take a warm shower, or press a warm (not hot) damp washcloth over closed eyes for
30–60 seconds. Repeat once if needed. This isn’t magic, but it’s a strong “softening the situation” move.
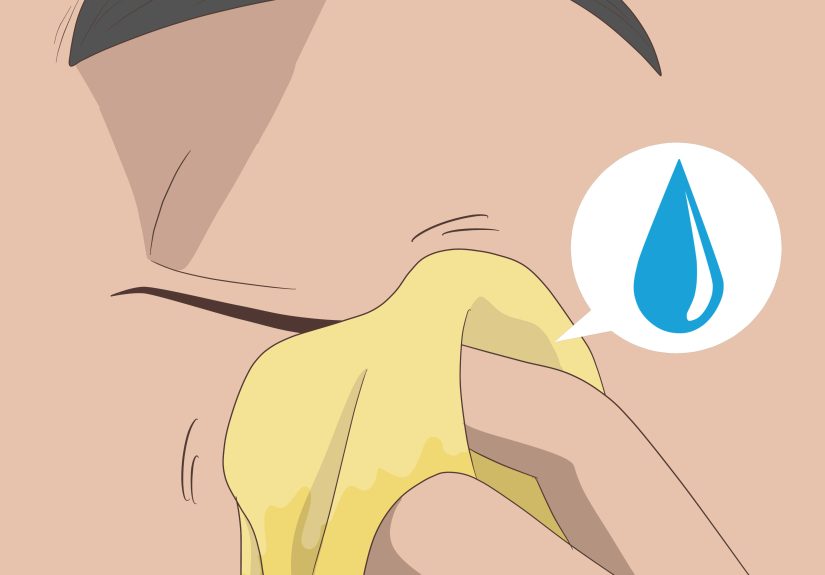
Step 3: Saturate the lash line with remover (the “let it sit” part)
Soak a cotton pad with oil-based remover (or rub a cleansing balm/oil between clean fingers), then press it gently onto
your closed eyelid along the lash line for 20–30 seconds.
This waiting time is where the glue starts to give up its life choices.
Step 4: Use a cotton swab for precision
Dip a cotton swab in remover and roll it along the lash line where the glue sits.
Focus on the base of the falsies. You’re not trying to “scrub glue off.” You’re trying to dissolve it.
If the glue is thick, do another 20-second press with a saturated pad, then return to the swab.
Step 5: Slide the individual lash offdon’t peel upward
Using clean fingertips, gently pinch the base of one lash cluster and wiggle side-to-side.
If it’s ready, it should slide away from the skin with minimal effort.
If you feel resistance, stop and add more removerthis is not a tug-of-war you want to win.
Step 6: Remove leftover glue safely
Once the lashes are off, use a fresh swab with remover to soften remaining adhesive. Then wipe gently with a damp cloth.
Avoid picking at glue with nails (tempting, yes; safe, no).
Method 2: Removing Under-Lash DIY Clusters (Bond + Seal Systems)
Some DIY lash kits place clusters underneath your natural lashes and use a “bond” adhesive that behaves differently from strip-lash glue.
The safest approach is to use the remover made for that bond, because it’s designed to break it down without
turning your lash line into a sticky science experiment.
Step 1: Use the kit’s remover (or a remover intended for DIY lash bonds)
Apply remover with a cotton swab or micro-brush to the bond points. Keep your eye closed and work slowly.
Let it sit for the time on the product instructions (often 30–90 seconds).
Step 2: Gently “walk” the clusters off
Once softened, clusters usually slide off with light pressure. Use your fingertips or a clean swab to coax them downward.
If a cluster is stuck, reapply remover and wait again.
Step 3: Cleanse afterward
After removal, cleanse your lash line with a gentle face cleanser and rinse well.
The goal is to remove remover residue so your lids feel normal again.
What About Professional Lash Extensions?
Professional lash extensions are bonded to individual natural lashes using stronger, longer-lasting adhesives.
At-home removal attempts can lead to lash breakage, irritation, and messy residue that’s hard to fully clean.
If you suspect your lashes are extensions (they’ve lasted weeks, they’re bonded along the lash hairs, not the skin),
professional removal is the safest option.
If you truly cannot get to a salon, the gentlest at-home approach people commonly try is repeated steam and an oil-based cleanser,
but it can take time and still may not fully remove the adhesive. The big rule stays the same:
never pull. If you develop redness, swelling, crusting, pain, or light sensitivity, stop and get medical guidance.
Stubborn Glue? Try This Troubleshooting Ladder
If your lashes won’t budge, it usually means the adhesive hasn’t softened enough. Here’s the calm, safe escalation plan:
- Do another “press and wait”: 20–30 seconds with a saturated pad on the lash line.
- Switch to a cleansing balm: Balms can cling better than watery removers, giving glue more time to dissolve.
- Add warmth again: Warm compress for 30–60 seconds, then remover.
- Use a lash glue remover made for eye-area adhesives (follow label directions carefully).
- Stop and seek help if you’re irritated, the glue is in your eye, or you’re tempted to yank.
One more time for the people in the back: if you feel like you need “more force,” you actually need “more soaking.”
Aftercare: Keep Your Natural Lashes Happy
Clean your lash line
Once lashes are off, wash your face and gently cleanse the eyelids. Rinse well and pat dry.
Clean skin helps prevent irritation and keeps leftover adhesive from collecting gunk.
Skip harsh eye makeup for 24 hours if you’re irritated
If your lids feel tender, take a short break. Think of it like letting your lash line “exhale.”
Brush gently (optional)
A clean spoolie can help separate lashes after everything is dry. If lashes feel fragile, don’t force it.
Watch for warning signs
Mild redness that fades quickly can happen, but persistent swelling, pain, discharge, or vision changes are not normal.
If you notice these, don’t keep experimentingget medical advice.
How to Avoid Lash Damage Next Time
- Use less glue than you think you need. Too much glue = harder removal and more residue.
- Let glue get tacky before applying. This improves hold without flooding your lash line.
- Avoid placing glue on your natural lashes. Aim for skin placement (for classic individuals), not lash-to-lash bonding.
- Don’t sleep in lashes unless the product is specifically designed for multi-day wear.
- Patch test adhesives if you have sensitive skin or a history of reactions.
FAQ: Quick Answers to Common “Help!” Moments
Can I use coconut oil or petroleum jelly?
Many people find oils (including coconut oil) can help soften adhesives, especially for makeup removal.
Petroleum jelly is very occlusive and can feel soothing, but it can also blur vision if it gets into the eye and may be messier to clean.
If you try either, use a tiny amount on a cotton swab, keep eyes closed, and cleanse afterward.
What if a lash (or glue) gets into my eye?
Don’t rub. Blink a few times and try flushing with sterile saline or clean water. If you can see the lash on the white of the eye,
a damp cotton swab can sometimes lift it gently. If irritation continues, get medical help.
My lashes look shorter after removaldid I ruin them?
Sometimes it’s leftover glue or makeup making lashes look sparse. Clean thoroughly and give it a day.
If you pulled lashes during removal, they may shed and take time to regrowanother reason gentle removal matters.
Wrap-Up: Gentle Wins the Lash Game
The safest way to remove individual false eyelashes at home is simple: soften the adhesive, slide the lashes off, and clean up residue without rubbing.
Your natural lashes are tiny, hardworking hairsnot Velcro strips. Treat them kindly, and they’ll keep showing up for you every morning.
(Unlike some people. We won’t name names.)
Real-World Experiences: What It’s Actually Like Removing Individual Lashes at Home (And What People Learn Fast)
Here’s the honest part: most people don’t mess up lash removal because they lack the “right product.”
They mess up because they’re in a rush, the glue is stronger than expected, or they assume removal should be instant.
If you’ve ever tried to remove individual lashes after a long daymaybe after a party, a school event, or a “why did I choose waterproof eyeliner?” moment
you already know the temptation: one confident tug and you’ll be free. The problem is that one confident tug can also remove a few of your real lashes,
and then you’re staring at the mirror doing math like, “Okay, how many lashes do I need to look normal again?”
A super common first-time experience is underestimating the power of the “press and wait.” People often dab remover on quickly, then try to peel the lash off.
When it doesn’t move, they assume the remover “doesn’t work.” In reality, it just didn’t have time.
When people try againthis time pressing a saturated pad to the lash line for 20–30 secondsthey’re shocked by how different it feels.
The glue goes from “cement” to “rubbery,” and the lash starts to slide instead of fight back.
Another common experience: discovering that cotton swabs are the real MVP. Pads remove makeup, but swabs do the detail work.
People who switch to a swab notice they can target the exact glue line without smearing remover into their eyes.
Rolling the swab along the lash line (instead of rubbing back and forth) is one of those tiny technique changes that suddenly makes removal feel controlled.
It’s also where people realize they were pulling at the lash from the wrong angle.
Sliding and wiggling side-to-side is gentler than peeling upwardespecially for individual clusters.
If you’ve tried under-lash DIY clusters, the experience can be even more “why is this so sticky?”
Many people report that regular micellar water isn’t enough because the bond is designed to be long-wearing.
The big lesson here is to use the remover made for that system and to be patient with the waiting step.
People who rush this part often end up with gummy residue that clings to natural lashes, which then leads to extra rubbingexactly what you’re trying to avoid.
The people who have the smoothest results usually do two gentle remover applications rather than one aggressive attempt.
There’s also a very real emotional experience to lash removal: the moment you think you’ve removed everything, but then you spot leftover glue in one corner.
Most people’s instinct is to pick it off with a nail (because it’s RIGHT THERE and it’s annoying).
The better movelearned after one or two “oops” momentsis to soften it again with a tiny bit of cleansing balm or oil on a swab, then wipe it away.
It’s slower, but it avoids inflaming the lid or pulling out lashes. Over time, people get faster not because they get more aggressive,
but because they get more strategic: warm compress first, soak longer, swab the glue line, then slide.
Finally, many people notice their lash line feels “relieved” after gentle removalless tight, less itchy, less irritated.
That’s usually a sign you removed adhesive without damaging skin. If your lids feel sore or look puffy, that’s often feedback from your body:
next time, use less force and more soaking. The best at-home lash removers aren’t the strongest productsthey’re the people who slow down,
keep everything clean, and treat the process like skincare, not like ripping off a bandage.