Table of Contents >> Show >> Hide
- Why Recycling Empty Oil Containers Matters
- Before You Start: The Golden Rule
- How to Recycle Empty Oil Containers: 13 Steps
- Step 1: Confirm Your Local Rule for Empty Oil Bottles
- Step 2: Separate the Used Oil from the Container Immediately
- Step 3: Keep the Used Oil Clean and Unmixed
- Step 4: Drain the Empty Oil Bottle Thoroughly
- Step 5: Let Gravity Do the Work (No “Quick Rinse” Tricks)
- Step 6: Put the Cap Back On
- Step 7: Inspect for Residue and Make a Simple Judgment Call
- Step 8: Choose the Correct Destination for the Empty Container
- Step 9: Recycle the Used Oil Separately at an Approved Collection Site
- Step 10: Handle Oil Filters the Right Way Too
- Step 11: Keep Oily Rags, Gloves, and Other Fluids Out of the Recycling Bin
- Step 12: Store and Transport Everything Safely
- Step 13: Make It a Repeatable Routine
- Common Mistakes to Avoid
- Quick FAQ
- Real-World Experiences and Practical Lessons (Extended Section)
- Conclusion
Let’s be honest: after a DIY oil change, the hardest part is not getting the oil out of the engine. It’s standing in the garage, staring at a slippery plastic bottle, and wondering, “Okay… where does this thing go now?” If that sounds familiar, you’re in the right place.
Recycling empty oil containers is one of those simple habits that makes a big difference. The catch? Rules vary by city. In one place, a drip-dry bottle goes in the recycling cart. In another, the same bottle goes in the trash after draining. That’s why the smartest approach is not just “recycle it,” but “recycle it the right way.”
This guide breaks it down into 13 clear steps, with practical tips, common mistakes to avoid, and real-world examples from U.S. recycling programs. We’ll also cover how to handle the used oil itself, because the bottle and the liquid do not follow the same rules.
Why Recycling Empty Oil Containers Matters
Used motor oil is one of the most common DIY automotive wastes, and it can cause major environmental damage when it’s dumped or handled carelessly. Even one oil change worth of used oil can contaminate a huge amount of water. The good news: used oil is highly recyclable, and many communities have collection options for households.
As for the container, most motor oil bottles are plastic, but they are only recyclable when they’re truly empty and prepared correctly. If there’s leftover oil sloshing around inside, that bottle can contaminate other recyclables and get rejected. Think of the empty bottle like a theater guest: it can come in, but only if it’s cleaned up and not bringing trouble.
Before You Start: The Golden Rule
Always check your local recycling rules first. This is not a cop-out. It’s the most important step. Some cities accept fully drained oil containers in curbside recycling. Others require them in the trash after draining. Some recommend taking them to a service station or household hazardous waste (HHW) site. The same item can have different rules depending on where you live.
If you only remember one thing from this article, remember this: used oil never goes in your curbside recycling cart, and the container only goes in recycling if your local program specifically allows it.
How to Recycle Empty Oil Containers: 13 Steps
Step 1: Confirm Your Local Rule for Empty Oil Bottles
Start with your city or county recycling guide, waste wizard, or HHW program. Search for “motor oil containers empty” plus your city name. This takes two minutes and saves you from contamination tags, rejected carts, or a very judgmental note from sanitation crews.
Local policies usually fall into one of three categories:
- Curbside recycling accepted (if bottles are fully drained and capped)
- Trash only (after drip-drying)
- Drop-off/service station (especially if residue remains)
Step 2: Separate the Used Oil from the Container Immediately
After your oil change, pour the used oil into a dedicated collection container right away. Do not leave it sitting in an open drain pan “just for now,” because “just for now” becomes “three weeks later” surprisingly fast.
Use a clean, sturdy, leak-proof container with a tight lid. Many people reuse the original oil bottle for temporary storage, but any compatible plastic container that seals well can work if your local program allows it. The key is to keep the liquid oil contained and separate from the empty bottle you’re preparing for disposal.
Step 3: Keep the Used Oil Clean and Unmixed
This is a big one. Do not mix used motor oil with water, coolant/antifreeze, brake fluid, solvents, or any mystery garage liquids. Contaminated oil is harder (and sometimes impossible) to recycle through regular programs.
Even a small amount of water can cause problems. If you are using a funnel, drain pan, or catch container, make sure it’s clean and dry before the oil touches it.
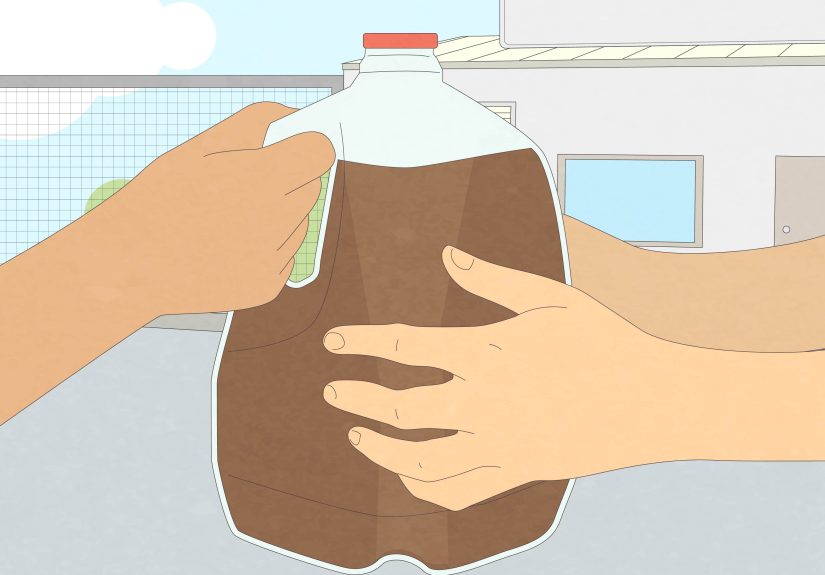
Step 4: Drain the Empty Oil Bottle Thoroughly
Once the used oil is transferred, turn the empty bottle upside down over your drain pan or catch container and let it drip out. This is the step people rush, and it matters.
Some local programs suggest letting it drain for at least 30 minutes. Others recommend drip-drying overnight. If your city gives a specific time, follow that. If not, a longer drain time is usually safer. The goal is simple: no free-flowing oil left inside.
Step 5: Let Gravity Do the Work (No “Quick Rinse” Tricks)
It may be tempting to rinse the bottle with water or detergent. Don’t do that unless your local program explicitly tells you to. Adding water can create contaminated runoff, and putting oily rinse water down a drain is a bad idea.
For most programs, “empty” means drained, not washed. Gravity is your friend here. Flip it, drain it, and let time handle the rest.
Step 6: Put the Cap Back On
After the bottle is fully drained, replace the cap. This surprises a lot of people because caps are sometimes removed for other types of recycling. But for empty oil containers, many local programs specifically say to cap the bottle after draining.
Why? It helps reduce drips, odors, and mess during collection. It also prevents your recycling bin from becoming a tiny science experiment on a hot day.
Step 7: Inspect for Residue and Make a Simple Judgment Call
Pick up the bottle and check it. Is it fully drained, with just a light film inside? Or is there still visible oil pooling in the corners? If there’s obvious liquid residue, it is not ready.
If the bottle won’t fully drain (damaged neck, heavy residue, mixed fluids), treat it more carefully and follow your local HHW or disposal guidance. When in doubt, do not toss a partially oily bottle into your recycling cart.
Step 8: Choose the Correct Destination for the Empty Container
Now follow the local rule you checked in Step 1:
- If your city accepts empty oil bottles in curbside recycling: Place the drip-dried, capped bottle in the recycling cart.
- If your city says trash only: Place the drip-dried, capped bottle in the garbage cart.
- If your city recommends drop-off/service station: Bring it with your used oil and filters.
This is where people get tripped up because the bottle is plastic, so it feels automatically recyclable. Unfortunately, recycling programs care less about your feelings and more about contamination.
Step 9: Recycle the Used Oil Separately at an Approved Collection Site
Your used oil (the liquid) should go to an approved used-oil collection center, HHW facility, or participating service station/auto shop. Many states and local agencies maintain searchable directories, and nationwide tools can help you find nearby drop-off locations.
Do not pour used oil into curbside carts, yard drains, toilets, sinks, or onto the ground. If you do, your future self and your local watershed will both be disappointed.
Step 10: Handle Oil Filters the Right Way Too
If you changed your filter, don’t ignore it. Oil filters can hold a surprising amount of leftover oil. Many programs require draining the filter before disposal or recycling. Some local or state guidance also recommends puncturing and draining the filter for several hours.
The exact rule varies, so check your local program. The main point: filters are not “regular trash” until they’re handled properly.
Step 11: Keep Oily Rags, Gloves, and Other Fluids Out of the Recycling Bin
Empty oil bottles are one thing. Oily gloves, absorbents, and rags are another. Coolant, brake fluid, and transmission fluid are also separate streams. Many city programs direct these items to HHW facilities rather than curbside recycling.
If you’re doing a full garage cleanup, sort everything into categories before disposal. A five-minute sorting session can prevent a recycling-cart mess and make drop-off day much smoother.
Step 12: Store and Transport Everything Safely
Until you can drop off the used oil, store it in a sealed container in a cool, dry place, away from kids, pets, and ignition sources. Put the container in a box or tray when transporting it in your car to catch drips.
Pro tip: keep a small “oil recycling kit” in your garagea funnel, nitrile gloves, a catch tray, and a labeled jug. It makes the next oil change much less chaotic, and you’ll look oddly professional while using it.
Step 13: Make It a Repeatable Routine
The best recycling system is the one you’ll actually use every time. Save the local disposal page on your phone. Put a reminder in your maintenance notes. Keep one clean container ready for the next oil change. If your city hosts seasonal collection events, mark the dates.
Once you build the habit, recycling empty oil containers becomes easy: drain, cap, sort, and send it to the right place. No drama. No spills. No guessing.
Common Mistakes to Avoid
Putting used oil in the recycling cart
This is the fastest way to create contamination problems. The cart is for approved recyclables onlynot liquid motor oil, even if the cart is technically full of “recycling stuff.”
Mixing motor oil with other fluids
Coolant and brake fluid are not invited to this party. Mixing fluids can cause your load to be rejected and may require special disposal.
Assuming all plastic oil bottles are curbside recyclable everywhere
Some cities say yes. Others say no. Local rules win every time.
Rushing the draining step
A bottle that is “mostly empty” may still be too oily for recycling. Give it time to drip dry properly.
Quick FAQ
Are empty oil containers recyclable?
Often yesbut only if they are fully drained and your local recycling program accepts them. Some programs still require trash disposal after draining.
Can I put the cap on before recycling?
In many local programs, yes, and it’s actually recommended after draining. Always follow local guidance.
What plastic are motor oil bottles made from?
Many empty motor oil and antifreeze containers are made from HDPE (#2), but the material alone does not guarantee curbside acceptance. Condition and local policy matter.
Where can I take used motor oil?
Try certified used oil collection centers, HHW facilities, or participating service stations/repair shops. Many state and national directories can help you locate a site.
Real-World Experiences and Practical Lessons (Extended Section)
One of the most useful things about this topic is how quickly you learn that “recycling” is not just about materialsit’s about systems. People who do their own oil changes often assume the hard part is mechanical, but the real learning curve is disposal. A common experience is the first-time DIYer who carefully changes the oil, feels proud, and then accidentally mixes a little coolant into the used-oil jug because the funnel or drain pan wasn’t fully clean. Suddenly, what should have been a quick drop-off becomes a phone call to the local HHW program. It’s not a disaster, but it teaches a memorable lesson: setup matters.
Another frequent experience happens in apartments or homes without a lot of garage space. People store the used oil “temporarily” in a corner, and then the container gets bumped, the cap loosens, and now there’s an oily box, an oily floor, and an oily mood. The fix is simplestore the jug inside a tray or shallow plastic binbut most people only learn it after one small spill. That’s why experienced DIYers often create a mini oil-handling station: drain pan, funnel, labeled jug, gloves, and absorbent pads all in one place. It feels like overkill until the first time it saves your trunk carpet.
There’s also the local-rule surprise. In some California communities, residents are told to drip-dry empty oil bottles, put the cap back on, and place them in the recycling cart. In other places, residents are told the exact opposite: drip-dry first, then put the container in the trash. This confuses people because both instructions can be correct. The difference is the local sorting facility, contamination policy, and what the program is equipped to handle. Seasoned recyclers learn not to argue with the rulethey adapt to it. The smartest phrase in recycling is, “What does my city say?”
Another practical lesson comes from people who try to be “extra clean” and rinse out bottles with water. It seems like a responsible move, but if that oily rinse water ends up in a drain, they’ve created a new problem. Experienced folks usually stop rinsing altogether and rely on a longer drip-dry time instead. It is slower, but cleaner from a waste-management perspective.
Finally, people who recycle used oil regularly almost always mention how much easier it gets after the second or third time. They save the local drop-off location, learn the accepted hours, and combine the trip with errands. Some cities even offer one-day collection events or curbside options for used oil and filters, which makes the routine even easier. In other words, the biggest challenge is not technical knowledgeit’s building the habit. Once that habit is in place, recycling empty oil containers becomes one of the easiest “green” wins in the garage.
Conclusion
Recycling empty oil containers the right way is not complicated, but it is specific. The winning formula is simple: drain the bottle thoroughly, keep used oil uncontaminated, follow your local rule for the empty container, and take the liquid oil to an approved collection site.
If you remember the “13 steps” approach, you’ll avoid the most common mistakes and make your DIY oil changes cleaner, safer, and more environmentally responsible. And yes, you’ll also avoid the classic garage mystery of “Which jug has what in it?”which is a victory all by itself.


