Table of Contents >> Show >> Hide
- Getting to Know Foamflower
- Ideal Growing Conditions
- How to Plant Foamflower
- Routine Care and Maintenance
- Propagating Foamflower
- Pests, Diseases, and Common Problems
- Design Ideas and Companion Plants
- Real-Life Foamflower Growing Experiences and Tips (Extra Insights)
- Conclusion: A Low-Maintenance Star for Shady Spaces
If you’ve ever wished your shady garden would stop looking like the “before” photo in a makeover show, foamflower might be your new best friend. This charming woodland perennial (Tiarella cordifolia and its hybrids) brings frothy white or pale pink blooms, patterned foliage, and an easygoing personality to spots where many plants sulk. With the right conditions, it forms a soft, sparkling carpet under trees, along paths, or in that awkward dark corner you pretend not to see.
The good news: foamflower isn’t fussy. Give it shade, moisture, and decent soil, and it will quietly handle the rest. Below, we’ll walk through everything you need to know to plant, grow, and multiply foamflower, plus real-world tips to keep it happy for years.
Getting to Know Foamflower
Foamflower is a native woodland plant in the saxifrage family, found in eastern North America along stream banks and forest floors. It’s typically hardy in USDA zones 4–9, depending on the variety, and is grown mainly as a shade groundcover. Plants are usually low and mounding, about 8–12 inches tall in bloom, spreading over time through short stolons to form colonies.
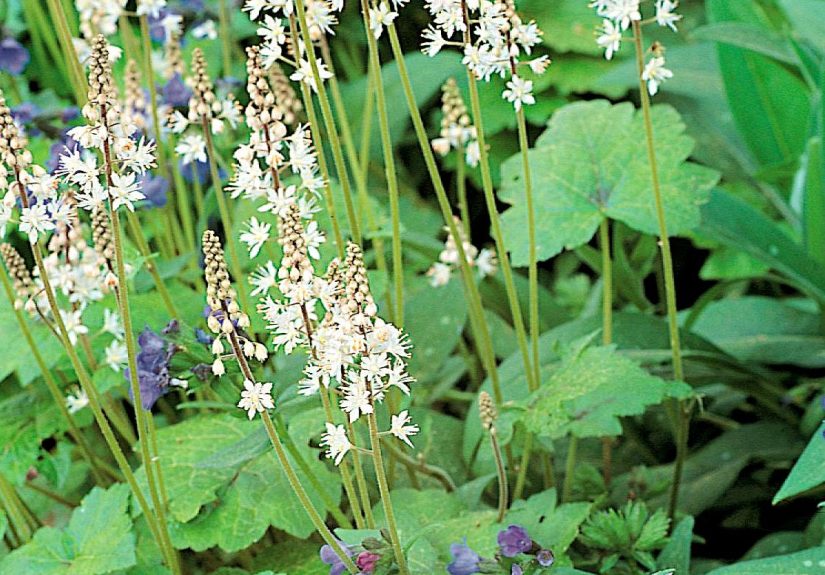
The leaves are heart-shaped or lobed, often marked with burgundy or chocolate-colored veins. In spring, the plants send up slender flower spikes topped with tiny star-shaped blossoms that look like little pom-poms of foamhence the name “foamflower.” Many cultivars keep their foliage attractive well into fall, adding multi-season interest to shady beds.
Another plus: foamflower is generally considered deer and rabbit resistant and rarely bothered by serious pests. It’s also great for pollinators, offering nectar to early-season insects when not much else is blooming in the shade garden.
Ideal Growing Conditions
Light Requirements
Foamflower naturally grows in woodland shade, so think “dappled forest light” when choosing a spot. In most climates, it does best in:
- Full shade to part shade – Under trees, along the north side of a house, or beneath taller shrubs.
- Morning sun, afternoon shade – A couple of hours of gentle morning sun is usually fine, especially in cooler regions.
Harsh afternoon sun, particularly in hotter southern zones, can scorch the leaves, fade the color, and dry out the soil too quickly. If your foamflower looks crispy or bleached, it’s probably begging for more shade and more moisture.
Soil Preferences
Foamflower thrives in soil that mimics a forest floor:
- Moist but well-drained – Consistently damp, never swampy.
- Rich in organic matter – Think compost, leaf mold, shredded leaves, or aged bark.
- Neutral to slightly acidic pH – It’s happy in the average garden soil that isn’t strongly alkaline.
Heavy clay can be improved with organic matter and a bit of raised planting. Very sandy soil will need lots of compost and more frequent watering.
Water and Humidity
Because it evolved along streams and in moist woods, foamflower likes consistent moisture. The top inch of soil should feel slightly damp most of the time, especially during its first year. Once established, it can handle brief dry spells, but repeated drought stress will reduce vigor and flowering.
Temperature and Hardiness
Most foamflower varieties are hardy through cold winters and perform well in regions with cool to moderate summer temperatures. In very hot climates, extra shade and mulch are essential to keep roots cool and moist. In colder areas, the foliage may die back in winter, then resprout in spring.
How to Plant Foamflower
When to Plant
You can plant foamflower in either spring or fall:
- Spring – Ideal for cooler regions or new beds. Plants have the whole growing season to establish roots.
- Fall – Great for regions with mild winters. Soil is still warm, and rainfall is often more reliable.
Site Preparation
- Choose a shady spot. Look for areas with morning sun or filtered light beneath trees or shrubs.
- Loosen the soil. Work the soil 8–10 inches deep, breaking up clumps and removing rocks and roots.
- Add organic matter. Mix in 2–3 inches of compost, leaf mold, or well-rotted manure to improve texture and moisture retention.
- Check drainage. If water tends to pool, consider creating a gentle slope or raising the bed a few inches.
Spacing and Layout
Spacing depends on how quickly you want groundcover:
- For a fast carpet: Plant 12–15 inches apart in a staggered grid.
- For budget-friendly coverage: Plant 18–24 inches apart and give them a few seasons to fill in.
Step-by-Step Planting
- Water the plant in its nursery pot an hour before planting so the root ball is moist.
- Dig a hole as deep as the pot and slightly wider.
- Gently remove the plant from the pot, loosening circling roots with your fingers.
- Place the plant so the crown (where stems meet roots) is level with the surrounding soil.
- Backfill with the improved soil, firming gently to remove air pockets.
- Water thoroughly to settle the soil.
- Add a 2–3 inch layer of mulch, such as shredded bark or leaf mold, keeping it a small distance away from the crown.
If the foliage wilts slightly after planting, don’t panic. New transplants often look a bit dramatic for a few days. Just keep the soil consistently moist and shade steady.
Routine Care and Maintenance
Watering Strategy
For the first growing season, water whenever the top inch of soil starts to feel dry. Aim for deep, less frequent watering rather than frequent, shallow splashesthis encourages deeper root growth.
Once established, foamflower usually needs supplemental water during dry spells or heatwaves, especially in containers or very sandy soil. In naturally moist, shady beds with good organic matter, rainfall may be enough.
Mulching and Feeding
Mulch does a lot of the heavy lifting with foamflower:
- Conserves moisture so you water less often.
- Suppresses weeds that would compete for nutrients and water.
- Slowly feeds the soil as organic mulch breaks down.
Refresh mulch once or twice a year, especially after winter. As for fertilizer, foamflower isn’t a heavy feeder. In most gardens, an annual top-dressing of compost in spring is enough. If your soil is poor, you can use a balanced, slow-release fertilizer at a light rate in early spring.
Deadheading and Grooming
Foamflower doesn’t require pruning, but a little grooming keeps it tidy:
- Snip off spent flower stalks after blooming to keep the plant neat and encourage more foliage growth.
- Remove any damaged or tattered leaves throughout the season.
- In cold climates, you can trim back old foliage in early spring as new leaves emerge.
Overwintering
In-ground plants usually overwinter well with minimal help. Leaving mulch in place protects the shallow roots from freeze-thaw cycles. In colder zones or exposed spots, a slightly thicker layer of leaves or straw around the plants (but not smothering the crown) adds extra insulation.
Foamflower in containers is more vulnerable to winter damage. Move pots into a sheltered locationagainst a house wall, in an unheated garage, or sunk into the ground and mulchedso the roots don’t freeze solid.
Propagating Foamflower
Foamflower is refreshingly easy to multiply, which is great if you’re trying to cover a large shady area without emptying your wallet.
Division
Division is the most common and reliable method. You can divide foamflower in early spring as new growth emerges, or in fall once the weather cools.
- Water the plant well a day beforehand.
- Gently dig around the clump, lifting it with as much root and attached stolons as possible.
- Use your hands or a clean knife to separate the clump into smaller sections, each with roots and a healthy crown.
- Replant divisions at the same depth, spacing them 12–24 inches apart.
- Water thoroughly and keep evenly moist until established.
Dividing every few years prevents overcrowding, improves air circulation, and gives you fresh plants to spread around or share.
Seeds
Foamflower can be grown from seed, but hybrids usually don’t come true, and it’s slower than division. If you’re growing the straight species and enjoy experiments, collect seed after the flower spikes dry, sow in pots or a nursery bed, and be patient.
Pests, Diseases, and Common Problems
One of foamflower’s major selling points is how little trouble it causes. There are usually no serious insect or disease issues in healthy, well-sited plants.
Possible Issues
- Powdery mildew: In humid, crowded conditions with poor air circulation, leaves may develop a white, powdery coating. Thin nearby plants, divide congested clumps, and water the soil rather than the foliage.
- Leaf scorch: Brown, crispy edges often point to too much sun, too little water, or both. Move the plant to deeper shade and improve moisture levels.
- Root rot: Prolonged soggy soil can cause the crown to rot. Improve drainage, reduce watering, and avoid planting in low, waterlogged spots.
Deer and rabbits typically leave foamflower alone, though a very hungry critter will try almost anything. Slugs and snails may sample young leaves in very damp gardens, but they’re usually minor annoyances rather than full-blown disasters.
Design Ideas and Companion Plants
Because foamflower stays relatively low and spreads into soft mounds, it shines as a groundcover and edging plant in shade gardens. Here are some ideas to get you inspired:
- Woodland carpet: Mass foamflower under deciduous trees, where it will enjoy spring light before the canopy leafs out.
- Pathway edging: Line shady paths or stepping stones with foamflower to soften hard edges and create a “fairy forest” vibe.
- Mixed shade border: Combine with hostas, ferns, hellebores, heuchera, and brunnera for layered textures and foliage color.
- Moist shade accent: Plant near water features or along rain garden edges, provided the soil drains well.
Look for cultivars with interesting leaf patternslike dark central veining or deeply lobed leavesto get foliage drama even after the spring flowers fade.
Real-Life Foamflower Growing Experiences and Tips (Extra Insights)
Once you’ve grown foamflower for a couple of seasons, you start to notice its personality. Gardeners who fall for it often share similar storiesthis plant quietly earns its keep and then some.
Tip 1: Treat It Like a Mini Woodland
Foamflower is happiest when you pretend your garden bed is a tiny forest floor. That means plenty of organic matter and a light blanket of leaves or mulch. In many gardens, simply chopping autumn leaves with a mower and letting them sit around the plants works wonders. Over time, the soil becomes darker, looser, and sponge-like, and the foamflower responds with thicker clumps and more flowers.
Tip 2: Use It as a “Problem Solver” Plant
Have that awkward space under a large shrub where grass refuses to grow but weeds thrive? Foamflower loves that spot. Plant a few clumps and give them a year or two. As they spread, they create a living mulch that crowds out many weeds, keeps the soil covered, and looks far more intentional than bare dirt or constant mulching.
Tip 3: Don’t Be Afraid to Move It
If you misjudge light levels or moisture the first time, foamflower is remarkably forgiving about being moved. Many gardeners dig and shift clumps in early spring, noticing that within a few weeks the plants have perked up and settled in as if nothing happened. If a plant seems unhappyscorched, floppy, or underperformingrelocating it to deeper shade or richer soil is often all it takes.
Tip 4: Pair It with Bold Foliage
Foamflower has delicate blooms, but the foliage is surprisingly versatile. It looks especially nice next to big, bold leaves like hosta or glossy evergreen shrubs. The contrast in leaf size and texture makes both plants look better. Try a drift of foamflower in front of large, blue hostas, or in front of dark-leaved heuchera for an elegant shade combo.
Tip 5: Keep an Eye on Moisture in Summer
Gardeners often notice that foamflower looks flawless in spring and early summer, then a little tired by late July or August if the weather turns hot and dry. A simple routine helps: deep watering once or twice a week during heatwaves, plus maintaining a thick (but not smothering) layer of organic mulch. You’ll see fewer crispy edges and more consistent leaf color.
Tip 6: Use Division as Free Landscaping
After a few years, established foamflower clumps usually start sending runners or expanding beyond their original footprint. That’s your signal: it’s division time. Many gardeners make a habit of dividing a handful of clumps each spring or fall and replanting them farther along a path or into a new bed. Over several seasons, a small original planting can turn into a generous drift that would have cost a small fortune if purchased as new plants.
Tip 7: Accept Seasonal Changes
Like many woodland perennials, foamflower has its peak seasons. It’s a star in spring with its foamy blooms, then transitions into a foliage player. In hot climates, you might see some leaf decline at summer’s height, followed by a rebound in fall. Instead of expecting it to look perfect 12 months a year, think of it as part of an ensemble castferns, hostas, and evergreen groundcovers can support it visually when it’s resting.
Once you embrace foamflower’s woodland roots and give it the shade, moisture, and organic-rich soil it craves, it tends to reward you with very little drama. For gardeners tired of fighting with turfgrass in the shade or watching sun-loving perennials fail under trees, foamflower often feels like that “Ah-ha!” plant that finally makes the space work.
Conclusion: A Low-Maintenance Star for Shady Spaces
Foamflower may not scream for attention the way a giant rose bush does, but it quietly transforms shady corners into soft, luminous carpets of foliage and spring bloom. With simple caregood soil, steady moisture, and gentle shadeit grows into a dependable groundcover that supports pollinators, resists deer, and looks good through much of the year.
If your shade garden currently consists of moss, mud, and regret, give foamflower a try. Plant a few clumps, treat the soil like a woodland, and let time do its work. In a couple of years, you might find that your “problem area” has become your favorite part of the yard.


