Table of Contents >> Show >> Hide
- What You’re Actually Doing (And Why It Matters)
- Tools and Supplies You’ll Want Nearby
- Pre-Install Checks (The Stuff That Prevents 90% of Problems)
- Step-by-Step: Installing the Torque Converter Into the 4L60E
- Installing the Transmission to the Engine (Without Wrecking Anything)
- Setting Converter-to-Flexplate Clearance (The “Free Play” Sweet Spot)
- Bolting the Converter to the Flexplate (And Torquing It Like You Mean It)
- Fluid Fill, Cooler Flush, and First Start
- Troubleshooting: Common 4L60E Torque Converter Install Problems
- Quick Checklist Before You Call It Done
- Conclusion
- Real-World Experiences & Lessons Learned (The Extra You’ll Thank Yourself For)
Installing a torque converter on a 4L60E is one of those jobs that looks simpleuntil it isn’t.
It’s basically a round, heavy metal donut. How hard could it be? (Famous last words.)
The reality: if the converter isn’t fully seated into the transmission pump before you bolt the transmission to the engine,
you can wipe out the front pump in about the time it takes to say, “Why is it making that noise?”
This guide walks you through the correct, real-world way to install a torque converter into a 4L60E transmission:
how to get the “three engagements,” how to measure seating depth, how to set converter-to-flexplate clearance,
and how to avoid the mistakes that turn your weekend wrenching into an unexpected transmission rebuild.
What You’re Actually Doing (And Why It Matters)
The torque converter connects the engine to the transmission using fluid coupling (and a lockup clutch on most modern converters).
When you install it, the converter has to engage multiple internal components inside the 4L60Emost importantly the pump drive.
If it’s not seated and you “pull” the transmission to the engine with the bellhousing bolts, you can crack the pump, ruin the pump gears,
damage the stator support, and create enough sadness to last through three oil changes.
The “Three Clicks” Myth (It’s Not a Myth)
You’ll often hear, “Rotate it until you feel three clicks/clunks.” That’s not folkloreit’s a useful shorthand.
A properly installed converter will typically drop in through three distinct engagement stages as it mates with:
the input shaft splines, the stator support splines, and finally the pump drive tangs/flats.
You might not hear literal clicks, but you should feel the converter move inward in steps as you rotate and apply gentle inward pressure.
Tools and Supplies You’ll Want Nearby
- Automatic Transmission Fluid (ATF) appropriate for your build (Dexron VI isNC: follow your vehicle/trans builder guidance)
- Clean ATF for lubing seals/hub (don’t use mystery-lube from the bottom drawer)
- Transmission jack (strongly recommended) and basic hand tools
- Torque wrench (for converter and bellhousing fasteners)
- Straightedge/ruler or calipers (to measure converter depth and clearance)
- Thread locker (many builders use it on converter-to-flexplate bolts)
- New front pump seal (recommended if you have accesscheap insurance)
- Safety gear: gloves, eye protection, and a healthy respect for heavy rotating parts
Pre-Install Checks (The Stuff That Prevents 90% of Problems)
1) Confirm You Have the Right Converter
“It bolts up” is not the same as “it’s correct.” Before you install anything:
- Verify the converter matches your 4L60E’s intended application (year range, input type, lockup vs non-lockup where applicable).
- Confirm bolt pattern and bolt count to the flexplate (many GM setups use a 3-bolt pattern; some flexplates have multiple patterns).
- Check the converter pilot (the snout that fits into the crankshaft). Make sure the diameter and fit are correctno burrs, no forced “persuasion.”
- Inspect the flexplate for cracks around the crank and converter bolt pads; replace if questionable.
2) Inspect the Transmission Front Pump Area
The converter hub rides in the front pump bushing and passes through the front seal. If the seal is hard, nicked, or leaking,
replace it now while you can actually reach it. Also inspect the pump bushing condition if the transmission is open or being serviced.
A worn bushing can chew up a converter hub and cause leaks or pressure issues.
3) Pre-Lube the Converter Hub and Seal Area
Put a light film of clean ATF on the converter hub (the smooth surface that rides in the seal/bushing).
You’re trying to prevent a dry start and avoid cutting the seal during installation.
4) Should You Pre-Fill the Torque Converter with ATF?
Many converter manufacturers recommend adding some ATF (often around a quart) before installation to reduce “dry start” time.
Don’t fill it to the brim like you’re meal-prepping soupleave room so it doesn’t burp fluid everywhere as you tilt and install it.
If you do prefill, be ready with a drain pan and a calm spirit.
Step-by-Step: Installing the Torque Converter Into the 4L60E
Step 1: Position the Transmission Safely
Ideally, have the transmission stable and slightly angled (or bellhousing facing up if it’s out of the vehicle).
The goal is control. Wrestling a converter while the transmission wobbles is how knuckles lose arguments.
Step 2: Align and Start the Converter on the Input Shaft
Lift the converter and line it up with the input shaft opening. Slide it on gently.
Don’t force it. If it doesn’t want to start straight, pull it back off and re-align.
Starting crooked can damage splines or nick the seal area.
Step 3: Rotate + Push (Gently) Until Fully Seated
With the converter supported, apply light inward pressure while rotating it.
You should feel it “step” inward as it engages internal components.
In a perfect world you feel three distinct drops:
- First engagement: converter turbine/input splines start meshing.
- Second engagement: stator support splines engage.
- Final engagement: pump drive tangs/flats engage the pump gear set.
The final engagement is the one that matters most. If you stop early, the converter may look “kind of in,”
but it will still sit too far forwardand that’s how pumps get broken.
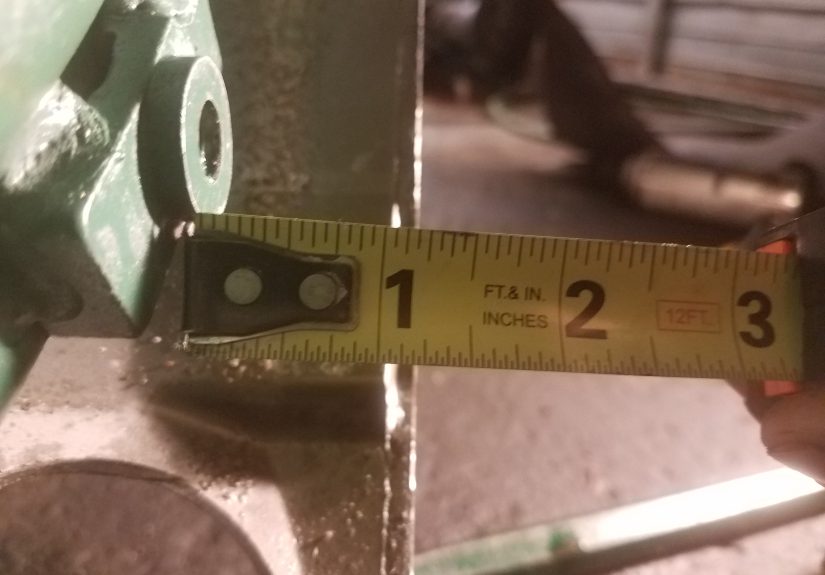
Step 4: Verify Seating Depth (Don’t GuessMeasure)
The cleanest way to verify a seated converter is to measure from the bellhousing mating surface to the converter mounting pads.
Use a straightedge across the bellhousing face and measure down to a converter pad.
Typical depth for many 4L60E/4L80E style installs is around an inch (often roughly 1″ to 1-1/8″ depending on converter diameter and application),
but the point isn’t chasing one magic numberit’s confirming the converter is fully engaged and matches your engine/flexplate stack-up.
If your measurement is suspiciously shallow (converter pads too close to the bellhousing face),
that’s a big clue the converter isn’t fully seatedor you have a mismatch in parts.
Step 5: Make Sure the Converter Still Spins Freely
With the converter fully seated, rotate it by hand. It should turn smoothly.
If it binds, feels gritty, or won’t rotate, stop and investigatedon’t “install harder.”
Sometimes the pump gear tangs are not aligned; continuing to rotate while applying gentle in/out motion often helps.
Installing the Transmission to the Engine (Without Wrecking Anything)
1) Use the Dowels and Proper Alignment
The engine block has alignment dowels. These matter. They keep the transmission centered on the crankshaft.
If dowels are missing or damaged, fix that first. Misalignment can cause vibration, seal wear, or pump damage.
2) Never Pull the Transmission to the Engine With Bolts
The bellhousing bolts are not a winch. If the transmission won’t slide flush to the engine by hand (with light persuasion, not rage),
something is misaligned: converter not seated, dowels not lining up, converter pilot hanging in the crank, or the trans angle is wrong.
Forcing it closed with bolts can shove the converter into the pump and break expensive things instantly.
3) Once Mated, Re-check Converter Freedom
After the bellhousing is seated flush and bolts are snug, reach the converter/flexplate area and rotate the converter.
It should still rotate. If it doesn’t, stop. Something is clamping it or pushing it forwardboth are bad.
Setting Converter-to-Flexplate Clearance (The “Free Play” Sweet Spot)
Why Clearance Matters
When the transmission is bolted to the engine, the converter is still sitting back in the transmission.
You then pull it forward to meet the flexplate. You want a small gap (free play) so the converter isn’t constantly pushing on the pump
or bottoming into the crankshaft. A common target range is roughly 0.100″–0.175″ (often described as about 1/8″–3/16″)
depending on the transmission family and parts stack-up.
How to Check It
- With the transmission fully bolted to the engine, push the converter rearward (toward the transmission) as far as it will go.
- Measure the gap between converter pads and flexplate pads.
- Pull the converter forward until it meets the flexplate. Confirm it doesn’t bind.
If the Gap Is Wrong
- Zero gap / no free play: converter may not be fully seated or parts are mismatched. Do not proceed.
- Gap is huge (for example > 1/4″): could indicate wrong converter, wrong flexplate, missing spacer, or mismatched crank pilot depth.
- Tempted to shim it “perfectly tight”: don’t. Fully shimming away all clearance can load the pump and crank thrust bearing.
Bolting the Converter to the Flexplate (And Torquing It Like You Mean It)
Step-by-step
- Rotate the converter to align bolt holes with the flexplate pads.
- Start all converter bolts by hand (no cross-threading drama).
- Tighten evenly. Many builders use thread locker on converter bolts.
- Torque to spec for your bolt size/application. A commonly cited GM converter-to-flexplate torque is about 46 lb-ft on many LS/4L60E applications, but always verify for your exact bolts and hardware grade.
- After torquing, rotate the engine by hand and re-check that nothing rubs and the converter moves normally.
Tip: If you’re using aftermarket converter bolts or a flexplate with different hardware, torque specs can change.
When in doubt, use the manufacturer’s instructions for the bolts/converter/flexplate you’re running.
“Tight enough” is not a spec. It’s a vibe. A dangerous vibe.
Fluid Fill, Cooler Flush, and First Start
1) Flush or Replace the Cooler (Seriously)
If the old transmission failed, the cooler and lines can be full of debris. That debris will happily destroy your fresh parts.
Flush the cooler properly or replace it if contamination is suspected.
2) Fill the Transmission Correctly
Add ATF in stages. Start with a few quarts, then start the engine, immediately add more as the pump fills the converter and circuits,
and cycle through gears with the wheels chocked and brakes applied. Keep checking fluid level per the correct procedure (engine running, in park/neutral depending on spec, at operating temp).
3) Listen Like a Paranoid Audio Engineer
On first start, you’re listening for abnormal whining, grinding, or no-movement symptoms. A loud pump whine, no line pressure behavior,
or immediate nasty noises can be a sign the converter/pump relationship is unhappy.
Shut it down and re-check before you “see what happens.” What happens is usually expensive.
Troubleshooting: Common 4L60E Torque Converter Install Problems
Problem: “I Can’t Get the Final Engagement”
- Try gentle in/out motion while rotating the converterpump tang alignment can be finicky.
- Confirm you’re supporting the converter’s weight so it’s not sagging on the shaft.
- Inspect for burrs on the converter hub or damage in the pump gear area (if accessible).
- Double-check you actually have the correct converter for the transmission/input.
Problem: “Transmission Bolts Up, But Converter Won’t Spin”
- Stop. Do not start the engine.
- Likely causes: converter not fully seated, incorrect pilot engagement, wrong flexplate spacing, or the transmission was pulled in with bolts.
- Separate the transmission and re-check seating depth and crank pilot fit.
Problem: “The Gap to the Flexplate Is Too Big”
- Verify converter part number and flexplate application.
- Confirm the flexplate is installed correctly and fully seated on the crank flange.
- Check for missing spacers/adapters if your combo requires them.
Quick Checklist Before You Call It Done
- Converter fully seated (verified by measurement, not hope)
- Transmission mates to engine without being “pulled” together by bolts
- Converter spins freely after trans is bolted up
- Converter-to-flexplate clearance is in a safe range before bolting
- Converter bolts torqued properly and re-checked
- Cooler flushed/replaced if failure occurred
- Fluid filled and checked correctly at temperature
Conclusion
Installing a torque converter in a 4L60E isn’t hard in the “needs-a-PhD” sense. It’s hard in the “one wrong assumption can grenade your pump” sense.
The winning formula is simple: seat it fully, measure it, don’t force the transmission to the engine, confirm clearance, torque bolts correctly,
and treat the first startup like a flight checklist.
Do that, and your 4L60E torque converter installation goes from stressful to satisfyinglike finally getting that third “clunk” after 10 minutes of gentle rotation and whispered bargaining.
Real-World Experiences & Lessons Learned (The Extra You’ll Thank Yourself For)
If you’ve never installed a 4L60E torque converter before, here are a few “shop-floor truths” that don’t always show up in the neat bullet lists.
These are the kinds of lessons people usually learn right after they say, “Eh, it’s probably fine.”
1) The Converter Can Feel “In”… and Still Be Wrong
The sneakiest mistake is stopping after the second engagement. The converter will sit in the bellhousing, it won’t fall out,
and from across the garage it looks installed. Then you lift the transmission, bolt it to the engine, and everything feels normaluntil the pump becomes modern art.
The fix is boring but effective: measure depth at the pads. Measurement doesn’t care about your confidence level.
2) Gravity Is Not Your Friend
When the transmission is angled under a vehicle, the converter’s weight can sag on the input shaft.
That sag makes engagement harder, and it can make the converter “hang” just enough to refuse the final pump engagement.
Supporting the converter with one hand while rotating with the other (or changing the trans angle slightly) can suddenly make it drop that last step.
It’s the mechanical equivalent of finding the last piece of a puzzle you swore was missing.
3) “Just Tighten the Bellhousing Bolts” Is a Trap
You’ll hear this advice from someone’s cousin’s neighbor who once changed a transmission in a muddy driveway during a lunar eclipse:
“If it’s close, just snug the bolts and it’ll pull together.” That’s how pumps die.
The bellhousing should seat flush with normal alignment and reasonable effort.
If you need bolt force, something is wrongperiod. Back it off and diagnose before you create a new problem.
4) Clearance Is Not Optional, and “Zero” Is Not “Perfect”
People sometimes chase a “perfectly tight” converter-to-flexplate fit with shims until there’s no gap.
That can preload the pump and crank thrust bearing. The converter needs a little breathing room so it’s not constantly pushing forward.
If you’re measuring and you’re not seeing a small, healthy free play range, stop and correct the stack-up.
A tiny gap is normal. A zero gap is a warning label.
5) The First Start Tells the Truth
Even when everything is installed correctly, the first start is the moment you verify your work.
Listen for odd pump noises, confirm fluid level behavior, confirm gear engagement, and don’t “rev it to see if it’ll catch.”
If it doesn’t move, shut it down and troubleshoot. A calm shutdown beats a loud failure every time.
Bottom line: the best 4L60E torque converter installation is equal parts technique and patience.
Seat it fully, measure it, confirm clearance, torque correctly, and treat shortcuts like expired milktechnically still there, but likely to ruin your day.