Table of Contents >> Show >> Hide
- What Prime Rib Roast Actually Is (And Why It’s So Good)
- How to Buy the Right Prime Rib Roast
- Your Prime Rib Doneness Guide (The Part Everyone Cares About)
- Essential Equipment (You Don’t Need Much, But You Need the Right Stuff)
- How to Prep a Prime Rib Roast for Better Flavor and Even Cooking
- Best Cooking Methods for Prime Rib Roast
- Step-by-Step: How to Expertly Cook a Prime Rib Roast to Your Ideal Doneness
- Prime Rib Timing: Helpful, But Never the Boss
- Common Prime Rib Mistakes (And How to Avoid Them)
- Serving Ideas and Leftover Gold
- Experience-Based Kitchen Lessons (500+ Words of Real-World Prime Rib Situations)
- Conclusion
Prime rib roast is the kind of dinner that makes people suddenly start using words like “magnificent” and “legendary” before they’ve even sat down. It’s dramatic, delicious, and just intimidating enough to make home cooks pace around the kitchen like they’re defusing a bomb. The good news? Cooking a prime rib roast to your ideal doneness is much more about temperature control than culinary wizardry.
In other words: you do not need a chef’s hat, a French accent, or a lucky spatula. You need a plan, a reliable thermometer, and a little patience. In this guide, you’ll learn how to choose the right roast, prep it for maximum flavor, roast it evenly, and nail the exact internal temperature for rare, medium-rare, medium, or beyondwithout turning an expensive cut of beef into a very fancy regret.
What Prime Rib Roast Actually Is (And Why It’s So Good)
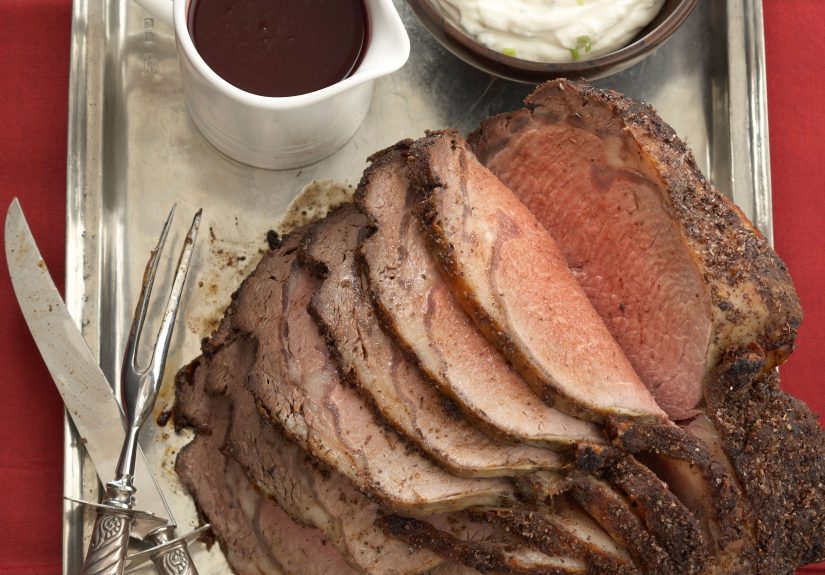
Prime rib roastalso called a standing rib roast (bone-in) or ribeye roast (boneless)comes from the rib section of the cow. It’s prized for rich marbling, deep beefy flavor, and a naturally tender texture. That marbling is the built-in insurance policy that helps the roast stay juicy, even during a long cook.
One important detail: the term “prime rib” does not automatically mean USDA Prime grade. You can buy prime rib roasts graded Prime, Choice, or Select. USDA Prime usually has the most marbling (and the highest price), while Choice is often the sweet spot for flavor, tenderness, and budget.
How to Buy the Right Prime Rib Roast
Bone-In vs. Boneless
Bone-in prime rib looks stunning on the table and can help insulate part of the roast during cooking. Boneless prime rib is easier to carve and often cooks a little more evenly. If you want the best of both worlds, ask your butcher to cut the bones off and tie them back on. You get the presentation and easier slicing later.
How Much Prime Rib Per Person?
For planning, a practical rule is:
- Bone-in: about 1 pound per person (especially for hearty eaters and leftovers)
- Boneless: about 1/2 to 3/4 pound per person pre-cook weight
Prime rib leftovers are a blessing, not a problem. Tomorrow’s steak sandwich will thank you.
What to Look For at the Store or Butcher
- Good marbling (thin white streaks throughout the meat)
- A creamy white fat cap (not yellowing)
- Even shape for more consistent roasting
- A roast tied with butcher’s twine (or tie it yourself)
Your Prime Rib Doneness Guide (The Part Everyone Cares About)
If you remember only one thing from this article, make it this: cook by internal temperature, not by time alone. Time-per-pound estimates are useful, but ovens vary, roast shapes vary, and your uncle keeps opening the oven door “just to look.”
Also, prime rib continues to cook after it leaves the oven. This is called carryover cooking. The internal temperature often rises about 5–10°F while the roast rests, depending on the size of the roast and the cooking method.
Prime Rib Temperature Chart (Target Final Doneness)
| Doneness | Final Internal Temp (after resting) | Pull Temp (general range) | What It Looks Like |
|---|---|---|---|
| Rare | 120–125°F | 115–120°F | Red center, cool to warm |
| Medium-Rare | 130–135°F | 120–130°F (method-dependent) | Warm red center, pink surrounding |
| Medium | 135–140°F | 130–135°F | Warm pink center, mostly rosy |
| Medium-Well | 145–150°F | 140–145°F | Slight pink center |
| Well-Done | 155°F+ | 150°F+ | Little to no pink |
Food safety note: For whole beef roasts, U.S. food-safety guidance commonly cites a safe minimum internal temperature of 145°F with at least a 3-minute rest. Many home cooks and chefs prefer prime rib at rare to medium-rare for texture and flavor, but if you’re cooking for older adults, pregnant guests, immunocompromised people, or anyone who prefers a higher doneness, aim higher and use a thermometer.
Essential Equipment (You Don’t Need Much, But You Need the Right Stuff)
- Instant-read thermometer: Non-negotiable. This is your MVP.
- Roasting pan or sheet pan + rack: Elevates the roast for better air circulation.
- Butcher’s twine: Helps create an even shape for even cooking.
- Sharp carving knife: Because hacking at a prime rib is emotionally difficult.
- Foil (optional): For loose tenting during resting (though some cooks skip it to preserve crust).
How to Prep a Prime Rib Roast for Better Flavor and Even Cooking
1) Salt Early (Dry Brine if You Can)
Generously season the roast with kosher salt and black pepper. If possible, do this the day before and refrigerate the roast uncovered overnight. This dry-brine approach helps season the meat more deeply and can improve browning on the outside.
Want more flavor? Add garlic, rosemary, thyme, or a mustard-herb paste. Just don’t bury the beef under so much seasoning that it tastes like a spice rack exploded.
2) Trim and Tie for a Uniform Shape
If one end of the roast is much thinner than the other, it’ll overcook faster. Tying the roast helps it hold a more even cylindrical shape, which improves both roasting and slicing.
3) Room Temperature Rest: Optional, Not Magic
You’ll see conflicting advice about letting the roast sit out for 1–3 hours before cooking. Some trusted home-cooking sources recommend it for more even cooking, while other testing-focused sources find it makes less difference than people thinkespecially for large roasts. A smart middle ground is this: don’t stress about “perfect tempering.” Focus on good seasoning, a dry surface, and accurate temperature monitoring.
Best Cooking Methods for Prime Rib Roast
Method 1: Traditional Roast (High Heat Start, Then Lower Heat)
This classic method gives you a beautiful crust and dependable results.
- Start the roast at a higher temperature (for example, 450°F) for a short initial sear.
- Reduce the oven to 325°F (or similar) and continue roasting until target pull temp.
- Rest before slicing.
This is a great choice if you want familiar timing, solid crust, and a straightforward workflow.
Method 2: Low-and-Slow / Reverse Sear (Best for Edge-to-Edge Doneness)
If your dream is a rosy interior from edge to edge with minimal gray band, this method is hard to beat.
- Roast at a low temperature (often 200–250°F, depending on your oven and recipe style).
- Pull the roast near your target internal temp.
- Rest.
- Finish with a very hot oven sear (or brief blast of high heat) right before serving.
Reverse sear gives you excellent control and a dramatic crust at the end. It’s especially useful when guests are arriving on “holiday time” (which is apparently 45 minutes late).
Method 3: Smoker or Grill (For a Prime Rib With Extra Character)
Prime rib on a smoker or indirect grill is fantastic. Many guides use a low indirect temperature (roughly the 225–300°F range depending on setup), then finish with a hot sear. The same doneness rules apply: cook to internal temperature, not a timer.
Step-by-Step: How to Expertly Cook a Prime Rib Roast to Your Ideal Doneness
Step 1: Choose Your Target Doneness Before You Start
Don’t decide mid-roast. Pick your final target (for example, medium-rare at 130–135°F) and write down your pull temperature range. This keeps you calm when the thermometer starts climbing and everyone in the house starts asking, “Is it ready yet?”
Step 2: Prep the Roast
- Pat dry with paper towels
- Season generously (salt + pepper minimum)
- Tie if needed
- Place on a rack, fat side up
Step 3: Roast and Monitor Temperature
Use your preferred method (traditional or low-and-slow). Start checking internal temperature early enough that you’re not surprised at the finish line.
Insert the thermometer into the thickest part of the roast, avoiding bone and large fat pockets. If you hit bone, your reading can be off. If you hit a giant fat seam, your thermometer will lie to your face.
Step 4: Pull Early for Carryover Cooking
Remove the roast when it is 5–10°F below your desired final doneness (the exact amount depends on roast size and cooking method). Larger roasts tend to rise more during resting.
Example (6–8 lb roast, target medium-rare):
- Desired final temp: 130–135°F
- Typical pull range: around 120–128°F
- Rest and confirm final temp before carving
Step 5: Rest the Roast
Resting is not optional if you want juicy slices. Rest for about 15–30 minutes depending on roast size and method. Some cooks loosely tent with foil; others leave it untented to preserve crust. Either approach can work. If crust is your priority, use a loose tent or no tent at all.
Step 6: Carve Like a Pro
If bone-in, remove the twine and bones first (they should come away easily if tied back on). Then slice across the grain into thick or thin slices based on preference. For a dinner-party look, cut 1/2-inch slices. For steakhouse drama, go thicker.
Prime Rib Timing: Helpful, But Never the Boss
Timing charts are useful for planning dinner, but not for determining exact doneness. As a rough planning guide, many sources give time-per-pound estimates that vary by oven temperature (for example, around 325°F roasting charts versus low-temperature methods around 225°F). Use those numbers to estimate when to start, then let your thermometer decide when to stop.
Translation: set the table by the clock; pull the roast by temperature.
Common Prime Rib Mistakes (And How to Avoid Them)
1) Cooking to Time Instead of Temperature
The fastest path to overcooked prime rib is treating minutes per pound like a promise. They’re guidelines, not laws of physics.
2) Forgetting Carryover Cooking
If you wait until the roast is already at your final target temp before removing it, it may overshoot while resting. That’s how “medium-rare” becomes “well, at least the gravy is good.”
3) Slicing Too Soon
Cut immediately and you’ll watch precious juices flood your cutting board. Resting helps redistribute moisture and improves texture.
4) Using a Dull Knife
A dull knife shreds slices and ruins presentation. Sharpen before carving. Your roast deserves better.
5) Overcomplicating the Seasoning
Prime rib already brings serious flavor. Salt, pepper, garlic, and herbs are plenty. Save the 19-ingredient rub for cheaper cuts.
Serving Ideas and Leftover Gold
Prime rib pairs beautifully with horseradish sauce, au jus, roasted potatoes, Yorkshire pudding, green vegetables, and a crisp salad to balance the richness. For leftovers, slice only what you need and refrigerate the rest unsliced for better reheating.
Leftover prime rib makes incredible sandwiches, hash, steak-and-eggs breakfasts, and beef stroganoff. In fact, there’s a strong argument that cooking prime rib once is secretly meal prep in a tuxedo.
Experience-Based Kitchen Lessons (500+ Words of Real-World Prime Rib Situations)
One of the most common prime rib experiences home cooks talk about is the “holiday panic spiral.” It usually starts with a beautiful roast, a clean kitchen, and confidence. Then the thermometer stalls, dinner guests arrive early, and suddenly someone suggests “just turn the oven up.” That one decision can create a thick gray outer band before the center is ready. The lesson: prime rib rewards patience more than aggression. When the roast seems slow, trust your plan and verify temperature in multiple spots instead of cranking the heat in frustration.
Another frequent experience is over-trusting carryover cooking. A cook pulls the roast extra early because they’ve heard, correctly, that the temperature rises while restingbut they underestimate how much searing or how little roast mass changes the result. The roast rests, climbs only a few degrees, and dinner is now rare when everyone wanted medium-rare. The fix is simple: treat carryover as a range, not a guarantee. A very large roast cooked low and slow may carry more than a smaller roast cooked conventionally. This is why experienced cooks check again after resting and adjust with a quick hot finish if needed.
There’s also the classic “my prime rib is perfect but my timing is chaos” story. The roast is ready an hour before the mashed potatoes, or the side dishes are done while the beef still needs 25 minutes. This is where the reverse-sear method often wins people over. You can roast low, rest the meat, and then do the final high-heat sear close to serving time. That flexibility reduces stress and makes the cook look suspiciously calm. Guests may assume you’ve done this a hundred times. You do not need to correct them.
Some cooks learn their biggest lesson during carving. The roast looked incredible, but the slices came out ragged or uneven because the bones were still attached awkwardly or the knife was dull. A small prep choicehaving the butcher cut and tie the bones, or sharpening a carving knife before guests arrivecan dramatically improve the final presentation. Prime rib is one of those dishes where the “last five minutes” matter just as much as the first five.
A surprisingly common experience is discovering that a simpler seasoning wins. Many first-time cooks throw everything at the roast: mustard, brown sugar, paprika, onion powder, five herbs, and a mysterious spice blend from the back of the cabinet. Then they taste it and realize the best bites are the ones where the beef flavor shines through. Seasoning should support prime rib, not audition for a starring role. A generous salt-and-pepper base plus garlic and herbs is often the sweet spot.
Finally, the most valuable prime rib experience is learning that perfection is a range. One end may be closer to medium for guests who prefer less pink, while the center is medium-rare for everyone else. That’s not a flaw; it’s a dinner-party superpower. Expert prime rib cooking isn’t about producing laboratory meat. It’s about understanding doneness, reading temperature correctly, managing carryover, and serving a roast that tastes incredible. Once you’ve done it oncereally done it, with confidenceyou stop fearing prime rib and start looking for excuses to make it again.
Conclusion
If you want to expertly cook a prime rib roast to your ideal doneness, focus on four things: choose a well-marbled roast, season it generously, use a thermometer, and pull it before the final target temperature so carryover cooking can finish the job. That’s the difference between a dry, overcooked roast and a juicy, show-stopping centerpiece.
Whether you choose a traditional roast, a reverse sear, or a smoker, the winning strategy is the same: respect the temperature, rest the meat, and carve with intention. Do that, and your prime rib won’t just be dinnerit’ll be the meal everyone talks about while quietly angling for leftovers.