Table of Contents >> Show >> Hide
- What Makes Concrete So Tough to Drill?
- Tools and Materials You’ll Need
- Safety First: What to Check Before You Drill
- Step-by-Step: How to Drill Into Concrete
- Common Mistakes When Drilling Into Concrete (and How to Avoid Them)
- Tips for Better Results in Different Concrete Situations
- Basic Troubleshooting: When the Drill Won’t Advance
- Extra : Real-World Experiences and Pro-Level Tips
If you’ve ever tried to hang a shelf on a concrete wall with a regular drill and a random wood bit, you already know: concrete does not care about your feelings. The good news is that drilling into concrete doesn’t have to end with smoking drill bits, crumbling holes, and a bruised ego. With the right tools, a few pro tips, and some built-in patience, you can put clean, precise holes exactly where you want them.
In this guide, we’ll walk through everything you need to know about how to drill into concrete safely and effectively, including tools, prep, step-by-step instructions, common mistakes, troubleshooting, and some real-world experience-based tips to boost your confidence.
What Makes Concrete So Tough to Drill?
Concrete is a mix of cement, sand, water, and aggregate (rock or gravel). Once cured, it becomes extremely hard and abrasive. That means:
- Standard drill bits dull quickly or barely scratch the surface.
- Friction and heat build up fast while drilling.
- Aggregate stones inside the concrete can stop your bit in its tracks.
To handle all that, you need not just power, but the right type of power and the right bits. That’s where hammer drills, rotary hammers, and masonry bits come in.
Tools and Materials You’ll Need
Before you start, gather the proper gear. Think of this as your concrete-drilling toolkit:
Power Tools
- Hammer drill – Ideal for most DIY jobs on concrete, brick, or block. It combines rotation with a hammering action to chip away material as it spins.
- Rotary hammer – A heavier-duty tool for thick slabs, foundations, or frequent drilling. It delivers stronger hammer blows and typically uses SDS-type bits.
- Standard drill (optional) – Can work in very light-duty concrete or for starting a pilot hole, but it’s slow and can overheat quickly compared with a hammer drill.
Drill Bits and Fasteners
- Carbide-tipped masonry drill bits – Designed specifically for concrete and other masonry. They withstand abrasion and heat better than regular bits.
- SDS masonry bits – Used with rotary hammers for larger or deeper holes.
- Concrete screws or masonry anchors – Such as blue concrete screws, expansion anchors, or sleeve anchors, sized to match your drill bit diameter.
Safety Gear
- Safety glasses or goggles
- Hearing protection (hammer drills are loud)
- Dust mask or respirator
- Work gloves
Other Helpful Supplies
- Masking tape or painter’s tape
- Pencil or marker
- Vacuum or brush for dust cleanup
- Depth stop or tape to mark drilling depth on the bit
- Spray bottle of water (optional, for long or deep holes to help with cooling and dust)
- Stud/pipe/wire detector for walls with hidden services
Safety First: What to Check Before You Drill
Drilling into concrete is usually safe when done correctly, but there are a few risks you should actively avoid:
1. Hidden Wires and Pipes
If you’re drilling into a wall or ceiling, especially inside a home, always assume there could be electrical wires or plumbing hidden behind the surface. Use a multi-function detector that can sense metal and live voltage, and avoid areas directly above outlets, switches, or known pipe runs when possible.
2. Structural Concerns
Drilling small holes for anchors is generally fine, but think twice before drilling many large, deep holes in structural elements like beams, columns, or load-bearing walls. If in doubt, consult a contractor or structural professional.
3. Personal Protection
Concrete dust is abrasive and can be harmful to your eyes and lungs. Always wear eye protection and a dust mask, and consider hearing protection when using hammer or rotary hammer drills. Keep your work area tidy so you don’t trip over cords or debris.
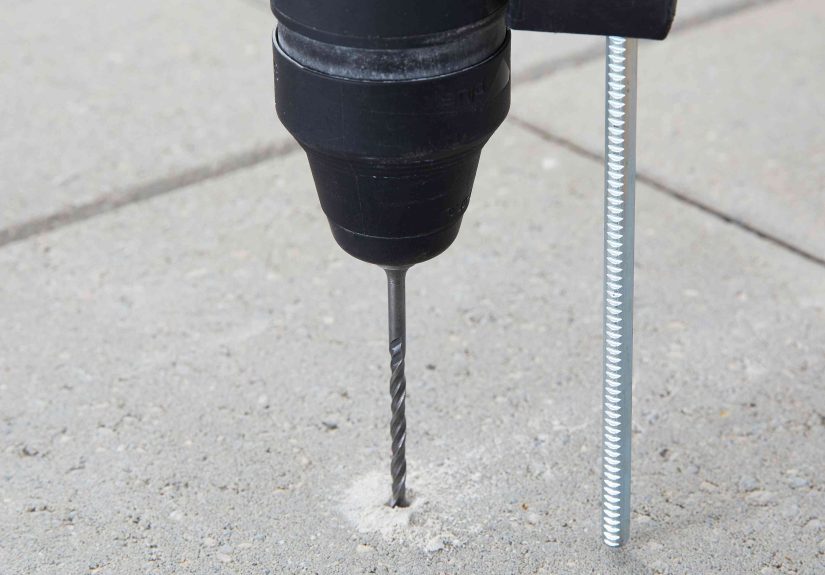
Step-by-Step: How to Drill Into Concrete
Ready to make some perfectly round holes in that stubborn slab or wall? Follow these steps.
Step 1: Mark Your Hole Location
- Measure and mark the exact spot where you need the hole using a pencil or marker.
- Place a small square of masking tape over the mark. This helps keep the bit from wandering and gives you a better visual target.
- If drilling several holes (e.g., for a shelf bracket), measure carefully and use a level to keep the marks aligned.
Step 2: Choose the Right Bit and Set the Depth
- Select a carbide-tipped masonry bit that matches the size recommended for your concrete screw or anchor.
- Check the anchor packaging for required hole depth. You typically want the hole slightly deeper than the screw or anchor length.
- Use the depth stop on your drill if it has one, or wrap a band of tape around your bit at the target depth so you know when to stop.
Step 3: Set Up Your Drill
- Insert the masonry bit securely in the chuck and tighten it firmly.
- Set the drill to hammer mode (often shown with a little hammer icon). If you’re using a rotary hammer, select the appropriate drilling setting for concrete.
- Use a medium speed setting. You don’t need maximum RPM; you need consistent power and hammering action.
Step 4: Start the Hole Slowly
- Hold the drill with both hands, feet firmly planted for balance.
- Place the tip of the bit on your mark, at a 90-degree angle to the surface.
- Squeeze the trigger gently, starting at low speed so the bit doesn’t skate across the concrete.
- Once the bit bites into the surface and creates a small dimple, you can increase speed and pressure slightly.
Step 5: Let the Hammer Drill Do the Work
This is the part where most DIYers overthink it. With concrete drilling, slow and steady almost always wins.
- Use firm, steady pressureenough to keep the bit engaged, but not so much that the motor bogs down or the drill struggles.
- Periodically back the bit out of the hole to clear dust. This reduces friction, keeps the bit cooler, and helps it cut faster.
- If progress suddenly slows or you feel a lot of vibration, you may have hit a piece of aggregate. Try easing off, pulling out slightly, and then reapplying pressure. Sometimes a brief “pulsing” motion helps the bit chip around the obstruction.
Step 6: Clear the Dust and Check the Depth
- As you approach the tape mark or depth stop, ease off the trigger and let the drill finish the last bit of depth gently.
- Remove the bit and vacuum or blow out the concrete dust from the hole. A clean hole grips anchors much better.
- Insert the anchor or screw to make sure it fits snugly. If it doesn’t seat fully, you may need to deepen or slightly widen the hole.
Step 7: Install Your Screw or Anchor
- For concrete screws, place your fixture (for example, a bracket or base plate) and drive the screw through the predrilled hole into the concrete using a drill or impact driver.
- For expansion anchors, tap the anchor into the hole until it’s flush, then tighten the bolt or screw that causes the anchor to expand and grip the concrete.
- Check for a firm, wobble-free connection. If the anchor spins freely, the hole may be too large or damaged; you may need a larger anchor or to move slightly and try again.
Common Mistakes When Drilling Into Concrete (and How to Avoid Them)
1. Using the Wrong Type of Drill
A regular cordless drill can technically drill into concrete, but it’s painfully slow and hard on both the tool and bit. For anything beyond very shallow holes, a hammer drill or rotary hammer is the right choice. If you’re renting, this is not the time to cheap outget the proper tool for the job.
2. Using the Wrong Drill Bit
Attempting to drill concrete with a wood or generic metal bit is a quick way to dull it, overheat your drill, and produce ugly, shallow holes. Always use carbide-tipped masonry bits designed for concrete. For frequent or heavy-duty work, SDS bits with a rotary hammer offer even better performance.
3. Pushing Too Hard
More pressure doesn’t always mean faster drilling. Excessive force can overheat the bit, burn out your motor, and create uneven holes. Instead, let the hammer action chip away while you provide steady, controlled pressure. If the drill seems to be struggling, back off, clear dust, and then continue.
4. Not Clearing Dust
Concrete dust collects inside the hole and acts almost like brakes on your bit. Periodically pull the bit out and vacuum or blow out the dust. This simple step makes drilling easier and helps prevent binding and overheating.
5. Ignoring Safety Gear
Concrete chips and dust can cause eye injuries, lung irritation, and hearing damage over time. It’s tempting to “just do one quick hole” without PPE, but that’s when accidents happen. Glasses, mask, and ear protection are basic but important for this kind of work.
6. Not Planning the Anchor Layout
Randomly placed holes lead to crooked shelves, misaligned TV mounts, and extra patching work. Plan and mark your anchor positions carefully before you pick up the drill. Measure twice, drill once… especially in concrete.
Tips for Better Results in Different Concrete Situations
Drilling Into Old or Very Hard Concrete
- Use a higher-quality hammer drill or rotary hammer if possible.
- Choose premium carbide bits and replace them if they become dull.
- Work in short bursts and let the bit cool between holes.
Drilling Large or Deep Holes
- Consider starting with a smaller pilot hole, then step up to a larger bit.
- Use a rotary hammer for holes over about 1/2 inch in diameter or several inches deep.
- For very deep holes, occasionally spraying a little water can help with cooling and dust, but avoid creating mud that clogs the hole.
Drilling Near Edges
- Avoid drilling too close to corners or edges; this can cause the concrete to chip or crack.
- If you must drill near an edge, use lighter pressure and a smaller bit to start the hole.
Basic Troubleshooting: When the Drill Won’t Advance
If you feel like you’re just polishing the hole instead of deepening it, try this checklist:
- Is your drill in hammer mode? If not, switch it.
- Is the bit dull? If it’s glazed, bluish, or chipped, replace it.
- Is dust packed in the hole? Back out, clear dust, and try again.
- Did you hit aggregate or rebar? Sometimes you just hit a tough stone. Try angling slightly or moving your hole a small distance if possible. Never cut through rebar in structural elements without professional guidance.
Extra : Real-World Experiences and Pro-Level Tips
The more you drill into concrete, the more you realize it’s all about rhythm, patience, and respect for the material. Here are some experience-based insights that can save you headaches (and drill bits) as you go.
Learn the “Feel” of the Drill
When you first start, every vibration feels the same. After a few holes, you’ll start to notice differences:
- A smooth, steady vibration usually means everything is going wellyour bit is cutting, dust is clearing, and the drill is happy.
- A harsh rattling or “bouncing” feeling often means you’ve hit a harder aggregate or you’re pushing too hard.
- A sudden drop in resistance might indicate you just broke through to a cavity or thinner section of concreteease off so you don’t blow out the back of the hole.
As you develop this “feel,” you’ll naturally adjust pressure and speed to keep things under control, which leads to cleaner holes and less wear on your tools.
Use Pilot Holes Strategically
On really hard concrete or when you’re new to drilling, starting with a smaller pilot hole can make a big difference. For example:
- Drill a 3/16-inch pilot hole first, then follow with a 1/4-inch or 3/8-inch bit.
- The smaller bit removes material and gives the larger bit a guided path, so the second pass is smoother and faster.
This is especially useful when your drill isn’t top-of-the-line or when you’re working with very dense, older concrete slabs.
Don’t Ignore Bit Quality
Inexpensive bits can be tempting, but concrete is brutal on cheap steel. A higher-quality carbide masonry bit may cost a little more, but it will:
- Drill faster with less effort.
- Stay sharp longer.
- Create cleaner, more consistent holes that actually hold anchors well.
If you’re doing a lot of drillingsay, installing a large number of anchors or working on a basement finishing projectinvesting in a good set of bits is absolutely worth it.
Anchor Choice Matters
People often focus on the drilling and then grab whatever anchors are in the random hardware bin. Instead, match the anchor to the job:
- Light loads (small shelves, picture frames): concrete screws or plastic inserts with screws.
- Medium loads (TV brackets, cabinets): heavy-duty concrete screws or sleeve anchors.
- Heavy loads (handrails, structural brackets): wedge anchors rated for the load, installed at proper depth and spacing.
The wrong anchor in a perfectly drilled hole can still fail. Read the packaging, pay attention to edge distances and spacing, and don’t exceed rated loads.
Keep the Workspace Manageable
Concrete drilling kicks up a surprising amount of dust and chips. Simple tricks can keep your space livable:
- Ask a helper to hold a vacuum nozzle just below the drill bit while you work.
- Use a small dust-collection attachment that sticks to the wall around the drilling area.
- Lay down a drop cloth under the work zone to make cleanup easy.
It’s not just about neatnessless dust hanging in the air also means less irritant getting into your eyes and lungs.
Respect Your Limits (and the Tool’s Limits)
If you smell burning, hear the drill straining, or feel the casing getting very hot, pause. Let the tool cool down. Continually pushing through that can shorten the life of the motor and destroy the bit. It’s better to take an extra minute per hole than to buy a new drill.
Practice on a Scrap Area First
If you’re nervous about drilling a visible wall or an expensive slab, practice first. Test your drill, bits, and anchors in a lower-stakes spotlike an out-of-the-way corner of a garage floor. This mini “test zone” lets you:
- Dial in the right speed and pressure.
- See how your anchors fit and hold.
- Get comfortable with the noise and feel of the hammer drill.
Once you’ve successfully drilled a few holes in a test area, tackling the “real” project feels far less intimidating.
The Bottom Line
Drilling into concrete is one of those DIY tasks that looks scary until you’ve done it a couple of times. With a hammer drill or rotary hammer, quality masonry bits, the right anchors, and a little patience, you can confidently install shelves, TV mounts, railings, and more. The concrete may be tough, but with the right approach, so are you.
SEO JSON