Table of Contents >> Show >> Hide
- Before You Start: What Makes a Furry Head Look “Right”?
- Tools and Setup (Traditional or Digital)
- How to Draw a Furry’s Head: 11 Steps
- Step 1: Pick the View (Front, 3/4, or Side)
- Step 2: Draw the Cranial Ball (Your “Skull Sphere”)
- Step 3: Add the Face “Front Plane” (Where Features Will Live)
- Step 4: Place the Eye Line and Brow Line
- Step 5: Build the Muzzle as a Simple 3D Form
- Step 6: Shape the Jaw and Cheeks (The “Face Frame”)
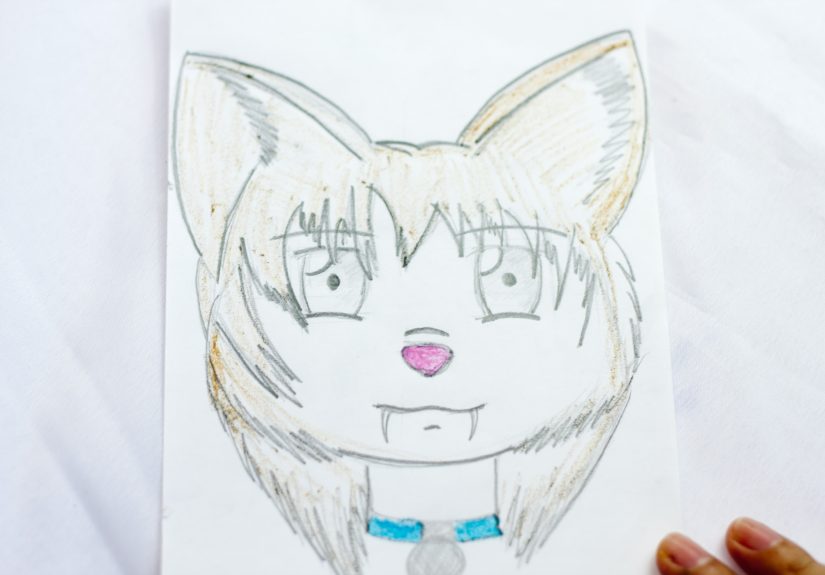
- Step 7: Place the Eyes (Big Emotion, Smart Structure)
- Step 8: Add the Nose and Mouth (Readable, Not Overworked)
- Step 9: Design the Ears (Shape Language = Species + Personality)
- Step 10: Add Fur Direction and Key Markings (Work Smarter, Not Hair-der)
- Step 11: Clean Line Art, Shade, and Finish
- Quick Species “Cheat Codes” (So You Don’t Reinvent Biology)
- Common Mistakes (And Fast Fixes)
- A Simple Practice Plan (So This Skill Actually Sticks)
- Real-World Learning Experiences (The Fun, The Flops, The Fur)
- Conclusion
Drawing a furry head is basically the best of both worlds: you get the friendly structure of an animal skull,
plus the expressiveness of a cartoon character who absolutely has opinions about snacks. If you’ve ever looked
at a fursona and thought, “How do they make it look so cute and so 3D at the same time?”, you’re in the right place.
This guide walks you through a reliable, repeatable processso you’re not just “copying a picture,” you’re
building a head you can rotate, stylize, and redraw from different angles. You’ll learn where features go,
how to shape muzzles for different species, and how to add fur texture without turning your drawing into
a fuzzy TV static screen.
Before You Start: What Makes a Furry Head Look “Right”?
Most furry head styles sit somewhere between real animal anatomy and cartoon clarity.
That means you’ll usually see:
- A clear cranial mass (the “skull ball” you can feel in your mind, even if it’s stylized).
- A readable muzzle (not just a triangle nose floating in space).
- Bigger, more expressive eyes than a realistic animalbecause emotion sells.
- Cheek fluff and brow shapes that frame the face and create personality.
- Fur suggested with value and direction, not 10,000 identical hair lines.
Tools and Setup (Traditional or Digital)
You don’t need fancy gear. You need control and layerseven if your “layers” are just “light sketch”
and “clean lines.”
- Traditional: HB pencil, eraser (kneaded if you have it), fineliner (optional), paper.
- Digital: any drawing app, one hard round brush, one soft brush, and an eraser. That’s enough.
Pro tip: If your sketching hand is feeling dramatic today, do a 30-second warmup of circles and S-curves.
Your lines will calm down like they just heard relaxing lo-fi music.
How to Draw a Furry’s Head: 11 Steps
Step 1: Pick the View (Front, 3/4, or Side)
If you’re a beginner, start with 3/4 view. It’s the most common in furry art because it shows
both eyes and the muzzle depthbasically, it’s the “best angle” filter of character drawing.
Decide now: front (symmetry practice), 3/4 (most useful), or side (best for muzzle anatomy).
Step 2: Draw the Cranial Ball (Your “Skull Sphere”)
Lightly sketch a circle or sphere shape. Think of it as the helmet your character’s brain would wear
to a skateboard park. (Safety first.)
Add a centerline that wraps around the sphere to show the head’s direction. This line is your
anti-wonky insurance policy.
Step 3: Add the Face “Front Plane” (Where Features Will Live)
On a furry head, the face isn’t a flat sticker slapped onto a ball. You want a front plane area where
the muzzle and eye region can attach in 3D.
Lightly sketch a slightly flattened area on the front of the sphere (like you gently pressed a foam ball).
This helps you place the muzzle and eyes without guessing.
Step 4: Place the Eye Line and Brow Line
Add a horizontal guideline across the cranial ball for the eye line. In most furry styles,
eyes sit around the midline or slightly above it, depending on how “cute” or “toony” you want the character.
Then add a brow line above it. Even if your character doesn’t have visible brows, that ridge area controls
expression (soft = friendly, sharp = intense, angled = “I have a plan and it involves chaos”).
Step 5: Build the Muzzle as a Simple 3D Form
This is where furry heads level up. Instead of a flat snout shape, think of the muzzle like a box
or wedge attached to the sphere. The top plane helps you place the nose; the side planes show depth.
- Canine-style: longer wedge, clearer bridge, nose points outward.
- Feline-style: shorter muzzle, softer wedge, more compact front.
- Bear-style: thick muzzle, rounded bridge, heavier nose pad.
Keep it centered on the face plane (use your centerline). If the muzzle drifts off-center, your character
will look like they’re trying to talk while turning away from the camera. (Relatable, but not intentional.)
Step 6: Shape the Jaw and Cheeks (The “Face Frame”)
Connect the muzzle back into the head with a jawline. In many furry styles, the jaw is simplified and
slightly roundedunless you want a sharper, more mature look.
Add cheeks as soft forms on either side of the muzzle. Cheek fluff is a common furry design tool because it:
- Makes the face more readable at small sizes (great for icons and profile pics).
- Creates a strong silhouette (instantly recognizable character design).
- Lets you show personality: fluffy cheeks = cozy; sleek cheeks = athletic; spiky cheeks = mischievous.
Step 7: Place the Eyes (Big Emotion, Smart Structure)
Eyes are where your furry head becomes a character, not just an animal drawing. Place them on the eye line,
but remember: on a sphere, the far eye curves away.
For a clean, appealing look:
- Use simple shapes first (almond, oval, or slightly rounded triangle).
- Keep the eyes aligned to the head tilt (match your guidelines).
- Make the far eye a bit narrower in 3/4 view (perspective, not favoritism).
Want a quick style dial?
Bigger eyes + higher placement = cuter. Smaller eyes + lower placement = more realistic.
Step 8: Add the Nose and Mouth (Readable, Not Overworked)
Place the nose on the front plane of the muzzle. Many styles use a rounded triangle or soft heart-like shape.
Then add a simple mouth line: usually a short line down from the nose into a gentle curve for the lips.
If you want a friendly expression, curve the mouth slightly upward and soften the corners. If you want
“confident smirk,” lift one side (but keep it subtle so it doesn’t become “I just remembered an embarrassing memory”).
Step 9: Design the Ears (Shape Language = Species + Personality)
Ears are not just accessories; they’re species ID and mood indicators. Place them based on skull structure:
typically the upper sides of the cranial ball.
- Wolf/dog: tall triangles or slightly rounded triangles.
- Cat: smaller, sharper triangles with a clear inner ear.
- Rabbit: long ear shapes with a bend (great for expressive posing).
- Bear: small round ears that sit wider apart.
Tilt ears forward for attention, outward for relaxed, back for annoyed/scared. Instant storytelling.
Step 10: Add Fur Direction and Key Markings (Work Smarter, Not Hair-der)
Fur isn’t drawn by individually outlining every hair. It’s suggested with direction,
edges, and values.
- Indicate fur direction with a few flowing strokes along cheeks, brow, and neck.
- Use small “tuft” shapes at silhouette edges (cheeks, chin, ear base) for a fluffy feel.
- Add markings (mask pattern, spots, stripes) as big shapes first, then refine.
If you’re coloring later, keep markings clean and simple. Complex markings are awesomeright up until
you realize you have to redraw them consistently from five angles.
Step 11: Clean Line Art, Shade, and Finish
Time to make it look finished:
- Line art: tighten the forms, vary line weight (thicker on shadow side, lighter on light side).
- Shading: shade the muzzle underside, under the brow ridge, inside the ear, and under the chin.
- Highlights: add a small highlight on the nose and eyes for life.
- Texture: suggest fur with soft value transitions, not endless scratches.
A simple rule: if your drawing reads well from far away, then details will add flavor. If it doesn’t read
from far away, details will just add confusion with extra steps.
Quick Species “Cheat Codes” (So You Don’t Reinvent Biology)
- Canines: longer muzzle, taller ears, stronger cheek silhouette.
- Felines: shorter muzzle, rounder face, sharper eye shapes, smaller nose pad.
- Foxes: narrow muzzle, big ears, sleek cheek fur with sharp tips.
- Rabbits: tiny muzzle, big eyes, long ears that can bend and flop.
- Bears: thick muzzle, small ears, heavier brow for a sturdy look.
Common Mistakes (And Fast Fixes)
- “My eyes look mismatched.”
Fix: redraw the eye line, check that both eyes sit on the same curved guideline around the sphere. - “The muzzle looks pasted on.”
Fix: add a clear connection plane where muzzle meets the cranial ball; shade the overlap to show depth. - “It looks flat.”
Fix: push valuesshadow under brow, under muzzle, and under chin. Depth needs contrast. - “My fur looks like noodles.”
Fix: stop drawing every strand. Indicate direction and break edges into a few tufts. Let values do the work.
A Simple Practice Plan (So This Skill Actually Sticks)
- Day 1: Draw 10 cranial balls with centerlines (front, 3/4, side).
- Day 2: Add muzzles as boxes/wedges to each head. Keep it simple.
- Day 3: Add eyes + ears + one marking pattern. Focus on readability.
- Day 4: Pick one head and fully clean + shade it. Save it as your “baseline.”
Repeat weekly and you’ll notice something magical: your drawings start improving even when you’re not trying
as hard. (It’s not sorcery. It’s mileage.)
Real-World Learning Experiences (The Fun, The Flops, The Fur)
Learning to draw a furry head usually comes with a few universal experiences, and honestly, they’re kind of a rite of passage.
First, there’s the Circle Phase, where you draw what you swear is a perfect circle, then you step back
and realize you’ve created a potato with ambitions. You erase it, redraw it, and suddenly you’ve spent ten minutes
“warming up” without actually starting the head. Congratulations: you’re officially an artist.
Next comes the Muzzle Mystery. You put a muzzle on the face and it looks fine… until you add the second
eye. Then the muzzle shifts spiritually to the left, the eyes drift apart like they’re avoiding awkward small talk,
and you start wondering if symmetry is a government conspiracy. This is normal. The fix is boring but effective:
centerline, eye line, and treating the muzzle like a 3D form instead of a sticker. Once you do that a few times,
the muzzle starts behaving like it pays rent.
Then you hit the Expression Breakthrough. One day, you adjust a brow curve by just a tiny amount and suddenly
your character goes from “neutral” to “mildly offended at your playlist.” It feels like unlocking a secret level.
This is where furry art gets addictive: small shape changes create big personality shifts. A rounder cheek reads cozy.
A sharper eye shape reads confident. A slightly tilted ear reads curious. You start making choices on purpose.
After that, you meet your old enemy: Fur Texture. Most people try to solve fur by drawing lots of lines.
The result looks like spaghetti fell on your character’s face. Eventually you discover the better approach: fur is
suggested with value changes, edge breaks, and direction flow. You’ll notice that the best-looking fur often has fewer
lines than the messy versionbecause it’s placed where it matters: cheek edges, chin fluff, ear bases, and the neck silhouette.
Your art gets cleaner and somehow fluffier at the same time, which feels illegal.
Finally, there’s the Consistency Era, where you design a cool marking pattern and immediately regret it when
you have to redraw it in three-quarter view. This is also normal. Most artists learn to keep markings simple at first,
then level up later when their construction skills can handle it. If you want a practical win: make one “signature” marking
(a mask, stripe, or spot cluster) and keep the rest subtle. It’s easier to repeat, and your character is still recognizable.
The best part? Each “oops” teaches a specific skillstructure, alignment, depth, texture, or design. And once you’ve drawn
a few furry heads using the same steps, you stop feeling like you’re guessing. You start feeling like you’re building.
That’s the moment your fursona goes from “a drawing I made” to “a character I can actually draw again tomorrow.”
Conclusion
A furry head is easier to draw when you treat it like a 3D build: sphere for the skull, a solid muzzle form, guidelines
for eye placement, and fur suggested with smart edges and values. Stick to the 11 steps, practice a few angles, and you’ll
be able to create heads that look consistent, expressive, and unmistakably yourswhether you’re drawing a cozy rabbit,
a confident wolf, or a cat who definitely knocked your drink off the table on purpose.