Table of Contents >> Show >> Hide
- Before You Try the Flip
- How to Do a Standing Back Flip from the Ground: 14 Steps
- Step 1: Start in the right place
- Step 2: Warm up like you mean it
- Step 3: Build the body positions first
- Step 4: Improve your vertical jump
- Step 5: Learn the dip without collapsing
- Step 6: Swing the arms with purpose
- Step 7: Jump up, not back
- Step 8: Keep your head neutral
- Step 9: Reach the full set before tucking
- Step 10: Snap the knees in fast
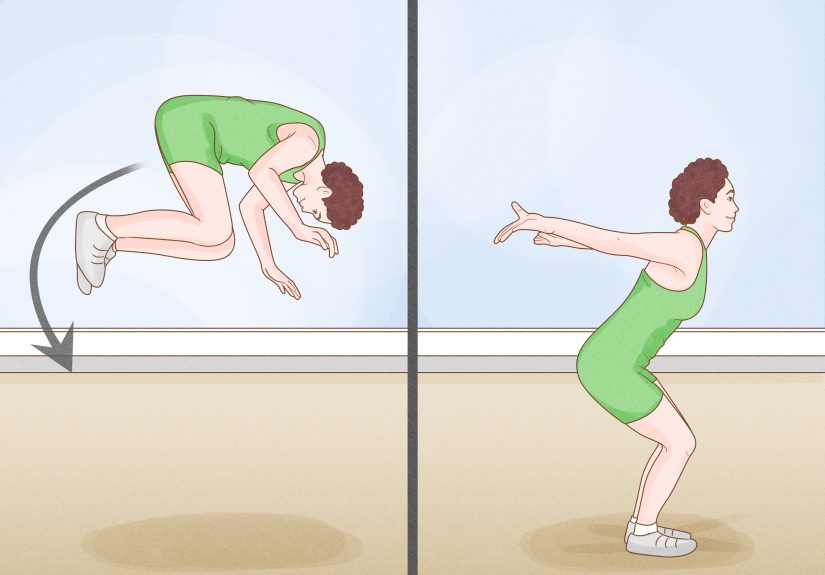
- Step 11: Stay compact in the air
- Step 12: Open at the right time
- Step 13: Land in an athletic position
- Step 14: Repeat only when the reps stay clean
- Common Mistakes That Wreck a Standing Back Flip
- Drills and Conditioning That Actually Help
- How Long Does It Take to Learn?
- Conclusion
- What Learning a Standing Back Flip Really Feels Like
Safety note: A standing back flip is a high-risk tumbling skill. Learn it with a qualified coach, an engaged spotter, and proper mats or a spring floor. This article is for education, not for teaching yourself in a backyard with heroic confidence and questionable judgment.
A standing back flip looks like pure magic. One second you are upright, the next second you are upside down, and then somehow you land like gravity owes you a favor. In gymnastics and cheer, this skill is often called a standing back tuck. It is flashy, satisfying, and excellent for making your friends say, “Wait, do that again.”
But let’s be honest: it is also a skill that can go very wrong very fast if you rush it. A standing back flip demands explosive legs, a strong core, good air awareness, and clean progressions. It is not just “jump backward and hope for the best.” Hope is not a coaching method. Neither is panic.
If you want to learn this skill the smart way, the goal is simple: build the mechanics first, then the confidence, then the flip. Below is a practical 14-step guide that breaks the movement into something you can actually understand. You will also find drills, common mistakes, landing advice, and a longer section on what the learning experience really feels like for most athletes.
Before You Try the Flip
The standing back flip is safer and more realistic when you already have a few basics: a solid vertical jump, body tension, the ability to tuck quickly, and comfort moving backward under supervision. Many athletes also benefit from being able to perform backward rolls, strong rebound jumps, handstand variations, and controlled stick landings before working the full skill. That foundation matters because the flip is less about bravery and more about timing, shape, and height.
Just as important is the environment. A coach, a trained spotter, and padded progressions are not “nice extras.” They are part of the skill. If your setup is random, your results will be random too. And random is not what you want when your neck is attending the session.
How to Do a Standing Back Flip from the Ground: 14 Steps
Step 1: Start in the right place
Use a gymnastics gym, cheer facility, or tumbling space with appropriate mats and a coach who knows how to teach backward rotation. A standing back flip should begin with supervision, not improvisation. The safest athletes are usually the least dramatic ones because they respect the setup from day one.
Step 2: Warm up like you mean it
Warm your ankles, knees, hips, shoulders, back, and wrists before doing any tumbling. Add light cardio, dynamic stretching, jumps, lunges, and basic shapes. Cold muscles are not impressed by ambition. They prefer preparation.
Step 3: Build the body positions first
Practice three positions until they feel automatic: a tall set position with arms up, a tight tuck position with knees pulled in, and a strong landing position with bent knees and chest controlled forward. The flip moves quickly, so your body should already know where it is trying to go.
Step 4: Improve your vertical jump
Your first mission is not rotation. It is height. The best standing back flips start with an aggressive jump upward, not a desperate throw backward. Work on straight jumps, tuck jumps, and rebound jumps so your legs learn to create lift before you ask them to create a full flip.
Step 5: Learn the dip without collapsing
Stand tall, keep your chest lifted, and make a quick controlled dip through the knees and hips. Think “load and explode,” not “sit in a chair and write a novel.” The dip should be short, athletic, and powerful. Too deep, and you lose speed. Too loose, and your timing disappears.
Step 6: Swing the arms with purpose
Your arms help generate momentum and rhythm. They swing down and then drive up fast as you jump. A lazy arm swing often creates a lazy flip. A sharp arm swing helps your body rise taller and organize the takeoff. In short, your arms are not decoration.
Step 7: Jump up, not back
This is the correction almost everyone needs. A standing back flip is powered upward first. Yes, you rotate backward, but the athlete should think about rising through the floor rather than throwing the head and shoulders behind them. If you jump backward too early, the skill turns into a fast argument with the ground.
Step 8: Keep your head neutral
Do not whip your head back. That old-school habit can destroy body alignment and reduce height. Keep the neck neutral, the chest open, and the eyes in a natural line as you take off. Good flips usually look calm at the top, even when the athlete feels like fireworks inside.
Step 9: Reach the full set before tucking
After the jump, extend through the hips and rise tall before pulling into the tuck. This is called the set, and it is the moment that separates clean flips from rushed ones. Tucking too early often kills height and turns the skill into a low, scary whip. Be patient for one split second. It pays rent.
Step 10: Snap the knees in fast
Once you leave the ground and finish the set, pull the knees toward the chest quickly. Think “compact and tight.” A fast tuck helps rotation happen efficiently. Keep the body organized and avoid letting the knees drift apart or the tuck become sloppy. Tight shapes flip better than mushy ones.
Step 11: Stay compact in the air
In the middle of the flip, body tension matters. Keep the core engaged and the tuck active instead of dangling in the air and waiting for the universe to solve it. A standing back flip is a brief skill, but every fraction of a second matters. Tight equals faster. Loose equals suspense.
Step 12: Open at the right time
As you finish the rotation, open from the tuck so you can prepare to land. The goal is not to stay balled up forever like a stressed hedgehog. Opening too late can drop you low. Opening too early can leave you short. This timing usually improves fastest when a coach spots the skill and uses progressions like flat-back drills and mat-stack work.
Step 13: Land in an athletic position
Absorb the landing with bent knees, strong hips, and a controlled chest. Keep the shoulders over the knees and the knees over the toes. Do not lock the legs or fling the arms wildly like you are swatting bees. A good landing is quiet, balanced, and ready to stop.
Step 14: Repeat only when the reps stay clean
Once you get the flip, avoid doing too many tired reps. Quality beats quantity. Stop when the jump gets low, the tuck gets late, or the landing gets messy. Smart athletes do not train until their form falls apart. They train until the skill looks repeatable, then live to flip another day.
Common Mistakes That Wreck a Standing Back Flip
Throwing backward instead of upward
This is the classic error. Athletes get nervous, toss the shoulders back, and lose the height needed for a safe rotation. The fix is to trust the jump and think tall before tuck.
Dipping too low
A giant squat looks powerful, but it often slows the takeoff. A back flip needs a fast, springy load, not a dramatic pause at the bottom.
Tucking too soon
Early tucking steals lift. You want to finish the set, then snap the knees in. Rushing the tuck makes the flip feel faster, but not better.
Letting fear change the shape
Fear usually shows up as hesitation, fake throwing, random extra swings, or a weird head toss. If that sounds familiar, welcome to being human. The answer is not more panic. It is more progression work, more spotting, and more consistent reps.
Drills and Conditioning That Actually Help
The best drills improve pieces of the skill without forcing the full flip too early. Tuck jumps help with fast knee lift. Rebound jumps teach explosive takeoff. Stick landings train control at the end. Flat-back drills onto mats help athletes understand the line of the jump and the feeling of safe backward rotation. Spotted back-tuck reps teach timing and confidence without turning every attempt into a guessing game.
Conditioning matters too. Strong legs create height. Strong abs and hip flexors speed up the tuck. Strong back and shoulder muscles improve posture and body tension. Useful exercises include tuck jumps, V-ups, planks, jumps to a stable box, controlled rebounds, and basic gymnastics strength work such as hollow holds, arch work, and push-up variations. You do not need to become a superhero. You do need to become more prepared than the skill is difficult.
How Long Does It Take to Learn?
That depends on the athlete. Some people have great leg power but poor air awareness. Others are flexible and coordinated but mentally allergic to backward motion. Some athletes get the movement on a spot quickly and then need weeks to trust themselves alone. Others can do the flip, but not land it consistently. There is no magical timeline, which is annoying but true.
The fastest progress usually happens when athletes focus on three things: consistent progressions, low-volume quality reps, and honest feedback. Video helps. A coach helps more. Ego helps the least.
Conclusion
A standing back flip from the ground is one of those skills that looks fearless but is really built on structure. The athletes who learn it best are not always the boldest; they are usually the ones who respect the setup, train the basics, and keep chasing height, shape, and timing instead of trying to “just send it.”
If you remember nothing else, remember this: jump up, stay tight, tuck fast, and land like you planned it. Use mats. Use a spotter. Use your brain. That last one is wildly underrated.
What Learning a Standing Back Flip Really Feels Like
Learning a standing back flip is not just a physical skill. It is a whole emotional mini-series. Episode one is usually excitement. You watch someone do it cleanly and think, “That looks amazing. I, too, would like to become airborne and impressive.” Episode two is reality. The coach says, “Jump up first,” and suddenly your body reveals that it has very different ideas about what “up” means.
For most athletes, the first big hurdle is not strength. It is trust. Backward movement feels unnatural at first. The brain loves things it can see, and a standing back flip asks you to leave the ground and rotate into space you cannot watch in real time. That can make even strong athletes hesitate. They dip, stop, fake throw, reset, swing again, and basically perform a one-person debate club before every rep.
Then something interesting happens. After enough drills, the fear starts to change shape. It does not always disappear in a dramatic movie montage. It usually gets smaller in boring, useful ways. The mat stack feels familiar. The spot feels less mysterious. The set starts to rise instead of drift. The tuck becomes quicker. The landing stops sounding like a dropped toolbox. You begin to understand that the flip is not chaos. It is sequence.
Another common experience is frustration with timing. Athletes often feel like they are doing everything at once: dip, swing, jump, lean, tuck, open, land. It can feel impossible to sort out. But once the pieces click, the skill gets simpler, not because it becomes easy, but because it becomes organized. You stop trying to force the flip and start letting each phase happen in order. That is a huge turning point.
There is also the confidence gap between “I can do it with a spot” and “I can do it alone.” That gap is real. Plenty of athletes are physically ready before they are mentally ready. The first unspotted back flip can feel like standing at the edge of a diving board, except the pool is made of self-doubt and leg power. This is where repetition and coaching matter most. Confidence is usually built through evidence. One clean rep becomes three. Three become ten. Then suddenly the skill that once felt impossible starts to feel normal.
And yes, the first truly clean landing is unforgettable. Not just because you got around, but because it feels controlled. The jump is higher, the tuck is faster, and the landing has that satisfying “stuck it” quality that makes athletes grin immediately. It is the moment when the skill stops being a survival event and starts becoming something you can actually own.
In the long run, learning a standing back flip teaches more than a flashy trick. It teaches patience, body awareness, respect for progressions, and the very useful life lesson that panic is not a substitute for technique. That may not sound as exciting as flipping backward, but it is part of why the skill stays meaningful long after the first successful rep.