Table of Contents >> Show >> Hide
- What We Mean by “Bottle Rocket” (and What We Don’t)
- Safety First (Because Gravity Doesn’t Care About Your Weekend Plans)
- Materials Checklist
- Step-by-Step: Build the Rocket
- Step-by-Step: Launch It (3 Safe Launch Methods)
- The Science Behind the Whoosh (Quick but Real)
- Make It Fly Higher and Straighter: Tuning Tips
- Quick Experiments (Because You’re Basically a Rocket Scientist Now)
- Troubleshooting: When Your Rocket Refuses to Be Legendary
- FAQ
- Bonus: Backyard “Field Notes” (Real Experiences People Tend to Have)
- Conclusion
Want a science project that feels like a tiny space program, costs about the same as a convenience-store snack,
and lets you yell “THREE… TWO… ONE…” without anyone calling security? Perfect. A water bottle rocket
is one of the most satisfying DIY builds you can do in an afternoon: a plastic soda bottle, some tape and cardboard,
a little water, a little air pressure, and suddenly your backyard is Mission Control.
This guide walks you through how to build a bottle rocket the safe, STEM-friendly waypowered by
water and compressed air (not chemicals, not fireworks, not “hold my soda” energy). You’ll get
simple build steps, multiple launch options, tuning tips for higher flights, and the science behind the whoosh.
What We Mean by “Bottle Rocket” (and What We Don’t)
In this article, a “bottle rocket” means a water rocket: a 2-liter soda bottle that launches when
pressurized air forces water out of the nozzle, creating thrust. This is a classic physics demo for Newton’s laws,
pressure, and aerodynamics.
We are not building anything explosive, combustible, or pyrotechnic. If it involves flames, fuses,
or “just a tiny bit of fuel,” it does not belong in this project. Your goal is a clean, loud, glorious splashnothing
more.
Safety First (Because Gravity Doesn’t Care About Your Weekend Plans)
Bottle rockets are fun, but they’re still pressurized systems. Treat them like you’d treat a powerful tool:
with respect, space, and basic common sense.
- Adult supervision is recommended, especially for kids.
- Launch outdoors in a large open area, away from trees, power lines, and buildings.
- Wear safety glasses and keep observers well back (think: a clear “no one near the launcher” zone).
- Never lean over a rocket or launcher while it’s pressurized.
- Use only undamaged carbonated-beverage bottles (they’re typically built tougher than many other bottles).
- If using a pump/launcher with a gauge, keep beginner launches conservative (for example, around 40 psi), and do not “see what happens” beyond safe limits.
- Always aim straight upnever at people, pets, cars, or your neighbor’s grill.
Materials Checklist
Rocket Materials
- One 2-liter carbonated soda bottle (clean, label removed, no dents or cracks)
- Cardboard or stiff plastic sheet (for fins)
- Clear packing tape or duct tape
- Scissors and a marker
- Optional: modeling clay or putty (for nose weight / ballast)
- Optional: plastic bag + string (parachute) or ribbon (streamer recovery)
Launching Options (Pick One)
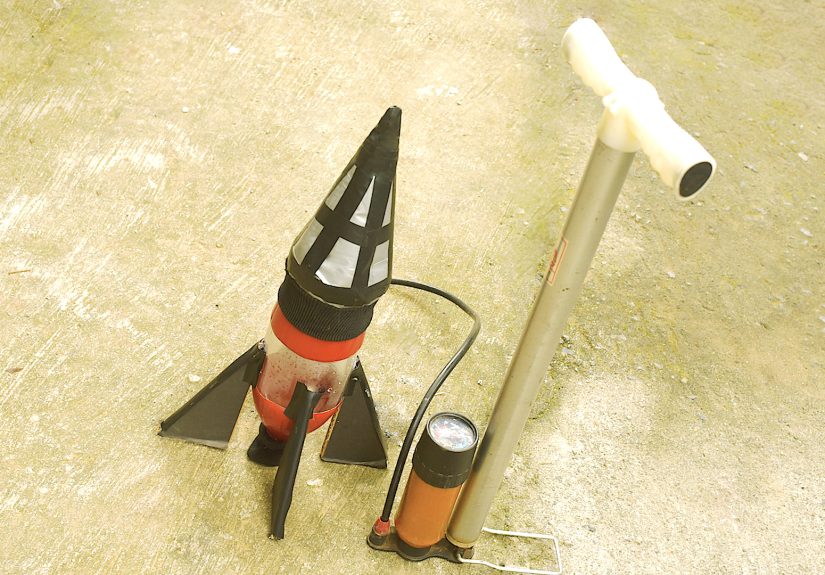
- Option A (Easiest & safest): A commercial water bottle rocket launcher designed for this activity.
It usually includes a release mechanism and a way to pressurize safely. - Option B (Simple DIY launch pad): A snug cork + ball pump needle adaptor + a bicycle pump
(ideally with a pressure gauge) + a stable stand (like an upside-down milk crate). - Option C (Low-pressure stomp launcher): A stomp bottle connected to tubing and a launch tube,
launching a lightweight paper rocket (great for younger builders and classroom demos).
Step-by-Step: Build the Rocket
The rocket is just a bottleuntil you add stability. Your mission is to help it fly straight instead of doing
interpretive dance in the sky.
- Prep the bottle.
Rinse it, remove the label, and inspect it carefully. If it’s scratched, dented, or cloudy in weird ways,
retire it. Space programs have budgets; you have spare bottles. - Decide which end is “up.”
Most water rockets launch upside down: the bottle’s neck points downward (that’s the nozzle),
and the bottle’s base becomes the top of the rocket. - Mark a starting water line.
A common starting point is about one-third of the bottle’s volume filled with water. On a 2-liter
bottle, that’s roughly 700 mL. Use a marker to draw a line so you can repeat tests consistently. - Add fins (3 or 4).
Cut 3–4 identical fins from cardboard or stiff plastic. Keep them the same size, and tape them evenly spaced
near the bottle’s “bottom” (which is physically near the neck/nozzle end when the rocket is upside down).
Why? Fins help keep the rocket pointed in one direction and reduce wobble. - Make a nose cone.
Tape a paper or lightweight cardboard cone onto the bottle’s base (the “top” during flight). Keep it smooth,
centered, and not too heavy. A messy cone increases drag and makes the rocket fly like it’s late for a meeting. - Balance it (optional but powerful).
If your rocket tends to flip or tumble, add a small amount of modeling clay inside the nose cone area to shift
the center of mass forward (toward the top). Small changes can make a huge difference. - Add recovery (optional).
Want your rocket to land gently instead of committing to a dramatic belly-flop?- Streamer: Tape a long ribbon inside the nose cone so it trails out after launch.
- Parachute: Make a simple parachute from a plastic bag with strings taped to the inside of the cone.
Keep recovery systems lightweight and neatly packed so they don’t snag during liftoff.
- Final tape check.
Press down all tape edges. Anything flapping in the wind becomes “unexpected aerodynamic research.”
Step-by-Step: Launch It (3 Safe Launch Methods)
Method A: Commercial Water Rocket Launcher (Recommended)
- Set up in an open field with a clear safety zone around the launcher.
- Add water to your marked line (start at 1/3 full).
- Mount the rocket onto the launcher per the manufacturer’s directions.
- Pressurize with a bike pump (use a gauge if available; stay conservative for early tests).
- Countdown (mandatory for morale) and release using the launcher’s pull cord or trigger.
- Wait a moment after landing before approachingthen retrieve, adjust, and relaunch.
Method B: Cork-and-Pump “Milk Crate” Launch Pad (Simple DIY)
This approach uses a tight cork as a “release valve.” It works, but it’s less controlled than a purpose-built launcher,
so keep pressures modest and use lots of space.
- Build the cork adapter.
With adult help, create a hole through a cork and push a ball pump needle adaptor through it. Tape around the
needle and cork to keep the fit snug and reduce air leaks. - Make a stable stand.
Flip a milk crate upside down and feed the pump hose through an opening so the cork and needle can sit upright
as a “launch mount.” The goal is stabilityno wobbling launch pads. - Fill the rocket with water.
Start at about 1/3 full. - Insert the cork firmly.
You want a tight sealsnug, not “I welded it shut with anxiety.” - Place the rocket upside down on the stand.
Keep faces and hands away from the rocket’s path. - Pressurize slowly with a bike pump.
Use a pump with a gauge if possible and keep early tests conservative. Stand back while pumping. - Lift off happens when the cork pops.
The rocket will launch suddenlyso the safety zone matters.
Method C: Low-Pressure Stomp Launcher (Classroom-Friendly)
If you want rockets with lots of giggles and less pressure risk, a stomp launcher is fantastic. You connect a stomp
bottle to a tube, slide a lightweight rocket on the tube, and launch it with a single-foot stomp.
- Assemble a stomp air system (stomp bottle + tubing + a smooth launch tube).
- Make a lightweight rocket from paper/cardstock wrapped into a tube with fins and a pointed nose.
- Slide rocket onto the launch tube.
- Stomp with one foot (seriouslytwo feet can slip and turn your launch into a blooper reel).
- Experiment with rocket length, nose shape, and fin angles for better flight.
The Science Behind the Whoosh (Quick but Real)
A water rocket is a reaction engine. When pressurized air pushes water out of the nozzle, the water shoots downward.
Newton’s Third Law says the rocket gets an equal and opposite push upward. The faster and longer you eject mass
(water), the more momentum change you get, and the higher the rocket can go.
Water plays two roles: it’s the reaction mass (what gets thrown out) and it helps convert stored
pressure into thrust efficiently. Air is the energy storagecompressed air holds potential energy
that becomes kinetic energy when released.
Your rocket’s flight path is a tug-of-war among:
thrust (up), gravity (down), and drag (slowing you down).
Fins, a smooth nose cone, and good balance help keep the rocket stable so it doesn’t waste energy spinning or tumbling.
Make It Fly Higher and Straighter: Tuning Tips
1) Water Amount: Don’t Overfill
Too little water and you don’t have enough reaction mass. Too much water and your rocket is heavy and has less air
volume to pressurize. A great starting point is about 1/3 full, then test variations (1/4, 1/2, etc.).
2) Pressure: Consistency Beats Bragging Rights
Higher pressure generally increases thrustup to the point where it becomes unsafe or inconsistent. If you’re testing
designs, keep the pressure the same each time so you can tell what changed the flight: fins? water ratio?
nose weight? your dramatic countdown voice?
3) Center of Mass vs. Center of Drag
A stable rocket typically benefits from having its center of mass forward (toward the nose) and its
center of drag behind it (fins help with this). If your rocket flips, add a little nose weight or enlarge fins.
4) Fins: Symmetry is Your Friend
- Use identical fins placed evenly around the body.
- Make sure each fin is straight and securely taped on both sides.
- Big fins add stability but also dragso go big for stability first, then shrink later if you want more speed.
5) Smooth Surfaces
Tape seams down, trim ragged edges, and keep the nose cone centered. Aerodynamics doesn’t demand perfection,
but it does punish chaos.
Quick Experiments (Because You’re Basically a Rocket Scientist Now)
- Water ratio test: Launch at the same pressure using 1/4, 1/3, and 1/2 water. Record which goes highest.
- Nose weight test: Add a small amount of clay to the nose and compare stability and distance.
- Fin shape test: Triangle vs. trapezoid fins; measure which flies straighter.
- Altitude measurement: Stand a fixed distance away and use an angle finder/clinometer app to estimate height.
(Keep the observer position consistent for fair comparisons.)
Troubleshooting: When Your Rocket Refuses to Be Legendary
- It won’t launch: The seal might be too loose (air leaks) or too tight (cork jammed). Refit the cork,
check the needle adaptor, and confirm the bottle neck is clean. - It launches sideways: Uneven fins, uneven weight, or a tilted launch setup. Fix symmetry and ensure
the launcher is level and aimed straight up. - It tumbles end-over-end: Add a small amount of nose weight, increase fin area, and reduce any wobble
in the launch. - It barely gets off the ground: Too much water, too little pressure, or big drag from bulky add-ons.
Try less water (around 1/3), check your seal, and simplify the design. - It breaks on landing: Add a streamer/parachute, launch in grass, and reduce pressure while you tune.
FAQ
How much water should I put in a 2-liter bottle rocket?
Start with about one-third full (roughly 700 mL). Then experiment. Many builders find that a
mid-range fill often performs well, but your best result depends on your rocket’s weight, fin drag, and launch pressure.
What bottle should I use?
Choose a 2-liter carbonated beverage bottle in good condition. Avoid bottles that are thin-walled,
non-carbonated, scratched up, or sun-baked. If in doubt, swap it outplastic fatigue is not a fun surprise.
Do I need a special launcher?
You can launch with a simple cork-and-pump setup, but a purpose-built launcher is safer and more consistent.
If you’re doing repeated tests or launching with kids, consistency is gold.
Can I make it go higher without making it dangerous?
Yes: focus on efficiency. Improve fin symmetry, reduce drag, keep water ratio optimized, and keep pressure consistent
(not extreme). A stable rocket often beats a wobbly “high pressure hero.”
Bonus: Backyard “Field Notes” (Real Experiences People Tend to Have)
The first thing you notice about bottle rockets is that your brain immediately forgets you’re a grown adult. There’s
something about holding a plastic bottle like it’s a spacecraft that makes everyonekids, teens, parents, that one uncle
who “used to be into engineering”turn into an excited launch director.
Experience #1: The seal is everything. Most first launches fail in one of two ways: either the rocket
hisses like an annoyed cat because the seal leaks, or it refuses to release because the cork is jammed in too well.
People learn quickly that “tight” is a Goldilocks problem. The happy place is snug enough to hold pressure but not so
stubborn it becomes a permanent houseguest.
Experience #2: Everyone becomes obsessed with “just one tweak.” After the first successful launch,
it’s rarely “Great, we’re done.” It’s: “Okay but what if we make the fins slightly bigger?” Then: “What if we add a tiny
bit of clay to the nose?” Then: “What if we reduce tape drag by smoothing the seams?” Next thing you know, someone is
drawing fin templates like they’re pitching a startup, and another person is keeping a launch log with suspiciously
serious handwriting.
Experience #3: The funniest failures are also the best lessons. A rocket that spins like a sprinkler
teaches stability. A rocket that flips at apogee teaches center of mass. A rocket that goes “splat” teaches recovery
systems. In engineering classrooms, this is the moment everyone realizes failure isn’t a dead endit’s a data point.
Your “oops” is basically a free consultant.
Experience #4: Measuring makes it more exciting. The moment you start estimating altitudeusing a fixed
observer distance and an angle readingyou’re not just launching, you’re running experiments. Even a simple scoreboard
(“highest,” “straightest,” “longest hang time”) turns casual launches into a friendly competition. And because each
change has a visible result, people stay engaged longer than they do with most activities that don’t involve snacks.
Experience #5: Launch etiquette appears out of thin air. Groups naturally develop roles: one person
fills water, one person checks fins, one person pumps, one person calls the countdown, and someone inevitably becomes
“range safety” and starts insisting on the clear zone like they’re guarding national secrets. This is a good thing.
Safe launches feel smoother, calmer, andironicallymore fun.
Finally, there’s the afterglow: wet grass, a taped-up bottle, and the satisfying feeling that you just built a working
reaction engine from household materials. You don’t need a lab coat. But if you wear one anyway, no judgmentscience
is about confidence.
Conclusion
Building a bottle rocket is the perfect mix of simple materials and real physics. Start with a strong 2-liter soda
bottle, add symmetrical fins and a smooth nose cone, launch with water and compressed air, and keep things safe with
distance and eye protection. Once you’ve nailed a stable flight, experiment like an engineer: change one variable at a
timewater amount, pressure, fin shape, nose weightand watch your rocket level up.
If you want the quickest path to great results, prioritize consistency: same water line, same pressure, same launch
angle (straight up), and a clean, open launch site. Your future selfthe one holding a rocket that finally flies
straight instead of doing corkscrewswill be extremely grateful.