Table of Contents >> Show >> Hide
- What Is Micropore Tape (and When Should You Use It?)
- Before You Start: A 30-Second Checklist
- How to Apply Micropore Tape: 11 Steps
- Step 1) Pick the right width (and don’t overthink it)
- Step 2) Prep the skin: clip hair, then clean and dry
- Step 3) If needed, apply barrier film (and let it dry fully)
- Step 4) Measure your tape with the “half-inch rule”
- Step 5) Round the corners (optional, but secretly elite)
- Step 6) Place the dressing firstcenter it like you mean it
- Step 7) Anchor one end of the tape to skin (no stretching!)
- Step 8) Lay the tape across the dressing, then pressdon’t yank
- Step 9) Add additional strips in a stable pattern
- Step 10) Check circulation and comfort (yes, really)
- Step 11) Plan removal now (your future self will thank you)
- How to Remove Micropore Tape Safely (Without Skin Drama)
- Common Mistakes (and How to Fix Them Fast)
- When to Stop DIY and Call a Clinician
- FAQ: Quick Answers People Actually Need
- Real-World Experiences: What Applying Micropore Tape Feels Like (and What People Learn the Hard Way)
- Conclusion
Micropore tape (aka “paper surgical tape”) is the unsung hero of first aid kits: lightweight, breathable, surprisingly strong,
and polite to sensitive skin when you use it correctly. It can secure gauze over a small wound, keep a dressing from sliding
around, or help stabilize light tubingwithout feeling like you’re ripping off your soul during removal.
But there’s a catch: most “tape problems” aren’t tape problems. They’re technique problems. Apply it with tension and you can
get puckering, blisters, or itchy irritation. Stick it on damp lotion-y skin and it’ll peel off like a bad decision.
Rip it off fast and… congratulations, you’ve invented your own DIY wax strip.
This guide walks you through 11 practical steps for applying Micropore tape the way clinicians dosecure, comfortable, and
easy to removeplus common mistakes, troubleshooting tips, and a long “real-world experiences” section at the end.
What Is Micropore Tape (and When Should You Use It?)
Micropore tape is a breathable paper medical tape designed for gentle skin contact. People commonly use it to:
- Hold gauze or a nonstick pad over minor cuts, scrapes, or surgical dressings.
- Secure light dressings on areas that move (hands, forearms, shoulders) without bulky wraps.
- Support Steri-Strip edges or reinforce a dressing border (only if your clinician says it’s okay).
- Label tubing/dressings (yes, some folks write on ittiny “medical sticky notes”).
Important: If you have a fresh surgical incision with Steri-Strips or “tape strips,” do not remove or retape
unless your surgeon/clinic told you to. For deep wounds, heavy bleeding, bites, burns, signs of infection, or worsening pain,
get medical care.
Before You Start: A 30-Second Checklist
- Clean hands: Wash with soap and water (or use sanitizer if soap isn’t available).
- Clean, dry skin: Tape sticks best to skin that’s clean and fully dryno lotion, oil, or dampness.
- Right supplies: Dressing (gauze/nonstick pad), Micropore tape, scissors (optional), and a trash bag.
- Sensitive skin plan: If you’re prone to irritation, consider a skin barrier film (let it dry first).
How to Apply Micropore Tape: 11 Steps
Step 1) Pick the right width (and don’t overthink it)
For small dressings on fingers or faces, a narrower tape is easier to control. For larger gauze on an arm/leg, wider tape
means fewer strips and fewer edges to peel. The goal: enough coverage to hold the dressing, not mummify the neighborhood.
Step 2) Prep the skin: clip hair, then clean and dry
If there’s hair where the tape will sit, clip or trim (don’t shave if you can avoid itshaving can irritate skin).
Then clean the area with mild soap and water (or follow wound-care instructions you were given). Pat completely dry.
Tape and moisture are not friends.
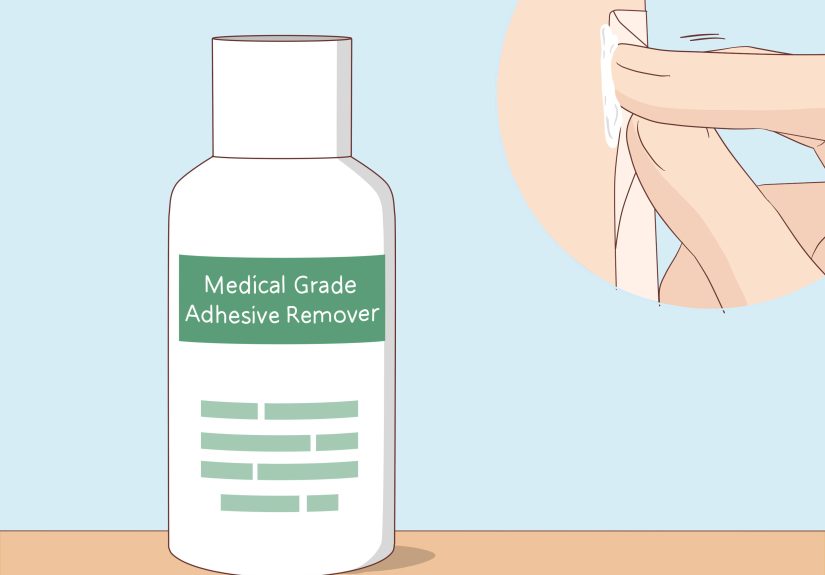
Step 3) If needed, apply barrier film (and let it dry fully)
People with fragile or sensitive skin often do better with a no-sting barrier film under tape. Apply it where the tape will go,
then wait until it’s totally dry. If it’s still tacky-wet, you’re basically gluing tape to a puddle.
Step 4) Measure your tape with the “half-inch rule”
Cut or tear strips long enough to extend about ½ inch beyond the edge of the dressing on each side.
Too short and it pops off. Too long and you create extra corners that catch on clothing, towels, and your will to live.
Step 5) Round the corners (optional, but secretly elite)
If you’re cutting tape with scissors, rounding the corners helps prevent lifting. Square corners love to peel firstespecially
on joints, hands, and anywhere you move like a human being.
Step 6) Place the dressing firstcenter it like you mean it
Put your gauze or nonstick pad on the wound/dressing site per your instructions. Make sure it’s positioned correctly before
you tape. Once tape is on, “adjusting” usually means “replacing.”
Step 7) Anchor one end of the tape to skin (no stretching!)
Here’s the biggest technique point: apply Micropore tape without tension. Don’t pull it tight like athletic tape.
Gently place one end onto the skin next to the dressing and press it down.
Step 8) Lay the tape across the dressing, then pressdon’t yank
Smooth the tape over the dressing and onto skin on the other side. Use gentle pressure to “seat” the adhesive. If you pull the tape
while applying, it can rebound and tug at skin later, causing discomfort or blisters. Think: lay it down like you’re making a bed,
not strapping down cargo.
Step 9) Add additional strips in a stable pattern
For small pads, two strips in an “X” can work. For larger dressings, use 3–4 strips like “rails” (parallel lines) or a picture-frame
border. Keep edges flat and avoid wrinkleswrinkles become peel points.
Step 10) Check circulation and comfort (yes, really)
If tape is on a finger/toe/hand, confirm you didn’t wrap it too snugly. Look for:
- New numbness/tingling
- Coldness or color change (pale/blue-ish)
- Throbbing pain that wasn’t there before
If any of those show up, loosen and reapply with less coverage/tension. Micropore tape should feel secure, not like a tiny
medieval punishment.
Step 11) Plan removal now (your future self will thank you)
When you’re done, create a small “lift tab” by folding over a tiny corner of tape (or sticking a small piece of tape onto the corner
as a starter). This makes removal easier laterespecially if you have long nails, tender skin, or zero patience.
How to Remove Micropore Tape Safely (Without Skin Drama)
Removal matters as much as application. The safest technique is the clinical classic:
“low and slow”.
- Support the skin with one finger near the peel line.
- Peel back slowly, keeping the tape low and close to the skin (pull it back over itself, not straight up).
- Go in the direction of hair growth when possible.
If the tape is stubborn, try removing it after a shower or soften it with warm water on a cloth. For adhesive residue, a small amount
of oil-based product (like mineral oil or petroleum jelly) may helpthen wash gently afterward.
Common Mistakes (and How to Fix Them Fast)
Mistake: Tape won’t stick
- Cause: Skin is damp, oily, or has lotion residue.
- Fix: Clean with mild soap and water, dry fully, reapply. Press gently to improve contact.
Mistake: Tape peels at the corners
- Cause: Corners catch on clothing or flex points.
- Fix: Round corners, use shorter strips, or “frame” the dressing with overlapping edges.
Mistake: Itching or redness under tape
- Cause: Skin sensitivity, tension, moisture trapped, or adhesive reaction.
- Fix: Remove, let skin rest, consider barrier film next time, avoid stretching tape, and rotate placement slightly.
Mistake: Skin hurts when removing tape
- Cause: Pulled upward quickly, or skin wasn’t supported.
- Fix: Low-and-slow removal, support skin, soften adhesive with warm water or oil if appropriate.
When to Stop DIY and Call a Clinician
Seek medical advice promptly if you notice any of the following:
- Increasing redness, warmth, swelling, pus, or bad odor
- Fever or chills
- Wound edges opening or bleeding that won’t stop
- Severe pain, numbness, or skin blistering/tearing from tape
- Allergic reaction signs (hives, widespread rash, facial swelling, breathing trouble)
FAQ: Quick Answers People Actually Need
Can I put Micropore tape directly on a wound?
Typically, you place a proper dressing (like a nonstick pad or gauze) over the wound and use tape on the surrounding skin
to hold it in place. Tape directly on a wound can disrupt healing and hurt during removal.
How often should I replace the tape?
Replace it if it’s loose, wet, dirty, or no longer holding the dressing securely. Many dressings are changed daily (or as directed),
but follow the care plan you were givenespecially after surgery.
Is Micropore tape good for sensitive skin?
It’s often chosen because it’s gentler than many plastics, but “sensitive” varies. If you’re reactive, use a barrier film,
avoid stretching, and remove low-and-slow.
Can I shower with Micropore tape on?
Sometimes yes, depending on the wound and dressing typebut moisture can loosen tape. If you’re caring for a surgical incision,
follow your surgeon’s instructions about keeping it dry and when showering is allowed.
Real-World Experiences: What Applying Micropore Tape Feels Like (and What People Learn the Hard Way)
Let’s talk about the part most instructions skip: the very human experience of living with Micropore tape on your body while you
do normal thingstype, cook, sleep, sweat, shower, and inevitably snag your dressing on a doorframe like it owes you money.
A common first-time story goes like this: someone cleans a small scrape, slaps gauze on, then pulls the tape tight “so it stays.”
Ten minutes later, their skin starts to feel pinched. An hour later, the edges look a little red. By evening, the tape has created
tiny wrinkles that feel like mini speed bumps. The lesson most people learn quickly is that Micropore tape behaves best when you
lay it down gently. No tension. No tug-of-war. The tape is supposed to hold the dressing, not compress your skin.
Another classic scenario: the “mysterious non-stick” problem. Someone applies tape right after putting on lotion, sunscreen, or
a healing ointment that migrated outside the dressing area. The tape peels within minutes, and they assume the tape is low quality.
Then they try more tape (and more frustration), creating a furry border of tape layers. The fix is boring but magical:
wash the area with mild soap and water, dry completely, and then reapply. Suddenly the tape sticks like it’s proud of itself.
People who tape dressings on fingers often discover that finger joints are basically tiny tape-destroying machines. If you put a big
strip across a knuckle, it will wrinkle every time you bend, and wrinkles invite peeling. The “aha” moment is switching to smaller
strips placed like supportive brackets rather than one giant strip across the bend. Some folks also learn the joy of rounding tape
cornersan oddly satisfying upgrade that reduces snagging on pockets, gloves, and bedding.
Then there’s removal. Many peopleadults includeddefault to “rip it off fast” because they want it over with. That’s when the tape
turns into an impromptu waxing session. The low-and-slow method feels almost too gentle to work, but it’s the difference between
“mildly annoying” and “why is my skin coming with it.” Experienced users often remove tape after a shower or warm compress, support
the skin with one hand, and peel the tape back over itself with the other. It’s slower, but it’s also dramatically less painful.
Sensitive-skin users frequently share a similar pattern: the first few times are trial-and-error, and then they develop a routine.
Barrier film (fully dried), minimal tape contact area, and rotating placement slightly each change can prevent irritation from building up.
People who need repeated tapinglike securing a small dressing dailyoften prefer fewer, well-placed strips rather than a big “tape blanket.”
Less adhesive contact can mean happier skin, especially over a week.
Finally, there’s the emotional experience: Micropore tape is small, but it makes people feel “put together.” A secure dressing lets you
move without worrying about bleeding through a bandage or exposing a healing area. When it’s applied well, you forget it’s therewhich is
basically the highest compliment a piece of tape can receive. When it’s applied poorly, it becomes the main character of your day.
The good news is that the technique is learnable. After a couple of dressing changes, most people go from “sticky chaos” to “quiet competence.”
Conclusion
Applying Micropore tape well is mostly about three things: clean, dry skin, no tension during application,
and low-and-slow removal. Use enough tape to secure the dressing (with a little extra beyond the edges), smooth it down
firmly, and avoid stretching it like athletic tape. For sensitive skin, barrier film can helpjust let it dry completely.
Do those basics consistently and Micropore tape becomes what it was meant to be: an easy, breathable way to keep dressings in place
not a daily battle between your skin and sticky paper.