Table of Contents >> Show >> Hide
- Why a DIY Toothbrush Holder Is Worth It
- The Main Project: Upcycled Bottle-Cap Toothbrush Holder (Hometalk-Inspired)
- Creative Variations That Also Work Really Well
- 1) Mason Jar + Flower Frog Lid Holder (Farmhouse, Neat, and Surprisingly Practical)
- 2) Drilled Wood Block Holder (Minimalist and Durable)
- 3) PVC Pipe “Cubbies” (Bright, Cheap, and Kid-Friendly)
- 4) Drawer Organizer Insert (The “My Countertops Deserve Peace” Option)
- 5) Wall-Mounted “Brush Rail” Inside a Cabinet
- Design Rules That Keep Your DIY Holder From Becoming a Science Experiment
- Cleaning and Maintenance (The Boring Part That Makes Everything Better)
- Budget and Time
- Conclusion
- Real-World DIY Experiences (What People Learn After Living With a Toothbrush Holder)
A toothbrush holder is one of those tiny bathroom things you don’t think about until it’s gross, crowded, or mysteriously sticky. And yes“mysteriously sticky”
is a real scientific term in bathrooms. The good news: you can make a toothbrush holder that’s fun, functional, and way more charming than the sad plastic cup
that’s been clinging to your sink since 2017.
This guide is inspired by the classic Hometalk-style DIY spirit: creative reuse, simple materials, and a result that makes guests say,
“Wait… you made that?” We’ll build one main project (a bottle-cap holder that looks like happy little parking spots for toothbrushes),
then walk through several smart variationsfrom farmhouse Mason jar setups to minimalist drilled-wood racks. Along the way, you’ll get the “why” behind good design:
airflow, drainage, easy cleaning, and storage that doesn’t turn your toothbrush heads into awkward roommates.
Why a DIY Toothbrush Holder Is Worth It
A good toothbrush holder does three things: keeps brushes separated, helps them dry, and is easy to clean. A great toothbrush holder also fits your routine.
If your household includes kids, guests, electric toothbrushes, tiny bathrooms, or one person who squeezes toothpaste from the middle like a chaotic raccoon,
you need a systemnot just a container.
What “good” looks like in toothbrush storage
- Airflow: Brushes should be able to air-dry between uses.
- Separation: Brush heads shouldn’t touch (it’s not a toothbrush party).
- Drainage: Water shouldn’t pool where the bristles live.
- Cleanability: You should be able to wash it fastwithout needing a tiny brush to clean the tiny brush holder.
- Placement: Keep it away from splash zones and easy to reach when you’re half awake.
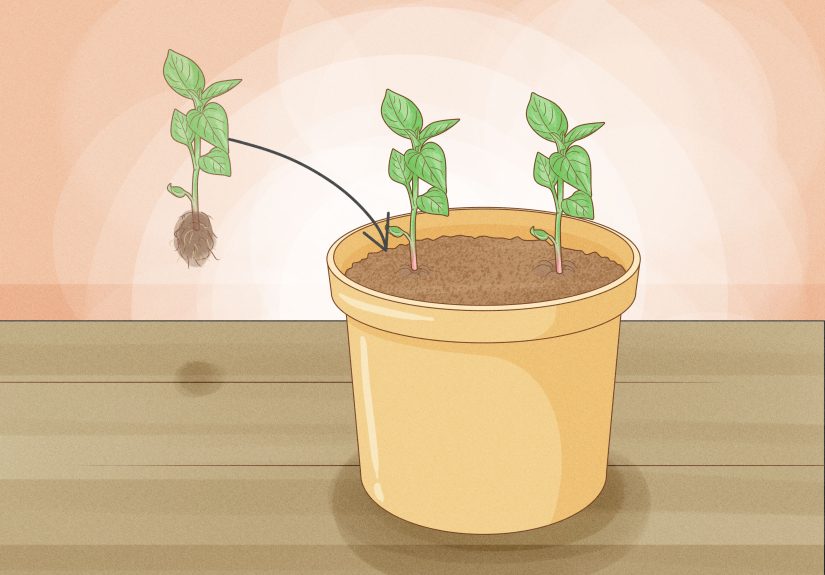
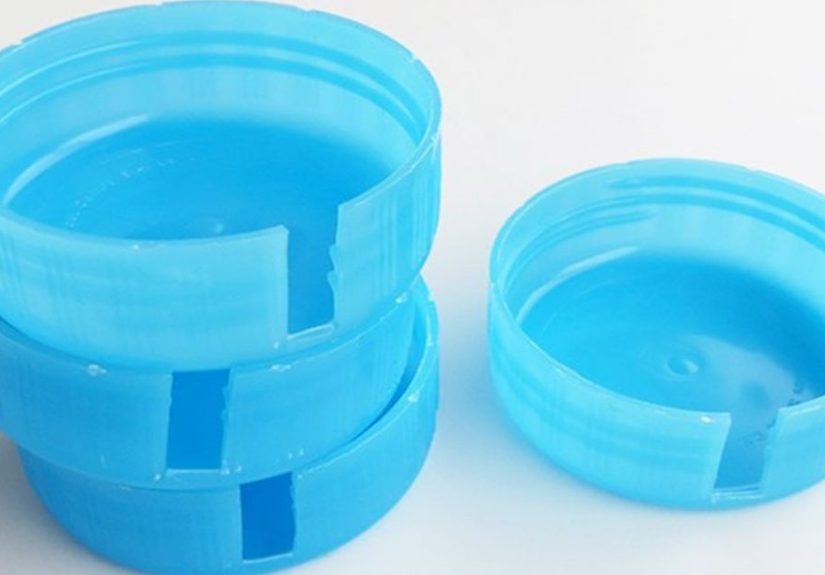
The Main Project: Upcycled Bottle-Cap Toothbrush Holder (Hometalk-Inspired)
This is the “wow, that’s clever” version: a neat row (or grid) of bottle caps mounted to a backer board. Each cap becomes a designated holder for one brush.
It’s colorful, customizable, and weirdly satisfyinglike parking your toothbrush in its assigned spot.
Materials
- 8–12 clean plastic bottle caps (or more, depending on your household)
- 1 backer board (scrap wood, a small cutting board, or a piece of sealed plywood), roughly 6″ x 14″ (size is flexible)
- Water-resistant adhesive (silicone, epoxy, or a strong construction adhesive rated for humid rooms)
- Sandpaper (medium and fine grit)
- Primer + paint (optional) and a clear sealant (recommended for wood)
- Drill + small bit (optional but helpful for drainage holes)
- Mounting method: screws/anchors, or water-resistant adhesive strips designed for bathrooms
- Rubbing alcohol + cloth (for cleaning surfaces before mounting)
Step-by-step instructions
- Pick your caps (and commit to a vibe).
Choose caps that are similar depth and diameter. If you want color-coding (kids, guests, “my brush, hands off”), now’s the time.
Wash them with dish soap and hot water, then let them dry completely. - Prep the backer board.
Sand the board to remove splinters and smooth edges. If you’re painting, apply primer, then paint.
Finish with a clear sealant so humidity doesn’t warp the board or turn it into a mildew magnet. - Plan your layout.
Arrange caps on the board before gluing. Leave enough space so toothbrush handles don’t bump each other.
A simple guideline: 1.5″–2″ between cap centers for slim brushes; more for chunky handles. - Add drainage (highly recommended).
Use a drill bit to make a small hole in the bottom edge of each cap (or near the lowest point when mounted).
This helps water escape instead of pooling inside the cap like a sad little pond. - Glue caps in place.
Apply adhesive to the cap edges (the part that touches the board), press firmly, and wipe away squeeze-out.
Let it cure fully per the adhesive instructions. Don’t rush thishumidity is undefeated against half-cured glue. - Test fit your toothbrushes.
Slide handles into caps. If a brush is too snug, rotate the cap slightly or swap it for a wider one.
The goal is “secure but not stuck.” - Mount the holder.
Clean the wall surface with rubbing alcohol and let it dry.
Mount with screws/anchors for maximum strength, or use bathroom-rated adhesive strips if you’re avoiding drilling tile.
Place it at a comfortable height and not directly next to the shower spray zone.
Pro upgrades (tiny changes, big payoff)
- Add name labels: vinyl letters, paint pen, or tiny tags under each cap.
- Add a drip ledge: attach a slim piece of plastic or sealed wood under the row to catch stray drips.
- Make it cabinet-friendly: mount it on the inside wall of a vanity cabinet for a cleaner countertop look.
- Include a “guest cap”: one extra slot that stays empty until visitors arrive.
Creative Variations That Also Work Really Well
Bottle caps are fun, but they’re not the only option. Here are DIY toothbrush holders that match different styles and skill levelswithout sacrificing hygiene and usability.
1) Mason Jar + Flower Frog Lid Holder (Farmhouse, Neat, and Surprisingly Practical)
This setup uses a Mason jar and a “flower frog” style lid insert to keep brush heads separated. It’s tidy, easy to rinse, and looks intentional
which is impressive considering it starts as “a jar.”
- Best for: countertops, shared bathrooms, guest bathrooms
- Key tip: choose a lid insert with openings wide enough for modern toothbrush handles
- Cleaning: rinse weekly; wash jar and insert with hot, soapy water regularly
2) Drilled Wood Block Holder (Minimalist and Durable)
If you like clean lines and hate clutter, drill angled holes into a sealed wood block. Set it on the counter or mount it on the wall.
Angled holes help brushes lean slightly so they don’t crowd each other.
- Cut a block (about 2″ x 2″ x 8″ works for 4–6 brushes).
- Mark holes 1.25″–1.75″ apart.
- Drill holes slightly larger than handle diameter at a slight angle.
- Seal the wood (this step is non-negotiable in a bathroom).
3) PVC Pipe “Cubbies” (Bright, Cheap, and Kid-Friendly)
Cut PVC pipe into short sections, sand the edges smooth, and glue them in a honeycomb cluster on a board.
Each pipe becomes a cubby for a brush (or toothpaste). It’s colorful, tough, and easy to wipe down.
- Best for: kids’ bathrooms, high-traffic households
- Safety note: sand edges thoroughly so nothing scratches hands or snags bristles
4) Drawer Organizer Insert (The “My Countertops Deserve Peace” Option)
If you’re committed to hiding clutter, create a drawer insert with upright slots. Use a slim tray and add dividers (sealed wood, acrylic, or plastic).
This is also a great option for electric toothbrush heads and flossers.
The trick: don’t trap moisture. Choose a design that allows airflow and let brushes dry before closing the drawer whenever possible.
5) Wall-Mounted “Brush Rail” Inside a Cabinet
Want the clean-counter look without losing convenient access? Mount your DIY holder inside a cabinet door or on the interior side wall of a vanity.
You get organization plus fewer visual distractionslike a secret toothbrush lounge.
Design Rules That Keep Your DIY Holder From Becoming a Science Experiment
1) Air-drying beats closed containers
Toothbrushes need airflow. Designs that hold brushes upright and open to air help them dry between uses. Avoid sealing damp brushes in closed cups or travel cases day-to-day.
2) Keep brush heads from touching
Separation matters in shared bathrooms. Your holder should keep bristles apartespecially if multiple people store brushes in the same spot.
3) Make it easy to clean (because you will… eventually)
Choose materials that can handle regular washing. Smooth plastic, sealed wood, stainless steel hardware, and washable inserts work well.
Raw wood and fabric elements look cute but can hold moisture and grime.
4) Placement: reduce splash and chaos
Put your holder where it won’t get constantly splashed by the faucet or shower spray. Bonus points if it’s not right next to where toothpaste regularly launches itself
into orbit.
Cleaning and Maintenance (The Boring Part That Makes Everything Better)
- Weekly: quick rinse or wipe-down of the holder surface; clear any standing water.
- Every 2–4 weeks: wash removable parts in hot, soapy water; wipe the wall area behind wall-mounted holders.
- Seasonally: inspect adhesives/mounts; re-seal wood if needed; declutter old or unused brushes.
A good rule of thumb: if you wouldn’t want to lick it, don’t let it silently collect grime next to the thing you put in your mouth twice a day.
Budget and Time
- Cost: often under $10–$25, depending on what you already have
- Build time: 30–90 minutes, plus adhesive/paint cure time
- Skill level: beginner-friendly (with optional “power tools for fun” upgrades)
Conclusion
A DIY toothbrush holder is a small project with a big daily payoff: less clutter, fewer “whose brush is this?” moments, and a bathroom setup that feels
intentionally organized. Whether you choose the bottle-cap wall mount (cheerful and clever), the Mason jar insert (farmhouse and tidy),
or a minimalist drilled wood block (sleek and calm), the best design is the one you’ll actually useand cleanwithout resentment.
Pick a style that matches your bathroom, build it with airflow and cleanability in mind, and give every toothbrush a proper home.
Your future selfrunning late, half-awake, and trying not to drop toothpaste on a shirtwill be genuinely grateful.
Real-World DIY Experiences (What People Learn After Living With a Toothbrush Holder)
The first week after you install a new DIY toothbrush holder is pure joy. Brushes line up like well-behaved little soldiers. The counter looks bigger.
You briefly consider becoming the kind of person who folds towels like a boutique hotel. Then real life shows up with wet hands, rushed mornings,
and someone (not naming names) who thinks “close the cap” is an optional lifestyle choice.
One of the biggest lessons DIYers run into is fit. Toothbrush handles are not standardized the way you hope they are.
That cute minimalist drilled block? Perfect for slim manual brushesuntil an electric toothbrush handle enters the chat like a bulky SUV in a compact parking lot.
The fix is simple: plan for the biggest brush in the household, and mix hole sizes or holder slots. In bottle-cap designs, you’ll quickly learn which caps
are “just right” and which turn into a tug-of-war every morning. If a brush sticks, people stop using the spot. And when people stop using the spot,
the counter becomes a toothbrush-themed clutter museum again.
The second real-life lesson is water. Bathrooms are humid, toothbrushes drip, and “it’ll dry” is not a maintenance plan.
Designs that don’t drain well can trap moisture at the bottom of a cap, a pipe cubby, or a too-deep jar insert. That’s why drainage holes and airflow matter.
A tiny hole in the bottom of a bottle cap can be the difference between “cute organizer” and “why does this smell like a forgotten rain boot?”
If your holder sits on the counter, a small tray underneath can save you from mysterious water rings.
Third: adhesive reality. Many people love the no-drill lifeuntil steam, tile texture, and cleaning sprays try to defeat the mounting method.
The best success stories share a pattern: clean the surface with rubbing alcohol, let it dry, use bathroom-rated mounting strips or proper anchors,
and wait the full cure time. The people who skip cure time often meet the holder again at 2 a.m. when it falls off the wall like a tiny home-improvement jump scare.
If you’re mounting on tile, it’s worth picking a method designed for humid bathrooms rather than hoping standard adhesive will behave.
Fourth: the “family factor.” In shared bathrooms, labels are not childishthey’re survival. Kids will grab the nearest brush.
Guests will choose the one that looks cleanest. The person with the fancy bamboo handle will swear everyone is using theirs (and they might be right).
Adding names, colors, or even simple icons can stop the daily confusion. Some households also love a “guest slot” that stays empty until visitors arrive,
which keeps guest brushes separate without needing an extra cup on the counter.
Finally: cleaning habits change when the holder is easy. People are more likely to wash a smooth plastic or sealed surface than a complicated,
decorative design with lots of crevices. The most “lived-in” success stories usually land on a simple routine: quick weekly wipe, deeper wash every few weeks,
and occasional decluttering of old brushes. When the holder looks good and functions well, it gets treated like a real part of the bathroomnot an ignored accessory.
And that’s the secret win: a toothbrush holder that helps your bathroom stay cleaner, not just look cuter in photos.