Table of Contents >> Show >> Hide
- Why an Adirondack Bench Works So Well Outdoors
- Project Overview: What You’re Building
- Materials: Pick the Right Wood (Your Future Self Will Thank You)
- Tools You’ll Use (No Fancy Shop Required)
- Design Notes: Comfort Geometry Without a Trig Degree
- Simple Cut Strategy (How to Avoid Chaos)
- Step-by-Step: Build the Adirondack Bench Frame
- Build the Seat and Back (Where Comfort Happens)
- The Star Feature: Cupholders That Don’t Feel Cheap
- Sanding and “Human Comfort” Details
- Finishing for Weather: Make It Last
- Customization Ideas (Make It Yours)
- Troubleshooting: Common DIY Bench Problems
- Safety Notes (Because Fingers Are Handy to Keep)
- Wrap-Up: Your Backyard Just Got an Upgrade
- Real-World Build Notes and Lessons Learned (About )
If your backyard seating currently screams “folding chair from the garage sale,” it’s time for an upgrade.
An Adirondack-style bench is basically the outdoor equivalent of sweatpants: relaxed, roomy, and somehow always the right choice.
And when you add cupholders? Congratulationsyou’ve officially built furniture that respects hydration and happy hour.
This guide walks you through a beginner-friendly DIY Adirondack bench with a reclined back, wide arms, and two legit cupholders.
It’s inspired by the classic “double-chair Adirondack bench” vibe you see in popular outdoor planstwo loungy seats with a shared middle zonewithout copying any single plan.
You’ll get a clear build approach, smart measurements, and the little details that separate “handmade” from “held together by hope.”
Why an Adirondack Bench Works So Well Outdoors
Adirondack furniture is designed for comfort first: lower seat, a gentle recline, and a wide stance that feels stable on grass, pavers, or a deck.
A bench version keeps that lounge feel but gives you “we’re hanging out” energy instead of “I brought my own chair” energy.
Plus, a two-seat bench encourages conversationwithout forcing anyone into an awkward loveseat cuddle.
The Cupholders Are Not a Gimmick
Cupholders are practical outdoors because they reduce spills on uneven surfaces, and they keep your drink from living dangerously on the arm edge.
Build them rightwith a drain hole and a clean rimand they’ll look like part of the design, not an afterthought.
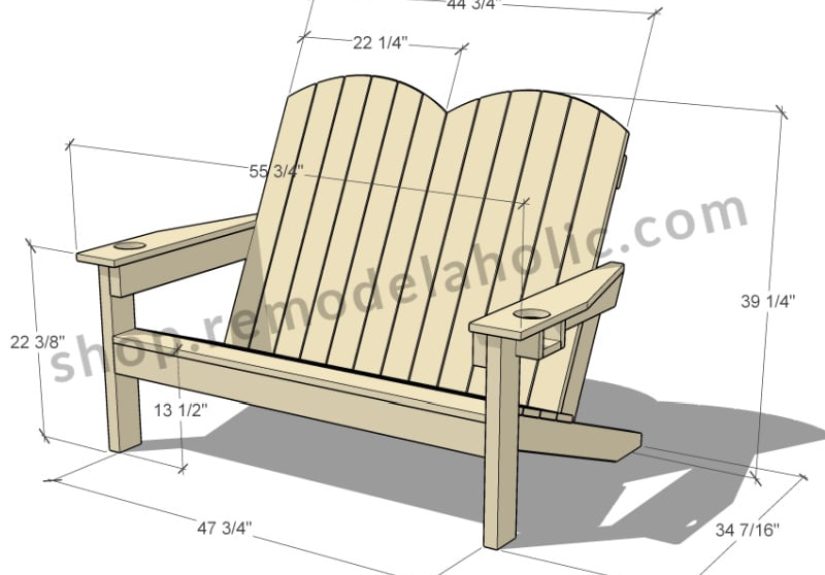
Project Overview: What You’re Building
This plan builds a two-person Adirondack bench with a relaxed back angle, slatted seat/back, and a center console that holds two cupholders.
Think: two Adirondack chairs that decided to share a table and commit to teamwork.
Suggested Finished Dimensions (Adjustable)
- Overall width: ~60″ (roomy for two adults)
- Overall depth: ~33–35″ (Adirondack-style lounge depth)
- Overall height: ~36–40″ (depends on back slat length)
- Seat height: ~12–16″ (low and loungy; adjust for easier get-up)
Most Adirondack builds feel best when the seat-to-back angle lands around the “ahhh” zone instead of the “upright dining chair” zone.
Many makers target roughly 100–105 degrees between the seat and back for comfort, rather than a strict 90-degree corner.
That’s one of the reasons Adirondack seating feels like vacation, even if you’re still answering emails.
Materials: Pick the Right Wood (Your Future Self Will Thank You)
Best Lumber Options
- Cedar: Lightweight, naturally rot-resistant, and outdoor-friendly. Great for benches you may move around.
- Redwood: Durable and stable outdoors, often pricier depending on your region.
- Exterior pine + paint: Budget-friendly, especially if you’re painting.
- Pressure-treated lumber: Strong and weather-tough, but heavier and not always the nicest to sand and finish for seating.
If you’re using cedar (a common favorite for outdoor builds), choose fasteners that won’t react with the wood or leave stains.
For outdoor furniture, stainless steel is a popular “no regrets” choice, especially where hands and clothing will touch the hardware.
Hardware & Supplies
- Exterior-grade screws (stainless or quality coated)
- Waterproof wood glue (optional but helpful in key joints)
- Wood filler rated for exterior use (if painting)
- Sandpaper: 80, 120, 180 grit
- Exterior finish: paint, exterior stain + sealer, or marine/spar topcoat
Tools You’ll Use (No Fancy Shop Required)
- Miter saw or circular saw (with a straightedge guide)
- Jigsaw (for gentle curves, if you choose curved arms/back)
- Drill/driver + bits, countersink bit
- Clamps (helpful, not mandatory, but they make you look like you know what you’re doing)
- Orbital sander (or sanding block + patience)
- Hole saw or Forstner bit for cupholders (3-1/2″ is a common sweet spot)
Design Notes: Comfort Geometry Without a Trig Degree
Adirondack seating feels good because the seat slopes slightly backward and the backrest reclines.
The goal is to support your hips and back without making you feel like you’re sliding into the next zip code.
Many comfortable designs use a low seat height and a reclined backoften the difference between “sit for a minute” and “accidentally watch the sunset.”
Slat Spacing and Outdoor Drainage
Outdoor furniture should breathe. Leave small gaps between slats so water drains and the wood can expand/contract.
A common slat gap is around 3/8″ to 7/16″, which looks clean and performs well outdoors.
Simple Cut Strategy (How to Avoid Chaos)
Pro tip from a lot of woodworking plans: cut everything first, then assemble.
You’ll be more consistent, you’ll measure fewer times while tired, and you’ll reduce the chance you build one side of the bench in “mirror universe.”
Suggested Lumber Breakdown (Flexible)
- 2x4s: Bench base frame, legs, seat supports, back supports
- 1x4s: Seat and back slats
- 1×6 (optional): Arms or console top for extra width
Instead of locking you into a single rigid cut list (which can vary by your lumber thickness and style choices),
use this build method: make two identical side assemblies, connect them with stretchers, add slats, then add the console with cupholders.
That approach is forgiving, repeatable, and beginner-friendly.
Step-by-Step: Build the Adirondack Bench Frame
Step 1: Build Two Matching Side Assemblies
Each side assembly acts like the “skeleton” of an Adirondack chair: a front leg, a back leg/support, and a seat stringer (the part that creates the seat slope).
Build one side, then use it as a template for the second side so they match perfectly.
If you want curves (arms or back supports), trace a gentle curve using a thin strip of wood or cardboard template, then cut with a jigsaw and sand smooth.
- Pre-drill and countersink to reduce splitting, especially near ends.
- Keep both side assemblies square at the base before you lock everything in with screws.
Step 2: Connect the Sides with Front/Back Stretchers
Once your two side assemblies stand on their own, connect them with stretchers: one near the front (under the seat front edge),
and one toward the back (supporting the rear of the seat and tying the frame together).
This is where the project starts to feel real, like furniture instead of modern art made from 2x4s.
Step 3: Add Center Supports
Add at least one center support under the seat slats so nothing sags over timeespecially if your bench will host real humans and not just decorative throw pillows.
If your bench is around 60″ wide, two center supports are even better (one under each seat zone).
Build the Seat and Back (Where Comfort Happens)
Step 4: Install Seat Slats
Cut seat slats to span from left side to right side (or install separate left/right sets if you prefer a split look).
Use spacers (a scrap of wood works) to keep gaps consistent.
Start at the front edge, then work back, keeping the slats aligned and the gaps even.
Step 5: Install Back Supports and Back Slats
Attach the back support rails so the back slats have something solid to land on.
Then install back slats from center outward (or one side to the other), keeping spacing consistent.
If you want the classic Adirondack “fan” look, make the center slat slightly wider and angle the outer slats.
If you want modern and clean, keep them parallelboth styles sit great.
The Star Feature: Cupholders That Don’t Feel Cheap
Option A: Cupholders in a Center Console (Recommended)
A center console gives you two cupholders and a little flat surface for snacks, sunglasses, or that one screw you set down and then immediately lost.
Build a small box/console between the two seats using 2x lumber framing and a 1x top.
How to Drill the Cupholders
- Diameter: 3-1/2″ holes fit many cans and tumblers; go 4″ if you live the “giant insulated cup” lifestyle.
- Depth: 1-1/4″ to 2″ feels secure without trapping the cup forever.
- Drain hole: Drill a small 1/4″–3/8″ hole in the bottom so rainwater doesn’t move in permanently.
- Edge comfort: Sand or route a small roundover so the rim feels finished.
Option B: Cupholders in the Arms
Wide arms are classic Adirondackand many DIYers love turning one arm into a drink station.
If you go this route, make sure the arm is wide enough to keep strength around the hole.
A clean way to do it is to laminate two boards for the arm thickness, then drill the cupholder after the glue cures.
Sanding and “Human Comfort” Details
The difference between “handmade bench” and “why does this feel like a cheese grater?” is edge treatment.
At minimum, break sharp edges with 120-grit sandpaper.
Better: add a small roundover on arms, front seat edge, and back slat tops.
Your elbows, legs, and unsuspecting guests will appreciate it.
Where to Spend Your Sanding Time
- Front edge of the seat slats (behind-the-knee comfort)
- Top edges of arms and console
- Cupholder rims
- Any curved pieces (sand smooth so they look intentional)
Finishing for Weather: Make It Last
Outdoor furniture fails in two main ways: water gets trapped, or the finish flakes and lets moisture in.
Your best defense is smart construction (gaps and drainage) plus an exterior finish that matches your tolerance for maintenance.
Finish Options
- Exterior paint: Most durable look, great for budget woods. Use exterior primer first.
- Exterior stain + sealer: Shows wood grain, easier touch-ups.
- Marine/spar topcoat: Beautiful, but can require refresh coats over time in full sun.
Finishing Tips That Actually Help
- Seal end grain well (it drinks moisture like it’s at brunch).
- Finish before final assembly if you want full coverage in tight corners.
- Use multiple thin coats rather than one thick “hope coat.”
Customization Ideas (Make It Yours)
- Make it taller: Raise the seat height a couple inches for easier standing.
- Add a footrest: A simple slatted footrest turns lounging into a sport.
- Widen the console: More snack space. Science supports this.
- Swap in cup inserts: Plastic or stainless inserts make cleanup easier and protect the wood rim.
- Add a bottle opener: Not required, but emotionally supportive.
Troubleshooting: Common DIY Bench Problems
“My Bench Wobbles”
Check for square during the stretcher stage. Add a lower stretcher or diagonal brace if needed.
Also confirm both side assemblies sit flatone twisted leg can turn your bench into a seesaw.
“My Slat Gaps Look Uneven”
Use spacers. Seriously. Even a paint stir stick is better than eyeballing.
If you already installed slats, you can often fix the look by loosening screws and re-spacing before tightening again.
“Cupholder Hole Splintered”
Tape the drilling area, drill halfway from the top, then flip and finish from the bottom.
A sharp hole saw/Forstner bit also makes a big difference.
Safety Notes (Because Fingers Are Handy to Keep)
- Wear eye and hearing protection when cutting and drilling.
- Clamp workpieces when drilling cupholdershole saws can grab and spin boards.
- Sand outdoors or use a mask, especially with pressure-treated or dusty lumber.
- Pre-drill near board ends to reduce splitting.
Wrap-Up: Your Backyard Just Got an Upgrade
A DIY Adirondack bench with cupholders is one of those projects that looks impressive, feels luxurious, and is surprisingly achievable.
Build it with solid joinery, outdoor-friendly fasteners, consistent slat spacing, and a finish that matches your climateand you’ll have a bench that invites long conversations,
short naps, and the occasional “Wait… you built this?!” compliment.
And remember: perfection is optional. Comfort is not. If it sits well, feels sturdy, and holds your drink without betrayal, you nailed it.
Real-World Build Notes and Lessons Learned (About )
Here’s the part nobody tells you until you’re already covered in sawdust: Adirondack benches are less about “hard woodworking” and more about “smart sequencing.”
Most DIYers who build a two-seat Adirondack bench say the hardest moments aren’t the cutsthey’re the little alignment decisions that pile up.
For example, the bench can look perfectly symmetrical from the front, but if the seat supports aren’t matched side-to-side, you’ll feel it when you sit.
One seat will feel like a gentle lounge, the other like it’s quietly encouraging you to scoot away.
The fix is simple: build the first side assembly, then use it as a physical template for the second. Don’t rely on measuring alone when your boards may have tiny variations.
Another common “experience moment” is discovering that slat spacing is emotional.
When the gaps are even, the bench looks professional.
When they’re slightly uneven, your eyes will find the problem every single time you walk outsidelike a tiny design gremlin.
The best practical trick is using a dedicated spacer (a scrap cut to the gap you want) and committing to it.
If you’re working in humid weather, it’s wise to keep gaps a touch generous, because boards expand.
People also notice the front seat edge quickly: if it’s sharp, it can dig behind the knees, especially with a low Adirondack-style seat.
A quick roundover (even by sanding) makes the bench feel instantly more “store-bought,” in the best way.
Cupholders are their own mini project. Many builders start by drilling the holes last, after assembly, because it feels safer to “place them exactly.”
But in practice, drilling cupholders can be easier before final installationespecially if the console top or arms can be laid flat and clamped securely.
A hole saw can grab and chatter if the piece shifts, so stability matters.
Another small detail that pays off: drill a drain hole.
It’s a 10-second step that prevents the cupholder from becoming a tiny birdbath, algae spa, or mosquito lounge.
If you want the cupholders to feel polished, consider adding inserts or sealing the inside of the hole thoroughly.
Raw end grain inside a cupholder will absorb moisture faster than the rest of your bench.
Finishing is where real life meets woodworking dreams. A bench sitting in direct sun will age differently than one on a covered porch.
Many DIYers find that paint is the most forgiving long-term if you want a consistent look.
Clear coats can be gorgeous, but they may need refresh coats over time, especially where sun and water hit hardestlike the top of arms and the console.
If you stain, plan on a maintenance schedule that matches your climate.
The good news: a well-built bench can handle finish touch-ups easily, especially if you avoid trapped water and use decent fasteners.
Finally, the most satisfying “experience” most people report is the first time they sit down and realize the bench feels solid.
No creaks. No flex. Just that steady, confident feeling that you made something meant to be usedby friends, family, and whoever shows up holding a drink and claiming their seat.
And if you catch yourself staring at it from the kitchen window like a proud parent? Completely normal. Encouraged, even.