Table of Contents >> Show >> Hide
- What “1970s EPROM Chaos” Actually Means
- Why You’re Still Meeting EPROMs in 2025
- Step 0: Triage Before You Touch Anything
- Identify the Chip Like a Detective, Not a Guess Artist
- Reading an EPROM Safely in 2025
- When the Data Looks Wrong: Bit Rot, Partial Erase, and False Alarms
- Erasing and Reprogramming: UV, Voltage, and Patience
- Modern Workarounds: Keep the Original, Run a Clone
- Documentation: The Secret Weapon Against Future Chaos
- Troubleshooting Cheat Sheet
- 2025 Field Notes: Experiences From the Front Lines of EPROM Work
- Conclusion: Turning EPROM Chaos Into a Repeatable Process
- SEO Tags
Somewhere in a drawer, in a lab, in a basement, or inside a piece of industrial equipment that refuses to retire, there’s a tiny ceramic chip
with a little quartz windowbasically a time capsule with legs. If you’ve met one lately, congratulations: you’ve just discovered that
the 1970s never really ended… they just got soldered onto a board and buried under decades of “temporary” fixes.
This is the modern reality of EPROM work: you’re trying to keep a system alive in 2025, but its brain was programmed when “cloud” was mostly a
weather forecast and storage came with a UV sunroof. And yes, it can feel chaoticbecause early EPROMs weren’t built for today’s expectations:
stable documentation, consistent pinouts, easy programmers, and firmware you can back up with a polite click.
Let’s turn that chaos into a repeatable, practical workflowone that helps you read, preserve, and (when appropriate) replace those vintage EPROMs
without accidentally erasing your only copy of history under a desk lamp.
What “1970s EPROM Chaos” Actually Means
EPROM stands for Erasable Programmable Read-Only Memory. In the 1970s, this was revolutionary: instead of waiting for a new mask ROM
every time firmware changed, you could program a chip in-house, test it, erase it, and do it again. That was the dream.
The chaos came free with the upgrade:
- Weird power requirements (especially early parts that wanted multiple rails).
- High programming voltages that modern gear doesn’t always support.
- Vendor-specific programming algorithms that make “close enough” a dangerous life philosophy.
- Documentation drift: notes in binders, labels in fading ink, and schematics that went to live on a farm upstate.
- Physical fragility: sockets oxidize, legs bend, labels fall off, and that window is basically an “erase me” sign for stray UV.
If you’re dealing with classics like the Intel 2708-era devices or early 2716-family parts, you’re dealing with technology that was groundbreaking
in its time and understandably opinionated about how it wants to be treated.
Why You’re Still Meeting EPROMs in 2025
If EPROMs are “obsolete,” nobody told the machines still running them. In 2025 you’ll see EPROMs in places like:
- Legacy industrial equipment: controllers, instrumentation, and specialized manufacturing gear.
- Medical and lab devices: older analyzers and diagnostic machines that were built to last (and then outlasted their vendors).
- Telecom and test equipment: systems designed for serviceability and field swaps.
- Retrocomputing and restoration: microcomputers, arcade boards, synths, and early embedded hardware.
- One-off prototypes: devices that became “production” because they worked once and no one wanted to touch them again.
Often the problem isn’t that the EPROM is evil. It’s that the only copy of the firmware is sitting on an aging chip, and you need that code
preserved before you do anything elserepair, migration, emulation, modernization, compliance, you name it.
Step 0: Triage Before You Touch Anything
EPROM projects go best when you treat them like evidence, not like loose change in your pocket.
Photograph everything
Take clear photos of the board, chip orientation, labels, jumpers, and any handwritten markings. The goal is to preserve context:
which chip came from which socket, and which way “up” was.
Cover the window (seriously)
If it’s a UV EPROM with a quartz window, cover it with opaque tape or a proper label once you’ve photographed it. Stray UV isn’t just sunlight
certain lighting can cause partial erasure over time, and bright light can cause weird temporary behavior. Window coverage is cheap insurance.
Assume the socket is guilty until proven innocent
Oxidized or tired sockets cause “ghost” failures that look like bad firmware. If you can, clean and reseat carefully, or consider replacing the socket
after you’ve backed up the ROM content.
Identify the Chip Like a Detective, Not a Guess Artist
Your success rate jumps the moment you stop saying “it’s probably a 27-something” and start identifying the exact part (and sometimes the exact vendor).
Start with the marking, then confirm the family
- 1702/1702A: very early EPROMs (tiny capacity, very unusual programming requirements).
- 2708/2704: early NMOS EPROMs that can require multiple supply rails in-system and high-voltage programming pulses.
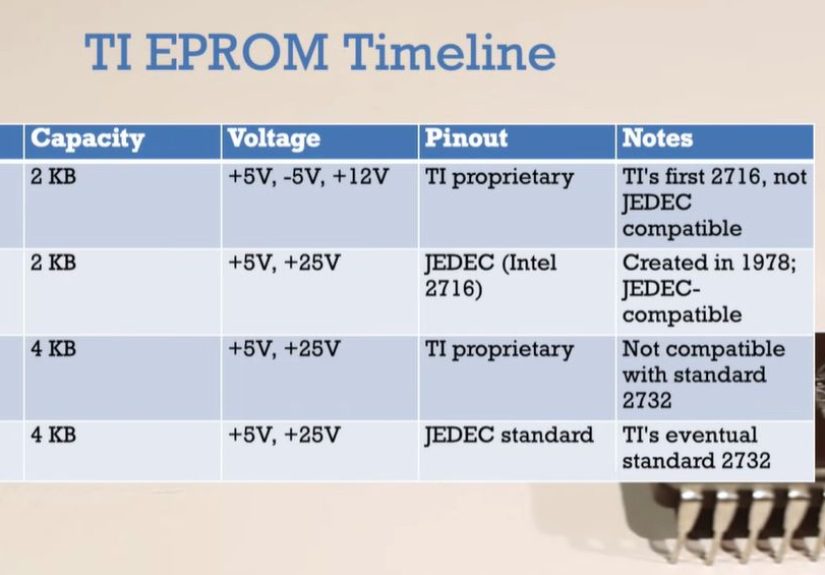
- 2716/2732/2764: later generations that are more “standard” but still vary by programming voltage and algorithm.
- 27Cxxx: usually CMOS versions (often nicer to power and generally better behaved).
Don’t ignore suffixes
A suffix letter can change programming voltage, speed grade, or algorithm. Some families have multiple VPP options across revisions
(for example, parts that want 25V vs. 21V vs. 12.5V programming). Reading is often forgiving. Programming is where mismatches bite.
Watch for pinout “gotchas”
Even when two chips look similar, a pin can change role across densities (address line vs. programming voltage pin, for example). If you plug the wrong
device type into a programmer profile, you can get a clean-looking dump that is actually garbageor worse, you can stress the chip.
Reading an EPROM Safely in 2025
Your first mission is always the same: make a verified backup. Everything else is optional until you have at least one trustworthy dump.
Use the right tools (and the right expectations)
Modern universal programmers are great for many later EPROM families, but truly early devices (and multi-rail weirdos) may require adapters, external
supplies, or specialty hardware. If the board uses something like a 2708-era EPROM, don’t assume your programmer can handle it out-of-the-box.
Make multiple reads and compare
Read the chip at least twice, save separate files, and compare them bit-for-bit. If they don’t match, you have a clue: unstable readout, socket/contact
problems, marginal chip behavior, or incorrect device selection in the programmer software.
Build an “evidence pack”
Along with the ROM dump, save:
- Board photos (top and bottom)
- Chip photos (including label and markings)
- Device type used in the programmer
- Date/time, operator notes, and any anomalies
- Checksums (CRC32/SHA-256) for your dump files
This sounds fussy until you’re six weeks later, staring at “ROM_FINAL2_FIXED_REAL.bin” and trying to remember whether you read U3 or U5.
When the Data Looks Wrong: Bit Rot, Partial Erase, and False Alarms
EPROM data can degrade over long timelines, especially if the chip has been exposed to UV or harsh environmental conditions. But don’t blame the silicon
too quicklymost “bad ROM” stories start with something simpler.
Common false alarms
- Wrong chip profile selected in the programmer (size/pinout mismatch).
- Marginal socket contact during reading.
- Adapter issues (especially for PLCC/ceramic packages).
- Board-level problems causing the system to misbehave, making you suspect firmware incorrectly.
If it really is marginal data
Try a “stability strategy”:
- Read multiple times and use a majority-vote approach on differing bits.
- Try a different reader/programmer (tool diversity catches tool assumptions).
- If there are multiple identical boards, dump the same-position ROM from another unit and compare.
- Check whether the system has multiple EPROMs with split firmware (low/high bytes, even/odd addressing, banked code).
In other words: treat recovery like digital forensics. You’re not “burning a chip.” You’re rescuing a tiny museum exhibit that also happens to run a machine.
Erasing and Reprogramming: UV, Voltage, and Patience
EPROM erasure is not a casual vibe. It’s physics. Specifically: UV light clears stored charge on a floating gate. That’s why the chip has a quartz window.
Use proper UV wavelength and dose
Traditional UV EPROMs are designed around shortwave UV (commonly referenced around 253.7 nm / 2537 Å). Erase time depends on intensity, distance,
and lamp aging. Dedicated EPROM erasers typically control exposure and help protect your eyes and skin from UV.
Don’t “sunlight it” unless you enjoy uncertainty
Sunlight can be inconsistent, slow, and can lead to partial erasure rather than a clean slate. Worse, bright light can cause confusing symptoms while
the chip is still installed and operating. If you must handle chips in bright environments, keep the window covered.
Programming is where compatibility matters most
Reading is relatively forgiving. Programming is not. Older parts may require very specific high-voltage pulses and timing. If you choose the wrong
algorithm or the wrong VPP, you can end up with:
- bits that won’t program (weak “0”s)
- bits that verify once and then “fade”
- overstress that reduces future reliability
In 2025, the winning move is often: don’t reprogram the original unless you have to. Preserve it, then work on a replacement.
Modern Workarounds: Keep the Original, Run a Clone
If your goal is system uptime and maintainability, the cleanest approach is usually:
dump the original EPROM → verify the dump → run a replacement → archive the original safely.
Replacement options in 2025
- New EPROM (same family): good for authenticity, but still needs UV erase and correct programming voltage.
- EEPROM/Flash-based drop-ins: some replacements are designed to mimic EPROM behavior while being electrically reprogrammable.
- EPROM emulators: hardware modules that behave like a ROM but load firmware from modern memory, great for development and troubleshooting.
A practical bonus: many later CMOS EPROMs (for example, 27C-family devices) have excellent retention specs compared to early generations, making them
better “keepers” once you’ve migrated the firmware.
Keep your legal/ethical footing
If you’re working on proprietary systems, treat firmware like the intellectual property it is. Backups for repair, preservation, and legitimate maintenance
are common needsbut distribution or misuse can create legal trouble. When in doubt, document your intent and keep access controlled.
Documentation: The Secret Weapon Against Future Chaos
The biggest difference between “EPROM chaos” and “EPROM competence” is documentation. In 1978, someone probably meant to write it down.
In 2025, you get to be the hero who actually does.
What to record every time
- Board name, revision, serial number
- Chip location (U-number), device type, manufacturer markings
- Dump filename conventions and checksums
- Any jumper settings, bank selections, or memory maps
- Test results after replacement (boot behavior, self-test, functional checks)
You’re not just saving today’s project. You’re saving future-you from doing archaeology with a multimeter at midnight.
Troubleshooting Cheat Sheet
Symptom: The dump changes every read
- Clean/replace the socket, reseat the chip, check adapter fit.
- Confirm correct device selection (size and pinout).
- Try a different programmer or slower read settings if available.
Symptom: The system boots with the old EPROM but not the “programmed” replacement
- Wrong programming algorithm or VPP used for the target device.
- Pinout mismatch across densities/families.
- Timing/speed grade mismatch (rare, but possible in tight systems).
Symptom: Erase “worked” but verification fails after programming
- Incomplete erase (common!). Increase erase time, check lamp aging/distance.
- Bad chip (worn-out or damaged cells).
- Incorrect programmer profile or marginal VPP.
2025 Field Notes: Experiences From the Front Lines of EPROM Work
The most consistent “experience” people report with old EPROMs in 2025 is this: the problem you think you have is rarely the problem you actually have.
EPROM chaos is less about the chip and more about the ecosystemsockets, supplies, documentation, and assumptions.
One common scenario: a legacy controller fails intermittently, and the organization assumes the firmware is corrupted because “it’s old.” The first dump
looks suspicious because it doesn’t match an online file someone found in a forum thread. Then you re-read the chip and the file changes. Panic sets in.
In reality, the culprit is often mechanical: oxidized socket contacts, a slightly loose adapter, or a programmer clip that isn’t making solid contact on
every pin. The fix is boring (clean, reseat, re-read) and that’s exactly why it gets skipped.
Another classic: the chip label is missing, but the footprint suggests a familiar family. Someone selects a “close enough” device profile, gets a clean read,
and celebratesuntil the replacement doesn’t boot. What happened? The dump might be misaligned because the device size was wrong, or the “similar” part
has a pin that behaves differently across densities. The result is a perfectly consistent, perfectly wrong file. In 2025, this is where process beats heroics:
confirm device markings, confirm capacity, confirm pinout assumptions, then dump.
People also learn quickly that UV windows are not decorative. A surprisingly painful lesson shows up in repair notes: chips left uncovered on a bench near
bright light “mysteriously” start failing verification later. Sometimes it’s partial erasure; sometimes it’s temporary photo-effects that go away once the
chip is back in normal lighting. Either way, the lesson is the same: once you’ve identified a windowed EPROM, cover it like it’s vampire-proofing.
On the more positive side, there’s a real sense of satisfaction in doing this work well. When you create a proper evidence packphotos, verified dumps,
checksums, notesand then build a modern replacement strategy, you transform a fragile single point of failure into a maintainable system. That can mean
an old instrument gets another decade of service, or a manufacturing line avoids a costly redesign, or a restoration project preserves a slice of computing
history that would otherwise blink out quietly.
The best “pro move” people share is surprisingly simple: treat each EPROM like it’s the only surviving manuscript. Because sometimes it is.
Once you work that waymethodical reads, verification, controlled light exposure, careful labelingthe chaos doesn’t vanish, but it becomes manageable.
And in 2025, “manageable” is basically the highest compliment you can give a 1970s technology still doing real work.
Conclusion: Turning EPROM Chaos Into a Repeatable Process
Dealing with 1970s EPROM chaos in 2025 isn’t about nostalgiait’s about reliability. Your job is to preserve the firmware, understand the electrical and
procedural quirks of early EPROM families, and choose a maintenance strategy that reduces risk going forward.
The winning workflow is consistent: identify precisely, protect the window, dump and verify, document everything, then run a clone while you archive the
original. Do that, and the “chaos” turns into something much better: a system you can actually support.


