Table of Contents >> Show >> Hide
- The quick answer (and the “do this first” checklist)
- Why potting soil gets “tired” (and sometimes a little sketchy)
- When you should NOT reuse potting soil
- Do this first: clean the soil like you’re resetting a tiny apartment
- Refresh or pasteurize: choose the right fix
- How to pasteurize potting soil safely (3 practical methods)
- Rebuild the mix: make old potting soil behave like new
- Where reused potting soil works best (and where it doesn’t)
- How to store reused potting soil so it stays usable
- Quick troubleshooting: when reused soil makes plants sulk
- Conclusion: reuse potting soil the smart way
- Experiences that make you a believer (and a better potting-soil reuser)
You know that moment after repotting when you’re standing over a sad pile of “old” potting mix like it just told you
it’s moving out? The good news: potting soil isn’t a one-and-done product. In most cases, you can reuse itand
you’ll save money, cut waste, and keep perfectly decent organic matter out of the trash.
The catch is right there in the title: you can reuse potting soil as long as you do a little prep first.
Think of it like leftovers. Yesterday’s pasta can be delicious… unless you leave it uncovered in the fridge for a week
next to an onion. Potting mix works the same way: if it’s healthy and you refresh it properly, it can grow great plants
again. If it’s harboring pests, disease, or salt buildup, it needs a reset (or a respectful retirement).
The quick answer (and the “do this first” checklist)
Yes, you can reuse potting soil, especially if the plants that grew in it were healthy. But before you plant anything
new, do these five things:
- Remove roots and debris (old stems, leaves, clumps, and mystery chunks).
- Break it up and check it (smell, texture, pests, mold).
- Decide: refresh or pasteurize (healthy soil gets refreshed; suspicious soil gets heat-treated).
- Rebuild structure (add aeration like perlite/pumice/bark; add organic matter like compost).
- Recharge nutrients (slow-release fertilizer or a balanced feeding plan).
Why potting soil gets “tired” (and sometimes a little sketchy)
Potting soil (more accurately, potting mix) isn’t really “dirt.” It’s a blend designed to be lightweight, hold
moisture, drain well, and give roots oxygen. Over a season (or a few), that blend changes.
1) Nutrients get used up (and washed out)
Fresh potting mix often contains starter fertilizer. Plants gladly eat it. Watering also flushes nutrients out the bottom
of the pot. Even if your mix still looks dark and fluffy, it’s usually running low on nitrogen, phosphorus, potassium,
and micronutrients. Translation: your next plant may move in and immediately ask, “So… where’s the pantry?”
2) Structure collapses and compaction steals oxygen
The bark, peat/coco coir, and other organic components break down over time. Air pockets shrink. The mix can compact,
hold too much water, and reduce oxygen around rootsan easy recipe for stressed plants and increased risk of root issues.
3) Salt buildup can sneak in
If you fertilize regularly (especially with synthetic fertilizers) and don’t flush containers occasionally, salts can
accumulate. This can show up as a crusty white layer on the soil surface or pot rim, and it can make plants look
under-watered even when they aren’t.
4) Pests and diseases may linger
Fungus gnats, root rot organisms, and other soil-borne problems can hang around. If the previous plant struggled with
disease, reusing the mix without treating it is like reusing a sponge you found in a gym locker room. Could it still
clean a dish? Technically. Should it? Absolutely not.
When you should NOT reuse potting soil
Reusing potting soil is smart. Reusing bad potting soil is like putting spoiled milk back in the fridge and
hoping it learns manners overnight. Skip reuse (or at least avoid reusing it for containers) if any of the following
are true:
- The previous plant was diseased (wilt, severe root rot, unexplained collapse, fungal problems, etc.).
- You had a pest party (heavy fungus gnat infestation, grubs, or persistent insects).
- The soil smells sour, musty, or swampy even after drying out.
- You see moldy growth throughout the mix (not just a little surface fuzz).
- The mix is heavily compacted and turns into brick-like clods that won’t loosen.
- You suspect chemical contamination (for example, herbicide drift or unknown “weed killer” exposure).
If you’re on the fence, you have options: you can pasteurize the mix (heat treatment), or you can downcycle it into
lower-risk uses like filling low spots in the yard, mixing lightly into garden beds, or using it as a bottom layer in
large decorative containers (with fresh mix in the root zone on top).
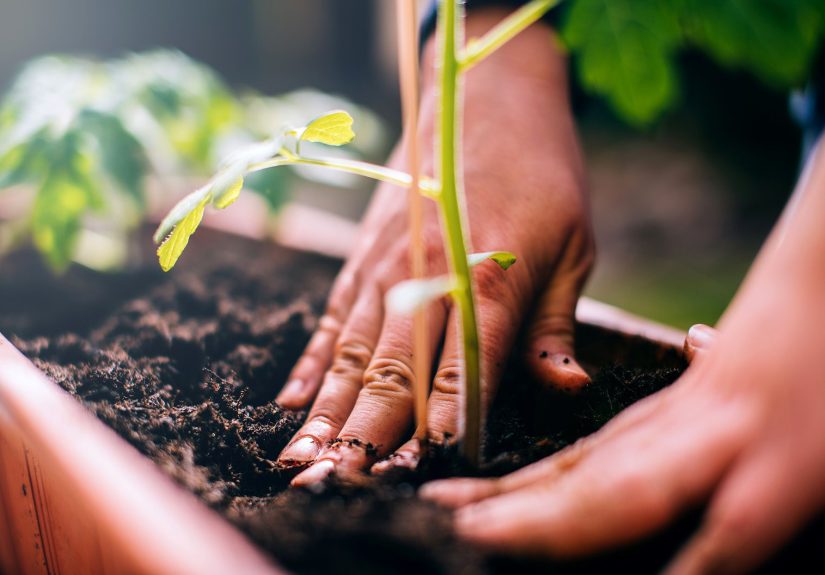
Do this first: clean the soil like you’re resetting a tiny apartment
Before you refresh or treat anything, start with a clean base. This is the step that makes reused potting soil work.
Skip it, and you’ll be planting into a tangle of old roots that acts like a sponge, a barrier, and a pest hotel all at
the same time.
Step 1: Remove roots, stems, and old mulch
Dump the potting mix into a tote, wheelbarrow, or on a tarp. Pull out thick roots and any remaining stems. Break up
root balls. If you see slow-release fertilizer prills from last season, that’s finethey’re not harmfulbut don’t assume
they still have much nutrition left.
Step 2: Break up clumps and check texture
Healthy reused potting soil should be crumbly, not sticky. If it’s hydrophobic (water beads up and runs off), it may
need rehydration and more organic matter. If it’s dense and heavy, it needs aeration material (more on that below).
Step 3: Do the “look and sniff” test
It sounds silly until it saves your plants. Soil should smell earthy. A sour or rotten odor suggests the mix stayed
too wet too long and may have a microbial imbalance. Also scan for fungus gnat larvae (tiny translucent worms), grubs,
or webby mold.
Refresh or pasteurize: choose the right fix
Refresh (no heat) if the soil seems healthy
If last season’s plants were healthy and you don’t see pests or mold, you can usually skip heat treatment and simply
rebuild the mix. This preserves more beneficial microbes and saves you time.
Pasteurize (heat-treat) if you suspect pests, weed seeds, or disease
If you had fungus gnats, questionable mold, or a plant that declined for unclear reasons, pasteurization is the safer
route. It reduces pathogens, insects, larvae, and many weed seeds. Note: pasteurization is different from “sterilizing
everything into a lifeless moon base.” The goal is to knock back problems without cooking the mix into toxicity.
How to pasteurize potting soil safely (3 practical methods)
Heat works because many plant pests and disease organisms can’t survive sustained high temperatures. The key is
controlled heat and moisture. Dry soil doesn’t heat evenly, and overheated soil can create plant-unfriendly compounds.
Method 1: Solarization (best for larger batches, least stink)
Solarization uses sun heat trapped under plastic. It’s slower, but it’s practical and doesn’t make your kitchen smell
like “earthy casserole.”
- Moisten the used potting mix so it’s damp (like a wrung-out sponge).
- Put it in black plastic bags or lidded buckets (bags heat faster; buckets are tidier).
- Seal and place in full sun during the hottest part of the year.
- Let it bake for several weeks. Mix or rotate bags occasionally for more even heat.
- After treatment, let it cool and air out before storing or planting.
Solarization is also used on garden soil with clear plastic stretched tightly over the surface. For potting mix, the bag
method is often simpler for home gardeners.
Method 2: Oven pasteurization (fast, effective, but… ventilate)
This is the “I need this done today” approach. It works well for small batches, but it can smell strong. Use good
ventilation and avoid overheating.
- Preheat the oven to a low setting.
- Place damp potting mix (not dripping) into an oven-safe pan no deeper than about 4 inches.
- Cover tightly with foil to hold moisture and heat evenly.
- Use a thermometer to check the center of the soil. Aim to keep the soil at pasteurization temperature for about 30 minutes.
- Let it cool fully before opening the foil (this also helps prevent re-contamination).
Tip: “Low and steady” is the win here. Overheating can be counterproductive, so keep temperatures controlled and don’t
crank the oven in a moment of emotional gardening.
Method 3: Microwave pasteurization (smallest batches, surprisingly handy)
If you’re reusing a modest amount of mix for a few houseplants, the microwave can help. This method is best for small,
damp batches in microwave-safe containers.
- Remove plant debris and moisten the soil.
- Place about 2 pounds of damp potting mix in a microwave-safe container (or bag made for microwave use).
- Vent it slightly so steam can escape (don’t seal it tight).
- Microwave on full power for a short cycle until the soil is steaming hot.
- Let it cool completely before using.
If you’ve ever wanted to explain to someone why your microwave smells like a forest floor, congratulationsthis is your
moment.
Rebuild the mix: make old potting soil behave like new
Once the soil is cleaned (and treated if needed), the real magic is rebuilding what time stole: air space and nutrients.
Reused potting soil fails when gardeners treat it like it’s identical to a fresh bag. It’s not. It’s a foundation that
needs renovation.
1) Restore aeration and drainage
Most used potting mixes need more “fluff.” Choose one or two amendments based on what you’re growing:
- Perlite: boosts drainage and air; great for most container plants.
- Pumice: similar benefits, heavier (helps prevent top-heavy pots from tipping).
- Orchid bark/pine bark fines: adds structure and long-lasting pore space.
- Coco coir: improves moisture handling and helps revive dried-out, hydrophobic mixes.
- Vermiculite: increases moisture retention (especially helpful for thirsty plants), but don’t overdo it for plants that hate wet feet.
A common approach is blending reused mix with a portion of fresh mix and adding extra aeration material. For example:
2 parts reused mix + 1 part fresh mix + a generous handful of perlite for each medium container.
2) Add organic matter (but keep it balanced)
Compost can help replace lost nutrients and improve texture, but too much compost can make a container mix dense.
For many container plants, replacing about one-quarter to one-third of the total volume with compost
(or a compost-based fresh potting mix) is a reasonable ceiling. If you’re growing drought-tolerant plants or anything
prone to root rot, aim lower and lean harder on aeration.
3) Recharge nutrients (the part plants actually care about)
Potting soil that looks fine can still be nutritionally emptylike a pretty fridge full of ketchup packets.
Recharging options:
- Slow-release fertilizer (simple and steady, great for annuals and many houseplants).
- Worm castings (gentle nutrition and microbial support; best as a supplement, not the whole plan).
- Balanced liquid fertilizer during the season (especially for heavy feeders like tomatoes, peppers, and petunias).
Specific example: If you’re planting patio tomatoes, don’t rely on reused mix alone. Use refreshed mix plus a
slow-release fertilizer at planting, then feed regularly once flowering starts. Tomatoes are enthusiastic eaters and
will absolutely leave your potting soil emotionally depleted.
4) Flush if you suspect salt buildup
If you see white crusting or your plants struggled despite consistent watering, flush the reused mix before replanting:
run water through it thoroughly (ideally in a pot with drainage) to leach salts out. Then let it drain and dry to a
workable moisture level before mixing amendments.
Where reused potting soil works best (and where it doesn’t)
Great uses for refreshed potting soil
- Annual flowers (especially when mixed with fresh potting mix and slow-release fertilizer).
- Herbs like basil, parsley, mint, and chives (they appreciate consistent nutrition and drainage).
- Hardy houseplants (pothos, spider plants, snake plants) when structure is rebuilt for drainage.
- Large containers as a bottom layer (top 6–10 inches should be your best, freshest mix for roots).
Use caution (or go fresh) for these situations
- Seed starting: seedlings are fragile; use fresh, sterile seed-starting mix for best results.
- Plants prone to root rot (succulents, some cacti): they need sharp drainage; reused mix must be heavily amended.
- Repeated crops in the same family: if last season’s tomato pot struggled, don’t reuse that mix for tomatoes again.
How to store reused potting soil so it stays usable
Reused potting mix can re-contaminate if it sits open to rain, insects, and airborne spores. Store it like you store
anything you want to keep clean:
- Use lidded bins, buckets with tight tops, or sealed bags.
- Label what’s inside (“refreshed,” “pasteurized,” and the date).
- Keep it in a dry place out of constant rain.
- If it’s bone dry later, rehydrate slowly before plantingdry peat/coir-based mixes can resist water at first.
Quick troubleshooting: when reused soil makes plants sulk
If water runs off the top and never soaks in
Your mix is hydrophobic. Fix it by slowly rehydrating (mist, mix, and repeat), then incorporate coco coir or fresh mix.
Bottom watering can also help re-wet stubborn dry media.
If fungus gnats show up again
Gnats thrive in consistently moist soil and decaying organic matter. Let the top inch dry between waterings, use yellow
sticky traps for adults, and consider pasteurizing future reused batches. Improving drainage (more perlite/pumice) also
helps.
If plants stay yellow even after fertilizing
Check drainage and root health first. Compacted mixes can keep roots stressed. Re-pot into a better-aerated refreshed
blend, and make sure the pot has drainage holes. Nutrients can’t fix roots that can’t breathe.
Conclusion: reuse potting soil the smart way
Reusing potting soil isn’t just allowedit’s often the most practical, sustainable choice. The secret is treating reused
mix like a base ingredient, not a finished product. Clean it, assess it, treat it if needed, rebuild structure,
and recharge nutrients. Do that, and your “old” potting soil becomes “experienced,” which sounds better and
honestly performs better, too.
Experiences that make you a believer (and a better potting-soil reuser)
Most gardeners don’t decide to reuse potting soil because they read a label and had a sudden spiritual awakening about
sustainability. It usually happens after a repotting session that leaves you with a mountain of used mix and the
uncomfortable realization that potting soil is not cheapand your trash can is not a potting soil museum.
A common first experience goes like this: you dump out a container that had a perfectly healthy plant, the soil looks
fine, and you think, “This seems… totally usable.” So you reuse it immediately, no cleanup, no refresh, no fertilizer,
just vibes. The next plant grows okay for a few weeks, then starts looking tired. Leaves pale. Growth slows. You water
more. It looks worse. You water less. Now it’s dramatic and droopy. Eventually, you realize the soil didn’t betray you;
you just asked it to perform a second season without feeding it or restoring the structure it lost. That’s not reuse.
That’s assigning a group project and then disappearing.
The second experience is where the lesson clicks: you try again, but this time you remove the old roots and rebuild the
mix. You add perlite because you’ve learned the hard truth that roots prefer oxygen to soggy mystery. You mix in a bit
of compost or fresh potting soil because plants are not powered by hope. You toss in a slow-release fertilizer so you
don’t have to remember to fertilize every five minutes like an over-caffeinated plant parent. And suddenly the reused
soil works. Not “barely survives” works. Actually thrives. You get flowers. You get new leaves. Your plant looks like it
has a tiny life coach whispering affirmations into its stomata.
Then there’s the “pest chapter,” which most people enter unwillingly. Maybe fungus gnats showed up one season and
treated your living room like a nightclub. You repot, you clean, and you swear you’ll never reuse soil again because you
can’t emotionally handle another tiny flying insect near your face at night. But later, you learn that reuse isn’t the
problemuntreated reuse is. When gardeners heat-treat suspicious soil (solarization in bags outside, or a small
oven batch with careful temperature control), the difference can be dramatic. The soil comes back cleaner, and future
pots don’t become gnat daycare centers. The experience isn’t glamorous, but it’s empowering: you’re no longer at the
mercy of whatever hitchhiked in last season.
Another classic experience is discovering that reused soil behaves differently with water. Fresh mixes often wet evenly.
Old mixes can turn hydrophobic if they dry out hard, especially peat- or coir-based blends. Gardeners learn to re-wet
slowlymixing, misting, and giving the soil time to absorb water instead of letting it repel everything like a raincoat.
Once you’ve watched water bounce off a pot like it’s auditioning for a trampoline team, you start appreciating the value
of rehydration and adding a bit of fresh organic component to restore moisture balance.
And finally, there’s the proudest experience: building a simple “soil reuse system” that makes gardening easier every
season. Gardeners keep a bin labeled “used mix,” another labeled “refreshed,” and maybe a smaller container for
pasteurized soil meant for houseplants. They learn which plants tolerate reused soil beautifully (many annuals and hardy
houseplants) and which deserve fresh mix (seedlings and finicky plants prone to root rot). They stop throwing away
usable materials and start treating potting mix like a resource that can be maintainedlike a cast-iron skillet, but
with more perlite and fewer pancakes.
The best part is that reusing potting soil becomes less of a chore and more of a small, satisfying ritual. It’s the
feeling of turning “waste” into “ready.” It’s saving money without sacrificing plant health. And it’s the quiet joy of
knowing your next pot is filled with a mix you intentionally improvedbecause you’re not just gardening anymore. You’re
running a tiny, well-managed ecosystem. With better drainage.


