Table of Contents >> Show >> Hide
- Can You Add a Lamp Shade to Any Ceiling Fan?
- Know Your Ceiling Fan Light Setup Before You Shop
- How to Measure the Right Ceiling Fan Shade
- Best Lamp Shade Styles for Ceiling Fans
- Tools and Materials You May Need
- How to Add a Lamp Shade to a Ceiling Fan
- When You Need a Full Ceiling Fan Light Kit Instead of Just a Shade
- Common Mistakes to Avoid
- Design Tips for a Better Ceiling Fan Upgrade
- Is This a DIY Job or a Call-the-Electrician Job?
- Final Thoughts
- Real-World Experiences With Adding a Lamp Shade to a Ceiling Fan
If your ceiling fan light looks a little too builder-grade, too bright, too blah, or too “this came with the apartment and nobody asked me,” adding a lamp shade can be a smart upgrade. A new ceiling fan shade can soften harsh light, change the style of the room, hide exposed bulbs, and make the whole fixture look more intentional. In some cases, it is a ten-minute refresh. In others, it turns into a tiny detective story involving fitter sizes, bulb clearance, and a fan that refuses to cooperate like a stubborn uncle at Thanksgiving.
The good news: adding a lamp shade to a ceiling fan is often possible. The not-so-good news: you cannot just grab any pretty shade and expect it to fit. Ceiling fan light kits are picky. Some accept replacement glass shades. Some need a matching bowl, globe, or diffuser. Some fans without lights can take a universal light kit. And some integrated LED fans are basically saying, “Nice try, but absolutely not.”
This guide breaks down how to add a lamp shade to a ceiling fan the right way, how to measure for a proper fit, what style options actually work, and when you need a full light kit instead of just a replacement shade. By the end, you will know whether your fan needs a quick glow-up or a more serious hardware upgrade.
Can You Add a Lamp Shade to Any Ceiling Fan?
Not to every ceiling fan, but to many of them, yes. The answer depends on the type of light setup your fan already has. That is the first thing to inspect before you shop.
Fans that usually can take a new shade
- Ceiling fans with exposed bulbs and small side shades
- Fans with a bowl light or globe attached under the motor housing
- Fans with a removable light kit designed for replacement parts
- Fans without lights that are labeled as light-kit compatible
Fans that are trickier
- Integrated LED ceiling fans with custom diffusers
- Fans with a no-light cap and no accessory-light compatibility
- Older fans with discontinued hardware or unusual mounting systems
That is why the phrase add lamp shade to ceiling fan can mean two totally different projects. One is simply replacing an existing glass shade. The other is adding an entirely new ceiling fan light kit and then finishing it with a shade or globe. Same decorating dream, different level of commitment.
Know Your Ceiling Fan Light Setup Before You Shop
Before you buy anything, climb up safely and look at the bottom of the fan. You are trying to identify which of these setups you have.
1. Multi-light fan with individual shades
This style has two, three, or four small bulbs, each usually covered by a bell-shaped glass shade. These shades often attach with set screws or a socket ring. This is one of the easiest situations for a replacement because you can usually shop by fitter size and shade shape.
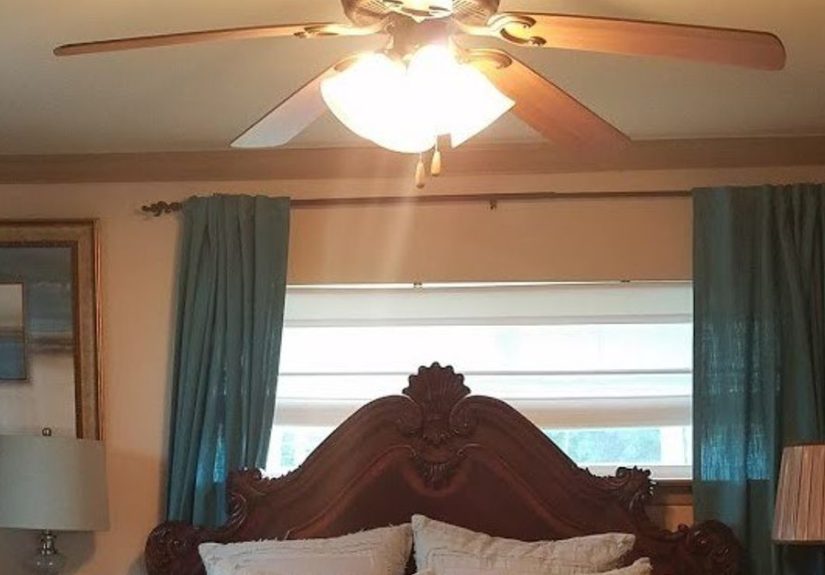
2. Bowl or globe light kit
This style uses one larger glass bowl, schoolhouse shade, or globe attached below the fan. It may be held in place by a finial, center cap, or a fitter with screws. Here, you need the correct opening diameter, overall width, and enough depth for the bulb or LED module inside.
3. Integrated LED with diffuser
This is where homeowners get their hopes up and the fan says, “Please consult the manual.” Integrated LED fans often use a custom diffuser rather than a universal shade. If the diffuser is cracked or ugly, you usually need the exact replacement part or a manufacturer-approved component.
4. No-light ceiling fan
If your fan has no light at all, you may still be able to add one. Some models accept a universal ceiling fan light kit or a brand-specific accessory light. In that case, the lamp shade comes after the light kit, not before it.
How to Measure the Right Ceiling Fan Shade
This is the part where tape measures become heroes. If you skip measuring, you may end up with a gorgeous shade that fits your hand better than your fan.
Measure the fitter opening
The fitter is the opening where the shade meets the fixture. For many small ceiling fan glass shades, a 2.25-inch fitter is common. Larger globes and bowls may use wider openings, and some replacement shades come in 3.25-inch or 4-inch fitter sizes. Measure the existing opening carefully, ideally in inches, and write it down before shopping.
Measure overall height and width
A shade can have the right fitter and still fail spectacularly if it is too tall, too wide, or too shallow. Check the full height and diameter of your existing shade, especially if your fan has pull chains, multiple bulbs, or low-hanging hardware.
Check bulb clearance
Your bulb should not press against the glass, crowd the diffuser, or trap too much heat. If the light is enclosed, make sure the bulb is rated for enclosed fixtures. This matters a lot with LED bulbs because heat buildup can shorten performance and lifespan.
Inspect how the old shade attaches
Does it use three fitter screws? A threaded socket ring? A center finial? A twist-lock bowl? A new shade has to match not only the size, but the attachment style too. This is where many “universal” purchases become very non-universal.
Best Lamp Shade Styles for Ceiling Fans
Once you know the measurements, the fun part begins. A ceiling fan light shade is not just a cover. It changes how the light feels in the room and how the fan reads visually.
Bell shades
Classic, simple, and easy to find. Bell shades work well on traditional and transitional fans. Frosted or opal bell shades soften glare nicely in bedrooms and living rooms.
Schoolhouse shades
These bring a vintage or cottage feel. They are great for older homes, farmhouse spaces, or anyone who wants their ceiling fan to stop looking like it came free with a rental agreement.
Seeded or clear glass shades
These feel lighter and more modern. Clear glass shows the bulb more, which can look stylish, but it also means you need a good-looking bulb. If your current bulb resembles a tiny industrial accident, frosted glass may be kinder.
Frosted bowl or globe shades
These diffuse light evenly and hide the bulb. They are practical, clean-looking, and popular in bedrooms, family rooms, and low-key spaces where you want less glare and more glow.
Drum-style shades
Some newer fans and light kits use a drum light design. These can look polished and contemporary, but they are usually part of a specific fixture system rather than a random add-on.
Tools and Materials You May Need
- Step stool or sturdy ladder
- Measuring tape
- Screwdriver
- Replacement ceiling fan glass shade, globe, or bowl
- Compatible light kit, if needed
- Correct bulbs
- Soft cloth or gloves for handling glass
If you are replacing the entire ceiling fan light kit, you may also need wire connectors and the installation instructions for your fan model. And yes, this is the moment when the manual goes from “paper clutter” to “beloved literature.”
How to Add a Lamp Shade to a Ceiling Fan
Step 1: Turn off power at the breaker
Do not rely only on the wall switch. Turn off power at the breaker before removing shades, bulbs, or the light kit. Electricity has no sense of humor.
Step 2: Remove the old shade or light cover
Take out the bulbs first. Then remove the old globe, bowl, or individual shades. If the glass is held by screws, loosen them gently. If it uses a center finial or retaining ring, support the shade with one hand while unscrewing with the other.
Step 3: Clean the fixture while it is open
This is optional, but also not optional if you have ever looked inside an old ceiling fan globe. Dust, grime, and the occasional dead bug have probably established legal residency. Wipe down the housing before installing the new shade.
Step 4: Test the new shade fit
Dry-fit the new shade before tightening everything. Make sure the fitter sits evenly, the bulb has room, and the pull chain does not rub the glass. If the shade uses set screws, tighten them evenly and gently. Glass does not respond well to brute confidence.
Step 5: Install the bulb
Use the bulb type and wattage recommended for the kit or fixture. If the shade fully encloses the bulb, choose an LED rated for enclosed fixtures. This small detail can save you from flickering, excess heat, and early bulb failure.
Step 6: Restore power and test the fan and light
Turn the breaker back on and test both functions. Look for wobble, rattling, buzzing, or a shade that shifts when the fan runs. A properly installed shade should stay secure and quiet.
When You Need a Full Ceiling Fan Light Kit Instead of Just a Shade
Sometimes the fan has no light assembly at all, or the existing setup is not designed for a separate replacement shade. In that case, adding a lamp shade means adding a ceiling fan light kit first.
A universal light kit can be a good option if your fan is labeled compatible with accessory lights. Some universal kits are designed to fit most ceiling fans, while others are only for fans that specifically accept an accessory light. Brand-specific kits are often the safest bet if you want fewer surprises and less muttering on a ladder.
If your fan has an integrated LED module, a random shade from the lighting aisle is rarely the answer. You will usually need the correct diffuser or a manufacturer-approved replacement part. Translation: this is not the time for creative optimism.
Common Mistakes to Avoid
Buying by looks only
A beautiful shade with the wrong fitter size is home decor heartbreak. Measure first, admire later.
Ignoring enclosed-fixture bulb ratings
Some globe and bowl shades trap heat. Not every LED bulb likes that. Always check packaging and fixture specs.
Overtightening screws
Set screws should be snug, not heroic. Overtightening can crack glass or create stress points that fail later.
Assuming every light kit is interchangeable
They are not. Ceiling fan light kit compatibility varies by manufacturer and model. Universal does not mean magical.
Forgetting the room style
A new shade should match more than the hardware. Think about the room’s mood, ceiling height, and how much light you actually want. A clear glass shade in a bedroom may be a bit too “operating room chic.”
Design Tips for a Better Ceiling Fan Upgrade
If you want the new shade to look intentional instead of “last-minute hardware store compromise,” keep a few design principles in mind.
- Match finish tones: Brushed nickel, matte black, white, bronze, and brass all read differently. A mismatched shade holder can look accidental.
- Balance the scale: Small shades on a large fan look skimpy. Oversized globes on a compact fan can look cartoonish.
- Use frosted glass for softer light: Great for bedrooms, nurseries, and cozy spaces.
- Use clear or seeded glass for style: Best when the bulb itself looks attractive.
- Think about airflow visually: The fan is already a moving object. A shade that feels too heavy can make the whole fixture look clunky.
Is This a DIY Job or a Call-the-Electrician Job?
If you are replacing an existing ceiling fan glass shade, this is usually a beginner-friendly DIY task. If you are installing a full light kit on a compatible fan, it is still manageable for many homeowners who are comfortable following instructions and turning off power correctly.
Call a licensed electrician if:
- You are unsure whether the fan accepts a light kit
- The wiring looks old, damaged, or confusing
- The fan wobbles badly or feels loose at the ceiling
- You are working with a very high ceiling
- The fan has an integrated LED system and replacement parts are unclear
There is no shame in outsourcing the dangerous part of home improvement. Plenty of smart people have learned this right after saying, “How hard can it be?”
Final Thoughts
Adding a lamp shade to a ceiling fan is one of those small upgrades that can make a room look surprisingly finished. The trick is knowing whether you need a simple replacement shade, a new bowl or globe, or a full ceiling fan light kit. Once you figure out the fitter size, attachment type, bulb clearance, and model compatibility, the project becomes much less mysterious.
If you want the simplest path, start by matching the existing shade style and measurements. If you want a more dramatic change, swap in a new compatible light kit and choose a shade that fits your room’s personality. Either way, a little planning goes a lot farther than buying the first pretty glass thing you see and hoping the ceiling fan develops a flexible attitude.
Real-World Experiences With Adding a Lamp Shade to a Ceiling Fan
One of the most common experiences homeowners describe is assuming the old shade is “standard,” only to discover that ceiling fan lighting is full of almost-matching parts. A person removes a cracked bell shade, heads to the store, buys the nicest frosted replacement on the shelf, gets home, climbs the ladder, and realizes the fitter is off by what looks like a laughably tiny amount. That tiny amount matters. The lesson most people learn fast is that ceiling fan shades are a measuring game first and a style game second.
Another common story happens with bowl lights. Someone wants to modernize an older fan with a sleeker globe, maybe something more minimal and less amber-tinted. The new bowl looks great in the box, but once installed, the bulb sits too close to the glass or the pull chain gets trapped awkwardly against the edge. The fan still technically works, but now every time the chain swings, it taps the shade like a tiny percussion instrument. The fix is usually simple: recheck height, chain length, and bulb shape. Still, it is a classic reminder that ceiling fan upgrades live in the details.
There are also plenty of success stories, especially when people replace harsh clear glass with opal or frosted shades. The room instantly feels calmer. Bedrooms stop looking overlit. Living rooms become warmer and more comfortable. People often expect the change to be purely decorative, then realize the quality of light matters just as much as the look of the fixture. A good shade does not just hide a bulb; it edits the mood of the whole room.
Many homeowners with older fans also discover that adding a compatible light kit is easier than replacing the entire fan. That can be a budget-friendly win. Instead of removing the whole fixture from the ceiling, they keep the fan body they already like and update only the lighting portion. It is not unusual for that one change to make the fan look years newer. Suddenly the room feels upgraded, even though the blades and motor stayed exactly where they were.
Then there is the integrated LED experience, which is where optimism goes to do push-ups. Homeowners often assume they can replace the diffuser with anything roughly the same size. Usually, they cannot. These fixtures tend to want exact parts, and the smartest move becomes checking the brand, model number, and manual before buying anything. It feels less exciting than wandering the lighting aisle, but it saves money and frustration.
The biggest shared takeaway from real-life projects is simple: patience beats guesswork. The best results come from measuring carefully, checking compatibility, and choosing a shade that works with both the hardware and the room. When people take those steps, the project is usually smooth, affordable, and strangely satisfying. It is one of those rare home upgrades that can make you look at the ceiling and think, “Well, that was actually worth it.”