Table of Contents >> Show >> Hide
- Why paint sprayer maintenance matters
- Tip 1: Clean the sprayer immediately after every use
- Tip 2: Always relieve pressure before cleaning anything
- Tip 3: Clean the filters, tip, and guard separately
- Tip 4: Use the right lubricant and storage fluid
- Tip 5: Inspect for leaks, wear, and clogs before the next project
- Tip 6: Store the sprayer clean, dry, and indoors
- Common paint sprayer maintenance mistakes to avoid
- Final thoughts
- Real-world experience: what people usually learn after living with a paint sprayer
- SEO Tags
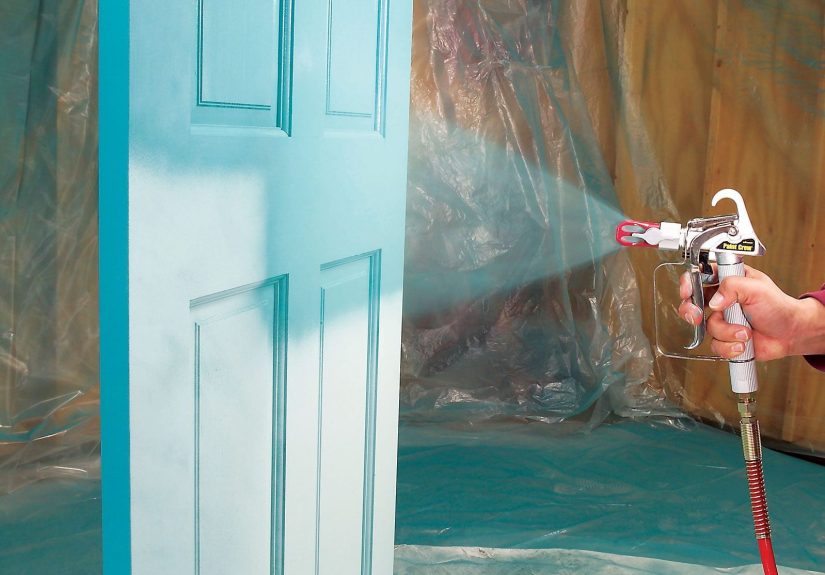
If a paint sprayer could talk, it would probably say two things after a long project: “Please stop pointing me at the fence,” and “Could you maybe clean me before the paint turns into concrete?” A paint sprayer is one of the fastest ways to get a smooth finish on walls, cabinets, furniture, fences, and exterior siding. But it is also one of the easiest tools to ruin with pure, old-fashioned neglect.
The good news is that paint sprayer maintenance is not complicated. It is mostly about timing, consistency, and resisting the universal DIY urge to say, “I’ll clean it tomorrow.” Tomorrow is where clogs, crusty spray tips, sticky filters, leaking packings, and expensive repair bills like to party.
Whether you use an airless sprayer, an HVLP sprayer, or a handheld model, the basic rule stays the same: clean it correctly, inspect it regularly, and store it like you want it to live a long and productive life. Here are six practical tips for cleaning and maintaining your paint sprayer so it keeps laying down smooth coats instead of throwing mechanical tantrums.
Why paint sprayer maintenance matters
Paint sprayers push coatings through small passages, filters, valves, and tips at high speed. That means even a little dried paint, leftover sludge, or dirty filter can mess with the spray pattern. Once that happens, you may see spitting, tails in the fan pattern, uneven coverage, or a tip that clogs every five minutes like it has a personal grudge.
Good maintenance does more than prevent annoyance. It helps protect the pump, packings, seals, hose, gun, and spray tip. It also improves finish quality, reduces wasted paint, and helps you catch wear before it turns into a full breakdown. In plain English: a clean sprayer is cheaper to own and less likely to ruin your Saturday.
Tip 1: Clean the sprayer immediately after every use
The first rule of paint sprayer care is brutally simple: do not let paint sit in the machine. Not for “just lunch,” not while you answer three emails, and definitely not overnight. Once paint begins drying inside the pump, hose, gun, or spray tip, cleanup gets harder fast, and performance drops even faster.
What to do right after spraying
- Return unused paint to its container if it is still clean and usable.
- Relieve pressure before touching the tip, gun, or filters.
- Flush the sprayer with the correct cleaning liquid for the coating you used.
- Keep flushing until the liquid runs clear through both the prime line and the gun.
For water-based coatings such as latex paint, cleanup usually starts with water or warm soapy water, depending on the manufacturer’s instructions. For oil-based coatings, stain, lacquer, or solvent-based products, you need the appropriate solvent recommended on the coating label and by the sprayer maker. This is not the moment for improvisation. Your sprayer is not a chemistry experiment with a trigger.
The big idea here is speed. Fresh paint is inconvenient. Dried paint is a lifestyle problem.
Tip 2: Always relieve pressure before cleaning anything
This is the tip that separates smart maintenance from emergency-room storytelling. Before you remove a spray tip, open the gun, clean a filter, or disconnect a hose, you need to relieve system pressure according to your model’s instructions. Airless paint sprayers in particular can hold significant pressure even when the unit is switched off.
A safe cleanup routine usually includes
- Turning the unit off.
- Setting pressure to the lowest setting.
- Engaging the trigger lock.
- Moving the prime or relief valve to the correct position.
- Triggering the gun into a suitable waste container, if your manual instructs it.
- Removing or reversing the spray tip before flushing, depending on the system.
Do not skip this because you are “just cleaning a little part.” Small parts are often connected to big pressure. A safe maintenance habit protects both you and the tool. It also prevents the surprise blast of leftover coating that somehow always finds the only clean shirt in the room.
Tip 3: Clean the filters, tip, and guard separately
Many paint sprayer owners make one classic mistake: they flush the machine and assume that means everything inside it is now clean. Nice dream. In reality, filters and spray tips trap debris on purpose. That is their entire job. If you do not clean them separately, your sprayer may still run, but it will not run well.
The parts that need extra attention
- Gun filter: catches debris before it reaches the tip.
- Manifold or inlet filter: helps keep larger particles from moving through the system.
- Spray tip: the first place you notice trouble when paint starts building up.
- Tip guard: easy to ignore, easy to coat in dried paint.
After the initial flush, remove these parts and clean them with the recommended fluid, a soft brush, and a little patience. Soft is the key word. Do not attack precision components with a nail, drill bit, mystery wire, or whatever is rattling around in your junk drawer. If you damage the opening in the tip, you damage the spray pattern. Then the sprayer starts painting like it is sneezing.
Hold the tip up to the light if needed. If the opening is not clear, keep cleaning. If a tip is worn, replace it. A worn tip often causes more overspray, a wider fan than expected, and a finish that looks rougher than it should.
Tip 4: Use the right lubricant and storage fluid
Cleaning is only half the job. The other half is preventing corrosion, stuck packings, dried seals, and pump wear while the sprayer is not in use. This is where lubricant and storage fluid matter.
Many airless sprayer manufacturers recommend a pump protector, storage fluid, or brand-specific throat seal liquid to keep internal parts protected. Why? Because water left sitting in a pump can encourage rust, and freezing temperatures can damage components in a hurry. If you cleaned a sprayer with water-based paint, that does not always mean you should leave plain water inside it during storage.
Smart maintenance habits here include
- Using manufacturer-recommended lubricant on packings or moving parts where required.
- Running protective storage fluid through the pump for longer storage.
- Giving metal components a final protective rinse when the manual calls for it.
- Letting certain cup gaskets or seals dry properly before long-term storage if your HVLP manufacturer recommends it.
This step is not glamorous, but neither is paying for preventable repairs. A small amount of the correct lubricant can help reduce friction, slow wear, and keep seals from drying out. Think of it as moisturizer for your sprayer, except the bottle usually looks much less fashionable.
Tip 5: Inspect for leaks, wear, and clogs before the next project
A paint sprayer rarely fails without warning. It usually drops hints first. Maybe the gun starts dripping. Maybe the pattern gets uneven. Maybe the pump loses prime, or the hose connection develops a suspicious little ooze of paint that says, “I am definitely becoming a problem.”
Do a quick inspection before every project and after every deep cleaning. You do not need a flashlight and a detective soundtrack. Just look carefully.
Check these areas
- Hose connections for wear, looseness, or leakage.
- Packings and seals for signs of paint bypass or fluid leakage.
- Filters for buildup or damage.
- Spray tip for wear and fan-pattern distortion.
- Intake components and valves for debris that can cause priming issues.
- Cup gaskets, lids, and fluid passages on HVLP systems.
If something leaks, do not ignore it and hope for a character arc. Small leaks often become expensive repairs when paint gets where it should not, or when worn seals start affecting pressure and spray consistency. Maintenance is cheaper when it happens early.
This is also the perfect time to strain paint before loading the sprayer. That one simple habit helps reduce clogs, protects filters, and keeps debris out of the system. Even brand-new paint can carry small lumps, dried bits around the rim, or contaminants picked up during handling.
Tip 6: Store the sprayer clean, dry, and indoors
Once the sprayer is clean, do not toss it into a dusty garage corner like it just offended you. Storage conditions matter. Heat, cold, moisture, dust, and leftover coating residue can all shorten the life of the tool.
Best practices for paint sprayer storage
- Store the unit indoors whenever possible.
- Keep the cord and hose wrapped neatly to avoid kinks and damage.
- Do not store the sprayer with paint sitting in the cup, hose, or pump.
- Use protective storage fluid if your system calls for it.
- Keep filters clean before putting the sprayer away.
- Store accessories such as tips, guards, brushes, and wrenches together so you are not hunting for them later like lost treasure.
For HVLP systems, pay attention to the cup, lid, and gasket arrangement during storage. For airless systems, protect the pump and avoid storing with plain water inside. For any model, dust-free and dry beats damp and chaotic every time.
Common paint sprayer maintenance mistakes to avoid
- Waiting until the next day to clean.
- Using the wrong solvent or cleaner.
- Skipping filter cleaning because “the flush should have handled it.”
- Using metal picks or hard tools on the tip opening.
- Ignoring leaks until they become bigger failures.
- Storing the unit with water in the pump or residue in the gun.
- Forgetting to strain paint before spraying.
- Using more pressure than necessary, which can increase wear and overspray.
Final thoughts
If you want professional-looking results, paint sprayer maintenance is not optional. It is part of the job. The sprayer that gets cleaned right away, flushed with the correct liquid, checked for wear, lubricated properly, and stored with a little respect is the sprayer that shows up ready for the next project.
That does not mean you need to become a full-time tool whisperer. It just means building a repeatable cleanup routine. Relieve pressure. Flush thoroughly. Clean the filters and tip. Inspect the parts. Protect the pump. Store it properly. Repeat. It is not glamorous, but it works.
And when your sprayer still performs beautifully on project number twenty instead of dying dramatically on project number three, you will feel a quiet kind of satisfaction that only clean equipment and avoided repair bills can deliver.
Real-world experience: what people usually learn after living with a paint sprayer
Once people have used a paint sprayer for a few real projects, their attitude toward maintenance usually changes in a hurry. On day one, a sprayer feels like a miracle machine. It covers a fence in record time, makes cabinet doors look smooth, and turns a room project into something that feels surprisingly professional. Then cleanup begins, and reality enters the chat.
A common experience is discovering that the actual spraying goes faster than the prep and cleanup combined. That is not a flaw in the tool. It is just the trade-off. A sprayer saves massive time during application, but only if the owner respects the maintenance routine afterward. People who learn this early tend to keep loving their sprayers. People who do not often end up with a clogged gun, a damaged tip, and a strong opinion about “high-maintenance tools.”
Another lesson that comes from experience is that tiny amounts of leftover paint can cause outsized problems. A little residue in a filter may not seem like much, but on the next project it can turn into sputtering, fan-pattern issues, or repeated tip clogs. Many DIYers assume the machine is broken when the real problem is yesterday’s dried paint hanging out where it does not belong. Experienced users stop blaming the sprayer for crimes committed by lazy cleanup.
People also learn that different coatings behave differently. Latex paint, primer, enamel, stain, and lacquer all leave behind their own kind of mess. A cleanup routine that worked fine for one material may be incomplete for another. That is why experienced users start paying more attention to product labels and manufacturer instructions. They stop guessing and start matching the flush fluid, cleaning method, and storage steps to the actual coating in the machine.
There is also a practical emotional lesson: maintenance feels annoying right up until it saves you. The first time someone catches a worn seal early, clears a dirty manifold filter before a project, or notices a distorted spray pattern and swaps a worn tip, maintenance stops feeling optional. It starts feeling smart. That shift matters. The sprayer becomes less of a temperamental gadget and more of a reliable system.
Over time, the best users develop their own post-project rhythm. They lay out the brushes, waste bucket, cleaning solution, rags, and storage fluid before they even start spraying. They strain paint automatically. They know where the filters are. They can spot the difference between a clog, a pressure issue, and a worn tip without descending into theatrical frustration. That kind of confidence usually does not come from talent. It comes from cleaning the tool properly over and over until the routine becomes second nature.
In other words, experience teaches the same lesson every manufacturer manual is trying to teach in a much less charming way: paint sprayers reward discipline. Treat them well, and they are fast, efficient, and capable of beautiful finishes. Treat them like a roller tray with a power cord, and they will eventually rebel.