Table of Contents >> Show >> Hide
- What Are “Keeper” Crops, Exactly?
- The 3 Storage Dials That Matter (More Than Fancy Containers)
- Quick Map: Three “Zones” for Most Home Storage
- Favorite #1: The Basement “Mini Root Cellar” (Cold + Moist Without the Renovation)
- Favorite #2: The “Cure First, Store Longer” Station (Because Skins Need Time to Toughen Up)
- Favorite #3: The Cool, Dry Pantry Zone (Winter Squash + Alliums, a.k.a. “Don’t Make It Damp”)
- Favorite #4: The Refrigerator “Micro-Cellar” (When You Want Precision and You’re Okay With Sharing Space)
- Favorite #5: The Sand (or Sawdust) Box Method (The Crispness Cheat Code)
- Keeper Crop Cheat Sheet (Practical Home Version)
- Troubleshooting: When Storage Goes Sideways
- Food Safety Note (The Unfun but Important Part)
- 500 More Words: Real-Life Lessons From Storing Keeper Crops
- Wrap-Up: Your Winter Pantry, Upgraded
Some crops are drama queens: they wilt if you look at them sideways, demand a spa day (aka the crisper drawer), and still ghost you by Thursday. “Keeper” crops are the opposite. They’re the dependable friends of the garden: sturdy, patient, and fully willing to hang out in the dark for monthsno group chat required.
Winter storage is basically matchmaking: you pair each crop with the temperature, humidity, and airflow it actually wants. Do that, and your pantry becomes a quiet little victory over grocery prices, midweek meal panic, and the annual “why did I grow 60 pounds of potatoes?” moment.
What Are “Keeper” Crops, Exactly?
Keeper crops are vegetables (and a few fruits) bred or naturally suited for long storage. They usually have at least one superpower: thick skins, low moisture, natural dormancy, or the ability to “heal” small wounds after harvest (curing). Think: potatoes, onions, garlic, winter squash, sweet potatoes, carrots, beets, rutabagas, parsnips, cabbage, and apples.
The trick is that “keeper” doesn’t mean “invincible.” It means: store me correctly and I’ll reward you. Store a carrot like an onion (dry and airy), and it’ll shrivel into a sad orange shoelace. Store an onion like a carrot (cold and damp), and it’ll rot in protest.
The 3 Storage Dials That Matter (More Than Fancy Containers)
1) Temperature: Slow the produce down
Even after harvest, produce is still alive. It “breathes” (respiration), using stored energy and releasing heat. Cooler temperatures slow that process, meaning better texture and longer storage life.
2) Humidity: Prevent shrivelingor prevent rot
Root crops generally want high humidity to stay crisp. Alliums (onions/garlic) and cured squash want lower humidity so their skins stay dry and mold doesn’t move in.
3) Ventilation + darkness: Keep things fresh and calm
Airflow helps reduce condensation and stale odors, and it can limit sprouting triggers. Darkness matters for potatoes in particular (light encourages greening and bitterness). Translation: your best storage space is usually boringand boring is exactly what you want.
Quick Map: Three “Zones” for Most Home Storage
You don’t need a perfect old-school root cellar. You need a plan. Most keeper crops fit into three practical zones:
- Cold + very moist: roots like carrots, beets, parsnips (just above freezing if possible; very high humidity)
- Cold + moist (or moderate): potatoes, apples, cabbage (cold, but not bone-dry)
- Cool + dry: winter squash/pumpkins, cured onions, cured garlic, cured sweet potatoes (cooler than your kitchen, with airflow)
Now for the fun part: five favorite setups that actually work in real homesbasements, garages, closets, and even that “mystery corner” where holiday decorations go to hibernate.
Favorite #1: The Basement “Mini Root Cellar” (Cold + Moist Without the Renovation)
If you have a basement (even a finished one), you can often carve out a small storage zone in the coolest corner usually along a north-facing wall, away from heat sources. Think of it as a VIP lounge for carrots and their rooty friends.
Best keeper crops for this setup
- Carrots, beets, parsnips, rutabagas, turnips
- Leeks (trimmed), celery root, winter radishes
- Cabbage (if you have space and a tolerance for “cabbage aroma”)
How to set it up (simple version)
- Pick the right spot: coldest, darkest corner; avoid furnace rooms and hot water pipes.
- Add insulation if needed: even rigid foam on the “warm” side helps stabilize temps.
- Bring in tools: thermometer + humidity gauge (cheap ones are fine; accuracy beats vibes).
- Use breathable storage: crates, slatted bins, cardboard boxes with holes, or meshnot sealed tubs for damp crops.
- Control humidity: damp burlap, a shallow pan of water, or a damp sand box for roots (more on that below).
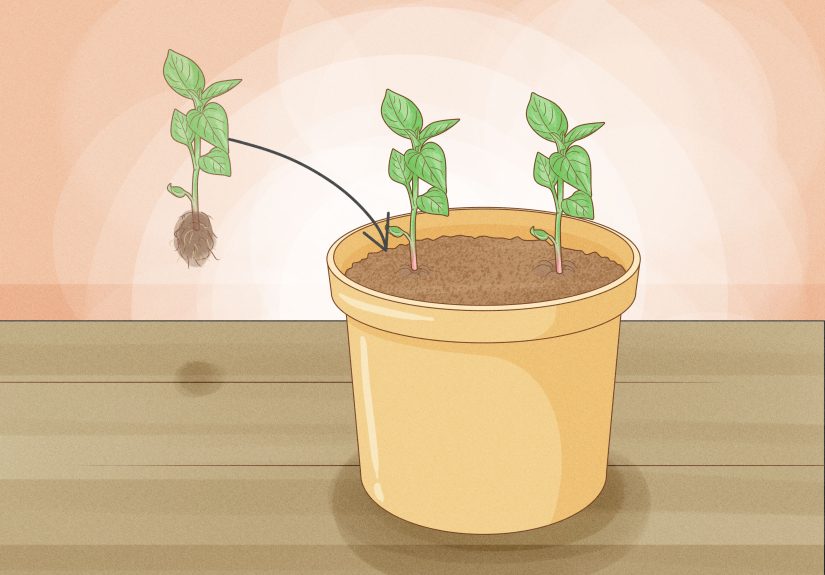
The biggest win: storing roots in a moist medium
For carrots and beets, a moist packing material is the difference between “crunchy in February” and “why is this limp.” Pack roots (unwashed, just brushed clean) in slightly damp sand, sawdust, or peat moss. Not wet. Think: “wrung-out sponge.”
Pro move: label boxes by harvest date and variety. Storage carrots are not the same as summer carrots, and your future self deserves to know which box is the overachiever.
Favorite #2: The “Cure First, Store Longer” Station (Because Skins Need Time to Toughen Up)
Curing sounds like something you do to bacon, but it’s also the secret handshake of winter storage. For certain crops, curing lets small cuts heal, skins thicken, and necks/outer layers dry down. That reduces rot and moisture loss later.
Crops that love curing
- Onions & garlic: cure until the necks are dry and papery.
- Potatoes: cure in a dark spot so skins set and minor scrapes heal.
- Winter squash & pumpkins: cure (most types) to harden rinds and extend storage life.
- Sweet potatoes: cure warm and humid to heal skins and improve sweetness.
How to cure without fancy equipment
Your goal is warm-ish temperatures, airflow, and no direct sun. A garage with a fan (if it’s not freezing), a covered porch, or an unused room works. Lay produce in a single layer on racks, screens, or cardboard, and give it space so air can move.
Once cured, you “graduate” crops into their long-term storage zone. The cure station is temporary. The storage zone is where they’ll live out their winter as calm, useful vegetableslike little edible batteries powering soups and dinners.
Favorite #3: The Cool, Dry Pantry Zone (Winter Squash + Alliums, a.k.a. “Don’t Make It Damp”)
Winter squash and cured onions/garlic don’t want a swamp. They want a cool, dry-ish room with good airflow. Too warm and they dehydrate and spoil faster. Too damp and mold throws a house party.
Best keeper crops for this setup
- Butternut, hubbard, kabocha, pumpkin (mature, unblemished, stems intact)
- Storage onions (not sweet onions), garlic
- Cured shallots
Set it up like this
- Choose a spot: a cool closet, unheated mudroom, insulated garage shelf, or a basement area that stays above freezing.
- Prioritize airflow: wire shelves, slatted crates, mesh bags for onions/garlic.
- Keep squash off cold concrete: use cardboard or wood so the underside doesn’t sweat.
- Don’t stack squash like bowling balls: store in a single layer when possible; check weekly for soft spots.
Small but mighty tip: separate fruit from squash
Apples and pears release ethylene gas as they ripen, which can shorten the storage life of squash and pumpkins. So give them different zip codessame house, different shelf, ideally with a little distance and airflow.
Favorite #4: The Refrigerator “Micro-Cellar” (When You Want Precision and You’re Okay With Sharing Space)
A fridge is basically a climate-controlled cave. If you have a spare fridge, you can store keeper crops with impressive consistencyespecially if your home swings between “toasty” and “why is my basement an ice rink?”
Best keeper crops for this setup
- Carrots, beets, radishes (in perforated bags)
- Cabbage (wrapped loosely or boxed to prevent dehydration)
- Apples (separate from veggies if possible)
- Potatoes (only if you can keep them at a suitable temperature and in darknessmore below)
How to avoid common fridge storage mistakes
- Don’t seal damp produce in airtight plastic: that’s a condensation factory.
- Use perforated bags: they keep humidity up while still letting excess moisture escape.
- Watch potato temperature: very cold temps can increase sugars in potatoes, which can affect flavor and browning when fried.
- Keep potatoes dark: even fridge light exposure is a no.
If you don’t have a spare fridge, the crisper drawer can still act like a mini root cellar for a smaller stash of roots especially if you rotate them into weekly cooking.
Favorite #5: The Sand (or Sawdust) Box Method (The Crispness Cheat Code)
If you want carrots that stay snappy deep into winter, storing them in a moist medium is the moveand you can do it without a full root cellar. A simple box or tote filled with slightly damp sand or sawdust can create a stable microclimate that prevents shriveling.
Best keeper crops for this setup
- Carrots, beets, parsnips, rutabagas, turnips
- Winter radishes
- Apples and pears can also be stored carefully (separately from vegetables), but roots are the usual winners here.
How to do it (step-by-step)
- Pick a container: cardboard box, wood crate, or a sturdy bin. If using plastic, don’t make it airtight.
- Add a base layer: 2–3 inches of slightly damp sand or sawdust.
- Lay produce in a single layer: roots not touching if possible.
- Cover completely: add more medium, then another layer of roots, and repeat.
- Store cold: unheated basement corner, insulated garage (above freezing), or another cold zone.
- Check monthly: remove any soft or rotting pieces immediately.
The moisture in the sand/sawdust keeps humidity high right where roots need it. The cold slows respiration. Together, they’re basically a crispness preservation spelljust with fewer candles and more practicality.
Keeper Crop Cheat Sheet (Practical Home Version)
Conditions vary by variety and home setup, but this chart gives you a strong starting point. If you’re new to storage, focus on getting temperature and humidity directionally correct (cold/moist vs cool/dry), then fine-tune.
| Crop | Best Prep | Preferred Storage Style | Common Home Setup |
|---|---|---|---|
| Carrots & beets | Trim tops; brush soil; don’t wash | Cold + very moist (often packed in damp medium) | Sand/sawdust box in cold basement corner |
| Potatoes | Cure in dark; avoid bruises | Cold + moist/moderate; dark; ventilated | Ventilated crate in cool basement (not near heat) |
| Onions & garlic | Cure until papery and dry | Cold/cool + dry; lots of airflow | Mesh bags on a cool closet shelf |
| Winter squash & pumpkins | Harvest mature; cure (most types) | Cool + dry; airflow; avoid chilling | Single layer on shelves in a cool room |
| Sweet potatoes | Cure warm & humid; handle gently | Cool (not cold) + fairly dry; ventilated | Boxes in a closet that stays comfortably cool |
| Cabbage | Harvest firm heads; keep wrapper leaves | Cold + moist | Basement cold zone or fridge (wrapped) |
| Apples | Sort carefully; store only perfect fruit | Cold + moist; separate from vegetables | Crates in a cold area, away from roots/squash |
Troubleshooting: When Storage Goes Sideways
If roots are shriveling…
- Your humidity is too low. Switch to damp sand/sawdust packing, or add a humidity source nearby (damp burlap, pan of water).
- Containers may be too airy. Use perforated bags or cover boxes loosely to hold humidity.
If onions/garlic are molding…
- Too humid or not cured enough. Move to a drier spot, increase airflow, and make sure they’re fully dried before long storage.
- Don’t store them in sealed containers.
If potatoes are sprouting…
- Too warm and/or too much light. Move them colder, keep them dark, and improve ventilation.
- Sort out damaged tubers; one rotting potato can speed up problems.
If squash is rotting on the bottom…
- Not enough airflow or sitting on cold, damp concrete. Store on cardboard/wood, keep single layer, and turn occasionally.
- Check for nicks and soft spots before storage; only perfect squash are long-haul candidates.
Food Safety Note (The Unfun but Important Part)
If produce is slimy, has deep mold, or smells “off,” don’t try to rescue it with optimism and a knife. Compost it. Storage is about reducing waste, not negotiating with rot.
500 More Words: Real-Life Lessons From Storing Keeper Crops
The first winter you try storing keeper crops, you learn a humbling truth: vegetables have opinions. Lots of them. You can read every guide, set up the cutest bins, and still discover that your basement “cold corner” is actually a tropical resort once the furnace kicks on in December. That’s not failureit’s data.
One of the biggest “aha” moments is realizing that storage starts at harvest, not at the shelf. If you yank carrots out of the ground like you’re starting a lawn mower, they’ll bruise, and bruises don’t age gracefully. Gentle harvest, gentle handling, and ruthless sorting matter. The best storage stash is boringly perfect: no cracks, no deep scratches, no mystery soft spots. The slightly banged-up ones aren’t trashthey’re tonight’s dinner and next week’s soup.
Another lesson: washing feels productive, but it isn’t always storage-friendly. Many keeper crops do better with soil lightly brushed off rather than scrubbed clean. Washing adds moisture, and moisture in the wrong place becomes rot’s best friend. Roots packed in damp sand are a different story because the moisture is controlled and consistent. But tossing wet carrots into a sealed bag and calling it “meal prep” is basically inviting condensation to move in and redecorate.
The humidity puzzle is where most people stumble. If you store onions next to carrots, one of them will be unhappy, and unhappy vegetables are surprisingly good at making that your problem. The fix is zoning: you don’t need ten rooms, just two or three microclimates. A mesh bag of onions can live in a cool closet while carrots hang out in a damp sand box in the basement. Winter squash can sit on a shelf in a spare room that stays cooler than the kitchen. The moment you stop trying to force one storage style on everything, winter gets a lot easier.
You also learn the power of the weekly check-in. It takes five minutes: look for soft spots, sniff for anything odd, and remove any produce that’s turning. That tiny routine prevents the classic chain reaction where one moldy onion becomes a whole bag of regret. It also helps you plan meals. If you notice a squash starting to soften, it moves to the front of the lineroasted, pureed, or turned into soup before it becomes compost.
Finally, the most satisfying lesson: storage changes how you cook. When you have potatoes, onions, squash, and carrots on hand all winter, weeknight dinners get simpler. You start building meals around what’s already stable and available: sheet-pan roasted roots, quick hash with onions and potatoes, squash blended into pasta sauce, cabbage sautéed into stir-fries. The garden doesn’t just feed you in summerit becomes a quiet, reliable pantry that keeps showing up long after the last frost. And honestly, that’s the kind of “relationship goals” I can get behind.
Wrap-Up: Your Winter Pantry, Upgraded
Winter storage for keeper crops isn’t about perfectionit’s about matching crops to conditions and making small, smart adjustments. Start with one setup (a sand box for carrots, a cool shelf for squash, mesh bags for onions), learn what your home naturally does, and refine from there. By mid-winter, you’ll have a system that feels less like “food storage” and more like “I planned ahead like a legend.”