Table of Contents >> Show >> Hide
- Before You Start: The Fast Prep That Makes Colors Pop
- Way 1: The Classic Spiral Tie-Dye Shirt
- Way 2: The Crumple (Scrunch) Method
- Way 3: Bullseye Tie-Dye (Concentric Rings)
- Way 4: Striped Tie-Dye (Horizontal, Vertical, or Diagonal)
- Quick Tie-Dye Timeline: From Plain Tee to Wearable Art
- How to Rinse, Wash, and Keep Colors Bright
- Common Tie-Dye Mistakes and Fast Fixes
- Real-World Tie-Dye Experiences: 500+ Words of What Actually Happens
- Conclusion
If your closet is full of “meh” T-shirts and your weekend plans include “do something fun but not complicated,” tie-dye is your new best friend.
You do not need a design degree, fancy studio lighting, or mysterious artist energy. You need a shirt, some dye, rubber bands, and the confidence
to make a beautiful mess on purpose.
This guide breaks down 4 quick tie-dye methods that are beginner-friendly, fast to set up, and seriously satisfying to reveal:
spiral, crumple, bullseye, and stripes. You’ll also get practical advice on dye prep, color placement, rinse-and-wash care, and how to avoid
the classic “why is my shirt muddy brown?” moment. (Don’t worry. We’ve all been there. Usually with purple and yellow.)
Whether you are crafting with kids, hosting a summer party, making team shirts, or rescuing an old white tee from drawer purgatory, this step-by-step
tutorial will show you how to tie dye a shirt quickly and still get bright, wearable results. Let’s make your laundry way more interesting.
Before You Start: The Fast Prep That Makes Colors Pop
Quick Supply Checklist
- White or very light T-shirt (100% cotton works best)
- Tie-dye kit or fiber-reactive dye bottles
- Rubber bands (lots)
- Gloves (your hands will thank you)
- Plastic table cover or trash bags for surface protection
- Zip-top bag or plastic wrap (to keep dyed shirt damp while setting)
- Paper towels
- Optional: squeeze bottles with narrow nozzles for cleaner color placement
Choose the Right Shirt Fabric
For bright results, choose natural fibersespecially cotton. Cotton absorbs dye more evenly and vibrantly than most synthetic blends.
If your shirt is a cotton-poly blend, it can still work, but colors may appear softer or slightly heathered. That can look cool, but go in
with realistic expectations. “Muted vintage vibes” is still a vibe.
Prep in 5 Minutes
- Pre-wash shirt to remove factory finishes, softener residue, or oils.
- Leave it damp (not dripping).
- Set up your protected work area and put on gloves.
- Mix dyes according to kit directions.
- Pick your pattern and start tying.
Pro tip: Damp fabric is easier to fold and helps dye travel more smoothly through fibers. Think of it like giving color a better road map.
Way 1: The Classic Spiral Tie-Dye Shirt
The spiral is the rock star of tie-dye patterns. It looks dramatic, takes only a couple minutes to form, and makes everyone say, “Wait, you made that?”
How to Fold a Spiral
- Lay the damp shirt flat.
- Pinch the center point where you want the swirl to begin (center chest is most common).
- Twist fabric in one direction until it coils into a flat disk, like a cinnamon roll.
- Wrap 3–4 rubber bands across the disk to create wedge sections (like pizza slices).
How to Apply Dye
- Apply a different color to each wedge on the front side.
- Flip and repeat on the back, matching or alternating colors.
- Avoid placing complementary colors directly next to each other if you want crisp edges (for example, yellow next to purple can get muddy).
Fast Spiral Color Combos
- Teal + purple + magenta for a neon galaxy look
- Blue + green + yellow for a tropical wave vibe
- Red + orange + yellow for sunset energy
Best for: Bold statement shirts, festival looks, first-time tie-dyers who want maximum “wow” with minimum complexity.
Way 2: The Crumple (Scrunch) Method
If folding makes you nervous, crumple tie-dye is your happy place. It is chaotic, forgiving, and practically impossible to mess up.
Perfect for beginners and anyone who likes abstract patterns.
How to Crumple
- Lay the damp shirt flat.
- Scrunch the entire shirt inward with your hands until it forms a loose disk or mound.
- Use several rubber bands to hold the shape together (not too tight).
How to Dye It
- Pick 2–4 colors.
- Dab or squeeze dye randomly over exposed fabric sections.
- Flip and repeat on the other side.
- Leave some white space if you want stronger contrast.
Why Crumple Is So Fast
No precise folds. No geometry. No overthinking. Just texture and color. This method works especially well when you want that cloud-like,
stonewash, or “accidentally cool” effect.
Best for: Group projects, kids’ crafts, quick weekend batches, and “I have 20 shirts to dye by tonight” situations.
Way 3: Bullseye Tie-Dye (Concentric Rings)
Bullseye tie-dye gives you clean circular rings and a retro look that never really left. It is easy to control and great for targeted designs.
How to Tie a Bullseye
- Pinch the shirt where you want the center of the bullseye (center, side, shoulder, or lower hem).
- Pull upward into a cone shape.
- Add rubber bands every 1–2 inches down the cone to create ring sections.
How to Color Each Ring
- Apply one color per section between rubber bands.
- Use light-to-dark order for clean transitions (for example, yellow → orange → red).
- For strong ring contrast, avoid over-saturating each segment.
Creative Bullseye Variations
- Double bullseye: Make two cone points before banding.
- Off-center target: Place center near shoulder or waist.
- Monochrome rings: Use different shades of one color for a modern look.
Best for: Personalized shirts, event teams, and anyone who wants a pattern that looks deliberate and polished.
Way 4: Striped Tie-Dye (Horizontal, Vertical, or Diagonal)
Stripes are the underrated hero of easy tie-dye patterns. They look clean, trendy, and surprisingly high-end when done in a restrained color palette.
How to Fold for Stripes
- Lay shirt flat.
- Accordion-fold it in one direction (top to bottom for horizontal stripes, side to side for vertical stripes, diagonal for diagonal stripes).
- Band the folded strip every 1–2 inches.
How to Dye for Crisp Lines
- Apply color to alternating sections for high contrast.
- Use fewer colors (2–3) for cleaner results.
- Keep dye flow controlled; too much dye can blur stripe boundaries.
Easy Stripe Palettes
- Navy + sky blue + white space (classic)
- Coral + peach + yellow (warm and summery)
- Black + gray + white (urban streetwear look)
Best for: Minimalists, matching family shirts, school spirit tees, and wearable everyday styles.
Quick Tie-Dye Timeline: From Plain Tee to Wearable Art
Typical “Fast but Good” Schedule
- 0:00–0:20 Setup and prep
- 0:20–0:45 Fold, tie, and dye shirt
- Set time: Follow your kit instructions (often 6–8 hours; overnight can deepen color)
- Final 20–30 min: Rinse, wash, and dry
If you want stronger saturation, give the dye more reaction time in a warm environment. If you want lighter pastels, rinse a little sooner and use less dye.
Tie-dye is part method, part preference.
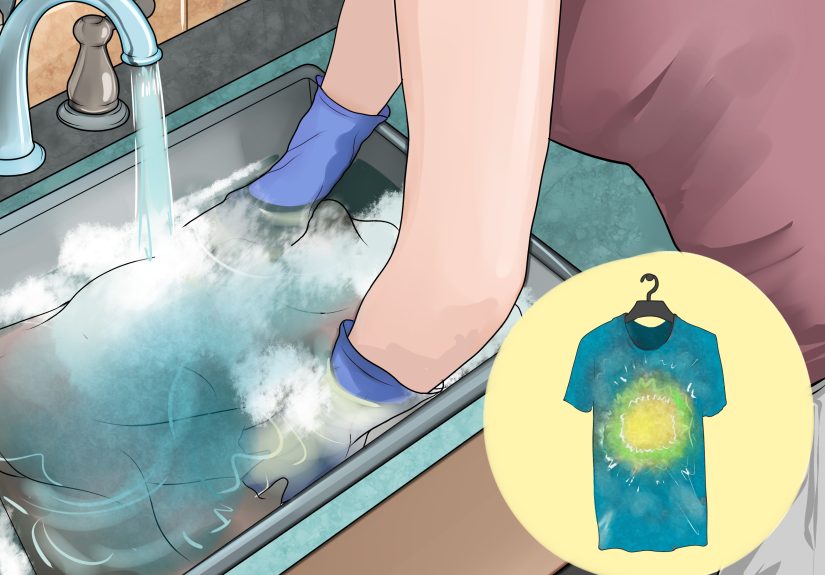
How to Rinse, Wash, and Keep Colors Bright
- Keep bands on for initial rinse in cold water to remove loose dye.
- Remove bands and continue rinsing until water is mostly clear.
- Wash shirt alone (or with similar tie-dye colors) on cold.
- Use mild detergent, no bleach, no fabric softener.
- Air-dry or tumble dry low.
First few washes matter. Treat your new shirt like it just got a fresh haircut: gently, proudly, and away from white laundry.
Common Tie-Dye Mistakes and Fast Fixes
Mistake 1: Colors turned muddy
Fix: Use fewer colors and place complementary colors apart. Leave white space between sections.
Mistake 2: Pattern looks blurry
Fix: Tighten folds and rubber bands. Apply less dye per section and control bottle pressure.
Mistake 3: Shirt came out pale
Fix: Increase dwell/set time, make sure shirt is pre-washed, and use dye meant for natural fibers.
Mistake 4: Uneven color patches
Fix: Work with damp fabric and rotate shirt while applying dye to reach hidden folds evenly.
Mistake 5: Dye got everywhere except the shirt
Fix: Cover your surface fully, keep paper towels nearby, and wear gloves before opening bottles.
Real-World Tie-Dye Experiences: 500+ Words of What Actually Happens
The first time I ran a “quick tie-dye afternoon” with a small group, everyone showed up with confidence and exactly zero understanding of how fast dye travels.
One person asked if they could “just eyeball” color placement on a spiral. Absolutely. That shirt came out looking like a tropical storm map and, somehow,
in the best way. Another person used six colors in a crumple pattern because “more is more.” It was not more. It was brown with emotional backstory. The lesson
was immediate: fun is automatic, good contrast is intentional.
A week later, we did a second round with a more structured plan. We used only three colors per shirt, pre-washed all cotton tees, and agreed on one rule:
leave a little white space. The quality jump was huge. Spirals had cleaner wedges, bullseyes had rings you could actually count, and stripe shirts looked
like boutique pieces you might overpay for online. Even the skeptics were into it. One teen made a diagonal stripe tee in navy and gray that looked so sharp
people assumed it was store-bought. That is the magical tie-dye moment: when handmade stops looking “crafty” and starts looking intentional.
We also learned that setting time changes everything. In one experiment, two nearly identical shirts were dyed with the same bottles and folds.
Shirt A was rinsed at around 6 hours; Shirt B sat overnight in a sealed bag. Shirt B came out richer and deeper, especially in blues and magentas.
Shirt A looked softer and more pastel. Neither was wrongthey just had different moods. So now we choose set time based on style goals:
short for airy and bright, longer for bold and saturated. That one tweak made everyone feel like they had more control over the final look.
Another practical experience: rinse strategy can either save your design or blur it. Early on, some people removed bands immediately and blasted shirts with hot water.
The results were… interpretive. Now we do a cold rinse first, keep pressure gentle, and remove bands after excess dye has started to move out.
Then we rinse again and wash separately. It sounds fussy, but it takes just a few extra minutes and prevents surprise color migration.
Think of it like letting nail polish dry before doing dishes. Timing matters.
Group projects exposed another truth: different personalities gravitate to different methods. Perfectionists love stripes because the fold logic feels organized.
Creative chaos types love crumple because there is no “wrong way.” Newbies tend to win with bullseye since sectioning is obvious and repeatable.
And extroverts? They choose spiral, then explain to everyone else why their swirl is “more dynamic.” (Sometimes they are right.)
If you are teaching a class or hosting a party, offering all four methods gives people a confidence entry point. That means fewer abandoned shirts
and more people saying, “Wait, can I do another one?”
My favorite real-world outcome came from a family event where grandparents, parents, and kids all dyed one shirt each using the same palette:
turquoise, lemon yellow, and fuchsia. Every shirt looked different despite shared colors. One grandparent made tidy bullseyes, one kid made
wild crumple fireworks, and one parent accidentally invented a very cool half-spiral by stopping the twist early. They took a group photo in matching-not-matching shirts,
and that image became their summer card. Tie-dye is one of those rare crafts where mistakes look artistic and effort feels playful.
The quick-and-easy methods are not just about speedthey make creativity accessible to people who usually say, “I’m not crafty.”
Give them gloves, a damp shirt, and one brave color choice, and suddenly they are artists with laundry baskets.
Conclusion
If you want a fast DIY win, these 4 ways to tie dye a shirt give you the best mix of speed, simplicity, and style. Start with
spiral for bold impact, crumple for effortless abstract patterns, bullseye for clean concentric rings,
and stripes for modern wearable results. Pre-wash your fabric, control your color count, respect set time, and rinse like a pro.
That is the formula.
The best part? You do not need perfection. Tie-dye rewards experimentation. Some shirts will look polished. Some will look wildly experimental.
Both are success stories. Start with one shirt and you’ll probably end up with five, because tie-dye has a habit of turning “just one quick project”
into a full-color weekend.