Table of Contents >> Show >> Hide
- First, a quick reality check (so your renovation doesn’t become a reality show)
- Cabinets & Storage: The biggest visual change for the least chaos
- 1) The “Goodbye Honey Oak” Cabinet Paint Flip
- 2) Two-Tone Cabinets (So Your Kitchen Has Some Personality)
- 3) Refacing Doors for a “New Cabinets” Look
- 4) Open Shelving in One Strategic Spot
- 5) Glass-Front Uppers for Light + Display
- 6) Hardware Swap: The 30-Minute “Before-and-After” Trick
- 7) Add Crown Molding + Light Rail for a Built-In Look
- 8) Soft-Close Hinges and Slides (The Quiet Luxury Upgrade)
- 9) Pull-Out Pantry Inserts (Hello, Organized Life)
- 10) Hidden Trash/Recycle Pull-Out (Because Adulting)
- Countertops & Backsplashes: Where the “after” photo really pops
- 11) Laminate to Quartz (The Classic Glow-Up)
- 12) Butcher Block on the Island Only
- 13) Waterfall Edge (Use Sparingly, Like Hot Sauce)
- 14) Counter-to-Backsplash Continuation
- 15) Vertical Subway Tile (A Small Twist, Big Difference)
- 16) One “Statement Zone” Behind the Range
- 17) Full-Height Backsplash (No More Awkward Line Endings)
- 18) Deep Single-Bowl Sink + Modern Faucet
- Lighting: The makeover move people regret not doing sooner
- Layout & Function: When the “after” is easier to live in
- Finishes & Surfaces: The underrated makeover multipliers
- How to choose your “best 3” makeovers (without spiraling)
- Conclusion: Your kitchen doesn’t need perfectionit needs a plan
- Extra: Real renovation experience (the part nobody posts in the “after” photo)
A kitchen makeover doesn’t have to be a full “move out, live on takeout, and argue about grout for three weeks” situation.
The best before-and-after kitchens usually come down to smart, high-impact changes: better light, cleaner lines, more storage,
and finishes that look intentional (not “the previous owner’s 2009 Tuscan phase”).
Below are 33 before-and-after kitchen makeover ideas you can mix and matchwhether you’re doing a weekend refresh
or planning a full renovation. Each one includes what it looked like before, what changed after, and why it works.
Steal like an artist. Renovate like a grown-up.
First, a quick reality check (so your renovation doesn’t become a reality show)
- Keep what’s working. If the cabinets are solid and the layout is decent, you can save big by upgrading surfaces and fixtures instead of rebuilding everything.
- Fix function before style. Great tile won’t save a kitchen where the trash can lives in the middle of the walkway.
- Plan the “unsexy” stuff. Outlets, ventilation, lighting placement, and storage are where makeovers turn into upgrades.
- Choose 1 hero moment. A statement backsplash, a bold island color, or a killer light fixture. One star. The rest is the supporting cast.
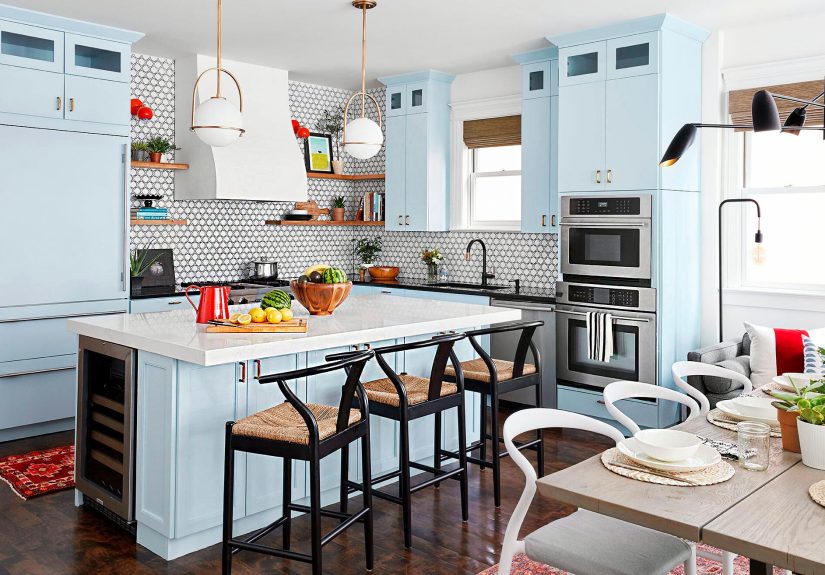
Cabinets & Storage: The biggest visual change for the least chaos
1) The “Goodbye Honey Oak” Cabinet Paint Flip
Before: Orange-toned wood cabinets darken the room and make everything feel dated.
After: Painted cabinets in a warm white or soft greige, paired with a modern hardware finish.
Why it works: Cabinet color changes the whole kitchen’s “mood lighting” without touching the layout.
2) Two-Tone Cabinets (So Your Kitchen Has Some Personality)
Before: All cabinets match, and the space reads flat.
After: Uppers in a lighter shade, lowers in a deeper tone (navy, olive, charcoal).
Why it works: You get contrast and depth without committing to an all-dark kitchen.
3) Refacing Doors for a “New Cabinets” Look
Before: Sturdy cabinet boxes, but dated door style (arched panels, heavy detailing).
After: New doors/drawer fronts (like Shaker) and updated edge veneer where needed.
Why it works: You keep the bones and get the face-liftoften faster than full replacement.
4) Open Shelving in One Strategic Spot
Before: Upper cabinets make the room feel boxed inespecially in a small kitchen.
After: Remove a few uppers and add open shelves near a window or sink.
Why it works: It “opens” the room visually without turning your whole life into a dusting schedule.
5) Glass-Front Uppers for Light + Display
Before: Heavy uppers dominate the wall.
After: A couple of glass-front cabinets (clear or reeded glass) mixed with solid doors.
Why it works: It breaks up the mass and adds a custom feeleven if your dishes are just… normal dishes.
6) Hardware Swap: The 30-Minute “Before-and-After” Trick
Before: Small knobs, brass from another era, or mismatched handles.
After: Larger pulls in a consistent finish (matte black, brushed nickel, warm brass).
Why it works: Hardware is jewelry for cabinets. Cheap jewelry still changes the outfit.
7) Add Crown Molding + Light Rail for a Built-In Look
Before: Cabinets stop short and look “builder-basic.”
After: Crown to the ceiling (or a finished top detail) plus a slim rail under uppers.
Why it works: These details visually “complete” the cabinetry and hide under-cabinet lighting nicely.
8) Soft-Close Hinges and Slides (The Quiet Luxury Upgrade)
Before: Doors slam. Drawers stick. Your kitchen soundtrack is chaos.
After: Soft-close hardware and smoother drawer slides.
Why it works: It’s not flashy, but it makes the kitchen feel high-end every single day.
9) Pull-Out Pantry Inserts (Hello, Organized Life)
Before: Deep cabinets swallow snacks like a black hole.
After: Pull-out pantry frames or roll-out shelves for tall storage.
Why it works: You stop buying “backup” ketchup because you can actually see your ketchup.
10) Hidden Trash/Recycle Pull-Out (Because Adulting)
Before: Trash can parked in plain sight like it’s part of the decor.
After: A pull-out bin cabinet near prep space.
Why it works: Better workflow, cleaner look, fewer awkward kitchen photos at parties.
Countertops & Backsplashes: Where the “after” photo really pops
11) Laminate to Quartz (The Classic Glow-Up)
Before: Busy laminate pattern, chipped edges, or a weirdly shiny finish.
After: Quartz or another durable surface in a calm, consistent tone.
Why it works: Counters are a giant visual planeupgrading them changes everything at once.
12) Butcher Block on the Island Only
Before: Matching counters everywhere feels monotone.
After: A warm wood top on the island, stone on the perimeter.
Why it works: You add warmth and texture without committing to wood maintenance across the whole kitchen.
13) Waterfall Edge (Use Sparingly, Like Hot Sauce)
Before: Island looks like a box with a hat.
After: Counter material continues down the sides.
Why it works: It’s architectural and polishedespecially in modern or minimalist kitchens.
14) Counter-to-Backsplash Continuation
Before: A short backsplash that ends abruptly (and collects splatters with enthusiasm).
After: Same material runs up the wall for a seamless look.
Why it works: It reads upscale, reduces visual clutter, and makes tight kitchens feel larger.
15) Vertical Subway Tile (A Small Twist, Big Difference)
Before: Standard horizontal subway tile that feels expected.
After: Vertical stack or vertical running bond.
Why it works: Your eye goes up, making ceilings feel taller.
16) One “Statement Zone” Behind the Range
Before: Backsplash blends into the background.
After: Patterned tile, slab stone, or a bold color behind the range only.
Why it works: A focal point makes the whole kitchen feel designednot just assembled.
17) Full-Height Backsplash (No More Awkward Line Endings)
Before: Tile stops mid-wall, leaving a paint strip that looks unfinished.
After: Tile to the bottom of uppers (or to the ceiling where appropriate).
Why it works: Clean lines photograph welland yes, you’re going to photograph it.
18) Deep Single-Bowl Sink + Modern Faucet
Before: Shallow double bowl that can’t fit a pan without negotiation.
After: Deeper single bowl, pull-down faucet, optional workstation accessories.
Why it works: Function upgrade you’ll feel daily, plus it updates the “center” of the kitchen.
Lighting: The makeover move people regret not doing sooner
19) Replace the Fluorescent Ceiling Box
Before: One harsh overhead fixture that turns everyone into a tired ghost.
After: Recessed lights + one or two decorative fixtures.
Why it works: Light becomes even, flattering, and layered instead of “surgery room chic.”
20) Under-Cabinet Lighting (Instant “After” Energy)
Before: Shadowy countertops that make chopping feel like a quest.
After: LED strips or puck lights under uppers, ideally on a dimmer.
Why it works: Better task lighting, more ambiance, and your backsplash finally gets its moment.
21) Add Dimmers Everywhere You Can
Before: One brightness level: “interrogation.”
After: Dimmers for overheads, pendants, and under-cabinet lighting.
Why it works: You can cook like a pro, then eat dinner like a human with a soul.
22) Statement Pendants Over the Island
Before: Island feels like a lonely slab in the middle of the room.
After: Two pendants (or one sculptural fixture) scaled correctly for the island length.
Why it works: It anchors the space and adds personality without changing a single cabinet.
23) More Natural Light (Window Upgrade or Smart Workarounds)
Before: Small window, dark corners, “why is it always nighttime in here?” vibe.
After: Larger window, glass door, or even a skylight/solar tube where feasible.
Why it works: Natural light makes materials look richer and spaces feel cleaner and bigger.
Layout & Function: When the “after” is easier to live in
24) Open Up One Wall (Even Partially)
Before: Kitchen is cut off from dining/living, and the cook is socially exiled.
After: Remove a non-structural wall, widen a doorway, or add a large pass-through.
Why it works: Flow improves instantlyplus you can talk to people while you pretend you enjoy hosting.
25) Peninsula to Island Swap
Before: Peninsula bottlenecks traffic and traps someone in the corner during parties.
After: A centered island with clearance around it (or no island if the space can’t handle it).
Why it works: Islands improve circulation when sized correctlyand add prep, storage, and seating.
26) Fix the “Fridge Traffic Jam”
Before: Refrigerator door opens into a walkway, turning snack time into a contact sport.
After: Move fridge to a less disruptive wall, or create a shallow “fridge niche.”
Why it works: A smoother path through the kitchen feels like more square footage.
27) Create a Landing Zone
Before: Bags, mail, and keys land on the counter because… where else?
After: A small drop zone: hooks, tray, drawer divider, or a narrow console near the entry.
Why it works: Your kitchen stops being the house’s junk magnet.
28) Dedicated Coffee or Beverage Station
Before: Coffee stuff sprawls across the counter like it’s paying rent.
After: One zone with outlets, storage for mugs, and space for the machine.
Why it works: It declutters your main prep space and makes mornings smoother.
29) Upgrade Storage with “Specialized” Inserts
Before: Pots stacked like a puzzle and lids living in chaos.
After: Vertical tray dividers, lid organizers, corner pull-outs, and drawer peg systems.
Why it works: You’re not adding cabinetsyou’re making your existing cabinets smarter.
Finishes & Surfaces: The underrated makeover multipliers
30) Flooring Swap That Modernizes Everything
Before: Worn vinyl, dated tile, or a floor color that fights every other finish.
After: Durable tile, refinished wood, or quality LVP in a balanced tone.
Why it works: Floors cover a massive area; changing them resets the entire palette.
31) Paint the Walls the “Right White” (Or Not White at All)
Before: Stark white that feels cold, or beige that feels tired.
After: A warmer white, soft neutral, or a muted color that complements cabinets and counters.
Why it works: Wall color is the background music of your kitchen. Choose the vibe on purpose.
32) New Sink, New Faucet, New Energy
Before: Old faucet, mineral buildup, shallow sink, awkward sprayer situation.
After: Pull-down faucet, deeper sink, and a finish that matches your hardware.
Why it works: It’s a daily touchpointupgrading it makes the whole kitchen feel updated.
33) Better Ventilation (Your Kitchen Shouldn’t Smell Like Yesterday)
Before: Weak ventilation, lingering odors, grease film, and “why is the smoke alarm so dramatic?”
After: A properly sized, effective range hood (ideally vented outside) and a habit of actually using it.
Why it works: It improves comfort and helps manage cooking byproductsespecially in open layouts.
How to choose your “best 3” makeovers (without spiraling)
If you’re overwhelmed, pick one upgrade from each category:
(1) Cabinets (paint, hardware, refacing),
(2) Light (under-cabinet + dimmers),
(3) A surface (backsplash or counters).
That combo produces the strongest before-and-after effect in photos and in real life.
And if you’re going biggerchanging layout, moving plumbing, upgrading electricaluse a design guideline mindset:
keep prep, cook, and clean zones efficient, and avoid creating obstacles that break your workflow.
The “after” should feel easier, not just prettier.
Conclusion: Your kitchen doesn’t need perfectionit needs a plan
The most inspiring before-and-after kitchen makeovers aren’t about chasing trends. They’re about solving problems:
dark corners, cluttered counters, awkward traffic, and surfaces that feel worn out. Start with what bothers you daily.
Then choose upgrades that make the space brighter, cleaner, and more functional.
Because a renovation is temporary. But a kitchen that works? That’s forever. (Or at least until someone invents self-cleaning countertops.)
Extra: Real renovation experience (the part nobody posts in the “after” photo)
After enough kitchen makeovers, you realize the “before” picture is never just about cabinets. It’s about friction.
It’s the drawer that won’t open because the dishwasher is in the way. It’s the one outlet that forces you to plug
the toaster in like you’re defusing a bomb. It’s the overhead light that makes your dinner look like cafeteria food.
A good renovation doesn’t just change finishesit removes tiny daily annoyances that quietly drain your patience.
The first big lesson: decision fatigue is real. In a kitchen, every choice touches another choice.
Pick a cabinet color and suddenly you’re debating counter undertones, then backsplash grout, then whether your floor
is “too warm,” then you’re reading a 47-comment thread about brushed nickel versus stainless steel like it’s breaking news.
My survival move is a “three-sample rule”: choose three options for each category (tile, hardware, paint), look at them
in your kitchen’s actual lighting, and decide. If you keep expanding options, your renovation will outlive your enthusiasm.
The second lesson: the timeline will lie to you. Not maliciouslyjust optimistically.
A “simple” cabinet paint project grows legs when you discover grease buildup, uneven doors, or the previous owner’s
creative relationship with screws. A countertop swap can stall if the backsplash needs repair or the sink cutout is special.
So even for small upgrades, plan for buffer time. Your future self will thank you when you’re not washing dishes in the bathtub.
Third: lighting is the confidence boost of renovations. People spend weeks choosing tile patterns,
then keep one harsh bulb that makes everything feel slightly sad. The best kitchens I’ve seen use layered lighting:
overhead for general brightness, under-cabinet for tasks, and something decorative for warmth. Add dimmers and suddenly
the same kitchen works for chopping onions at 6 p.m. and hanging out with friends at 9 p.m. without feeling like a showroom.
Fourth: storage upgrades are “invisible luxury.” A pull-out trash, a spice drawer near the cooktop,
roll-out shelves in deep cabinetsthese don’t scream for attention in photos, but they change how the kitchen feels.
Your counters stay clearer because your stuff has a home. And when your kitchen is functional, it looks cleaner even
before you clean it. (Which is the only kind of magic I truly believe in.)
Finally: protect the workflow. If you’re moving things around, think in zones: prep, cook, clean, and
store. Keep the high-traffic items (fridge, sink, trash, coffee) from colliding. Make sure doors and drawers can open
without blocking each other. And don’t place an island that turns your kitchen into an obstacle coursethere’s a big
difference between “more counter space” and “I just hip-checked the corner again.”
The best “after” kitchens aren’t perfect. They’re personal. They fit the way you actually liveweekday chaos, weekend
cooking, midnight snacks, big dinners, and quick breakfasts. So steal inspiration from beautiful makeovers, absolutely.
But let your renovation be guided by your daily life, not someone else’s highlight reel.