Table of Contents >> Show >> Hide
- Before You Start: The 30-Second Setup That Prevents Wobbly Circles
- Way #1: The String-and-Pin Compass (Best for Any Size Circle)
- Way #2: The DIY Beam Compass (Ruler/Cardboard Strip Method)
- Way #3: The Paperclip/Binder Clip Micro-Compass (Best for Small Circles)
- How to Check If Your Circle Is Actually a Circle
- Troubleshooting: Why Circles Go Wrong (and How to Fix Them)
- Conclusion: A Perfect Circle Is Just a Locked Radius and a Calm Rotation
- Real-World Experiences: What It’s Like to Draw Circles When It Actually Matters (500+ Words)
A perfect circle is one of humanity’s greatest achievementsright up there with sliced bread, Wi-Fi, and the ability
to eat tacos without immediately wearing them. And yet, the moment you actually need a circle, every round
object in your house mysteriously vanishes. No bowl. No lid. No coin. Not even a suspiciously circular potato.
The good news: you don’t have to trace anything to get a clean, accurate circle. If you can lock in a fixed
distance (the radius) and rotate around a steady center point, you can make a circle
that’s as “perfect” as your pencil line will allow. Below are three reliable, low-drama methodsranging from
“arts-and-crafts MacGyver” to “this belongs in a shop class”plus tips to keep your circle from turning into an egg.
Before You Start: The 30-Second Setup That Prevents Wobbly Circles
1) Pick your circle size (radius vs. diameter)
Decide whether you’re working with a radius (center to edge) or a diameter (edge to edge).
Most DIY circle tools work by setting the radius. If you need a 10-inch diameter circle, your radius is 5 inches.
Simple. Unless you’re doing this at 2 a.m., in which casedouble-check anyway.
2) Mark your center and secure your surface
A perfect circle requires an unmoving center. On paper, tape the page down. On cardboard, use painter’s tape underneath.
On wood, clamp or stabilize the workpiece. If the surface shifts, your “circle” becomes a fancy modern-art oval.
3) Use a sharp pencil and light pressure
Heavy pressure can tug your DIY tool out of alignment. Light, consistent pressure gives you a cleaner arc and fewer
“why is it bumpy right there?” moments.
Way #1: The String-and-Pin Compass (Best for Any Size Circle)
This is the classic “no compass, no problem” method. You’re basically building a giant compass using a fixed-length
string, a pivot point, and a pencil. It’s simple, accurate, and works for small circles or circles big enough to
qualify as a crop circle (minus the aliens… probably).
What you need
- Non-stretch string or twine (avoid stretchy yarn unless you want “interpretive geometry”)
- A pin, thumbtack, nail, or pushpin (depends on your surface)
- A pencil (mechanical pencils are nice for consistent line width)
- A ruler or tape measure
- Paper, cardboard, fabric, or wood
How to do it (step-by-step)
- Mark the center point where you want your circle.
- Measure the radius on your string and tie a small loop or knot at the center end.
- Anchor the center: push the pin/thumbtack through the loop into the center point.
- Set the pencil point: measure the radius from the center anchor and tie or wrap the string to the pencil at that distance.
- Pull the string taut (firm, not Hulk-level) and rotate the pencil around the center.
- Keep the pencil vertical as you movetilting changes the effective radius and thickens the line unevenly.
Pro tips for a truly “perfect” result
- Use non-stretch string. Even slight elasticity can create a subtle wobble.
- Wrap the string around the pencil a couple of times before taping it, so it can’t slide.
- For fabric, use a pin at the center and chalk or a fabric pencil at the edge; keep tension consistent.
- For wood, a small nail as the pivot and a pencil at the radius works greatjust don’t yank hard enough to pull the nail out.
Common mistakes (and quick fixes)
- Circle looks like an oval: your string wasn’t taut the whole time. Reset and keep steady tension.
- Radius “shrinks” mid-draw: the string slid down the pencil. Add tape or a tighter wrap.
- Center drifts: your pin isn’t anchored well, or your paper moved. Tape the paper and re-pin.
Way #2: The DIY Beam Compass (Ruler/Cardboard Strip Method)
If you want a circle that’s accurate and repeatableespecially larger circlesthis method feels like leveling up.
A beam compass is basically a long arm with two points: one stays fixed at the center and the other
holds the pencil at a set radius. You can make one with a ruler, a yardstick, or even a strip of sturdy cardboard.
What you need
- A ruler, yardstick, straight strip of wood, or stiff cardboard
- Pushpin/screw/nail (pivot point)
- Pencil (or fine marker)
- Drill/awl (for wood), or a hole punch/utility tool (for cardboard)
- Measuring tape or ruler for setting the radius
How to build it (fast)
- Make a pivot hole near one end of the beam (small hole is betterless wiggle).
- Make a pencil hole at your radius distance from the pivot hole.
- Test the fit: the pencil should sit snugly without flopping around.
How to draw the circle
- Mark your center point on the surface.
- Anchor the pivot hole at the center using a pushpin (paper), nail/screw (wood), or a pin through cardboard.
- Insert the pencil into the pencil hole at the set radius.
- Rotate the beam around the pivot while keeping the pencil upright and the pivot steady.
Why this is so accurate
The beam acts like a stiff arm that prevents tiny changes in radius. Unlike string, it won’t stretch, and unlike
freehand, your shoulder won’t decide halfway through that it’s time to improvise. If you’re laying out circles on
plywood or marking arcs for a project, this method is a workhorse.
Pro tips
- Stability wins: use a thicker beam for larger circles so it doesn’t flex.
- Small pivot hole: oversized holes allow the center to “wander” and create a slightly lopsided circle.
- Light pressure: pressing too hard can widen the pivot point or wobble the beam.
Way #3: The Paperclip/Binder Clip Micro-Compass (Best for Small Circles)
Sometimes you only need a neat circle for a diagram, a logo sketch, a bullet journal, or a chartnothing huge, just
clean. When you don’t have a compass, a paperclip can become one. It’s the kind of trick that makes you feel like a
responsible adult who definitely has their life together (even if your laundry is currently a chair).
Option A: Paperclip compass
- Unfold a paperclip so you have a straight section and a looped end.
- Create a pivot point: the looped end can hold a pin, or you can press it firmly as a pivot on paper.
- Secure a pencil point at the other end (some people tape the pencil to the paperclip).
- Set your radius by adjusting how far the pencil is from the pivot.
- Rotate smoothly, keeping the pivot steady and the pencil upright.
Option B: Binder clip + pencil (extra stable on paper)
- Clip a binder clip onto the paper near your intended center.
- Use the metal handle as the pivot point (some setups use a pin through the handle’s hole).
- Attach your pencil at the radius distance with a small piece of tape or by holding it against the handle.
- Rotate the pencil around while the binder clip keeps the pivot area from sliding.
When to use this method (and when not to)
- Great for: small circles, quick diagrams, repeated circles of similar size, classroom work.
- Not ideal for: very large circles (the “arm” is too short) or rough surfaces (pivot slips).
Micro-accuracy tips
- Use a hard lead (like HB or slightly harder) for a crisp line that doesn’t smudge easily.
- Make a tiny center dimple with the pin so the pivot doesn’t skate.
- Go slow: small circles exaggerate small wobbles.
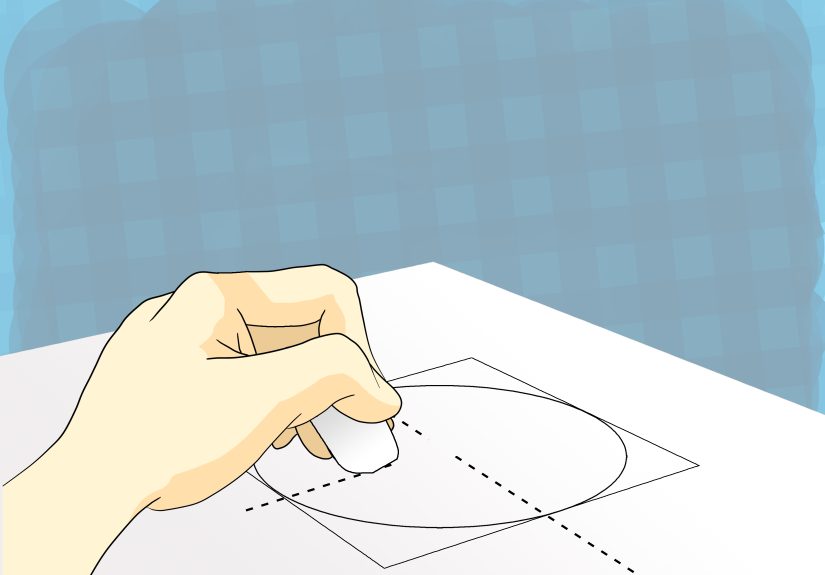
How to Check If Your Circle Is Actually a Circle
If you’re using a fixed-radius method (string or beam), you’re already most of the way there. But if accuracy really
matterssay you’re cutting material or aligning partshere are quick sanity checks:
- Measure the radius in multiple directions from the center to the line. It should match everywhere.
- Measure the diameter across several angles. If it changes, your center moved or your radius varied.
- Look for “flat spots” where your hand hesitated; those show up as slightly straighter segments.
Troubleshooting: Why Circles Go Wrong (and How to Fix Them)
Your line is uneven or fuzzy
Sharpen your pencil, lighten your pressure, and keep the pencil upright. If you tilt, you’re basically drawing with
the side of the lead, which makes your line thicker on one side.
Your circle has a “dent”
That’s usually a pause or a tug. On string circles, it happens when tension changes. On beam circles, it can happen
if the pivot shifts slightly. Re-anchor and draw in one steady motion.
Your radius mysteriously changes mid-circle
Something slipped. For string: tape the string to the pencil after wrapping it. For beam: tighten the pencil fit in
the hole or add a thin wrap of tape around the pencil so it doesn’t wobble.
You need a circle but can’t puncture the center
If you can’t put a pin or nail in the center (because the surface must stay pristine), use the beam method with a
non-marring pivot: tape a small folded piece of paper under the pivot area, or use a removable adhesive putty to
stabilize the pivot without leaving a hole. You can also draw the circle lightly first, then darken it once you’re
satisfied.
Conclusion: A Perfect Circle Is Just a Locked Radius and a Calm Rotation
You don’t need to trace a bowl, hunt down a missing lid, or accept a “good enough” freehand loop. If you can hold a
constant radius and rotate around a steady center, you can produce a clean, accurate circle on paper, wood, cardboard,
and even fabric.
For big circles, go with the string-and-pin method or a DIY beam compass. For small,
precise circles in drawings and diagrams, the paperclip/binder clip trick is fast and surprisingly
effective. Pick the method that matches your surface and sizeand enjoy the rare satisfaction of geometry behaving
exactly as advertised.
Real-World Experiences: What It’s Like to Draw Circles When It Actually Matters (500+ Words)
The first time most people try to “just draw a circle,” they learn an important truth: circles are judgmental.
They look innocent on the page, but they have no patience for shaky hands, sliding paper, or a pencil that’s been
sharpened into a blunt crayon. Over time, you start noticing that the secret isn’t artistic talentit’s controlling
the variables that love to wander.
For example, the string method feels foolproof until you try it on a light sheet of printer paper that isn’t taped
down. You anchor the center with a pin, pull the string tight, and start rotating like you’re drawing the world’s
most polite crop circle. Halfway around, the page shifts a millimeter. Your brain says, “That’s nothing.” Your circle
says, “That’s everything,” and rewards you with a tiny flat spot that stares at you forever. The fix is boring but
magical: tape the corners. Suddenly, the same technique produces a circle that looks like it came from a drafting
kit instead of a panic attack.
On wood, the learning curve is different. A nail pivot holds well, but pencils flex. If you pull the string too hard,
you don’t get a better circleyou get a pencil that leans outward, quietly changing the effective radius and making
your line slightly larger than planned. The “aha” moment is realizing that “taut” means consistent, not extreme.
When you keep the pencil vertical and the string just firm enough to stay straight, the circle becomes repeatable.
That’s when the method stops feeling like a trick and starts feeling like a tool.
The beam compass method has its own personality. It’s the most satisfying for project worklike laying out a round
tabletop, marking a speaker cutout, or drawing a clean arc for a templatebecause the rigid arm removes most of the
human wobble. But it teaches you that precision is a system: a snug pivot hole, a stable beam that won’t flex, and a
pencil that fits tightly enough to avoid slop. If your beam is flimsy (say, thin cardboard for a big circle), it can
bend slightly as you rotate, and that tiny bend becomes a tiny radius change. Switching to a stiffer stripwood,
a thicker ruler, or layered cardboardinstantly improves the result.
For small circles, the paperclip method is the one people underestimate until they try it for real. It’s perfect for
quick diagrams: pie charts, Venn diagrams, logo sketches, or classroom geometry. The main lesson is speed control.
If you rotate too fast, the pivot slides; too slow and hesitant, and you get a slightly bumpy line. The sweet spot
is smooth and steady, with light pressurelike you’re turning a volume knob rather than stirring soup.
The most practical “circle wisdom” I’ve seen is this: decide what “perfect” means for the job. If you’re making a
craft sign or a sketch, “perfect” might mean visually smooth. If you’re cutting material that must fitwoodworking,
sewing patterns, or hardware layouts“perfect” means measured repeatability. In those moments, the circle isn’t just
a shape; it’s a promise. And nothing keeps that promise better than a fixed radius, a stable center, and a process
that doesn’t rely on luck (or whatever mood your wrist is in today).