Table of Contents >> Show >> Hide
- Why Kitchen Cabinet Doors Get Out of Line
- Before You Start: A Fast 5-Minute Prep
- Simple Way #1: Adjust the Door Side to Side
- Simple Way #2: Adjust the Door Up or Down
- Simple Way #3: Adjust the Door In or Out
- How to Tell Which Hinge to Adjust First
- What If the Adjustments Don’t Fix the Door?
- Pro Tips for Better Cabinet Hinge Adjustment
- Real-World Examples of Common Cabinet Door Problems
- Experience: What Homeowners Usually Learn the First Time They Adjust Cabinet Doors
- Final Thoughts
If your kitchen cabinet doors look crooked, rub against each other, or refuse to sit flush, take a deep breath and step away from the idea of replacing the whole kitchen. In most cases, the fix is gloriously un-dramatic: a screwdriver, a few careful turns, and five to ten minutes of patience. That’s it. No demolition. No reality-show soundtrack. No contractor arriving with a truck full of expensive opinions.
The good news is that most modern kitchen cabinets use concealed hinges, sometimes called European hinges, and those hinges are designed to be adjusted. That means you can usually correct three common problems on your own: doors that are too far left or right, doors that sit too high or too low, and doors that stick out or sit too deep against the cabinet frame. Once you understand which screw changes what, cabinet hinge adjustment stops feeling like mechanical wizardry and starts feeling like basic home maintenance.
In this guide, you’ll learn 3 simple ways to adjust kitchen cabinet doors, how to spot which adjustment you actually need, and what to do when a stubborn door still refuses to behave. We’ll also cover a few real-world examples, common mistakes, and practical experiences that make the process easier the first time around.
Why Kitchen Cabinet Doors Get Out of Line
Cabinet doors rarely go crooked just to ruin your morning coffee, though it can feel personal. More often, the problem comes from normal wear and tear. Kitchen doors are opened and closed constantly, and over time that repeated motion can loosen mounting screws, shift the hinge position, or reveal tiny installation imperfections that were there all along.
Humidity can also play a role. Wood and wood-based materials react to seasonal moisture changes, which can slightly affect door alignment. In other homes, the issue shows up after cabinet installation because the walls or floors are not perfectly level. That is extremely common, especially in older houses where “straight” is more of a motivational concept than a measurement.
The important thing to know is this: if the cabinet door itself is not cracked, badly warped, or attached to damaged hardware, there is a very good chance a simple hinge adjustment will fix the problem.
Before You Start: A Fast 5-Minute Prep
Tools You’ll Need
For most cabinet door adjustments, you need only a #2 Phillips screwdriver. A small level, flashlight, and ruler can help, but they are not mandatory. A manual screwdriver is usually better than a drill because it gives you more control and reduces the chance of stripping the screws.
Check the Symptom First
Before touching any screw, close the door and look at the gaps around it. The gap around a cabinet door is often called the reveal. If the reveal is uneven, the door is telling you what kind of help it needs. A door that rubs against the one next to it usually needs a side-to-side adjustment. A door that sits lower than the one beside it needs a height adjustment. A door that won’t sit flush or pops outward when closed usually needs an in-and-out adjustment.
This small pause matters. If you turn random screws without diagnosing the issue, you can fix one problem and accidentally create two new ones. That is how a five-minute cabinet repair becomes a one-hour relationship test.
Simple Way #1: Adjust the Door Side to Side
When to Use This Adjustment
Use this adjustment when the gap between two cabinet doors is uneven, when one door is crowding the other, or when the door looks shifted too far left or right. This is one of the most common fixes for misaligned cabinet doors and uneven reveals.
How It Works
On many concealed hinges, the side-to-side adjustment screw sits on the hinge arm and moves the door horizontally. Turning it slightly changes the overlay, which is a fancy way of saying how much the door covers the cabinet opening or frame. Small turns can make a surprisingly big visual difference, so resist the urge to crank it like you’re trying to open a pickle jar.
How to Do It
Open the cabinet door and locate the adjustment screw on each hinge. It is usually the screw closest to the cabinet front on the hinge arm. Turn the screw a little, then close the door and check the gap. If the spacing between the doors improves, you’re on the right track. If not, turn it back and go in the opposite direction.
Adjust the top and bottom hinges in small increments until the vertical gap looks even. The goal is not mathematical perfection visible only to satellites. The goal is a clean, balanced look that doesn’t rub, scrape, or scream for attention.
Best Use Case
Imagine a pair of upper cabinet doors that nearly kiss in the middle every time you close them. The problem is not usually the cabinet itself. It is often just a horizontal alignment issue. A few careful turns on the side adjustment screw can create a neat, even gap and make the whole kitchen look more polished.
Simple Way #2: Adjust the Door Up or Down
When to Use This Adjustment
Use a height adjustment when one cabinet door sits noticeably higher or lower than the door next to it, or when the top lines of several doors look like they were arranged during a minor earthquake. This is especially common with heavier doors or cabinets that have settled after installation.
How It Works
On many hinges, height is adjusted by loosening the screws that secure the hinge plate or mounting plate to the cabinet frame. Once loosened slightly, the door can be shifted up or down and then tightened again in the new position.
How to Do It
Open the cabinet door and support it with one hand. Loosen the mounting screws just enough so the door can move. Do not remove them completely unless you enjoy surprise cabinet yoga. Shift the door up or down until the top edge aligns with neighboring doors, then tighten the screws firmly.
Check the door after tightening. Sometimes the door slips a little while you secure the screws, so you may need a second round of fine-tuning. If your cabinet has two hinges, adjust both evenly so you do not twist the door out of square.
Best Use Case
Say the left door of a sink base cabinet sits about a quarter inch lower than the right door. The side gaps might look fine, but the top line is off enough to bug you every time you walk by. A simple up-and-down adjustment usually solves that without replacing the hinges or touching the door fronts.
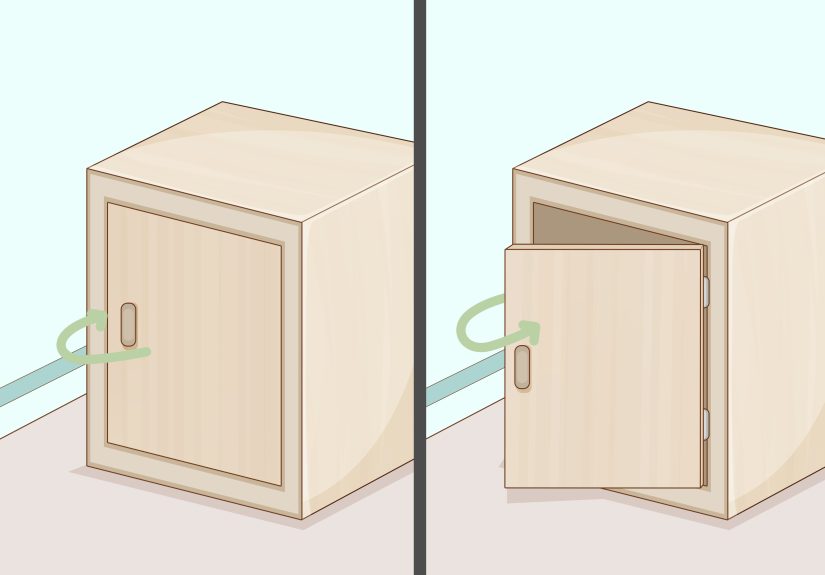
Simple Way #3: Adjust the Door In or Out
When to Use This Adjustment
Use the depth adjustment when the cabinet door does not sit flush with the frame, when one corner sticks out, or when the door does not close smoothly against a soft-close hinge. This is the move you want when the door alignment looks fine from the front but weird from the side.
How It Works
The in-and-out or depth screw changes how far the door sits from the cabinet box or face frame. On many concealed hinges, this screw is positioned farther back on the hinge. Turning it brings the door closer to the cabinet or pushes it farther away.
How to Do It
Open the door and find the depth adjustment screw on the hinge. Turn it a little, close the door, and look from the side. If the door now sits flush with the surrounding cabinet surfaces, you’ve nailed it. If not, make another tiny adjustment. Tiny is the keyword here. Cabinet door alignment rewards precision, not aggression.
This is also the right fix when a door bounces slightly instead of closing neatly. On soft-close cabinet hinges, depth can affect how the mechanism engages. If the door is too far out or too far in, soft-close performance may feel clunky even when the hinge itself is working properly.
Best Use Case
Picture a pantry door that looks acceptable when open but sticks out at the top when closed. That usually points to a depth issue rather than a side or height problem. A slight in-and-out adjustment at the top hinge often pulls the door into a cleaner, flush position.
How to Tell Which Hinge to Adjust First
Here’s the shortcut many DIYers wish they knew earlier: the top hinge usually controls the top half of the door, and the bottom hinge controls the bottom half. If the upper corner is the problem, start with the top hinge. If the lower corner is drifting, start with the bottom hinge. That sounds obvious once you hear it, but many people spend twenty minutes adjusting both hinges equally and wondering why the trouble corner is still winning.
Work in small steps and test the door after each change. That approach is slower than spinning screws at random, but it is much faster than having to undo all your previous guesses.
What If the Adjustments Don’t Fix the Door?
Sometimes a cabinet door still looks off after all three adjustments. When that happens, the hinge may not be the main problem. Start by checking whether any screws are stripped. If the screw keeps turning but never tightens, the hole may be worn out and need repair. In other cases, the hinge itself may be bent or worn and need replacement.
You should also inspect the door for warping. A warped door may twist enough that hinge adjustments only improve the look slightly. If one corner always sticks out no matter what you do, the door panel itself may be the issue. Likewise, if the cabinet box was installed out of level, you may be able to improve the door alignment, but not make it absolutely perfect without correcting the cabinet installation.
That is not failure. That is diagnosis. And diagnosis is what separates smart DIY from shouting at cabinetry.
Pro Tips for Better Cabinet Hinge Adjustment
Make One Change at a Time
If you adjust side, height, and depth all at once, it becomes difficult to tell what actually fixed the issue. One change at a time keeps the process clean and logical.
Use Small Turns
A quarter turn can make a visible difference. Start small, especially when adjusting the horizontal reveal between paired doors.
Check With the Door Closed
The hinge may look perfect while open and completely wrong when shut. Always evaluate alignment with the door fully closed.
Tighten Before Replacing
Loose screws are incredibly common. Before shopping for replacement hardware, make sure the existing screws are snug and the hinge plates are secure.
Align to the Cabinets, Not the Floor
In older homes, the floor may not be level. The cabinet lines matter more than the room’s floor line when you are trying to create a clean visual result.
Real-World Examples of Common Cabinet Door Problems
Problem: Two upper cabinet doors rub in the center.
Fix: Side-to-side adjustment. Move one door slightly left or the other slightly right until the gap is even.
Problem: One door hangs lower than the door beside it.
Fix: Height adjustment. Loosen the mounting screws, raise the door, then retighten.
Problem: The door closes, but one corner sticks out.
Fix: Depth adjustment, usually on the hinge nearest the problem corner.
Problem: Soft-close feels weak or the door bounces.
Fix: Check depth alignment first, then confirm the hinge is tight and not damaged.
Experience: What Homeowners Usually Learn the First Time They Adjust Cabinet Doors
The most common experience people have with kitchen cabinet repair is realizing they waited way too long to try it. A crooked cabinet door looks like one of those annoying problems that requires a specialist, a catalog of replacement parts, and maybe a dramatic sigh while standing in the hardware aisle. Then you finally grab a screwdriver, turn one screw a little, and suddenly the door closes like it has found inner peace.
But the first attempt is rarely perfect, and that is normal. Most people begin by assuming the problem is bigger than it is. They notice a door rubbing, looking uneven, or sitting proud of the frame, and they immediately wonder whether the cabinet is failing, the wood is warped, or the kitchen is somehow cursed. In reality, the first lesson is usually that small alignment issues are incredibly common. Kitchen cabinets get used hard. They are opened with wet hands, bumped with hips, leaned on by children, and occasionally yanked open by adults who have not yet had coffee. Hinges absorb all of that.
The second lesson is that patience matters more than strength. People often overcorrect on the first try. They turn a screw too far, close the door, and now the gap moved from bad to somehow worse. That can be frustrating, but it is also part of the learning curve. Cabinet hinge adjustment is less like fixing a bicycle and more like tuning a picture frame on a wall. Tiny moves matter. A quarter turn here, a quick check there, then another small tweak. Once you understand that rhythm, the work becomes surprisingly satisfying.
A lot of homeowners also discover that the top hinge and bottom hinge do not need identical treatment. That feels weird at first. There is a natural instinct to “keep things even” by adjusting both hinges the same amount. But real cabinet problems are often corner-specific. Maybe the top edge looks great while the bottom drifts left. Maybe the door sits flush at the bottom but kicks out at the top. The experience of solving those little corner problems teaches you to read the door more carefully instead of attacking every screw equally.
Another very relatable moment comes when you realize the door was not the villain at all. Sometimes the screws are just loose. Sometimes the hinge plate shifted slightly over time. Sometimes a soft-close hinge feels broken when the real issue is simply that the door depth is off by a hair. That kind of discovery is strangely empowering. You stop seeing cabinets as mysterious built-ins and start seeing them as adjustable systems with a logic you can understand.
And maybe the best part of the whole experience is how quickly the room looks better afterward. A properly aligned door does more than open and close smoothly. It makes the whole kitchen feel tidier, newer, and more expensive. The lines look cleaner. The reveals look intentional. The cabinets stop drawing attention for the wrong reason. It is one of those small repairs that delivers a surprisingly big visual payoff, which is probably why so many people finish the first door, step back, and immediately start checking every other cabinet in the room like an amateur inspector on a mission.
Final Thoughts
Learning how to adjust cabinet doors is one of those practical skills that pays off again and again. Once you understand the three basic moves, you can handle most minor alignment issues without calling a pro. Move the door side to side for uneven gaps, up and down for height problems, and in or out when the door will not sit flush. Add a little patience, a little testing, and a screwdriver, and you are in business.
So before you blame the cabinets, the house, the installer, or the moon’s gravitational pull, try the hinges first. In many kitchens, that simple adjustment is all it takes to turn annoying cabinet doors back into quiet, straight, well-behaved members of the household.